Working with Constraints in Interface Builder在接口生成器中使用约束
There are three main options for setting up Auto Layout constraints in Interface Builder: You can control-drag between views, you can use the Pin and Align tools, and you can let Interface Builder set up the constraints for you and then edit or modify the results. Each of these approaches has its own set of strengths and weaknesses. Most developers find that they prefer one approach over the others; however, being familiar with all three approaches lets you quickly switch between tools based on the task at hand.
在接口生成器中设置自动布局约束有三个主要选项:您可以控制视图之间的拖动,可以使用PIN和对齐工具,并且可以让接口生成器为您设置约束,然后编辑或修改结果。每一种方法都有自己的长处和短处。大多数开发人员发现,他们喜欢一个方法比其他人,但是,熟悉所有这三种方法可以让您快速切换工具之间的基础上手头的任务.
For all three options, start by dragging your views and controls from the Object library onto the scene. Resize and position them as needed. When you place a view on the canvas, Interface Builder automatically creates a set of prototyping constraints that define the view’s current size and position relative to the upper left corner.
对于所有三个选项,从对象库拖动视图和控件到场景开始。根据需要调整和定位它们。当你在画布上放置一个视图时,界面生成器会自动创建一组原型约束来定义视图的当前大小和相对于左上角的位置。
The app can build and run with the prototyping constraints. Use these constraints to quickly visualize and test a user interface, but then replace the implicit constraints with your own explicit constraints. Never ship an app with prototyping constraints.
应用程序可以创建和运行的原型约束。使用这些约束可以快速可视化和测试用户界面,但用自己的显式约束替换隐式约束。不要使用原型约束的应用程序。
As soon as you create your first constraint, the system removes all the prototyping constraints from the views referred to by the constraint. Without the prototyping constraints, your layout no longer has enough constraints to uniquely size and position all the views. It becomes an ambiguous layout. The affected constraints suddenly appear in red, and Xcode generates a number of warnings.
一旦创建第一个约束,系统将从约束所提到的视图中移除所有原型约束。没有原型约束,你的布局不再有足够的限制,以独特的大小和位置的所有意见。它变成了一个模糊的布局。受约束的突然出现红色,和Xcode产生大量的警告。
Don’t panic. Just keep adding your constraints until your layout is complete. As soon as you add one constraint, you are responsible for adding all the constraints needed to create a nonambiguous, satisfiable layout.
不要慌啊!只需添加约束,直到布局完成。当你添加一个约束,你负责将所有的约束,需要建立一个无二义的,可满足的布局。
For more information on fixing layout warnings and errors, see Debugging Auto Layout.有关修复布局警告和错误的详细信息,请参见调试自动布局。
Control-Dragging Constraints拖动控制约束
To create a constraint between two views, Control-click one of the views and drag to the other.若要在两个视图之间创建约束,请单击“视图中的一个”并拖动到另一个视图中。
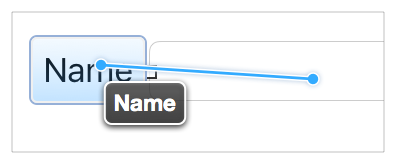
When you release the mouse, Interface Builder displays a HUD menu with a list of possible constraints.当你发布鼠标时,界面生成器会显示一个HUD菜单,并列出可能的约束条件。
Interface Builder intelligently selects the set of constraints based on the items you are constraining and the direction of your drag gesture. If you drag more or less horizontally, you get options to set the horizontal spacing between the views, and options to vertically align the views. If you drag more or less vertically, you get options to set the vertical spacing, and options to align the views horizontally. Both gestures may include other options (such as setting the view’s relative size).
接口生成器根据约束的项目和拖动手势的方向智能选择约束集。如果水平拖动或多或少,则可以设置视图和视图之间的水平间距,以便垂直对齐视图。如果垂直拖动更多,则可以得到设置垂直间距的选项,以及水平对齐视图的选项。两个手势可能包括其他选项(如设置视图的相对大小)。
NOTE注解
You can use the Control-drag gesture both on items in the canvas and on icons in the scene’s document outline. This is often useful when trying to draw constraints to hard-to-find items, like the top or bottom layout guides. When dragging to or from the document outline, Interface Builder does not filter the list of possible constraints based on the gesture’s direction.
可以在画布上的项目和场景文档大纲中的图标上使用控件拖动手势。这往往是有用的时候,试图提请约束难以找到项目,如顶部或底部的布局指南。当拖动到或从文档大纲中,接口生成器不会根据手势的方向筛选可能的约束列表。
Interface Builder creates the constraints based on the views’ current frames. Therefore, you need to position the views carefully before you draw the constraints. If you line up the views based on Interface Builder’s guidelines, you should end up with a reasonable set of constraints. If necessary, you can always edit the constraints afterward.
接口生成器基于视图当前帧创建约束。因此,在绘制约束之前,需要仔细定位视图。如果您基于接口生成器的指南排列视图,那么您应该有一个合理的约束集。如果必要的话,您可以随时编辑约束后。
Control-dragging provides a very quick way to set a constraint; however, because the constraint’s values are inferred from the scene’s current layout, it is easy to end up off by a point. If you want finer control, review and edit the constraints after you create them, or use the Pin and Align tools.
控件拖动提供了一个非常快的方法来设置约束,但是,因为约束的值是从场景的当前布局推断出来的,所以很容易通过一个点结束。如果您想要更精细的控件,在创建它们后复查和编辑约束,或者使用PIN和对齐工具。
For more information on Control-dragging constraints, see Adding Layout Constraints by Control-Dragging in Auto Layout Help.
有关控件拖动限制的更多信息,请参见“自动布局帮助”中的“控件拖动”添加布局约束。
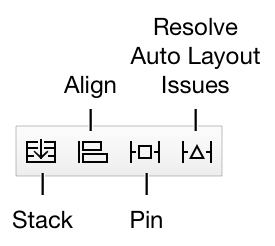
Using the Stack, Align, Pin and Resolve Tools使用堆栈,对齐,引脚和解决工具
Interface Builder provides four Auto Layout tools in the bottom-right corner of the Editor window. These are the Stack, Align, Pin, and Resolve Auto Layout Issues tools.界面生成器在编辑器窗口的右下角提供四个自动布局工具。这些是堆栈,对齐,引脚,并解决自动布局问题的工具。
Use the Pin and Align tools when you want fine control when making constraints or when you want to make multiple constraints at once. As an added advantage, when you use these tools, you don’t need to precisely place your views before creating the constraint. Instead, you can roughly set the relative position of the views, add your constraints, and then update the frames. This lets Auto Layout calculate the correct positions for you.
当你想在进行约束时或想要同时进行多个约束时,使用PIN和对齐工具。作为一个额外的优势,当您使用这些工具,您不需要精确地放置您的意见,然后创建约束。相反,可以粗略设置视图的相对位置,添加约束,然后更新帧。这让自动布局计算正确的位置为您。
Stack Tool堆栈的工具
The Stack tool allows you to quickly create a stack view. Select one or more items in your layout, and then click on the Stack tool. Interface Builder embeds the selected items in a stack view and resizes the stack to its current fitting size based on its contents.
堆栈工具允许您快速创建堆栈视图。在布局中选择一个或多个项目,然后单击堆栈工具。界面生成器将在堆栈中查看所选项目并调整栈大小电流拟合基于内容。
NOTE注解
The system infers the stack’s axis and alignment from the initial relative position of the views. You can modify the axis and alignment (and set the distribution and spacing) using the Attributes inspector.
系统从视图的初始相对位置推断堆栈的轴线和对齐方式。可以使用属性检查器修改轴和对齐方式(并设置布局和间距)。
Align Tool对齐工具
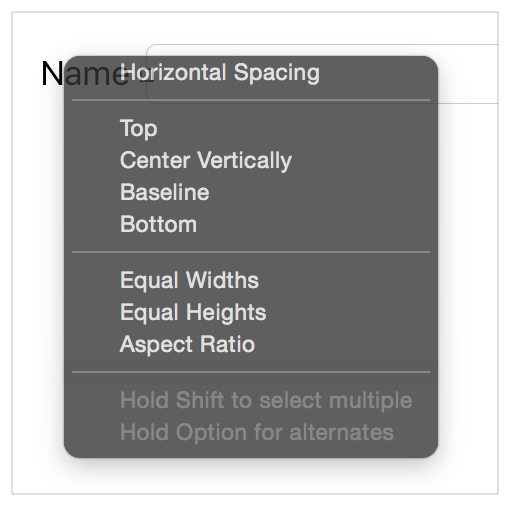
The Align tool lets you quickly align items in your layout. Select the items you want to align, and then click the Align tool. Interface Builder presents a popover view containing a number of possible alignments.
对齐工具可以快速对齐布局中的项。选择要对齐的项,然后单击对齐工具。界面生成器提出了包含多个可能弹出视图对齐。
Select the options for aligning the selected views, and click the Add Constraints button. Interface Builder creates the constraints needed to ensure those alignments. By default, the constraints do not have any offset (the edges or centers are aligned with each other) and none of the frames are updated when the constraints are added. You can change any of these settings before creating the constraints.
选择用于对齐所选视图的选项,然后单击“添加约束”按钮。接口生成器创建所需的约束,以确保这些对齐。默认情况下,约束没有任何偏移量(边或中心彼此对齐),当添加约束时没有任何帧更新。在创建约束之前,可以更改这些设置。
You typically select two or more views before using the Align tool. However, the Horizontally in Container or Vertically in Container constraints can be added to a single view. You can use the popover to create any number of constraints at once—though it rarely makes sense to create more than one or two at a time.
通常在使用对齐工具之前选择两个或多个视图。但是,水平容器或垂直容器约束可以添加到一个视图中。你可以使用弹出一次虽然很少有必要创建一个或两个以上的同时创建任意数量的限制。
For more information, see Adding Auto Layout Constraints with the Pin and Align Tools in Auto Layout Help.
有关更多信息,请参见在自动布局帮助中添加PIN和对齐工具的自动布局约束。
Pin Tool销工具
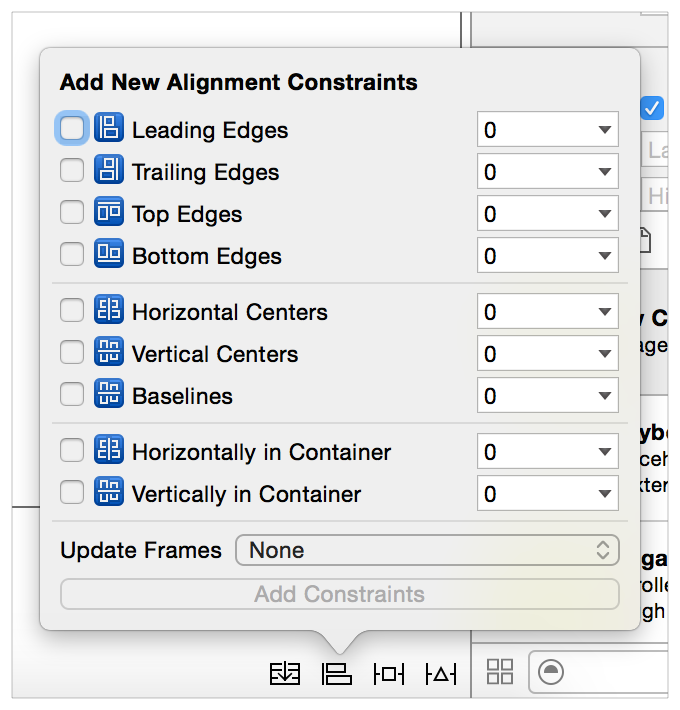
The Pin tool lets you quickly define a view’s position relative to its neighbors or quickly define its size. Select the item whose position or size you want to pin, and click the Pin tool. Interface Builder presents a popover view containing a number of options.
PIN工具允许您快速定义视图相对于其邻居的位置或快速定义其大小。选择要定位的位置或大小的项目,然后单击PIN工具。界面生成器提出了包含多个选项,弹出视图。
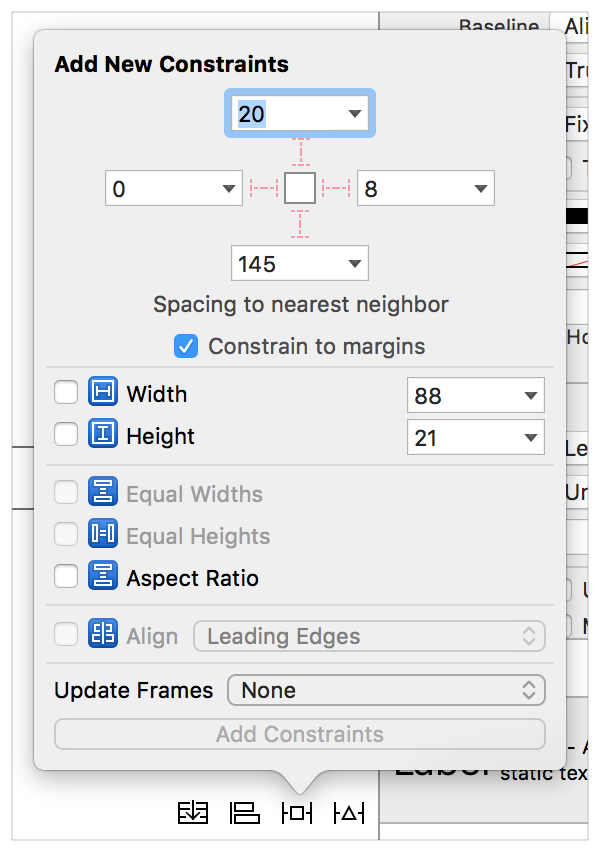
The top portion of the popover lets you pin the selected item’s Leading, Top, Trailing, or Bottom edge to its nearest neighbor. The associated number indicates the current spacing between the items in the canvas. You can type in a custom spacing, or you can click the disclosure triangle to set which view it should be constrained to or to select the standard spacing. The “Constrain to margins” checkbox determines whether constraints to the superview use the superview’s margins or its edges.
在弹出的顶部让你销选择项目的领导,顶部或底部边缘,后缘,其最近的邻居。关联的数字指示画布中的项之间的当前间距。您可以键入自定义间距,也可以单击“披露三角形”来设置它应该被限制到哪个视图或选择标准间距。“约束边缘”复选框确定视图使用视图的边缘或边缘约束。
The lower portion of the popover lets you set the item’s width or height. The Width and Height constraints default to the current canvas size, though you can type in different values. The Aspect Ratio constraint also uses the item’s current aspect ratio; however, if you want to change this ratio, you need to review and edit the constraint after creating it.
在弹出的下部可设置项的宽度或高度。宽度和高度限制默认为当前画布大小,但可以键入不同的值。宽高比约束也使用项目的当前纵横比,但是,如果你想改变这个比例,你需要审查和编辑约束后,创建它。
Typically, you select a single view to pin; however, you can select two or more views and give them equal widths or equal heights. You can also create multiple constraints at once, or you can update the frames as you add the constraints. After you’ve set the options you want, click the Add Constraints button to create your constraints.
通常,您选择一个单独的视图来命名;但是,您可以选择两个或多个视图,并给予它们相等的宽度或相等的高度。您还可以同时创建多个约束,或者在添加约束时可以更新帧。在设置了所需选项后,单击“添加约束”按钮来创建约束。
For more information, see Adding Auto Layout Constraints with the Pin and Align Tools in Auto Layout Help.
有关更多信息,请参见在自动布局帮助中添加PIN和对齐工具的自动布局约束。
Resolve Auto Layout Issues Tool解决自动布局问题工具
The Resolve Auto Layout Issues tool provides a number of options for fixing common Auto Layout issues. The options in the upper half of the menu affect only the currently selected views. The options in the bottom half affect all views in the scene.
解决自动布局问题工具提供了一些选项,用于修复常见的自动布局问题。菜单的上半部分中的选项只影响当前选定的视图。下半部分的选项影响场景中的所有视图。
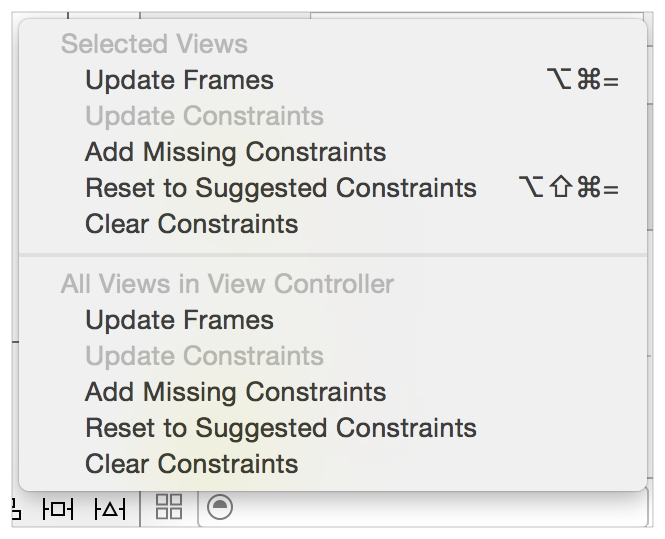
You can use this tool to update the views’ frames based on the current constraints, or you can update the constraints based on the views’ current location in the canvas. You can also add missing constraints, clear constraints, or reset the views to a set of constraints recommended by Interface Builder.
可以使用此工具根据当前约束更新视图的框架,也可以根据画布中视图的当前位置更新约束。还可以添加缺少的约束、清除约束或将视图重置为由接口生成器推荐的一组约束。
The commands to add or reset constraints are discussed in greater detail in Letting Interface Builder Create Constraints.
添加或重置约束的命令更详细地讨论,让接口生成器创建约束。
Letting Interface Builder Create Constraints让接口生成器创建约束
Interface Builder can create some or all of the constraints for you. When using this approach, Interface Builder attempts to infer the best constraints given the view’s current size and position in the canvas. Be sure to position your views carefully—small differences in spacing can result in significantly different layouts.
接口生成器可以为您创建一些或全部约束。当使用这种方法时,界面生成器试图推断给定的视图的当前大小和位置在画布上的最佳约束。一定要小心定位你的观点小间距的差异可能会导致显着不同的布局。
To let Interface Builder create all the constraints, click Resolve Auto Layout Issues tool > Reset to Suggested Constraints. Interface Builder creates all the required constraints for the selected views (or for all the views in the scene).
若要让接口生成器创建所有约束,请单击“解决自动布局问题工具>重置为建议约束”。接口生成器为所选视图(或场景中所有视图)创建所有所需的约束条件。
Alternatively, you can add a few constraints yourself, and then click the Resolve Auto Layout Issues tool > Add Missing Constraints. This option adds the constraints needed to have a nonambiguous layout. Again, you can add constraints either to the selected view or to all the views in the scene.
或者,您可以自己添加一些约束,然后单击“解决自动布局问题工具”>添加缺少的约束。这个选项会增加所需的nonambiguous布局约束。再次,您可以添加约束到选定的视图或场景中的所有视图。
This approach lets you rapidly build a nonambiguous, satisfiable layout, but unless the user interface is straightforward, the resulting layout may not behave the way you want. Always test the user interface and modify the constraints until you get the intended results.
这种方法可以让你快速建立nonambiguous,满足布局,但除非用户界面简单,得到的布局可能不会表现你想要的方式。始终测试用户界面并修改约束,直到得到预期的结果。
Finding and Editing Constraints查找和编辑约束
After you’ve added a constraint, you need to be able to find it, view it, and edit it. There are a number of options for accessing the constraints. Each option offers a unique method of organizing and presenting the constraints.
在你添加了一个约束后,你需要能够找到它,查看它,并编辑它。访问约束有许多选项。每个选项提供了一个独特的组织和呈现约束的方法。
Viewing Constraints in the Canvas查看画布中的约束
The editor displays all the constraints affecting the currently selected view as colored lines on the canvas. The shape, stroke type, and line color can tell you a lot about the current state of the constraint.编辑器将当前选定的视图显示的所有约束显示为画布上的彩色线条。形状,笔触类型和线条颜色可以告诉你很多关于约束的当前状态。
-
I-bars (lines with T-shaped end-caps). I-bars show the size of a space. This space can be either the distance between two items, or the height or width of an item.i-bars(T形端盖线)。i-bars展示空间的大小。此空间可以是两个项之间的距离,也可以是项目的高度或宽度。
-
Plain lines (straight lines with no end-caps). Plain lines show where edges align. For example, Interface Builder uses simple lines when aligning the leading edge of two or more views. These lines can also be used to connect items that have a 0-point space between them.平原线(直线没有端盖)。平原线显示边缘对齐。例如,接口生成器在对齐两个或多个视图的前缘时使用简单的线条。这些线也可用来连接有一个0点它们之间的空间项目。
-
Solid Lines. Solid lines represent required constraints (priority = 1000).实线。实线表示必要的约束(优先级= 1000)。
-
Dashed Lines. Dashed lines represent optional constraints (priority < 1000).虚线。虚线表示可选约束(优先级< 1000)。
-
Red Lines. One of the items affected by this constraint has an error. Either the item has an ambiguous layout, or its layout is not satisfiable. For more information, see the issues navigator or the disclosure arrow in Interface Builder’s outline view.红色的线。受此约束影响的项目有一个错误。任何项目都有一个模糊的布局或布局不满足。有关更多信息,请参见界面生成器的大纲视图中的问题导航器或发布箭头。
-
Orange Lines. Orange lines indicate that the frame of one of the items affected by this constraint is not in the correct position based on the current set of constraints. Interface Builder also shows the calculated position for the frame as a dashed outline. You can move the item to its calculated position using the Resolve Auto Layout Issues tool > Update Frames command.橙色线。橙色线表示,受此约束影响的项目之一的帧不基于当前约束集的正确位置。界面生成器还显示帧的计算位置为虚线轮廓。可以使用“解决自动布局问题工具>更新帧命令”将项目移动到其计算位置。
-
Blue Lines. The items affected by the constraint have a nonambiguous, satisfiable layout, and the item’s frame is in the correct position as calculated by the Auto Layout engine.蓝线。通过约束影响的项目都有一个无二义的,可满足的布局,和项目的框架是在正确的位置进行自动布局引擎计算。
-
Equal Badges. Interface Builder shows constraints that give two items an equal width or an equal height as a separate bar for each item. Both bars are tagged with a blue badge containing an equal (=) sign inside. 平等的徽章。接口生成器显示了两个项相等的宽度或相等的高度作为每个项目的单独栏的约束。两个酒吧都标有一个蓝色的徽章,里面有一个平等的(=)标志。
-
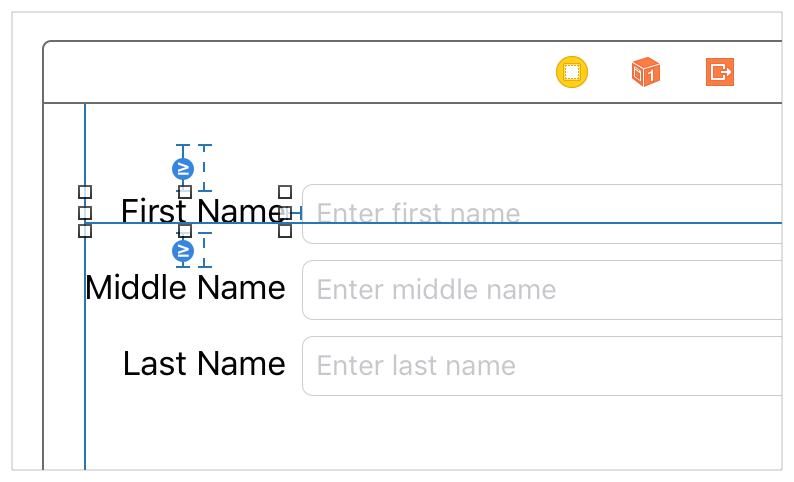
Greater-than-or-equal and less-than-or-equal badges. Interface Builder marks all constraints representing greater-than-or-equal-to and less-than-or-equal-to relationships with a small blue badge with a >= or <= symbol inside.大于或等于或小于或等于徽章。接口生成器标记所有大于或等于或小于或等于与一个小的蓝色徽章的关系的约束。
Listing Constraints in the Document Outline文档大纲中的列表约束
Interface Builder lists all the constraints in the document outline, grouping them under the view that holds them. Constraints are held by the closest view that contains both items in the constraint. For this calculation, each view contains itself and all its subviews, and the top and bottom layout guides are contained by the scene’s root view.
接口生成器列出了文档大纲中的所有约束,并将它们置于视图中,这些视图包含。约束由包含约束中的两个项的最近视图持有。这个计算,每个视图包含本身及其所有子视图,和顶部和底部的布局指南由现场的根视图包含。
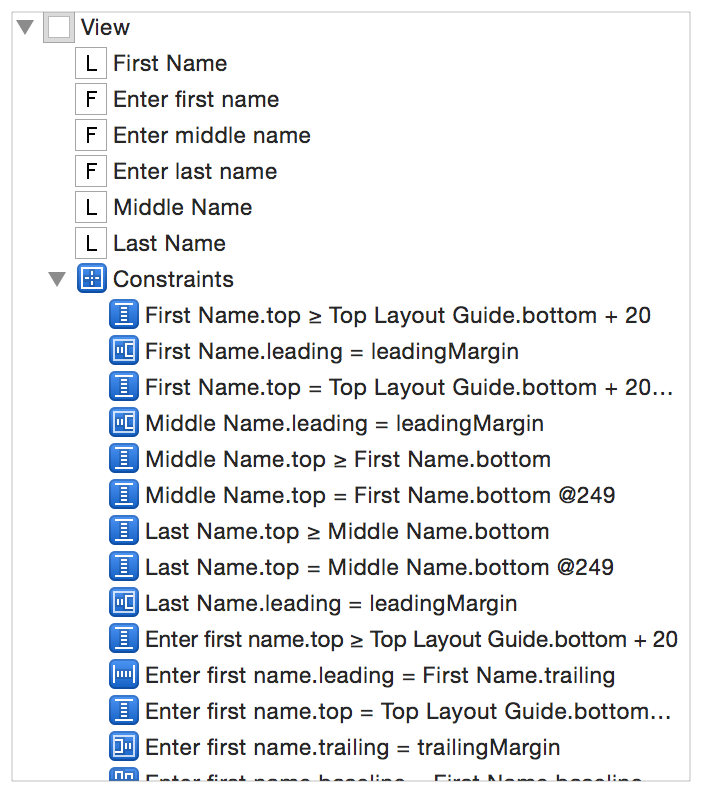
Even though constraints could be spread around the outline, most constraints end up under the scene’s root view. If you want to make sure you’ve found all the constraints, expand the entire view hierarchy.
尽管约束可以在大纲周围传播,但大多数约束最终都在场景的根视图下。如果要确保已找到所有约束,请展开整个视图层次结构。
The constraints are listed using pseudocode. These listings are often long, and they frequently start with a similar set of views, so you may have to increase the width of the outline before you can see meaningful information. Selecting a constraint in the outline highlights that constraint in the canvas. Use this feature to help you quickly identify the constraint you want to examine.
约束上市使用伪代码。这些列表通常很长,而且它们经常以类似的视图开头,所以在你看到有意义的信息之前,你必须增加大纲的宽度。在大纲中选择约束突出了画布中的约束。使用此功能可以帮助您快速识别要检查的约束。
For simple scenes, the outline is a great place to glance over all the scene’s constraints. However, as the layout becomes more complex, it quickly becomes hard to find specific constraints. You are often better off examining the constraints one view at a time—either by selecting the view in the canvas or by examining the view in the Size inspector.
对于简单的场景,轮廓是一个浏览所有场景约束的好地方。然而,随着布局变得更加复杂,它很快变得难以找到具体的约束条件。通常,您可以通过查看画布中的视图或通过检视大小检视器中的检视来检视每次检视一个视图的限制。
Finding Constraints in the Size Inspector在尺寸检查中查找约束
The Size inspector lists all the constraints affecting the currently selected view. Required constraints appear with a solid outline, and optional constraints appear with a dashed outline. The description lists important information about the constraint. It always includes the affected attribute and the other item in the constraint. It may also include the relationship, the constant value, and the multiplier or ratio.
大小督察列出影响当前选定视图的所有约束。必需的约束以实心的轮廓出现,并且可选的约束以虚线的轮廓出现。说明列出了有关约束的重要信息。它总是包含受约束的属性和约束中的其他项。它也可以包括关系、常量、乘数或比率。
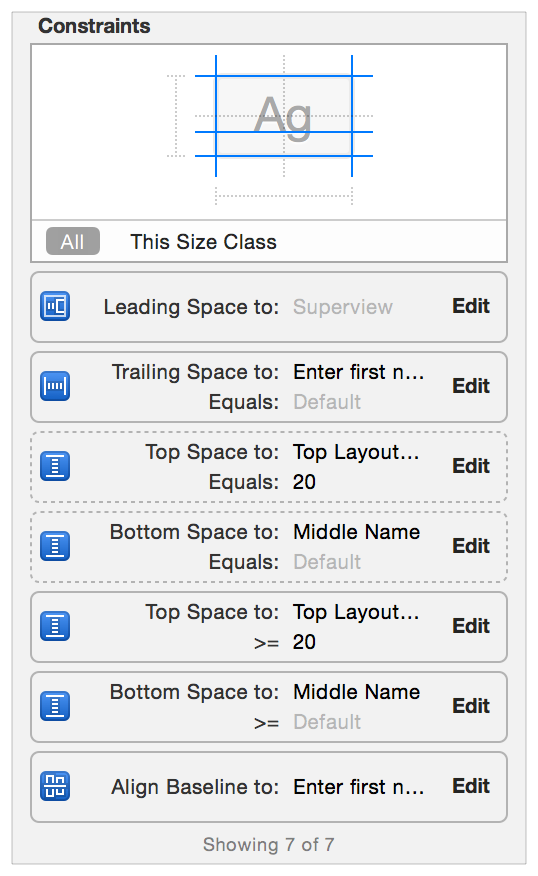
The diagram at the top of the above screenshot shows which attributes are affected by constraints. You can filter the list of constraints by selecting one or more of the diagram’s attributes. The list then shows only those constraints affecting the selected attributes.
上面截图中的图显示哪些属性受约束的影响。通过选择图表中的一个或多个属性,可以筛选约束列表。然后列表只显示那些影响选定属性的约束。
For more information, see Viewing the Complete List of Layout Constraints for an Item in Auto Layout Help.
有关更多信息,请参见“自动布局帮助”中的项目布局约束的完整列表。
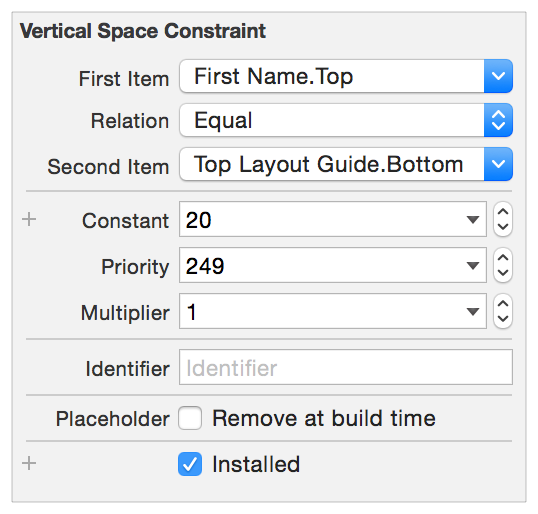
Examining and Editing Constraints检查和编辑约束
When you select a constraint either in the canvas or in the document outline, the Attribute inspector shows all of the constraint’s attributes. This includes all the values from the constraint equation: the first item, the relation, the second item, the constant, and the multiplier. The Attribute inspector also shows the constraint’s priority and its identifier.
当在画布或文档大纲中选择约束时,属性检查器显示所有约束的属性。这包括约束方程的所有值:第一项、关系、第二项、常数和乘数。属性检查器还显示约束的优先级和标识符。
NOTE
The constraint’s identifier property lets you provide a descriptive name so that you can more easily identify the constraint in console logs and other debugging tasks.
约束的标识符属性允许您提供描述性名称,以便在控制台日志和其他调试任务中更容易识别约束。
You can also mark the constraint as a placeholder. These constraints exist only at design time. They are not included in the layout when the app runs. You typically add placeholder constraints when you plan to dynamically add constraints at runtime. By temporarily adding the constraints needed to create a nonambiguous, satisfiable layout, you clear out any warnings or errors in Interface Builder.
还可以将约束标记为占位符。这些约束只存在于设计时。他们不包括在布局时,应用程序运行。当计划在运行时动态添加约束时,通常添加占位符约束。暂时添加需要创建nonambiguous,满足布局的约束,你清除界面中的任何警告或错误。
You can freely modify the Constant, Priority, Multiplier, Relation, Identifier, and Placeholder attributes. For the first and second item, however, your options are more limited. You can swap the first and second item (inverting the multiplier and constant, as needed). You can also change the item’s attribute, but you cannot change the item itself. If you need to move the constraint to a completely different item, delete the constraint and replace it with a new constraint.
您可以自由修改常量、优先级、乘数、关系、标识符和占位符属性。对于第一个和第二个项目,但是,您的选择更加有限。您可以交换第一和第二项目(反相乘数和常量,根据需要)。您也可以更改项目的属性,但不能更改项目本身。如果需要将约束移动到完全不同的项,请删除约束并用新约束替换它。
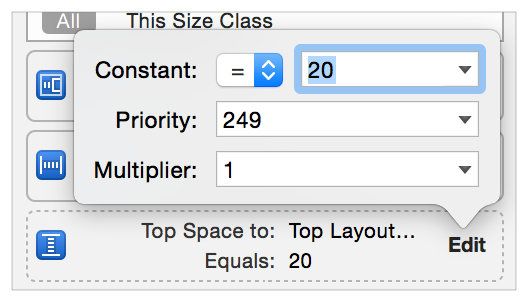
Some editing is also possible directly from the Size inspector. Clicking the Edit button in any of the constraints brings up a popover where you can change the constraint’s relationship, constant, priority, or multiplier. To make additional changes, double-click the constraint to select it and open it in the Attribute inspector.
一些编辑也可以直接从大小督察。点击任何约束的编辑按钮将弹出一个弹出,你可以改变约束关系不变,优先,或乘数。要进行额外更改,请双击约束以选择它并在属性检查器中打开它。
For more information, see Editing Auto Layout Constraints in Auto Layout Help.
有关更多信息,请参见编辑自动布局帮助中的自动布局约束。
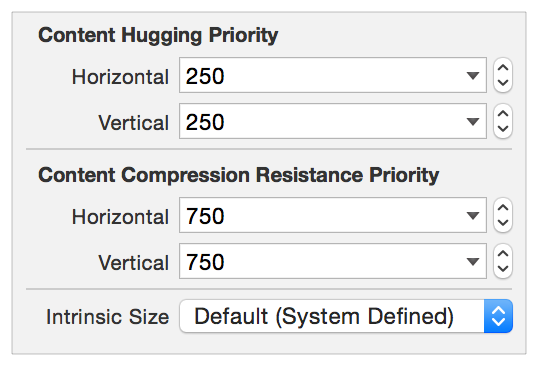
Setting Content-Hugging and Compression-Resistance Priorities设置内容拥抱和压缩优先权
To set a view’s content-hugging and compression-resistance priorities (CHCR priorities), select the view either in the canvas or in the document outline. Open the Size inspector, and scroll down until you find the Content Hugging Priority and Compression Resistance Priority settings.
设置一个视图的内容拥抱和抗压的优先级(优先选择查看CHCR),无论是在画布上或在“文档大纲”。打开大小督察,并向下滚动,直到你找到内容拥抱优先和压缩阻力优先设置。
You can also set the view’s intrinsic size in Interface Builder. By default, Interface Builder uses the size returned from the view’s intrinsicContentSize method. However, if you need a different size at design time, you can set a placeholder intrinsic content size. This placeholder affects the size of the view only in Interface Builder. It does not have any effect on the view at runtime.
还可以在界面生成器中设置视图的固有大小。默认情况下,界面生成器使用的大小从视图的intrinsiccontentsize方法返回。但是,如果在设计时需要不同的大小,则可以设置占位符的内部内容大小。此占位符仅在界面生成器中影响视图的大小。它在运行时对视图没有任何影响。
For more information, see Setting the Placeholder Intrinsic Size for a Custom View in Auto Layout Help.
有关更多信息,请参见在自动布局帮助中设置自定义视图的占位符内部大小。
iOS-Only FeaturesiOS的唯一特点
iOS adds a few unique features that interact with Auto Layout. These include the top and bottom layout guides, a view’s layout margins, a view’s readable content guides, and a view’s semantic content.
iOS增加了一些独特的功能,与汽车布局互动。这些包括顶部和底部的布局指南,视图的布局边距,视图的可读内容指南,和视图的语义内容。
Top and Bottom Layout Guides顶部和底部布局指南
The top and bottom layout guides represent the upper and lower edge of the visible content area for the currently active view controller. If you don’t want your content to extend under transparent or translucent UIKit bars (for example, a status bar, navigation bar, or tab bar), use Auto Layout to pin your content to the respective layout guide.
顶部和底部布局向导代表当前活动视图控制器的可见内容区域的上、下边缘。如果你不想你的内容透明或半透明的UIKit条下的扩展(例如,一个状态栏,导航栏,或标签栏),使用自动布局,把你的内容到各自的布局指南。
The layout guides adopt the UILayoutSupport protocol, giving the guide a length property, which measures the distance between the guide and the respective edge of the view. Specifically:
布局指南采用uilayoutsupport协议,给予引导length属性,该措施引导和视图的各个边缘之间的距离。明确地:
-
For the top layout guide,
lengthindicates the distance, in points, between the top of a view controller’s view and the bottom of the bottommost bar that overlays the view.对于上面的布局指南,长度指示点的距离,一个视图控制器的视图和最棒的覆盖视图底部的顶部之间。 -
For the bottom layout guide,
lengthindicates the distance, in points, between the bottom of a view controller’s view and the top the bar (such as a tab bar) that overlays the view.对于底部布局指南,长度表示的距离,在点之间,底部的视图控制器的视图和顶部的酒吧(如标签栏),覆盖了视图。
These guides can also act as items in a constraint, supporting the top, bottom, and height attributes. Typically, you constrain views to the top layout guide’s bottom attribute or to the bottom layout guide’s top attribute. The guides also provide topAnchor, bottomAnchor, and heightAnchor properties, to simplify the programmatic creation of constraints.
这些指南也可以作为约束的项目,支持顶部,底部和高度属性。通常,您将视图限制到顶层布局指南的底部属性或底部布局向导的顶部属性。该指南还提供topanchor,bottomanchor,和heightanchor性能,简化的编程方式创建约束。
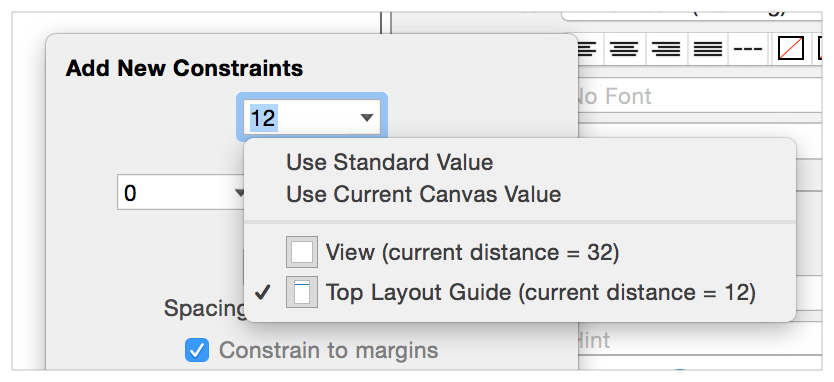
Interface Builder automatically offers the top and bottom layout guides as options when creating constraints to the root view’s top or bottom edge as appropriate. If the layout guide is the view’s nearest neighbor, Interface Builder uses the guide by default. When using the Pin tool you can switch between the layout guide and the root view’s edge, as needed. Just click on the disclosure triangle.
当创建根视图的顶部或底部边缘的约束时,接口生成器自动提供顶部和底部布局向导作为选项。如果布局向导是视图的最近邻居,接口生成器默认使用指南。当使用PIN工具,您可以切换之间的布局指南和根视图的边缘,根据需要。只需点击披露三角。
Layout Margins布局空间
Auto Layout defines margins for each view. These margins describe the preferred spacing between the edge of the view and its subviews. You can access the view’s margins using either the layoutMargins or layoutMarginsGuide property. The layoutMargins property lets you get and set the margins as a UIEdgeInsets structure. The layoutMarginsGuide property provides read-only access to the margins as a UILayoutGuide object. Additionally, use the preservesSuperviewLayoutMargins property to determine how the view’s margins interact with its superview’s margins.
自动布局为每个视图定义边距。这些利润描述视图和子视图的边缘之间的最佳间距。您可以访问视图的边缘使用的layoutmargins或layoutmarginsguide财产。的layoutmargins属性可以获取和设置页边距为uiedgeinsets结构。的layoutmarginsguide属性提供只读访问的空间为uilayoutguide对象。此外,使用preservessuperviewlayoutmargins属性确定视图的边缘与它的父视图的空间相互作用。
The default margins are 8 points on each side. You can modify these margins based on your app’s needs.
默认边距为每边8点。您可以根据应用程序的需要修改这些边距。
NOTE注解
The system sets and manages the margins of a view controller’s root view. The top and bottom margins are set to zero points, making it easy to extend content under the bars (if any). The side margins vary depending on how and where the controller is presented, but can be either 16 or 20 points. You cannot change these margins.
系统设置并管理视图控制器的根视图的边距。顶部和底部边距设置为零点,使得在条形下扩展内容变得容易(如果有的话)。边边距取决于控制器的位置和位置,但可以是16或20点。您不能更改这些边距。
When constraining a view to its superview, you typically use the layout margins instead of the view’s edge. In UIKit, the NSLayoutAttribute enumeration defines a number of attributes to represent top, bottom, leading, trailing, left, and right margins. It also includes attributes for the center X and center Y relative to the margins.
当约束观到它的父视图,你通常使用的布局空间而不是视图的边缘。在UIKit的nslayoutattribute枚举定义一些属性代表的顶部,底部,领先,落后,左、右边距。它还包括属性的中心x和中心y相对于边距。
In Interface Builder, Control-dragging a constraint between a view and its superview uses the margin attributes by default. When using the Pin tool, you can toggle the “Constrain to margins” checkbox. If it’s checked, the resulting constraints use the superview’s margin attributes. If it’s unchecked, they use the superview’s edges. Similarly, when editing a constraint in the Attribute inspector, the First Item and Second Item’s pop-down menus include a “Relative to margin” option. Select this item to use the margin attribute. Deselect it to use the edge.
在Interface Builder中,控制拖动约束之间的视图和它的父视图使用默认的margin属性。使用PIN工具时,可以切换“约束到边距”复选框。如果是托运,由此产生的约束使用视图的边缘属性。如果听之任之,他们使用视图的边缘。类似地,在属性检查程序中编辑约束时,第一项和第二项弹出菜单包括“相对边缘”选项。选择此项目使用边距属性。取消它使用边缘。
Finally, when programmatically creating constraints to the superview’s margins, use the layoutMarginsGuideproperty and create constraints to the layout guide directly. This lets you use the guide’s layout anchors to create your constraints, providing a streamlined API that is easier to read.
最后,当以编程方式创建约束视图的边缘,用layoutmarginsguideproperty创造直接约束的布局指南。这可以让您使用指南的布局锚创建您的约束,提供了一个精简的API,更容易阅读。
Readable Content Guides可读的内容指南
The view’s readableContentGuide property contains a layout guide that defines the maximum optimal width for text objects inside the view. Ideally, the content is narrow enough that users can read it without having to move their head.
视图的readablecontentguide属性包含一个布局指南定义文本对象在视图的最大宽度。理想情况下,内容足够窄,用户可以阅读而不必移动他们的头。
This guide is always centered inside the view’s layout margin and never extends beyond those margins. The size of the guide also varies depending on the size of the system’s dynamic type. The system creates wider guides when the user selects larger fonts, because users typically hold the device farther from them while reading.
本指南始终集中在视图的布局边距和从不超出这些利润范围。指南的大小也取决于系统的动态类型的大小。当用户选择较大字体时,系统会创建更宽的向导,因为用户通常在读取时将设备保持在远离它们的位置。
In Interface Builder, you can set whether the view’s margins represent the layout margins or the readable content guide. Select the view (typically the view controller’s root view), and open the Size inspector. If you select the Follow Readable Width checkbox, any constraints drawn to the view’s margins use the readable content guide instead.
在界面生成器中,可以设置视图的边距是否表示布局边距或可读的内容指南。选择视图(通常是视图控制器的根视图),并打开大小检查程序。如果选择“后续可读宽度”复选框,则绘制到视图边距的任何约束都使用可读的内容向导。
NOTE
For most devices there is little or no difference between the readable content guides and the layout margins. The difference becomes obvious only when working on an iPad in landscape orientation.
对于大多数设备,可读内容指南和布局边距之间几乎没有差异。只有当iPad在景观方向上工作时,差异才会明显。
Semantic Content语义内容
If you lay out your views using leading and trailing constraints, the views automatically flip positions when switching between left-to-right languages (like English) and right-to-left languages (like Arabic). However, some interface elements should not change their position based on the reading direction. For example, buttons that are based on physical directions (up, down, left, and right) should always stay in the same relative orientation.
如果您使用前导和尾随约束来设置您的视图,则在左到右语言(如英语)和右到左语言(如阿拉伯语)之间切换时,视图会自动翻转位置。然而,一些接口元素不应该改变它们的位置的基础上的读取方向。例如,基于物理方向(上、下、左、右)的按钮应该始终保持在相同的相对方向上。
The view’s semanticContentAttribute property determines whether the view’s content should flip when switching between left-to-right and right-to-left languages.
视图的semanticcontentattribute属性确定视图的内容就可以从左到右,从右到左的语言之间切换时。
In Interface Builder, set the Semantic option in the Attribute inspector. If the value is Unspecified, the view’s content flips with the reading direction. If it is set to Spatial, Playback, or Force Left-to-Right, the content is always laid out with the leading edges to the left and trailing edges to the right. Force Right-to-Left always lays out the content with the leading edges to the right and the trailing edges to the left.
在接口生成器中,在属性检查器中设置语义选项。如果该值未指定,则视图的内容与读取方向翻转。如果它被设置为空间,回放,或强制向左向右,内容总是与前面的左侧和后缘的权利。左到右的力总是在左边和右边的边上画上前缘的内容。
Rules of Thumb拇指规则
The following guidelines will help you succeed with Auto Layout. There are undoubtedly a number of legitimate exceptions for each of these rules. However, if you decide to veer from them, pause and carefully consider your approach before proceeding.
下面的指引将帮助您成功地自动布局。对于这些规则,无疑有一些合法的例外。但是,如果你决定改变他们,停下来,仔细考虑你的方法之前。
-
Never specify a view’s geometry using its frame, bounds, or center properties.不要使用其框架、边界或中心属性指定视图的几何体。
-
Use stack views wherever possible尽可能使用堆栈视图
Stack views manage the layout of their content, greatly simplifying the constraint logic needed for the rest of the layout. Resort to custom constraints only when a stack view doesn’t provide the behavior you need.堆栈视图管理其内容的布局,大大简化了其他布局所需的约束逻辑。仅当堆栈视图不提供您需要的行为时才诉诸自定义约束。
-
Create constraints between a view and its nearest neighbor.在视图和它最近的邻居之间创建约束。
If you have two buttons next to each other, constrain the leading edge of the second button to the trailing edge of the first. The second button generally should not have a constraint that reaches across the first button to the view’s edge.如果相邻有两个按钮,则将第二个按钮的前缘限制为第一个的后缘。第二个按钮通常不应该有一个约束,跨越第一个按钮到达视图的边缘。
-
Avoid giving views a fixed height or width. 避免给视图一个固定的高度或宽度。
The whole point of Auto Layout is to dynamically respond to changes. Setting a fixed size removes the view’s ability to adapt. However, you may want to set a minimum or maximum size for the view.自动布局的整个点是动态响应变化。设置一个固定大小删除视图的适应能力。但是,您可能需要设置视图的最小或最大大小。
-
If you are having trouble setting constraints, try using the Pin and Align tools. Although these tools can be somewhat slower than Control-dragging, they do let you verify the exact values and items involved before creating the constraint. This extra sanity check can be helpful, especially when you are first starting out.如果在设置约束时遇到困难,请尝试使用PIN和对齐工具。虽然这些工具可以比控件拖慢一些,但它们可以让您在创建约束之前验证所涉及的确切值和项。这额外的精神检查可以帮助,特别是当你是第一次出发。
-
Be careful when automatically updating an item’s frame. If the item does not have enough constraints to fully specify its size and position, the update’s behavior is undefined. Views often disappear either because their height or width gets set to zero or because they are accidentally positioned off screen.自动更新项目框架时要小心。如果该项目没有足够的约束,以完全指定其大小和位置,更新的行为是未定义的。视图经常消失,因为它们的高度或宽度被设置为零,或者因为它们意外地被定位在屏幕之外。
You can always try to update an item’s frame, and then undo the change, if necessary.您总是可以尝试更新项目的框架,然后撤消更改,如果必要的话。
-
Make sure all the views in your layout have meaningful names. This makes it much easier to identify your views when using the tools. 确保布局中的所有视图都有有意义的名称。这使得在使用工具时更容易识别您的视图。
The system automatically names labels and buttons based on their text or title. For other views, you may need to set an Xcode specific label in the Identity inspector (or by double-clicking and editing the view’s name in the document outline).系统自动根据其文本或标题命名标签和按钮。其他的观点,你可能需要在身份检查器设置Xcode特定的标签(或双击编辑在文档大纲视图的名称)。
-
Always use leading and trailing constraints instead of right and left. 总是使用前导和尾随约束而不是左和右。
You can always adjust how the view interprets its leading and trailing edges using its
semanticContentAttributeproperty (iOS) or itsuserInterfaceLayoutDirectionproperty (OS X).你总是可以调整的角度阐释了它的前缘和后缘的semanticcontentattribute财产(IOS)或其userinterfacelayoutdirection财产(OS X)。 -
In iOS, when constraining an item to the edge of the view controller’s root view, use the following constraints:在iOS中,当将项限制到视图控制器的根视图的边缘时,使用以下约束:
-
Horizontal constraints. For most controls, use a zero-point constraint to the layout margins. The system automatically provides the correct spacing based on what the device is and how the app presents the view controller.水平约束。对于大多数控件,使用一零点约束到布局边距。系统自动提供正确的间距基于设备是什么,以及如何应用程序提出了视图控制器。
For text objects that fill the root view from margin to margin, use the readable content guides instead of the layout margins.对于从边距到边距填充根视图的文本对象,请使用可读的内容指南而不是布局边距。
For items that need to fill the root view from edge to edge (for example, background images), use the view’s leading and trailing edges.对于需要从边缘到边缘填充根视图的项目(例如,背景图像),请使用视图的前、后边缘。
-
Vertical constraints. If the view extends under the bars, use the top and bottom margins. This is particularly common for scroll views, allowing the content to scroll under the bars. Note, however, that you may need to modify the scroll view’s
contentInsetandscrollIndicatorInsetsproperties to correctly set the content’s initial position.垂直约束。如果视图在条形图下扩展,请使用顶部和底部边距。这对于滚动视图特别常见,允许内容在栏下滚动。注意,然而,你可能需要修改滚动视图的contentinset和scrollindicatorinsetsproperties正确设置内容的初始位置。If the view does not extend under the bars, constrain the view to the top and bottom layout guides instead.如果视图不在条形图下扩展,则将视图限制为顶部和底部布局向导。
-
-
When programmatically instantiating views, be sure to set their
translatesAutoresizingMaskIntoConstraintsproperty toNO. By default, the system automatically creates a set of constraints based on the view’s frame and its autoresizing mask. When you add your own constraints, they inevitably conflict with the autogenerated constraints. This creates an unsatisfiable layout.当以编程方式实例化视图,务必号默认设置他们的translatesautoresizingmaskintoconstraints属性,系统自动创建一套基于视图的框架和它的自动调整尺寸的面具约束。当你添加你自己的约束,他们不可避免地与自动生成的约束冲突。这将创建一个永无止境的布局。 -
Be aware that OS X and iOS calculate their layouts differently.
In OS X, Auto Layout can modify both the contents of a window and the window’s size.
In iOS, the system provides the size and layout of the scene. Auto Layout can modify only the contents of the scene.
注意OS X和iOS计算不同的布局。
在OS X中,自动布局可以修改窗口的内容和窗口的大小。
在iOS中,系统提供了场景的大小和布局。自动布局只能修改场景的内容。These differences seem relatively minor, but they can have a profound impact on how you design your layout, especially on how you use priorities.这些差异似乎相对较小,但它们可以深刻影响您如何设计您的布局,特别是关于如何使用优先级。