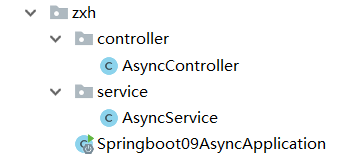
项目结构

-
创建SpringBoot项目,添加web支持
-
编写hello项目
@RestController
public class AsyncController {

    @Autowired
    AsyncService asyncService;

    @GetMapping("/hello")
    public String hello(){
        asyncService.asynService();
        return "OK";
    }

}
-
模拟延迟
@Service
public class AsyncService {

    public void asynService(){
        try {
            Thread.sleep(3000);
        } catch (InterruptedException e) {
            e.printStackTrace();
        }
        System.out.println("正在处理数据...");
    }


}
浏览器中访问,需要等到3秒,现在通过SpringBoot帮我们解决
-
SpringBoot开启异步处理
模拟延迟类
@Service public class AsyncService { //告诉spring这是一个需要异步处理的方法 @Async public void asynService(){ try { Thread.sleep(3000); } catch (InterruptedException e) { e.printStackTrace(); } System.out.println("正在处理数据..."); } }
主程序类
//开启异步处理 @EnableAsync @SpringBootApplication public class Springboot09AsyncApplication { public static void main(String[] args) { SpringApplication.run(Springboot09AsyncApplication.class, args); } }
邮件发送
1、导入依赖
 <!-- 邮件发送依赖 -->
 <dependency>
     <groupId>org.springframework.boot</groupId>
     <artifactId>spring-boot-starter-mail</artifactId>
 </dependency>
2、配置文件
配置发件人的信息
spring.mail.username=649318307@qq.com spring.mail.password=csnfxxjqxkgibeja spring.mail.host=smtp.qq.com # qq邮件发送需要开启加密验证 spring.mail.properties.mail.smtp.ssl.enable=true
3、邮件发送
JavaMailSenderImpl是一个封装好的类,用于发送邮件
@SpringBootTest class Springboot09AsyncApplicationTests { @Autowired JavaMailSenderImpl javaMailSender; //简单的邮件 @Test void contextLoads() { SimpleMailMessage mailMessage = new SimpleMailMessage(); //标题 mailMessage.setSubject("你好zxh"); //正文 mailMessage.setText("祝你开心!!"); //指定发件人 mailMessage.setFrom("649318307@qq.com"); //指定收件人 mailMessage.setTo("649318307@qq.com"); javaMailSender.send(mailMessage); } //复杂邮件 @Test void senderMail() throws MessagingException { MimeMessage mimeMessage = javaMailSender.createMimeMessage(); //组装~,开启文件上传 MimeMessageHelper helper = new MimeMessageHelper(mimeMessage, true); //标题 helper.setSubject("你好zxh"); //正文,使用html解析 helper.setText("<p style='color:red;'>祝你开心!!</p>", true); //附件 helper.addAttachment("术语.md", new File("C:\Users\HP\Desktop\术语.md")); helper.setFrom("649318307@qq.com"); helper.setTo("649318307@qq.com"); javaMailSender.send(mimeMessage); } }
SpringBoot自带了有4个关于定时任务的对象:
-
@Scheduled:什么时候执行
-
cron表达式
-
-
@EnableScheduling:开启定时功能
-
TaskExecutor:任务执行者
-
1、定时任务
@Service
public class ScheduledService {
    //告诉SpringBoot什么时候执行
    //cron表达式:秒 分 时 日 月 周,每两秒执行一次
    @Scheduled(cron = "0/2 * * * * ?")
    public void hello(){
        System.out.println("hello");
    }
}
2、开启定时任务
//开启定时功能 @EnableScheduling @SpringBootApplication public class Springboot09AsyncApplication { public static void main(String[] args) { SpringApplication.run(Springboot09AsyncApplication.class, args); } }
-