搭建hibernate项目框架的步骤:
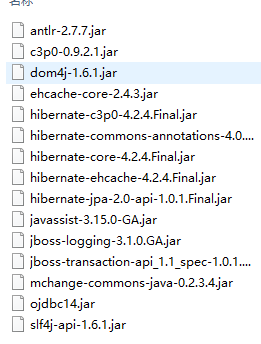
一、导入jar包
二、new .cfg.xml配置文件
 1 <?xml version="1.0" encoding="UTF-8"?>
 2 <!DOCTYPE hibernate-configuration PUBLIC
 3         "-//Hibernate/Hibernate Configuration DTD 3.0//EN"
 4         "http://hibernate.sourceforge.net/hibernate-configuration-3.0.dtd">
 5 <hibernate-configuration>
 6     <session-factory>
 7
 8         <!-- hibernate的基本信息 -->
 9         <property name="connection.username">root</property>
10         <property name="connection.password">root</property>
11         <property name="connection.driver_class">com.mysql.jdbc.Driver</property>
12         <property name="connection.url">jdbc:mysql:///hibernate</property>
13
14         <!-- hibernate的基本配置 -->
15
16         <!-- hibernate使用的数据库方言 -->
17         <property name="dialect">org.hibernate.dialect.MySQLInnoDBDialect</property>
18
19         <!-- 运行时是否打印sql语句 -->
20         <property name="show_sql">true</property>
21
22         <!-- 运行时是否格式化sql -->
23         <property name="format_sql">true</property>
24
25         <!-- 生成数据表的策略  这里是更新-->
26         <property name="hbm2ddl.auto">update</property>
27
28         <!-- 设置hibernate的事务隔离级别 -->
29         <property name="connection.isolation">2</property>
30
31         <!-- 配置c3p0数据源 -->
32         <property name="hibernate.c3p0.max_size">10</property>
33         <property name="hibernate.c3p0.min_size">5</property>
34         <property name="hibernate.c3p0.acquire_increment">2</property>
35         <property name="hibernate.c3p0.timeout">2000</property>
36         <property name="hibernate.c3p0.acquire_increment">2000</property>
37         <property name="c3p0.max_statements">10</property>
38
39         <!--@里的内容对于mysql是无效的,对于oracle是有效的 -->
40         <!--@ 设定JDBC的Statement读取数据的时候每次从数据库中取出的记录条数 -->
41         <property name="hibernate.jdbc.fetch_size">100</property>
42
43         <!-- @设定对数据库进行批量删除,批量更新和批量插入的时候的批次大小 -->
44         <property name="jdbc.batch_size">30</property>
45
46
47         <!-- 需要关联的hibernate映射文件 .hbm.xml -->
48         <mapping resource="entities/News.hbm.xml"/>
49
50     </session-factory>
51 </hibernate-configuration>
三、new 实体类
 1 package entities;
 2
 3 import java.util.Date;
 4
 5 /**
 6  * @author zxN
 7  * @version 创建时间:2016年1月3日 下午2:13:57
 8  * 类说明
 9  */
10 class News {
11     private Integer id;
12     private String title;
13     private String author;
14     private Date date;
15     public News() {
16         super();
17         // TODO Auto-generated constructor stub
18     }
19     public News( String title, String author, Date date) {
20         super();
21
22         this.title = title;
23         this.author = author;
24         this.date = date;
25     }
26     public Integer getId() {
27         return id;
28     }
29     public void setId(Integer id) {
30         this.id = id;
31     }
32     public String getTitle() {
33         return title;
34     }
35     public void setTitle(String title) {
36         this.title = title;
37     }
38     public String getAuthor() {
39         return author;
40     }
41     public void setAuthor(String author) {
42         this.author = author;
43     }
44     public Date getDate() {
45         return date;
46     }
47     public void setDate(Date date) {
48         this.date = date;
49     }
50     @Override
51     public String toString() {
52         return "News [id=" + id + ", title=" + title + ", author=" + author
53                 + ", date=" + date + "]";
54     }
55
56
57 }
四、new 实体类的 hbm.xml文件
 1 <?xml version="1.0"?>
 2 <!DOCTYPE hibernate-mapping PUBLIC "-//Hibernate/Hibernate Mapping DTD 3.0//EN"
 3 "http://hibernate.sourceforge.net/hibernate-mapping-3.0.dtd">
 4 <!-- Generated 2015-12-24 15:32:00 by Hibernate Tools 3.4.0.CR1 -->
 5 <!-- hbm.xml -->
 6 <hibernate-mapping package="entities">
 7     <class name="entities.News" table="NEWS">
 8         <id name="id" type="java.lang.Integer">
 9             <!-- 列名 -->
10             <column name="ID" />
11             <!-- 设置主键为自动增长 -->
12             <generator class="native"/>
13         </id>
14         <property name="title" type="java.lang.String">
15             <column name="TITLE" />
16         </property>
17         <property name="author" type="java.lang.String">
18             <column name="AUTHOR" />
19         </property>
20         <property name="date" type="java.util.Date">
21             <column name="DATE" />
22         </property>
23
24
25          <!-- 映射大对象 -->
26         <!-- 若希望精确映射SQL类型,可以使用sql-type属性 -->
27         <property name="content" >
28             <column name="CONTENT" sql-type="mediumtext"></column>
29         </property>
30
31         <property name="image" type="blob">
32             <column name="IMAGE" sql-type="mediumblob"></column>
33         </property>
34     </class>
35 </hibernate-mapping>
在这个文件里,设置主键的方式,若为自动递增的,应设置为native
并将这个文件关联到cfg.xml里边去(PS:路径前面不要有斜线!!!)
五、新建junit测试类