一. Vuex 概述
1.1 组件之间共享数据的方式
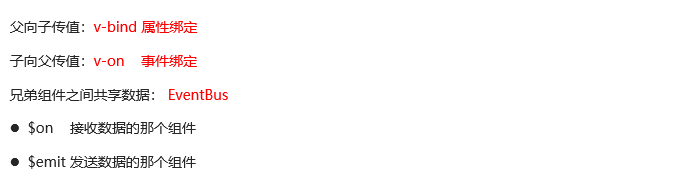
由于使用频繁,通常将v-bind:属性名=" "的格式简写成:属性名=" ".兄弟组件之间的共享即不相干组件之间的数据共享。
子组件:
//子组件接受数据
props: ['nodeName'],
// 子组件触发listenToAuditor事件并传值
confirmAuditors(){
  this.$emit('listenToAuditor',this.auditorIds)
  this.resetAuditors();
  this.dialogFormVisible=false
},
父组件:
<auditor-edit ref="auditor-edit"  v-on:listenToAuditor="getAuditors" v-bind:nodeName="dataObj.nodeName"/>
getAuditors(data){
  this.auditors = data;
  console.log(this.auditors);
  const uploadObj = document.getElementById("uploadButton");
  console.log(uploadObj)
  uploadObj.click();
},
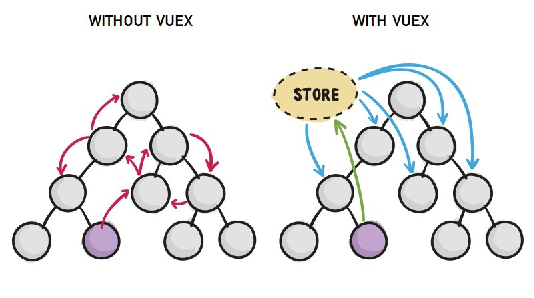
上面这三种共享数据的方式,只适合在小范围内来进行数据的共享,如果需要频繁的或者大范围的来实现数据的共享,那么上面三种方案就显得力不从心了,下面来介绍Vuex.
1.2 Vuex 是什么
Vuex 是实现组件全局状态(数据)管理的一种机制,可以方便的实现组件之间数据的共享。
1.3 使用 Vuex 统一管理状态的好处

1.4 什么样的数据适合存储到 Vuex 中
一般情况下,只有组件之间共享的数据,才有必要存储到 vuex 中;对于组件中的私有数据,依旧存储在组件自身的 data 中即可。
二. Vuex 的基本使用
1. 安装 vuex 依赖包
npm install vuex --save
2. 导入 vuex 包,并安装到vue项目中
 import Vuex from 'vuex'
 Vue.use(Vuex)
创建项目时用2.0版本,3.0版本的代码与这里的不同
3. 创建 store 对象,并且暴露出去
const store = new Vuex.Store({
     // state 中存放的就是全局共享的数据
     state: { count: 0 }
 })
4. 将 store 对象挂载到 vue 实例中,这样,所有的组件,就可以直接从 store 中获取全局的数据了
new Vue({
  el: '#app',
  render: h => h(app),
  router,
  // 将创建的共享数据对象,挂载到 Vue 实例中
  // 所有的组件,就可以直接从 store 中获取全局的数据了
  store
})
三. Vuex 的核心概念
3.1 核心概念概述
Vuex 中的主要核心概念如下:

3.2 State
State 提供唯一的公共数据源,所有全局共享的数据都要统一放到 Store 的 State 中进行存储。
// 创建store数据源,提供唯一公共数据
  const store = new Vuex.Store({
    state: { count: 0 }
  })
组件访问 State 中数据的第一种方式:
this.$store.state.全局数据名称
注意:在template标签范围内不需要this,直接写:$store.state.全局数据名称
组件访问 State 中数据的第二种方式:
// 1. 从 vuex 中按需导入 mapState 函数
import { mapState } from 'vuex'
通过刚才导入的 mapState 函数,将当前组件需要的全局数据,映射为当前组件的 computed 计算属性,这样在使用全局数据的时候,就像在用计算属性一样简单。
// 2. 将全局数据,映射为当前组件的计算属性
computed: {
  ...mapState(['count'])
}
在实际开发中,具体使用哪一种方式,按需求定,哪个方便就用哪个
3.3 Mutation
Mutation 用于变更 Store中 的数据。(注意:不能使用this$store.state.count++,因为在vuex中不允许组件直接去修改store中的数据),只有mutations中的函数才有权利修改state中的数据

// 定义 Mutation
  const store = new Vuex.Store({
    state: {
      count: 0
    },
    mutations: {
      add(state) {
        // 变更状态
        state.count++
      }
    }
  })
// 触发mutation
  methods: {
    handle1() {
      // 触发 mutations 的第一种方式
      this.$store.commit('add')
    }
  }
计数器案例:
store/index.js代码
import Vue from 'vue'
import Vuex from 'vuex'

Vue.use(Vuex)

export default new Vuex.Store({
  state: {
    count: 0
  },
  mutations: {
    add(state){
      state.count++
    },
    substract(state){
      state.count--
    }
  },
  actions: {
  },
  modules: {
  }
})
父组件代码:
<template>
  <div>
    <my-add></my-add>
    <p>---------------------</p>
    <my-substract></my-substract>
  </div>
</template>

<script>
import Add from './components/add'
import Substract from './components/substract'
export default {
  name: 'App',
  data () {
    return {}
  },
  components: {
    'my-add': Add,
    'my-substract': Substract
  },
  created () {},
  // mounted () {},
  computed: {},
  watch: {},
  methods: {}
}
</script>

<style lang='less' scoped>
</style>
子组件代码
<template>
  <div>
    <h3>当前最新的count值为:{{ $store.state.count }}</h3>
    <button @click="handle1">+1</button>
  </div>
</template>

<script>
import {mapState} from 'vuex'
export default {
  name: '',
  data () {
    return {}
  },
  created () {},
  // mounted () {},
  computed: {
    ...mapState(['count'])
  },
  watch: {},
  methods: {
    handle1(){
      this.$store.commit('add')
    }
  }
}
</script>

<style lang="less" scoped>
</style>
可以在触发 mutations 时传递参数:
// 定义Mutation
  const store = new Vuex.Store({
    state: {
      count: 0
    },
    mutations: {
      addN(state, step) {
        // 变更状态
        state.count += step
      }
    }
  })
// 触发mutation
  methods: {
    handle2() {
      // 在调用 commit 函数,
      // 触发 mutations 时携带参数
      this.$store.commit('addN', 3)
    }
  }
this.$store.commit() 是触发 mutations 的第一种方式,触发 mutations 的第二种方式:
// 1. 从 vuex 中按需导入 mapMutations 函数
import { mapMutations } from 'vuex'
通过刚才导入的 mapMutations 函数,将需要的 mutations 函数,映射为当前组件的 methods 方法:
// 2. 将指定的 mutations 函数,映射为当前组件的 methods 函数
methods: {
  ...mapMutations(['add', 'addN'])
}
注意:使用第二种方式触发mutations时,传递参数方法:this.substractN(3)
3.4 Action
Action 用于处理异步任务。
如果通过异步操作变更数据,必须通过 Action,而不能使用 Mutation,但是在 Action 中还是要通过触发Mutation 的方式间接变更数据。Actions中想要修改state中的数据,还是得通过commit去触发对应的mutations中的某个函数,dispatch方法的作用就是去触发Actions中的函数,commit方法的作用是触发mutations中的函数。可以认为context就是store实例对象。
// 定义 Action
  const store = new Vuex.Store({
    // ...省略其他代码
    mutations: {
      add(state) {
        state.count++
      }
    },
    actions: {
      addAsync(context) {
        setTimeout(() => {
          context.commit('add')
        }, 1000)
      }
    }
  })
// 触发 Action
  methods: {
    handle() {
      // 触发 actions 的第一种方式
      this.$store.dispatch('addAsync')
    }
  }
触发 actions 异步任务时携带参数:
// 定义 Action
  const store = new Vuex.Store({
    // ...省略其他代码
    mutations: {
      addN(state, step) {
        state.count += step
      }
    },
    actions: {
      addNAsync(context, step) {
        setTimeout(() => {
          context.commit('addN', step)
        }, 1000)
      }
    }
  })
 // 触发 Action
  methods: {
    handle() {
      // 在调用 dispatch 函数,
      // 触发 actions 时携带参数
      this.$store.dispatch('addNAsync', 5)
    }
  }
通过谷歌的vue调试工具,我们可以很方便的观察到vuex中存储数据的变化状态。
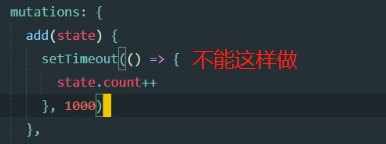
注意,要延时1s,不要在mutations的函数中使用setTimeout函数,因为这样的话,vue调试工具中的count值(count=0)与页面显示的count值(count=1)不会保持同步,即此时vue调试工具不能正常工作了。所以,在mutations的函数中不能写异步的代码,而setTimeout为异步函数,在Actions中执行异步操作
this.$store.dispatch() 是触发 actions 的第一种方式,触发 actions 的第二种方式:
// 1. 从 vuex 中按需导入 mapActions 函数
import { mapActions } from 'vuex'
通过刚才导入的 mapActions 函数,将需要的 actions 函数,映射为当前组件的 methods 方法:
// 2. 将指定的 actions 函数,映射为当前组件的 methods 函数
methods: {
  ...mapActions(['addASync', 'addNASync'])
}
mapActions其实本质上是把全局的某个函数addAsync映射为自己的methods中的一个函数了,此时可以直接将addAsync作为事件处理函数
<template>
  <div>
    <h3>当前最新的count值为:{{ $store.state.count }}</h3>
    <button @click="handle1">+1</button>
    <!-- <button @click="handleN">+N</button> -->
    <button @click="addNAsync(3)">+N</button>
  </div>
</template>

<script>
import {mapState,mapActions } from 'vuex'
export default {
  name: '',
  data () {
    return {}
  },
  created () {},
  // mounted () {},
  computed: {
    ...mapState(['count'])
  },
  watch: {},
  methods: {
    handle1(){
      // this.$store.commit('add')
      this.$store.dispatch('addAsync')
    },
    // handleN(){
    //   // this.$store.commit('addN',3)
    //   this.$store.dispatch('addNAsync',3)
    // }
    ...mapActions(['addNAsync']),
    // handleN(){
    //   this.addNAsync(3)
    // }
  }
}
</script>

<style lang="less" scoped>
</style>
3.5 Getter
Getter 用于对 Store 中的数据进行加工处理形成新的数据。getters不会修改state中的原数据,它只起到一个包装数据的作用,将store中的数据变一种形式给返回出来,

 // 定义 Getter
  const store = new Vuex.Store({
    state: {
      count: 0
    },
    getters: {
      showNum: state => {
        return '当前最新的数量是【'+ state.count +'】'
      }
    }
  })
通过count的值对外包装一个新的数据叫做showNum,这是我们可以将showNum定义为一个函数,第一个参数就是state对象,我们只要调了showNum这个函数,就会返回一个新的数据,即返回一个字符串“当前最新的数量是【'+ state.count +'】”
使用 getters 的第一种方式:
this.$store.getters.名称
<template>
  <div>
    <h3>{{$store.getters.showNum}}</h3>
  </div>
</template>
export default new Vuex.Store({
  state: {
    count: 0
  },
  getters: {
    showNum: state=>{
      return '当前最新的数量是【'+state.count+'】'
    }
  }
})
使用 getters 的第二种方式:在computed计算属性中,调用mapGetters,从而映射出当前组件中的计算属性。
import { mapGetters } from 'vuex'

computed: {
  ...mapGetters(['showNum'])
}
<template>
  <div>
    <h3>{{showNum}}</h3>
  </div>
</template>

<script>
import { mapGetters } from 'vuex'
export default {
  name: '',
  data () {
    return {}
  },
  computed: {
    ...mapGetters(['showNum'])
  }
}
</script>
3.6、Modules
module:可以让每一个模块拥有自己的state、mutation、action、getters,使得结构非常清晰,方便管理。
const moduleA = {
 state: { ... },
 mutations: { ... },
 actions: { ... },
 getters: { ... }
 }
const moduleB = {
 state: { ... },
 mutations: { ... },
 actions: { ... }
 }

const store = new Vuex.Store({
 modules: {
  a: moduleA,
  b: moduleB})
<template>
 <div id="app">
  <h1>{{useName}}</h1>
 </div>
</template>

<script>
export default {
 // computed属性,从store 中获取状态state,不要忘记login命名空间。
 computed: {
  useName: function() {
   return this.$store.state.login.useName
  }
 }
}
</script>