自定义starter
使用自定义starter
自动装配源代码跟踪
从springmvc到springboot最大的特点就是配置少,甚至不需要配置.这其中自动装配起了很大作用.这篇博客会带你了解下自动装配的源码以及怎么自己自定义starter
自定义starter
首先创建一个springboot工程.pom只需要导入spring-boot-starter依赖无需其他.


<?xml version="1.0" encoding="UTF-8"?>
<project xmlns="http://maven.apache.org/POM/4.0.0" xmlns:xsi="http://www.w3.org/2001/XMLSchema-instance"
    xsi:schemaLocation="http://maven.apache.org/POM/4.0.0 https://maven.apache.org/xsd/maven-4.0.0.xsd">
    <modelVersion>4.0.0</modelVersion>
    <parent>
        <groupId>org.springframework.boot</groupId>
        <artifactId>spring-boot-starter-parent</artifactId>
        <version>2.5.6</version>
        <relativePath/> <!-- lookup parent from repository -->
    </parent>
    <groupId>com.datang</groupId>
    <artifactId>test1</artifactId>
    <version>1</version>
    <name>test1</name>
    <description>Demo project for Spring Boot</description>
    <properties>
        <java.version>1.8</java.version>
    </properties>
    <dependencies>
        <dependency>
            <groupId>org.springframework.boot</groupId>
            <artifactId>spring-boot-starter</artifactId>
        </dependency>


    </dependencies>

    <build>
        <plugins>
            <plugin>
                <groupId>org.springframework.boot</groupId>
                <artifactId>spring-boot-maven-plugin</artifactId>
            </plugin>
        </plugins>
    </build>

</project>
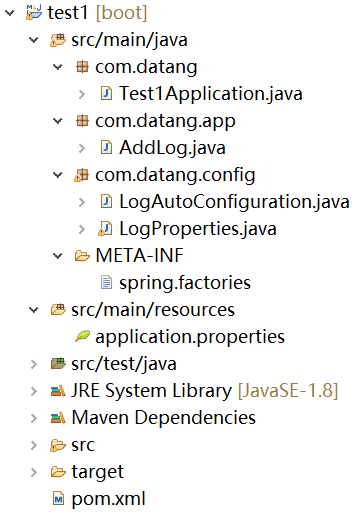
这是整体的目录结构.
启动类不能少因为我们自定义的功能依然需要使用springboot的注解.启动类的@SpringBootApplication是一个组合注解它会帮我们自动扫描其他包中的注解.
package com.datang;

import org.springframework.boot.SpringApplication;
import org.springframework.boot.autoconfigure.SpringBootApplication;

@SpringBootApplication
public class Test1Application {

    public static void main(String[] args) {
        SpringApplication.run(Test1Application.class, args);
    }

}
AddLog类是我们最终的功能类,很简单接收两个参数show方法打印出来.
package com.datang.app;

public class AddLog {
    private String log1;
    private String log2;
    public AddLog(String log1,String log2) {
        this.log1 = log1;
        this.log2 = log2;
    }

    public void show() {
        System.out.println(log1+"-----"+log2);
    }
}
LogAutoConfiguration最最核心的类没有之一.类上的四个注解@Configurable它声明当前类是一个配置类,一般和方法注解@Bean配合使用.@ConditionalOnClass(AddLog.class)这是一个条件注解,如果你没有看过springboot的源码会很陌生.这个注解表示要只有类路径下找到AddLog.class才会配置这个bean.那什么情况下类路径会有AddLog.class呢,当然是你的项目引用了当前这个自定义starter的依赖时就会有.@EnableConfigurationProperties(LogProperties.class)这这个注解必须要和@Configurable用在一块,它表示需要将某个类作为配置类.稍后我们将看到怎么使用它.@AutoConfigureAfter(LogProperties.class)这也是一个条件注解,它表示当前类注册成bean需要在LogProperties之后,为什么呢?因为我们的成员变量使用了LogProperties.addLogBean()方法体创建了一个AddLog对象,使用LogProperties这个Bean的两个方法拿到参数构造自己.上有两个注解@Bean就是注册AddLog这个bean,另外一个也是条件注解,它表示当前Spring容器中没有AddLog这个类型的Bean时才需要将方法体内的对象注册到bean中,是为了防止bean冲突.
package com.datang.config;

import org.springframework.beans.factory.annotation.Autowired;
import org.springframework.beans.factory.annotation.Configurable;
import org.springframework.boot.autoconfigure.AutoConfigureAfter;
import org.springframework.boot.autoconfigure.condition.ConditionalOnClass;
import org.springframework.boot.autoconfigure.condition.ConditionalOnMissingBean;
import org.springframework.boot.context.properties.EnableConfigurationProperties;
import org.springframework.context.annotation.Bean;

import com.datang.app.AddLog;

@Configurable
@ConditionalOnClass(AddLog.class)
@EnableConfigurationProperties(LogProperties.class)
@AutoConfigureAfter(LogProperties.class)
public class LogAutoConfiguration {
    @Autowired
    private LogProperties logProperties;

    @Bean
    @ConditionalOnMissingBean
    public AddLog addLogBean() {
        return new AddLog(logProperties.getLog1(), logProperties.getLog2());
    }
}
最后一个配置类,@ConfigurationProperties(prefix = "dfsn.log")它可以从yml或者properties读取属性然后封装到LogProperties对象中.要开启这个注解必须使用@EnableConfigurationProperties
package com.datang.config;

import org.springframework.boot.context.properties.ConfigurationProperties;

@ConfigurationProperties(prefix = "dfsn.log")
public class LogProperties {
    private String log1;
    private String log2;
    public String getLog1() {
        return log1;
    }
    public void setLog1(String log1) {
        this.log1 = log1;
    }
    public String getLog2() {
        return log2;
    }
    public void setLog2(String log2) {
        this.log2 = log2;
    }


}
现在思路很清晰了,我们自定义的starter功能类是AddLog它需要实例参数,它的参数由LogProperties类从配置文件中读取,LogAutoConfiguration用于在指定条件满足情况下将AddLog这个类装到Spring容器中.最后我们还需要最后一步,按照springboot的规则配置一个文件这个文件名是固定的需要在META-INF文件夹下名称为spring.factories,文件内容是一个key-value.它的key也是固定的value是LogAutoConfiguration配置类.
org.springframework.boot.autoconfigure.EnableAutoConfiguration=com.datang.config.LogAutoConfiguration
使用自定义starter
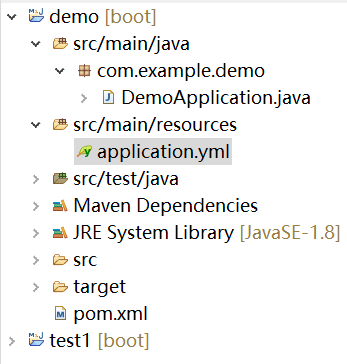
pom文件中指定自定义starter的依赖.
<?xml version="1.0" encoding="UTF-8"?>
<project xmlns="http://maven.apache.org/POM/4.0.0" xmlns:xsi="http://www.w3.org/2001/XMLSchema-instance"
    xsi:schemaLocation="http://maven.apache.org/POM/4.0.0 https://maven.apache.org/xsd/maven-4.0.0.xsd">
    <modelVersion>4.0.0</modelVersion>
    <parent>
        <groupId>org.springframework.boot</groupId>
        <artifactId>spring-boot-starter-parent</artifactId>
        <version>2.2.9.RELEASE</version>
        <relativePath/> <!-- lookup parent from repository -->
    </parent>
    <groupId>com.example</groupId>
    <artifactId>demo</artifactId>
    <version>0.0.1-SNAPSHOT</version>
    <name>demo</name>
    <description>Demo project for Spring Boot</description>
    <properties>
        <java.version>8</java.version>
    </properties>
    <dependencies>
        <dependency>
            <groupId>org.springframework.boot</groupId>
            <artifactId>spring-boot-starter</artifactId>
        </dependency>

        <dependency>
        <groupId>org.springframework.boot</groupId>
        <!--springBoot-start SpringBoot启动项  -->
        <artifactId>spring-boot-starter-web</artifactId>
    </dependency>

<dependency>
    <groupId>com.datang</groupId>
    <artifactId>test1</artifactId>
    <version>1</version>
    </dependency>

        <!--  <dependency>
           <groupId>org.springframework.boot</groupId>
           <artifactId>spring-boot-starter-data-redis</artifactId>
       </dependency> -->


    </dependencies>

    <build>
        <plugins>
            <plugin>
                <groupId>org.springframework.boot</groupId>
                <artifactId>spring-boot-maven-plugin</artifactId>
            </plugin>
        </plugins>
    </build>

</project>
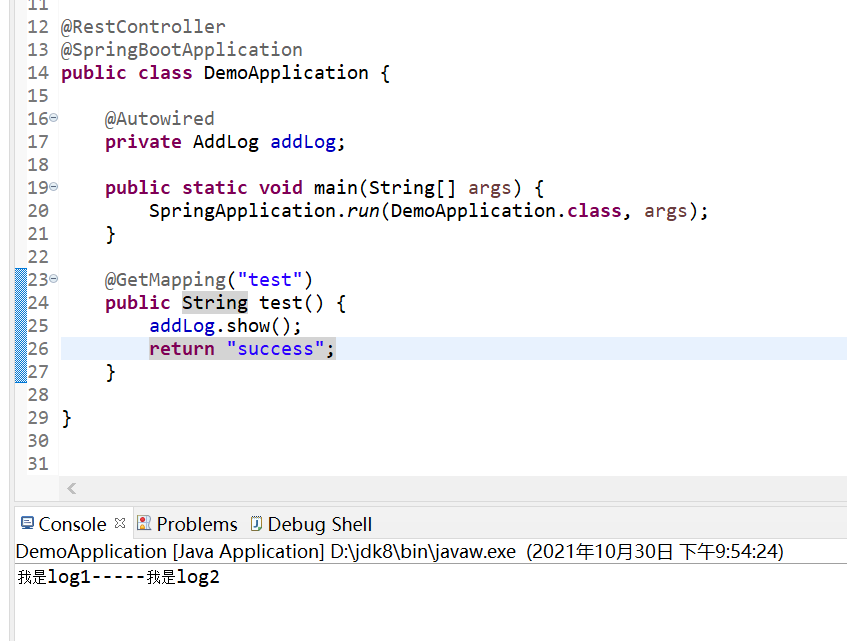
使用@Autowired注入自定义starter中的应用类调用方法.
package com.example.demo;
import org.springframework.beans.factory.annotation.Autowired;
import org.springframework.boot.SpringApplication;
import org.springframework.boot.autoconfigure.SpringBootApplication;
import org.springframework.web.bind.annotation.GetMapping;
import org.springframework.web.bind.annotation.RestController;
import com.datang.app.AddLog;
@RestController
@SpringBootApplication
public class DemoApplication {
@Autowired
private AddLog addLog;
public static void main(String[] args) {
SpringApplication.run(DemoApplication.class, args);
}
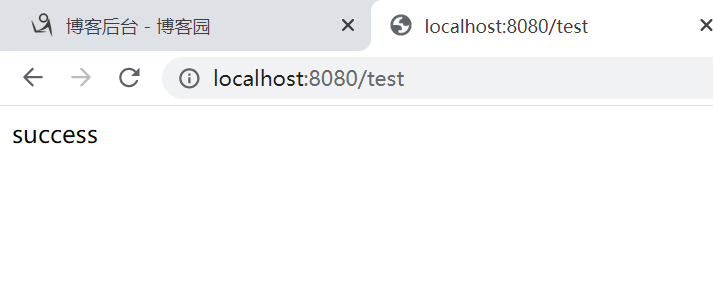
@GetMapping("test")
public String test() {
addLog.show();
return "success";
}
}
yml文件中配置两个参数就是LogProperties需要读取的两个参数.
# Spring配置
#spring:
  # redis配置
  #redis:
     # 地址
     #host: 127.0.0.1
     # 端口,默认为6379
     #port: 6379

dfsn:
  log:
    log1: 我是log1
    log2: 我是log2
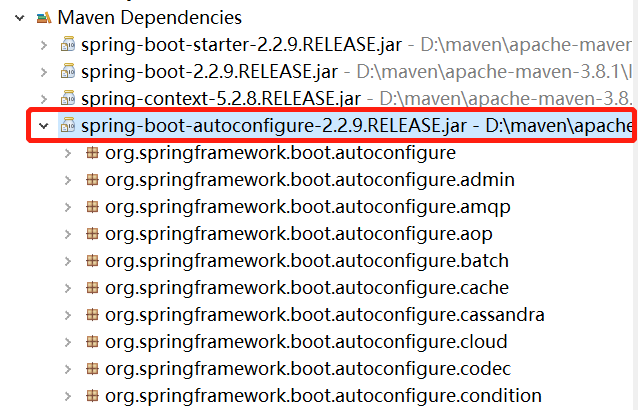
自动装配源代码跟踪
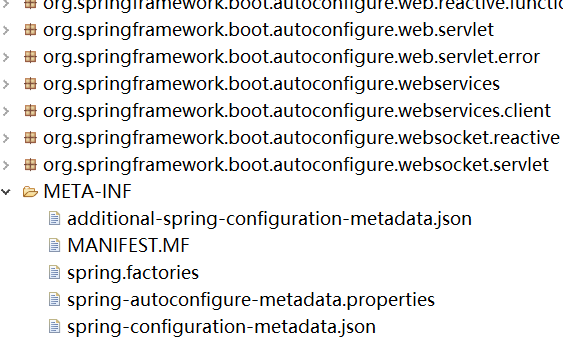
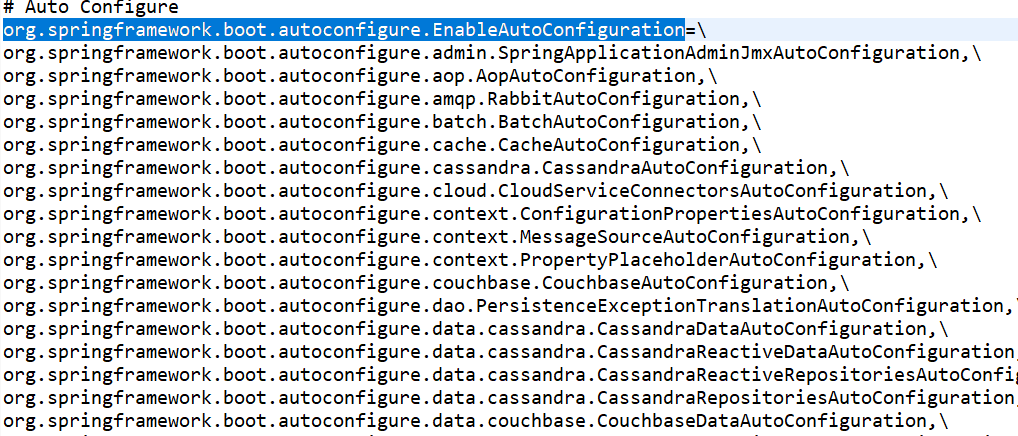
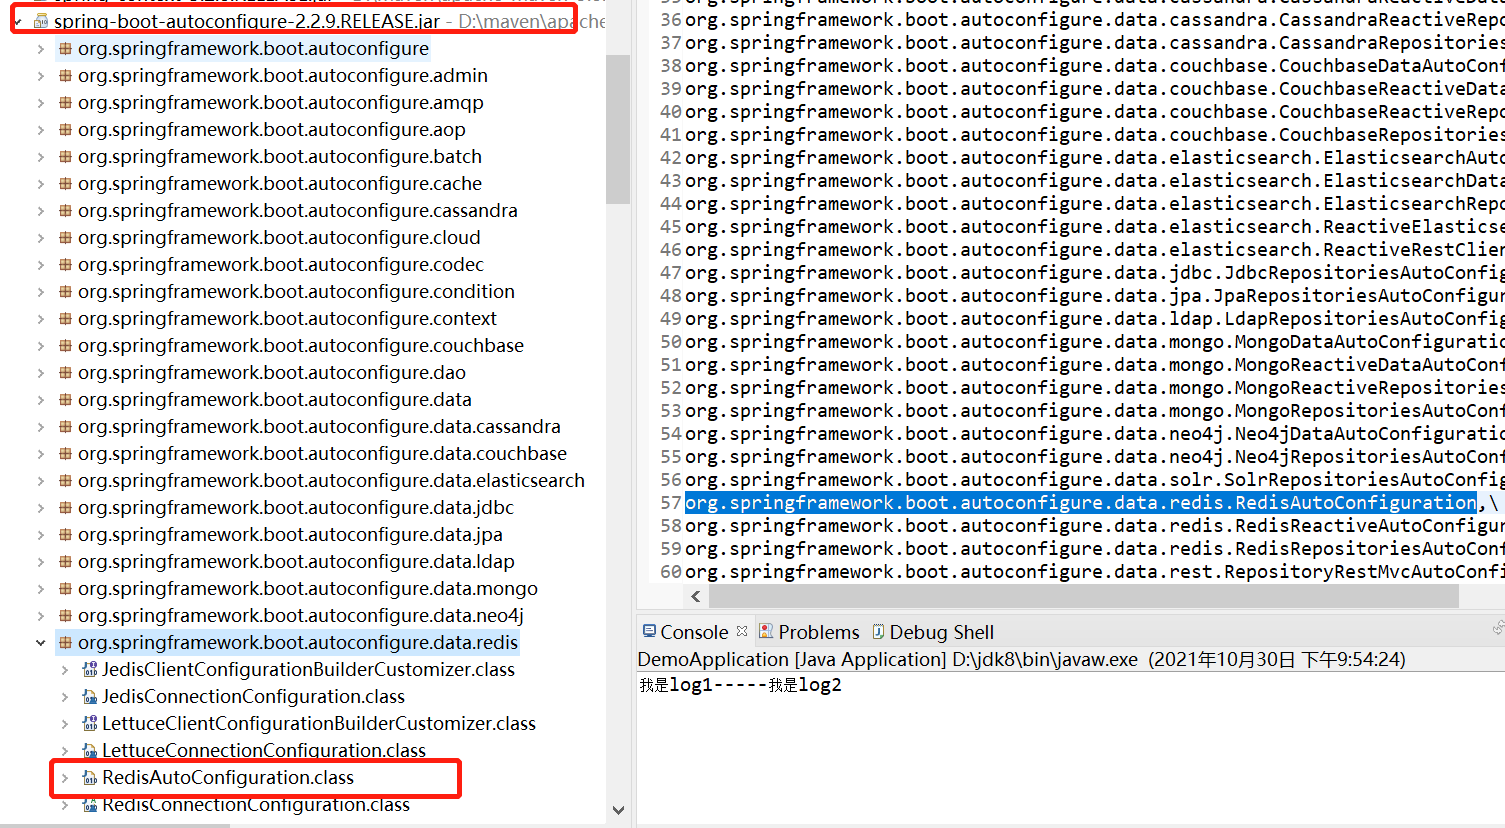
看源代码首先需要明确,自己要找的功能是什么,不要盲目进入源码.首先我们思考,springboot自动装配都能干啥,我们平时整合Redis,mongoDB等中间件时,一般只需要引入依赖,yml配置,然后就可以使用bean了.思考一下,springboot需要整合那么多中间件,是不是要有一个文件描述了那些中间件是支持的.spring-boot-autoconfigure这个项目它就是spring自动装配的核心项目.在MATE-INF下有一个spring.factories文件它里边就有org.springframework.boot.autoconfigure.EnableAutoConfiguration属性,它的value是集合.这就像是我们自定义的starter一样.
我们找一个熟悉的org.springframework.boot.autoconfigure.data.redis.RedisAutoConfiguration那这个类就是Redis的自动装配配置类了.
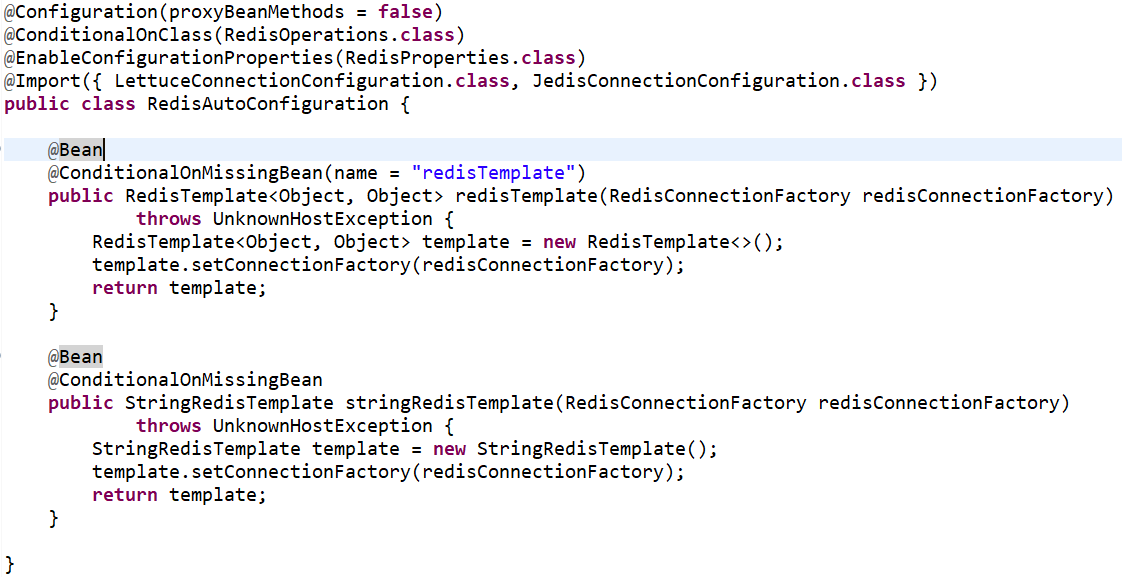
这个Redis的配置类和我们写的核心步骤是没有区别的.它多了一个@Import注解,这个注解就是spring中的<import>标签表示该类还有其他的配置类.
现在我们大概知道了,springboot自动装配的步骤就是,现在spring.factories文件中配置需要整合的中间件的配置类,如果是我们自定义的也需要在META-INF下创建同名的文件,并且使用相同的key.然后spring会根据value去找配置类.从配置类上读取条件注解,判断是否需要注册bean.条件注解中两个相当重要的是@ConditionalOnClass和@EnableConfigurationProperties它们分别对应pom文件中必须要有依赖,yml中必须有配置.我们自定义的starter也需要这样.
接下来我们看springboot的核心注解.SpringBootApplication除了元注解外,它有@SpringBootConfiguration,@EnableAutoConfiguration,@ComponentScan三个注解.@SpringBootConfiguration其实就是封装了@Configuration表示当前类是一个配置类.@ComponentScan是一个包扫描标识,它和xml中的<context:component-scan>标签作用一致.告诉springboot需要扫描某个包中的文件看看它里边有没有注解需要解析.springboot2后这个注解默认会扫描启动类同包以及其子包.
@Target(ElementType.TYPE)
@Retention(RetentionPolicy.RUNTIME)
@Documented
@Inherited
@SpringBootConfiguration
@EnableAutoConfiguration
@ComponentScan(excludeFilters = { @Filter(type = FilterType.CUSTOM, classes = TypeExcludeFilter.class),
        @Filter(type = FilterType.CUSTOM, classes = AutoConfigurationExcludeFilter.class) })
public @interface SpringBootApplication {
@EnableAutoConfiguration这个注解是自动装配的核心注解.它导入了AutoConfigurationImportSelector类.
@Target(ElementType.TYPE)
@Retention(RetentionPolicy.RUNTIME)
@Documented
@Inherited
@AutoConfigurationPackage
@Import(AutoConfigurationImportSelector.class)
public @interface EnableAutoConfiguration {
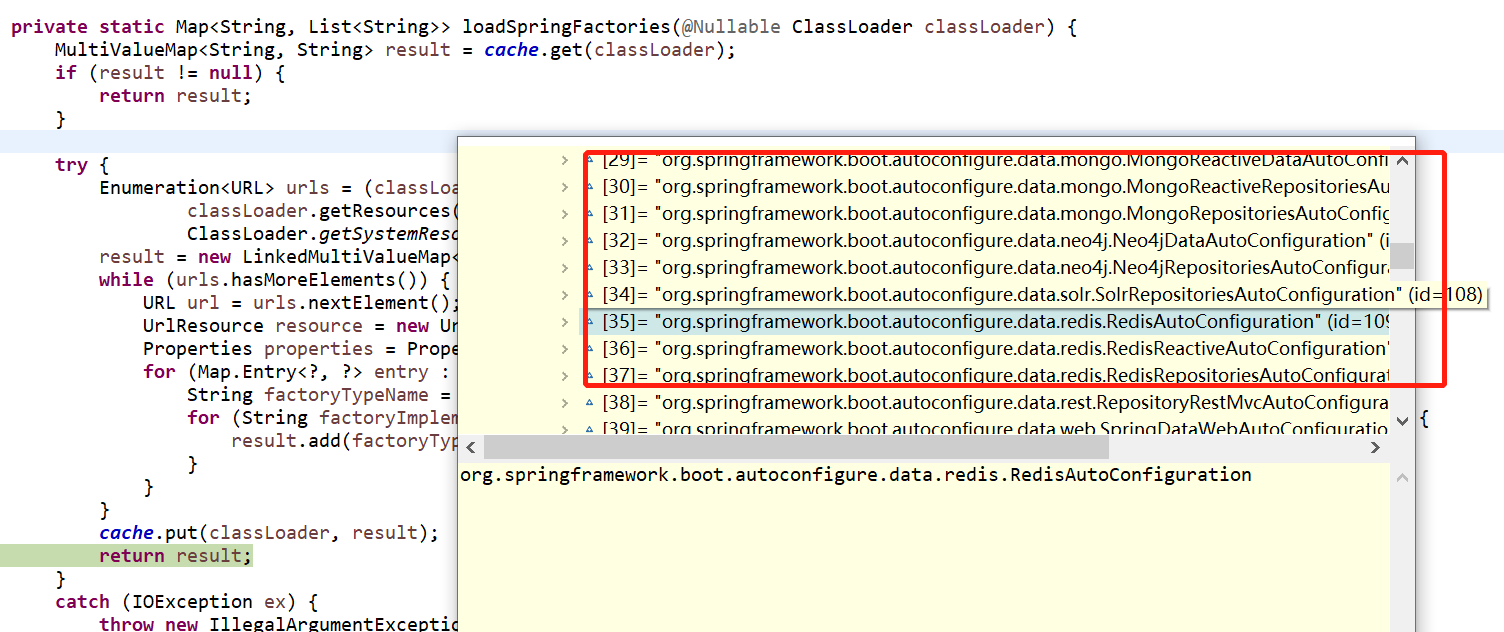
AutoConfigurationImportSelector的getCandidateConfigurations返回了一个集合,这个集合中包含了很多类全路径,在这个集合中的都是符合条件被自动装配的bean
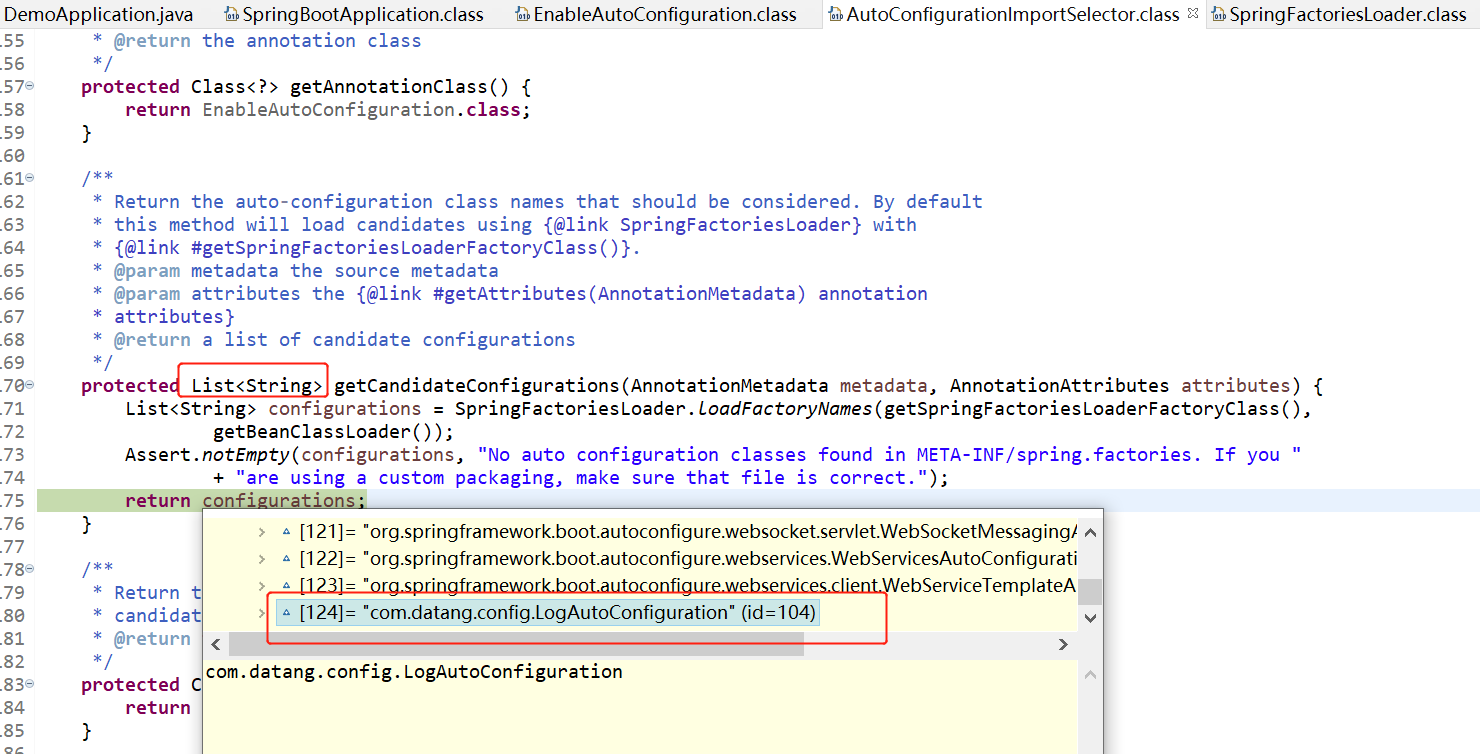
现在我们反着推导,看看从哪里筛选出这些符合条件的类的.
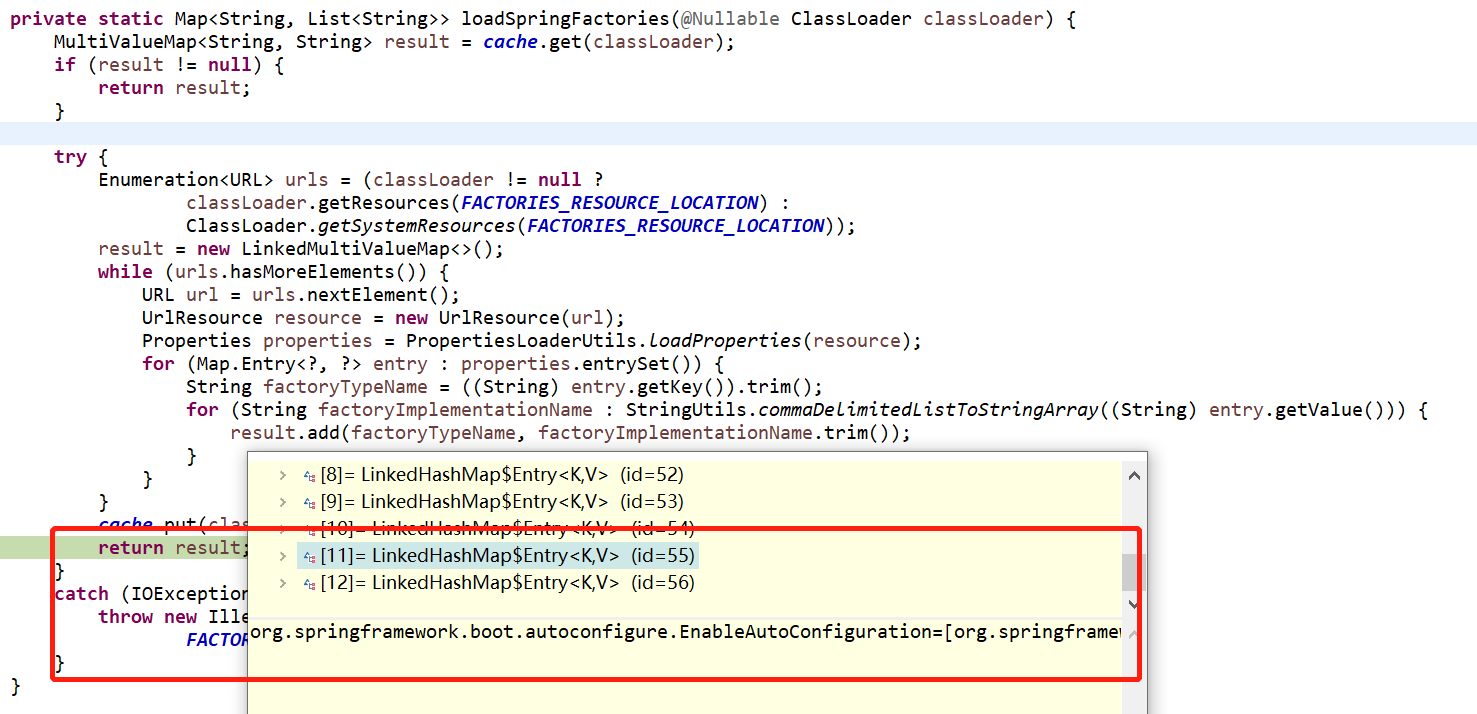
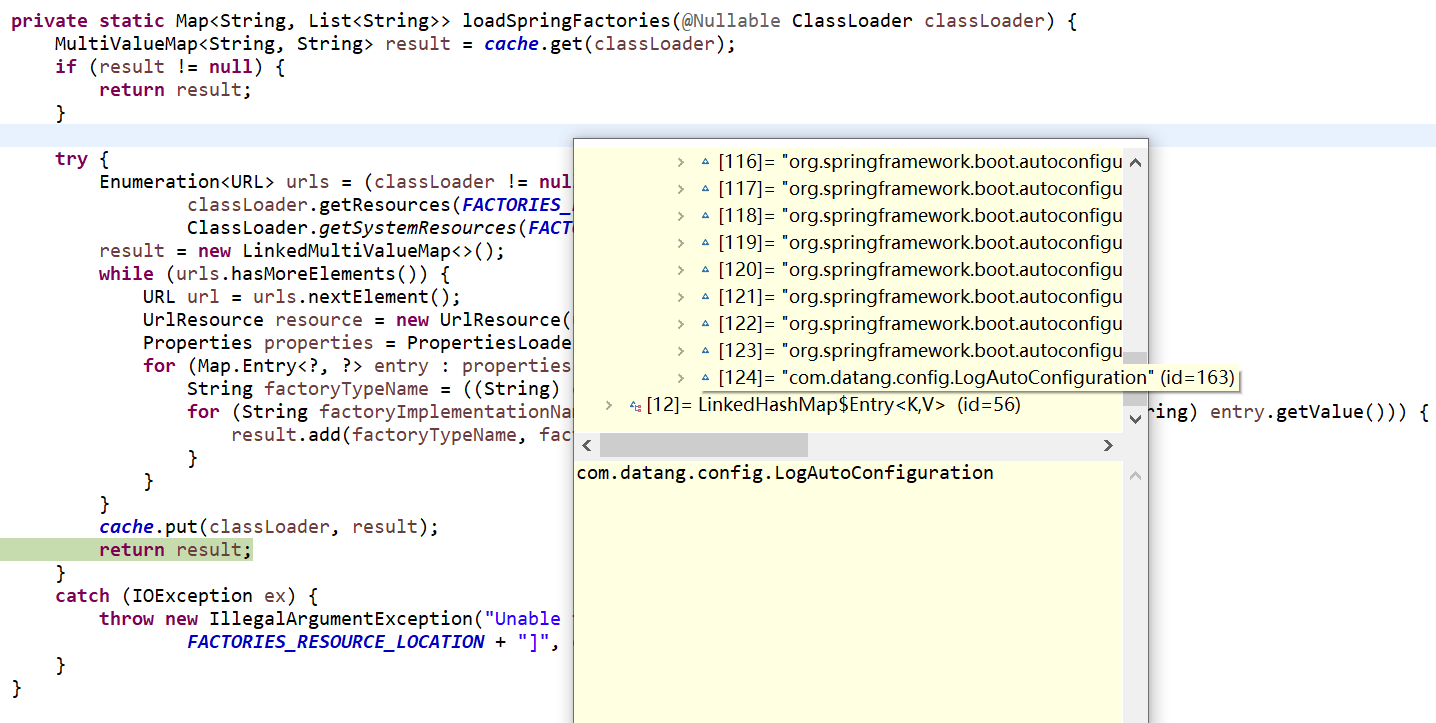
进入这个方法SpringFactoriesLoader.loadFactoryNames这个方法通过classLoader去public static final String FACTORIES_RESOURCE_LOCATION = "META-INF/spring.factories";路径下找配置.springboot自动装配和我们自定义starter的都是这个路径.这样就把所有可能需要装配的类的配置类给找到了.
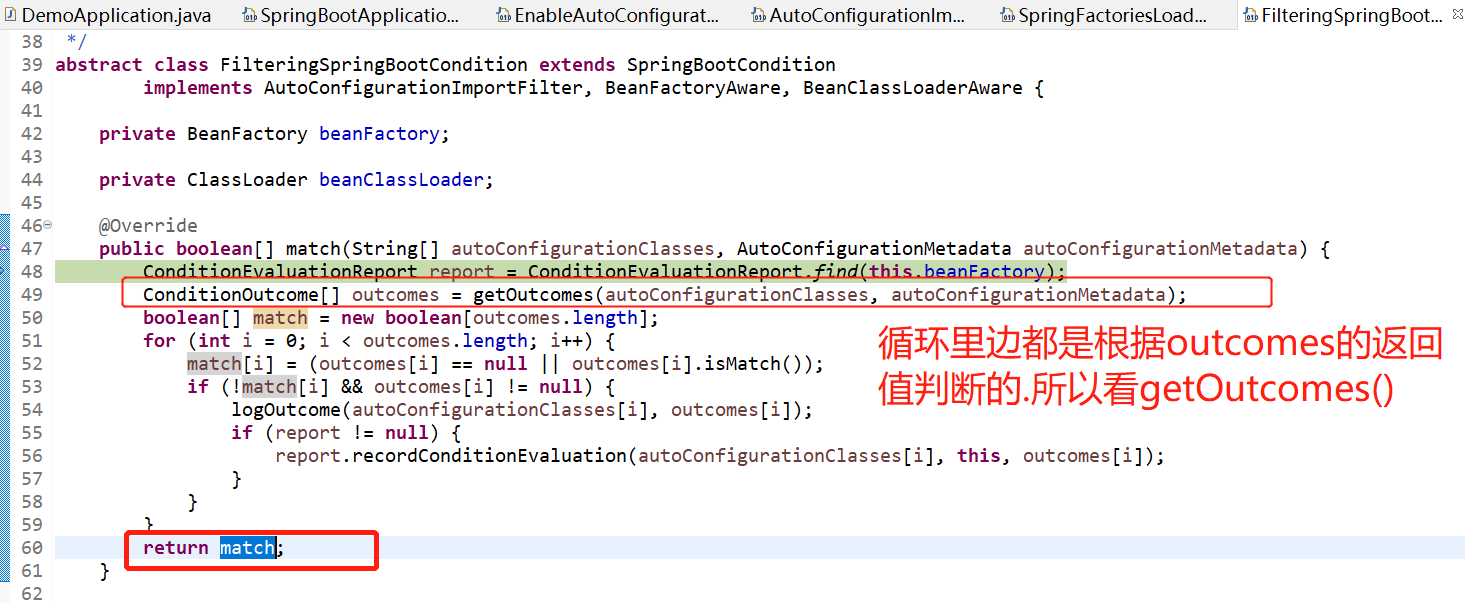
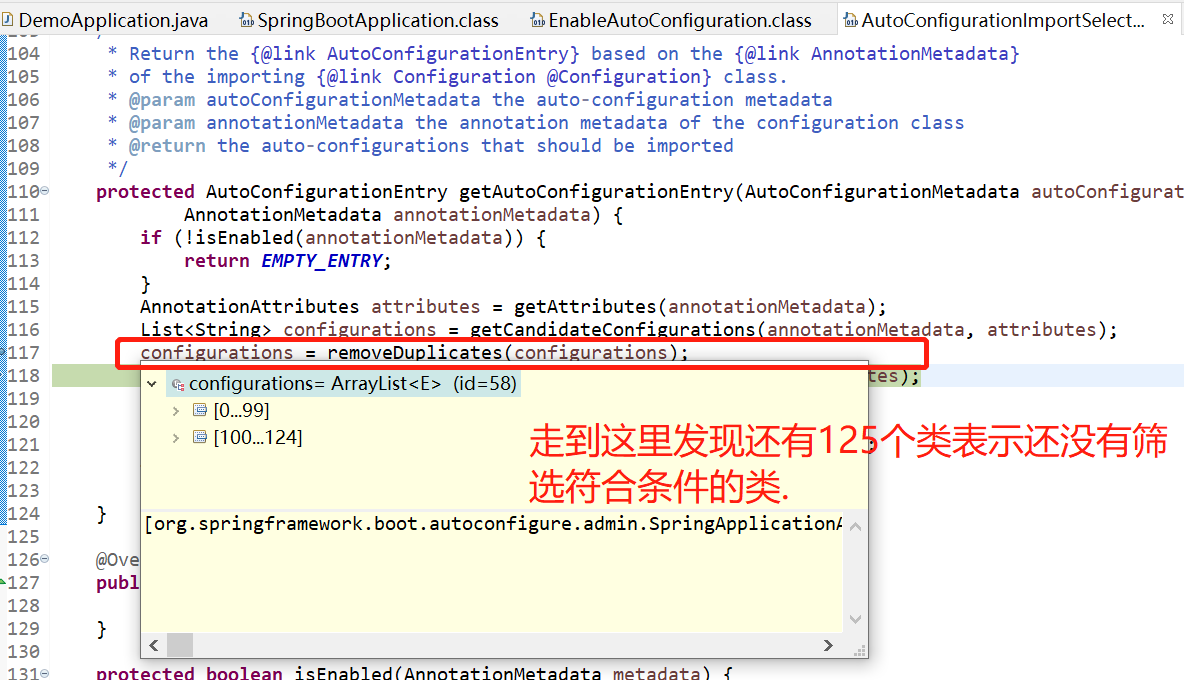
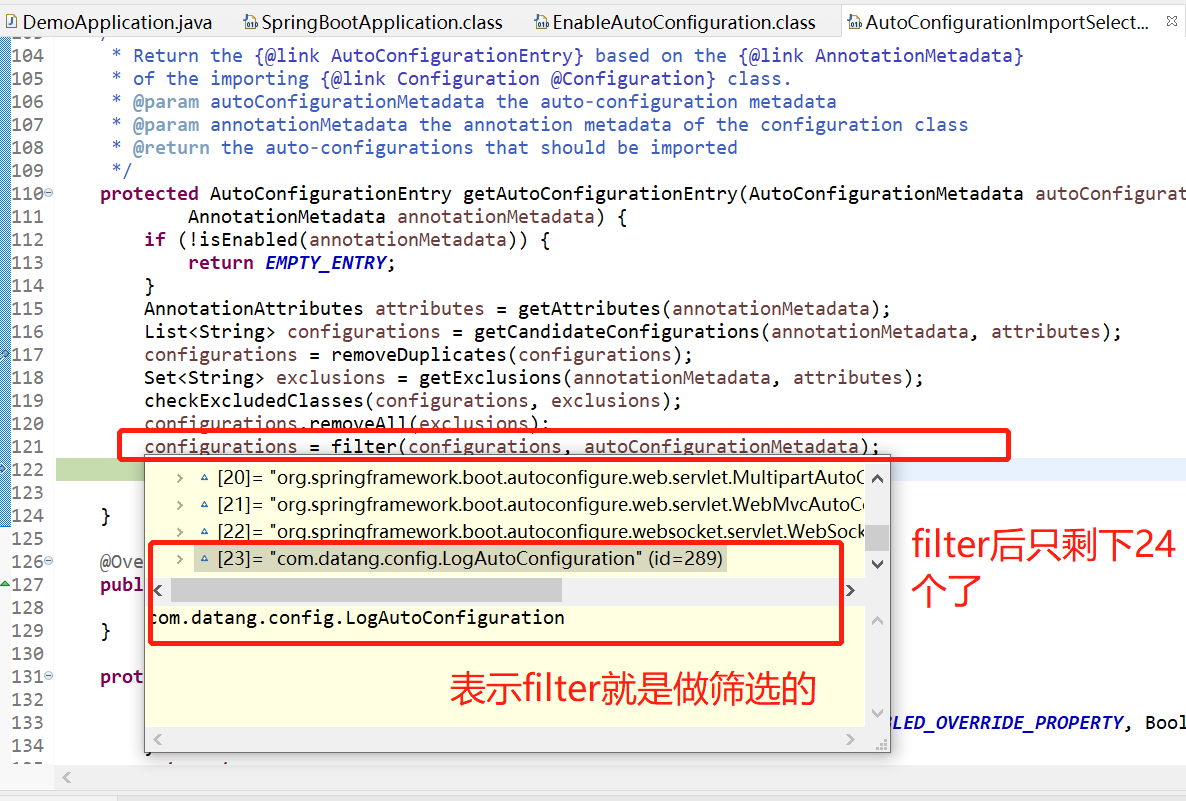
再次回到AutoConfigurationImportSelector现在已经找到了这些配置类,要看看如何筛选符合条件的类.找到谁调用了getCandidateConfigurations()
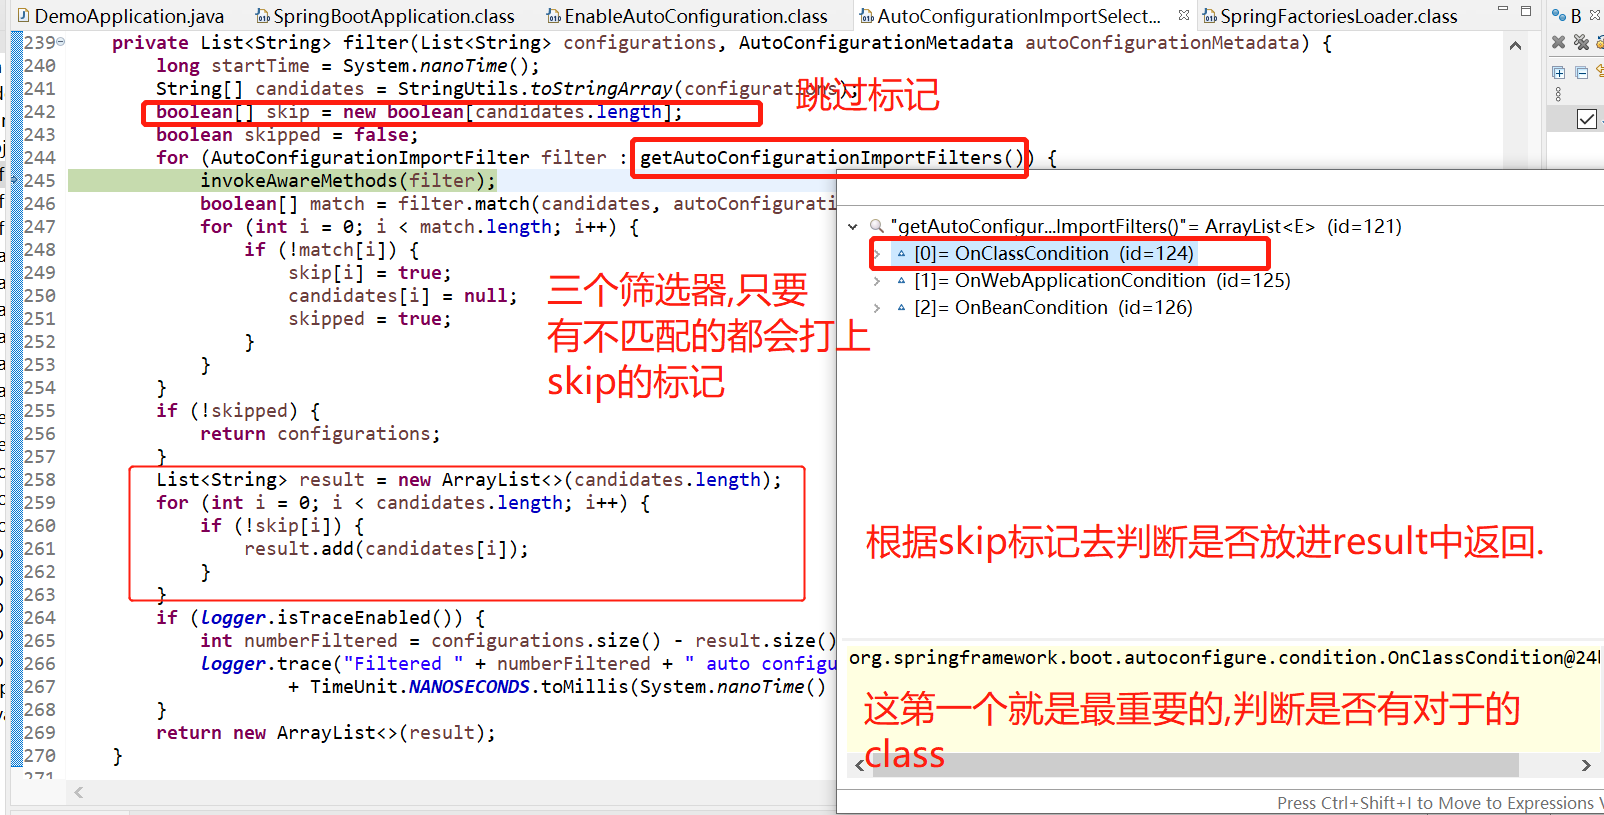
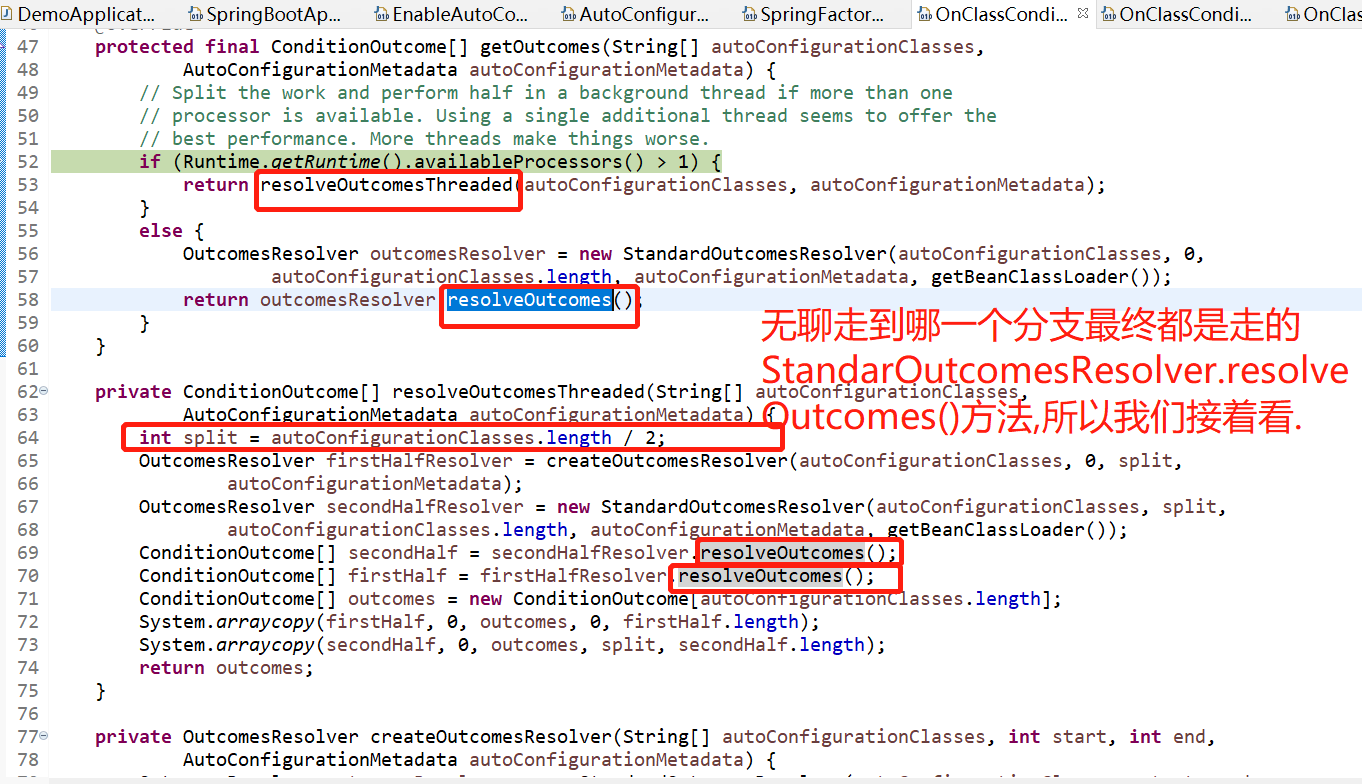
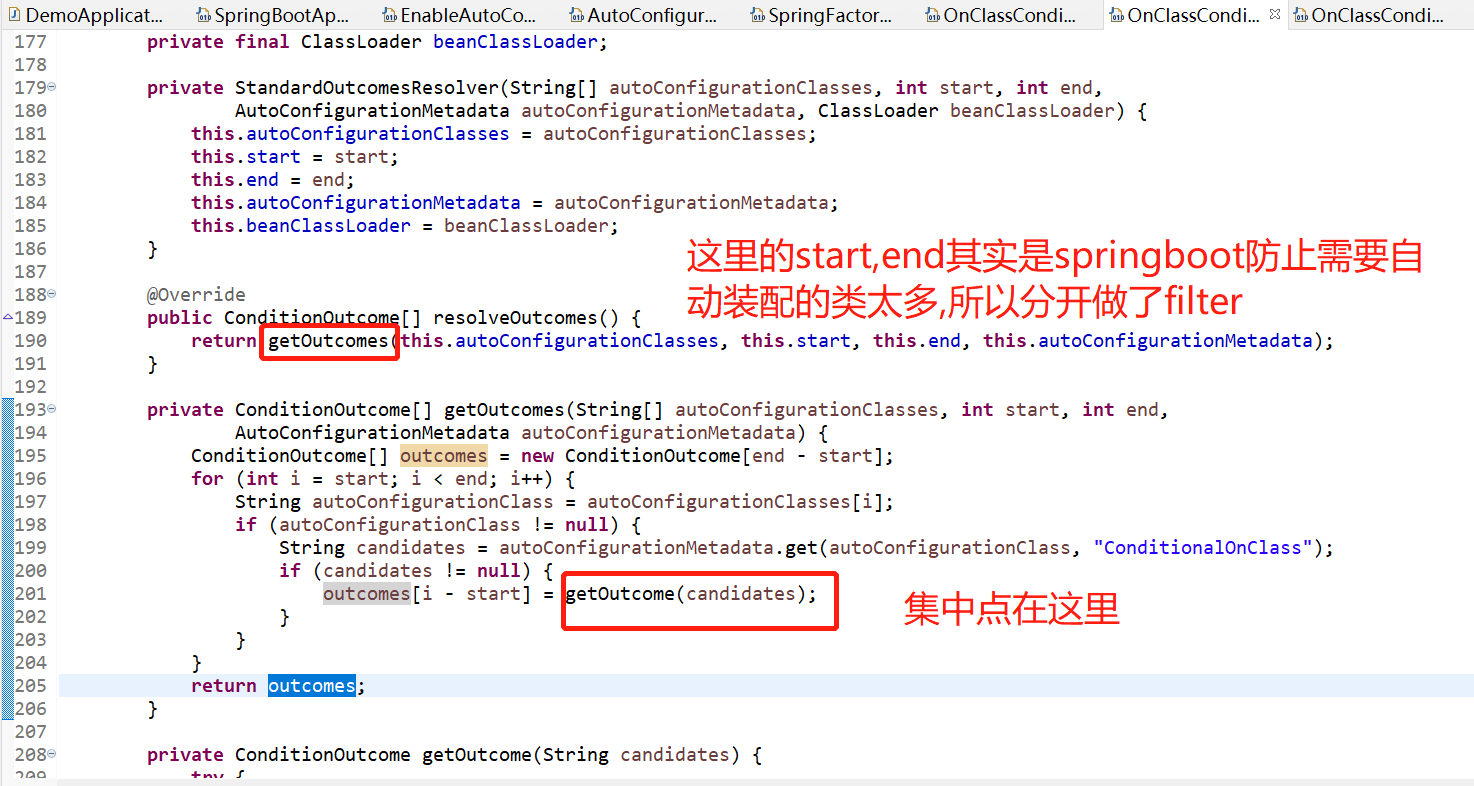
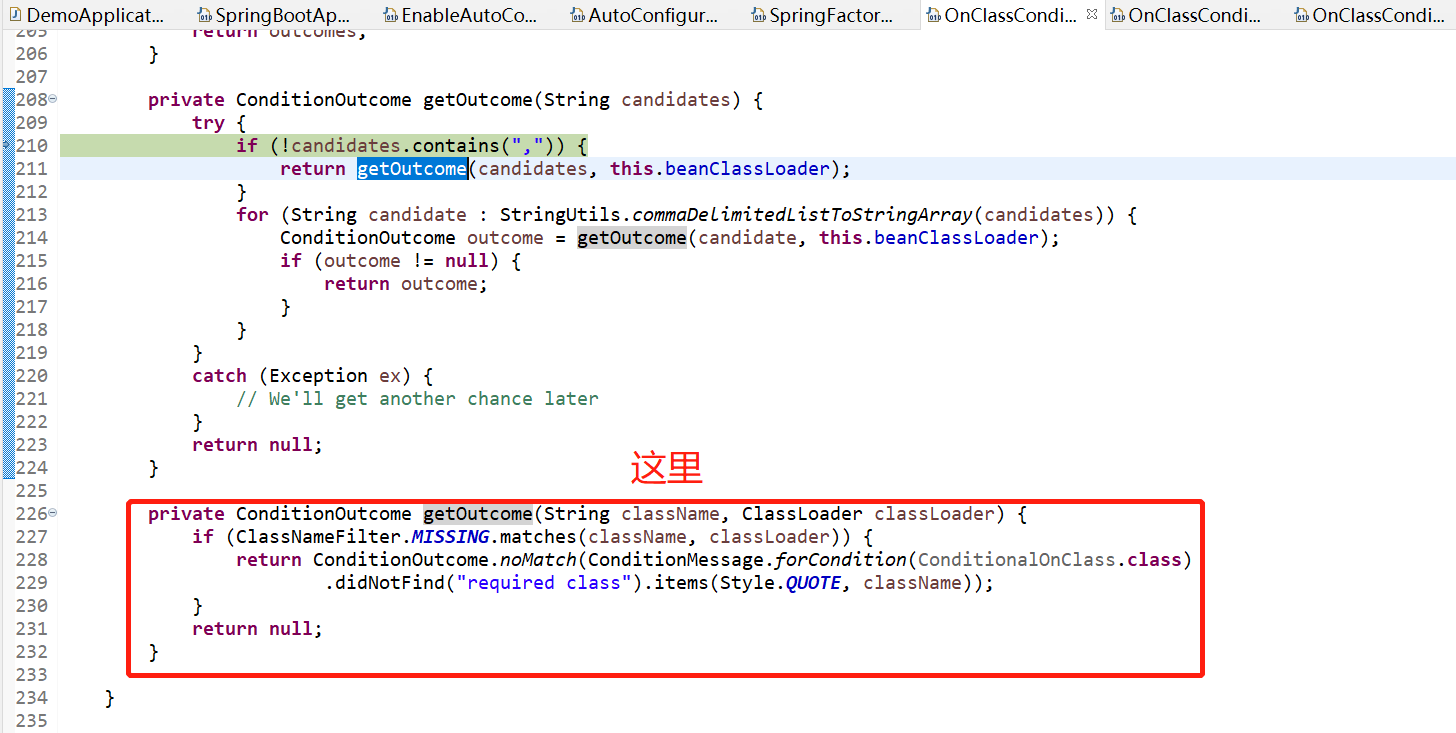
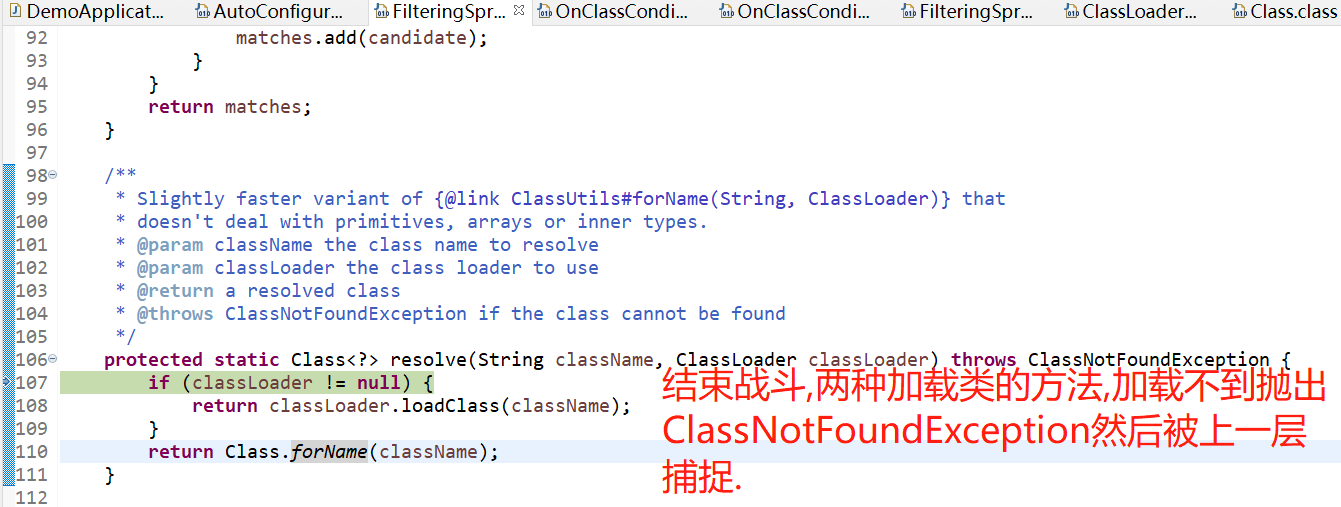
接下来我们就看OnClassCondition是怎么判断的.