本节内容:
- Socket语法及相关
- SocketServer实现多并发
Socket语法及相关
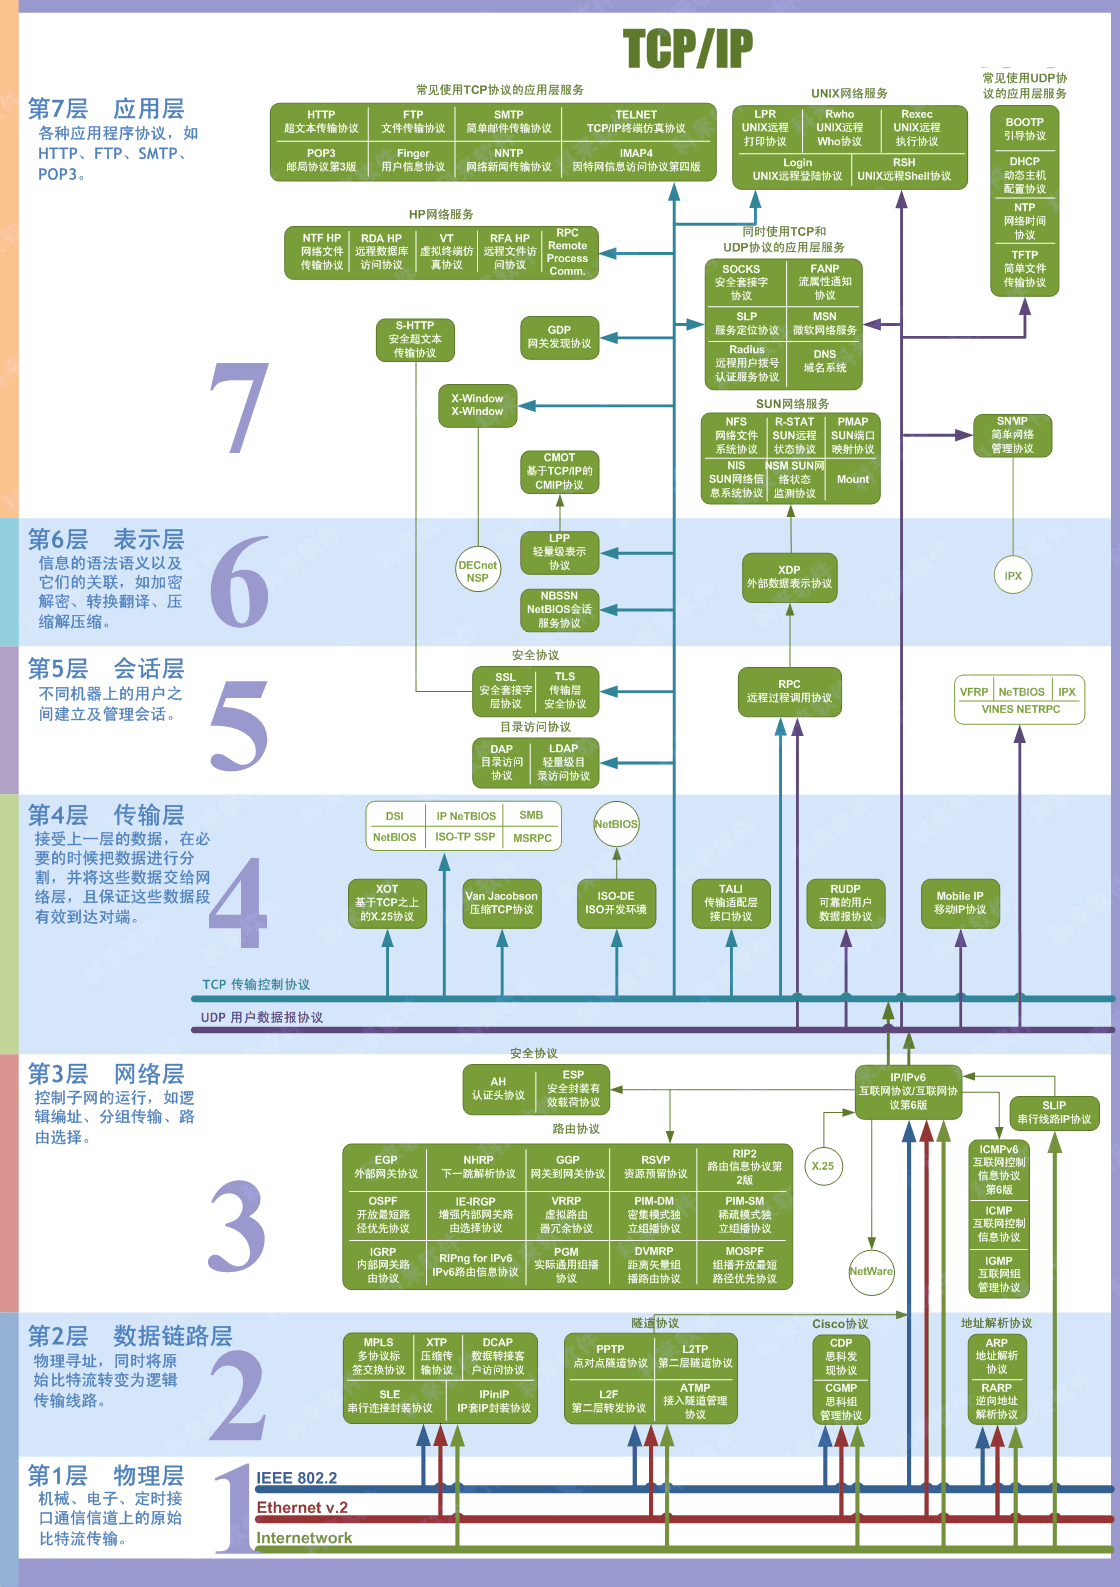
socket概念
socket本质上就是在2台网络互通的电脑之间,架设一个通道,两台电脑通过这个通道来实现数据的互相传递。 我们知道网络 通信 都 是基于 ip+port 方能定位到目标的具体机器上的具体服务,操作系统有0-65535个端口,每个端口都可以独立对外提供服务,如果 把一个公司比做一台电脑 ,那公司的总机号码就相当于ip地址, 每个员工的分机号就相当于端口, 你想找公司某个人,必须 先打电话到总机,然后再转分机 。
建立一个socket必须至少有2端, 一个服务端,一个客户端, 服务端被动等待并接收请求,客户端主动发起请求, 连接建立之后,双方可以互发数据。

A network socket is an endpoint of a connection across a computer network. Today, most communication between computers is based on the Internet Protocol; therefore most network sockets are Internet sockets. More precisely, a socket is a handle (abstract reference) that a local program can pass to the networking application programming interface (API) to use the connection, for example "send this data on this socket". Sockets are internally often simply integers, which identify which connection to use.
For example, to send "Hello, world!" via TCP to port 80 of the host with address 1.2.3.4, one might get a socket, connect it to the remote host, send the string, then close the socket:
|
1
2
3
4
|
Socket socket = getSocket(type = "TCP")connect(socket, address = "1.2.3.4", port = "80")send(socket, "Hello, world!")close(socket) |
A socket API is an application programming interface (API), usually provided by the operating system, that allows application programs to control and use network sockets. Internet socket APIs are usually based on the Berkeley sockets standard. In the Berkeley sockets standard, sockets are a form of file descriptor (a file handle), due to the Unix philosophy that "everything is a file", and the analogies between sockets and files: you can read, write, open, and close both. In practice the differences mean the analogy is strained, and one instead use different interfaces (send and receive) on a socket. In inter-process communication, each end will generally have its own socket, but these may use different APIs: they are abstracted by the network protocol.
A socket address is the combination of an IP address and a port number, much like one end of a telephone connection is the combination of a phone number and a particular extension. Sockets need not have an address (for example for only sending data), but if a program binds a socket to an address, the socket can be used to receive data sent to that address. Based on this address, internet sockets deliver incoming data packets to the appropriate application process or thread.
Socket Families(地址簇)
socket.AF_UNIX unix本机进程间通信
socket.AF_INET IPV4
socket.AF_INET6 IPV6
These constants represent the address (and protocol) families, used for the first argument to socket(). If the AF_UNIX constant is not defined then this protocol is unsupported. More constants may be available depending on the system.
Socket Types
socket.SOCK_STREAM #for tcp
socket.SOCK_DGRAM #for udp
socket.SOCK_RAW #原始套接字,普通的套接字无法处理ICMP、IGMP等网络报文,而SOCK_RAW可以;其次,SOCK_RAW也可以处理特殊的IPv4报文;此外,利用原始套接字,可以通过IP_HDRINCL套接字选项由用户构造IP头。
socket.SOCK_RDM #是一种可靠的UDP形式,即保证交付数据报但不保证顺序。SOCK_RAM用来提供对原始协议的低级访问,在需要执行某些特殊操作时使用,如发送ICMP报文。SOCK_RAM通常仅限于高级用户或管理员运行的程序使用。
socket.SOCK_SEQPACKET #废弃了
These constants represent the socket types, used for the second argument to socket(). More constants may be available depending on the system. (Only SOCK_STREAM and SOCK_DGRAM appear to be generally useful.)
Socket 方法
socket.socket(family=AF_INET, type=SOCK_STREAM, proto=0, fileno=None)
Create a new socket using the given address family, socket type and protocol number. The address family should be AF_INET (the default), AF_INET6, AF_UNIX, AF_CAN or AF_RDS. The socket type should beSOCK_STREAM (the default), SOCK_DGRAM, SOCK_RAW or perhaps one of the other SOCK_ constants. The protocol number is usually zero and may be omitted or in the case where the address family is AF_CAN the protocol should be one of CAN_RAW or CAN_BCM. If fileno is specified, the other arguments are ignored, causing the socket with the specified file descriptor to return. Unlike socket.fromfd(), fileno will return the same socket and not a duplicate. This may help close a detached socket using socket.close().
socket.socketpair([family[, type[, proto]]])
Build a pair of connected socket objects using the given address family, socket type, and protocol number. Address family, socket type, and protocol number are as for the socket() function above. The default family is AF_UNIX if defined on the platform; otherwise, the default is AF_INET.
socket.create_connection(address[, timeout[, source_address]])
Connect to a TCP service listening on the Internet address (a 2-tuple (host, port)), and return the socket object. This is a higher-level function than socket.connect(): if host is a non-numeric hostname, it will try to resolve it for both AF_INET and AF_INET6, and then try to connect to all possible addresses in turn until a connection succeeds. This makes it easy to write clients that are compatible to both IPv4 and IPv6.
Passing the optional timeout parameter will set the timeout on the socket instance before attempting to connect. If no timeout is supplied, the global default timeout setting returned by getdefaulttimeout() is used.
If supplied, source_address must be a 2-tuple (host, port) for the socket to bind to as its source address before connecting. If host or port are ‘’ or 0 respectively the OS default behavior will be used.
socket.getaddrinfo(host, port, family=0, type=0, proto=0, flags=0) #获取要连接的对端主机地址
sk.bind(address)
s.bind(address) 将套接字绑定到地址。address地址的格式取决于地址族。在AF_INET下,以元组(host,port)的形式表示地址。
sk.listen(backlog)
开始监听传入连接。backlog指定在拒绝连接之前,可以挂起的最大连接数量。
backlog等于5,表示内核已经接到了连接请求,但服务器还没有调用accept进行处理的连接个数最大为5
这个值不能无限大,因为要在内核中维护连接队列
sk.setblocking(bool)
是否阻塞(默认True),如果设置False,那么accept和recv时一旦无数据,则报错。
sk.accept()
接受连接并返回(conn,address),其中conn是新的套接字对象,可以用来接收和发送数据。address是连接客户端的地址。
接收TCP 客户的连接(阻塞式)等待连接的到来
sk.connect(address)
连接到address处的套接字。一般,address的格式为元组(hostname,port),如果连接出错,返回socket.error错误。
sk.connect_ex(address)
同上,只不过会有返回值,连接成功时返回 0 ,连接失败时候返回编码,例如:10061
sk.close()
关闭套接字
sk.recv(bufsize[,flag])
接受套接字的数据。数据以字符串形式返回,bufsize指定最多可以接收的数量。flag提供有关消息的其他信息,通常可以忽略。
sk.recvfrom(bufsize[.flag])
与recv()类似,但返回值是(data,address)。其中data是包含接收数据的字符串,address是发送数据的套接字地址。
sk.send(string[,flag])
将string中的数据发送到连接的套接字。返回值是要发送的字节数量,该数量可能小于string的字节大小。即:可能未将指定内容全部发送。
sk.sendall(string[,flag])
将string中的数据发送到连接的套接字,但在返回之前会尝试发送所有数据。成功返回None,失败则抛出异常。
内部通过递归调用send,将所有内容发送出去。
sk.sendto(string[,flag],address)
将数据发送到套接字,address是形式为(ipaddr,port)的元组,指定远程地址。返回值是发送的字节数。该函数主要用于UDP协议。
sk.settimeout(timeout)
设置套接字操作的超时期,timeout是一个浮点数,单位是秒。值为None表示没有超时期。一般,超时期应该在刚创建套接字时设置,因为它们可能用于连接的操作(如 client 连接最多等待5s )
sk.getpeername()
返回连接套接字的远程地址。返回值通常是元组(ipaddr,port)。
sk.getsockname()
返回套接字自己的地址。通常是一个元组(ipaddr,port)
sk.fileno()
套接字的文件描述符
socket.sendfile(file, offset=0, count=None)
发送文件 ,但目前多数情况下并无什么卵用。
SocketServer
The socketserver module simplifies the task of writing network servers.
There are four basic concrete server classes:
- class
socketserver.TCPServer(server_address, RequestHandlerClass, bind_and_activate=True) -
This uses the Internet TCP protocol, which provides for continuous streams of data between the client and server. If bind_and_activate is true, the constructor automatically attempts to invoke
server_bind()andserver_activate(). The other parameters are passed to theBaseServerbase class.
- class
socketserver.UDPServer(server_address, RequestHandlerClass, bind_and_activate=True) -
This uses datagrams, which are discrete packets of information that may arrive out of order or be lost while in transit. The parameters are the same as for
TCPServer.
- class
socketserver.UnixStreamServer(server_address, RequestHandlerClass, bind_and_activate=True) - class
socketserver.UnixDatagramServer(server_address, RequestHandlerClass,bind_and_activate=True) -
These more infrequently used classes are similar to the TCP and UDP classes, but use Unix domain sockets; they’re not available on non-Unix platforms. The parameters are the same as for
TCPServer.
These four classes process requests synchronously; each request must be completed before the next request can be started. This isn’t suitable if each request takes a long time to complete, because it requires a lot of computation, or because it returns a lot of data which the client is slow to process. The solution is to create a separate process or thread to handle each request; the ForkingMixIn and ThreadingMixIn mix-in classes can be used to support asynchronous behaviour.
There are five classes in an inheritance diagram, four of which represent synchronous servers of four types:
+------------+
| BaseServer |
+------------+
      |
      v
+-----------+        +------------------+
| TCPServer |------->| UnixStreamServer |
+-----------+        +------------------+
      |
      v
+-----------+        +--------------------+
| UDPServer |------->| UnixDatagramServer |
+-----------+        +--------------------+
Note that UnixDatagramServer derives from UDPServer, not from UnixStreamServer — the only difference between an IP and a Unix stream server is the address family, which is simply repeated in both Unix server classes.
- class
socketserver.ForkingMixIn - class
socketserver.ThreadingMixIn -
Forking and threading versions of each type of server can be created using these mix-in classes. For instance,
ThreadingUDPServeris created as follows:class ThreadingUDPServer(ThreadingMixIn, UDPServer): passThe mix-in class comes first, since it overrides a method defined in
UDPServer. Setting the various attributes also changes the behavior of the underlying server mechanism.
- class
socketserver.ForkingTCPServer - class
socketserver.ForkingUDPServer - class
socketserver.ThreadingTCPServer - class
socketserver.ThreadingUDPServer -
These classes are pre-defined using the mix-in classes.
Request Handler Objects
class
socketserver.BaseRequestHandlerThis is the superclass of all request handler objects. It defines the interface, given below. A concrete request handler subclass must define a new
handle()method, and can override any of the other methods. A new instance of the subclass is created for each request.setup()-
Called before the
handle()method to perform any initialization actions required. The default implementation does nothing.
handle()-
This function must do all the work required to service a request. The default implementation does nothing. Several instance attributes are available to it; the request is available as
self.request; the client address asself.client_address; and the server instance asself.server, in case it needs access to per-server information.The type of
self.requestis different for datagram or stream services. For stream services,self.requestis a socket object; for datagram services,self.requestis a pair of string and socket.
finish()-
Called after the
handle()method to perform any clean-up actions required. The default implementation does nothing. Ifsetup()raises an exception, this function will not be called.socketserver.TCPServerExampleserver side
12345678910111213141516171819202122232425262728importsocketserverclassMyTCPHandler(socketserver.BaseRequestHandler):"""The request handler class for our server.It is instantiated once per connection to the server, and mustoverride the handle() method to implement communication to theclient."""defhandle(self):# self.request is the TCP socket connected to the clientself.data=self.request.recv(1024).strip()print("{} wrote:".format(self.client_address[0]))print(self.data)# just send back the same data, but upper-casedself.request.sendall(self.data.upper())if__name__=="__main__":HOST, PORT="localhost",9999# Create the server, binding to localhost on port 9999server=socketserver.TCPServer((HOST, PORT), MyTCPHandler)# Activate the server; this will keep running until you# interrupt the program with Ctrl-Cserver.serve_forever()client side
123456789101112131415161718192021importsocketimportsysHOST, PORT="localhost",9999data=" ".join(sys.argv[1:])# Create a socket (SOCK_STREAM means a TCP socket)sock=socket.socket(socket.AF_INET, socket.SOCK_STREAM)try:# Connect to server and send datasock.connect((HOST, PORT))sock.sendall(bytes(data+" ","utf-8"))# Receive data from the server and shut downreceived=str(sock.recv(1024),"utf-8")finally:sock.close()print("Sent: {}".format(data))print("Received: {}".format(received))上面这个例子你会发现,依然不能实现多并发,哈哈,在server端做一下更改就可以了
把
1server=socketserver.TCPServer((HOST, PORT), MyTCPHandler)改成
1server=socketserver.ThreadingTCPServer((HOST, PORT), MyTCPHandler)线程与进程
http://www.cnblogs.com/alex3714/articles/5230609.html
主机管理之paramiko模块学习
http://www.cnblogs.com/wupeiqi/articles/5095821.html
作业1:用socketserver继续完善FTP作业
作业2:开发一个批量主机管理工具
需求:
- 可以对机器进行分组
- 可以对指定的一组或多组机器执行批量命令,分发文件(发送接收)
- 记录操作日志
堡垒机前戏
开发堡垒机之前,先来学习Python的paramiko模块,该模块机遇SSH用于连接远程服务器并执行相关操作
SSHClient
用于连接远程服务器并执行基本命令
基于用户名密码连接:
12345678910111213141516importparamiko# 创建SSH对象ssh=paramiko.SSHClient()# 允许连接不在know_hosts文件中的主机ssh.set_missing_host_key_policy(paramiko.AutoAddPolicy())# 连接服务器ssh.connect(hostname='c1.salt.com', port=22, username='wupeiqi', password='123')# 执行命令stdin, stdout, stderr=ssh.exec_command('df')# 获取命令结果result=stdout.read()# 关闭连接ssh.close()

import paramiko

transport = paramiko.Transport(('hostname', 22))
transport.connect(username='wupeiqi', password='123')

ssh = paramiko.SSHClient()
ssh._transport = transport

stdin, stdout, stderr = ssh.exec_command('df')
print stdout.read()

transport.close()
基于公钥密钥连接:
123456789101112131415161718importparamikoprivate_key=paramiko.RSAKey.from_private_key_file('/home/auto/.ssh/id_rsa')# 创建SSH对象ssh=paramiko.SSHClient()# 允许连接不在know_hosts文件中的主机ssh.set_missing_host_key_policy(paramiko.AutoAddPolicy())# 连接服务器ssh.connect(hostname='c1.salt.com', port=22, username='wupeiqi', key=private_key)# 执行命令stdin, stdout, stderr=ssh.exec_command('df')# 获取命令结果result=stdout.read()# 关闭连接ssh.close()
import paramiko

private_key = paramiko.RSAKey.from_private_key_file('/home/auto/.ssh/id_rsa')

transport = paramiko.Transport(('hostname', 22))
transport.connect(username='wupeiqi', pkey=private_key)

ssh = paramiko.SSHClient()
ssh._transport = transport

stdin, stdout, stderr = ssh.exec_command('df')

transport.close()
基于私钥字符串进行连接
SFTPClient
用于连接远程服务器并执行上传下载
基于用户名密码上传下载
123456789101112importparamikotransport=paramiko.Transport(('hostname',22))transport.connect(username='wupeiqi',password='123')sftp=paramiko.SFTPClient.from_transport(transport)# 将location.py 上传至服务器 /tmp/test.pysftp.put('/tmp/location.py','/tmp/test.py')# 将remove_path 下载到本地 local_pathsftp.get('remove_path','local_path')transport.close()基于公钥密钥上传下载
1234567891011121314importparamikoprivate_key=paramiko.RSAKey.from_private_key_file('/home/auto/.ssh/id_rsa')transport=paramiko.Transport(('hostname',22))transport.connect(username='wupeiqi', pkey=private_key )sftp=paramiko.SFTPClient.from_transport(transport)# 将location.py 上传至服务器 /tmp/test.pysftp.put('/tmp/location.py','/tmp/test.py')# 将remove_path 下载到本地 local_pathsftp.get('remove_path','local_path')transport.close() Demo堡垒机的实现
实现思路:
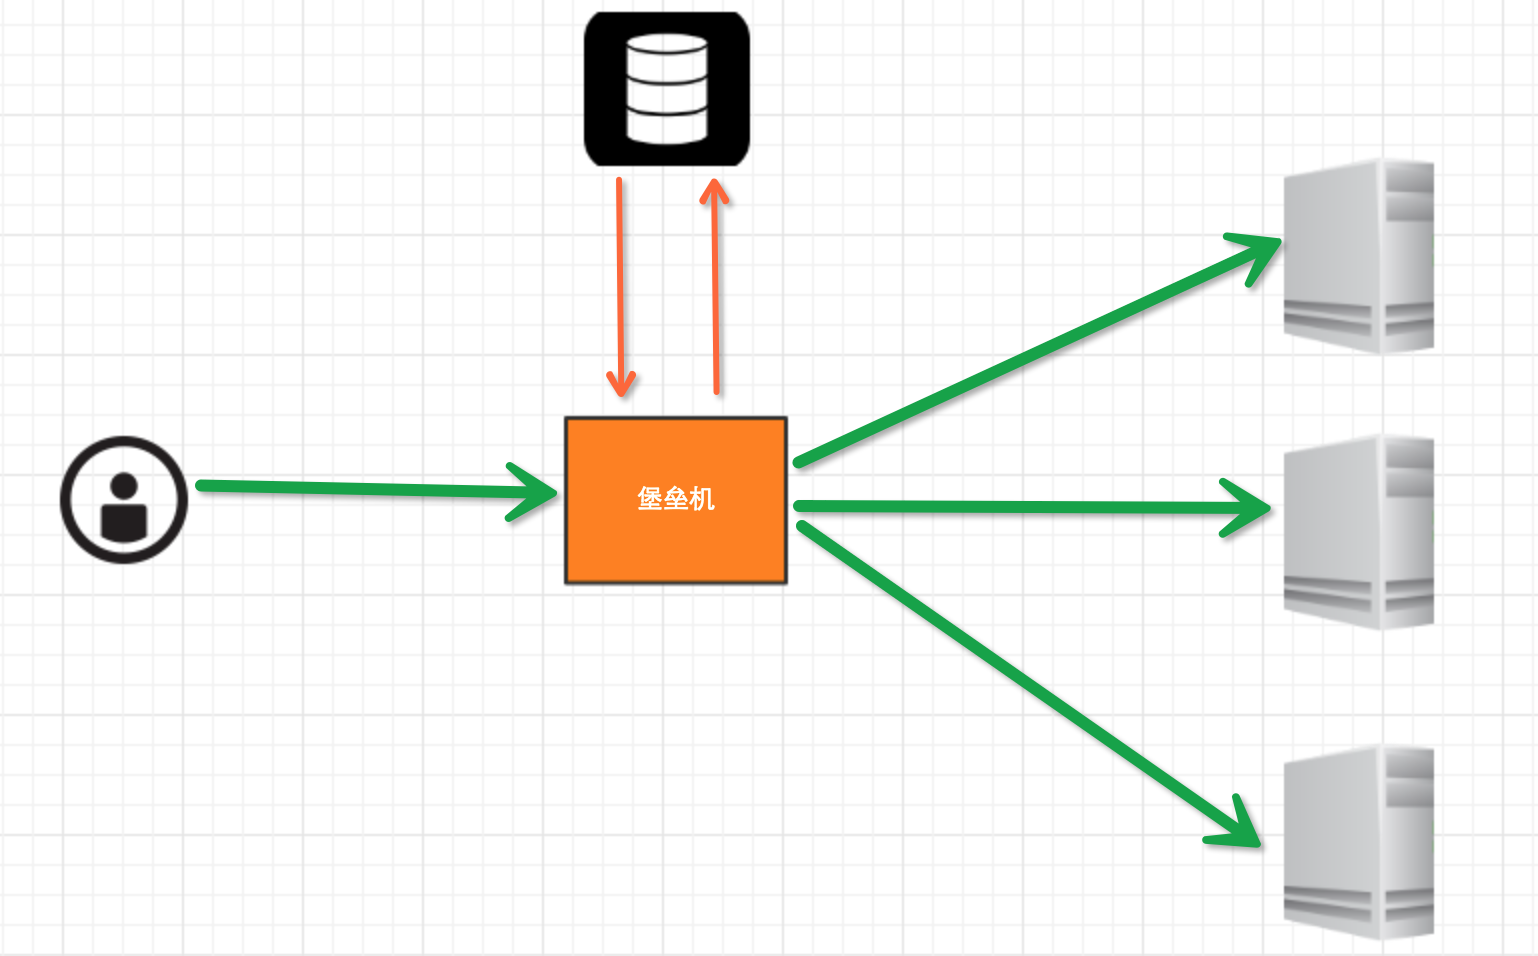
堡垒机执行流程:
- 管理员为用户在服务器上创建账号(将公钥放置服务器,或者使用用户名密码)
- 用户登陆堡垒机,输入堡垒机用户名密码,现实当前用户管理的服务器列表
- 用户选择服务器,并自动登陆
- 执行操作并同时将用户操作记录
注:配置.brashrc实现ssh登陆后自动执行脚本,如:/usr/bin/python /home/wupeiqi/menu.py
实现过程
步骤一,实现用户登陆
12345678importgetpassuser=raw_input('username:')pwd=getpass.getpass('password')ifuser=='alex'andpwd=='123':print'登陆成功'else:print'登陆失败'步骤二,根据用户获取相关服务器列表
123456789101112131415161718192021dic={'alex': ['172.16.103.189','c10.puppet.com','c11.puppet.com',],'eric': ['c100.puppet.com',]}host_list=dic['alex']print'please select:'forindex, iteminenumerate(host_list,1):printindex, iteminp=raw_input('your select (No):')inp=int(inp)hostname=host_list[inp-1]port=22步骤三,根据用户名、私钥登陆服务器
12345678910111213141516171819202122tran=paramiko.Transport((hostname, port,))tran.start_client()default_path=os.path.join(os.environ['HOME'],'.ssh','id_rsa')key=paramiko.RSAKey.from_private_key_file(default_path)tran.auth_publickey('wupeiqi', key)# 打开一个通道chan=tran.open_session()# 获取一个终端chan.get_pty()# 激活器chan.invoke_shell()########## 利用sys.stdin,肆意妄为执行操作# 用户在终端输入内容,并将内容发送至远程服务器# 远程服务器执行命令,并将结果返回# 用户终端显示内容#########chan.close()tran.close()
while True:
    # 监视用户输入和服务器返回数据
    # sys.stdin 处理用户输入
    # chan 是之前创建的通道,用于接收服务器返回信息
    readable, writeable, error = select.select([chan, sys.stdin, ],[],[],1)
    if chan in readable:
        try:
            x = chan.recv(1024)
            if len(x) == 0:
                print '
*** EOF
',
                break
            sys.stdout.write(x)
            sys.stdout.flush()
        except socket.timeout:
            pass
    if sys.stdin in readable:
        inp = sys.stdin.readline()
        chan.sendall(inp)
# 获取原tty属性
oldtty = termios.tcgetattr(sys.stdin)
try:
    # 为tty设置新属性
    # 默认当前tty设备属性:
    #   输入一行回车,执行
    #   CTRL+C 进程退出,遇到特殊字符,特殊处理。

    # 这是为原始模式,不认识所有特殊符号
    # 放置特殊字符应用在当前终端,如此设置,将所有的用户输入均发送到远程服务器
    tty.setraw(sys.stdin.fileno())
    chan.settimeout(0.0)

    while True:
        # 监视 用户输入 和 远程服务器返回数据(socket)
        # 阻塞,直到句柄可读
        r, w, e = select.select([chan, sys.stdin], [], [], 1)
        if chan in r:
            try:
                x = chan.recv(1024)
                if len(x) == 0:
                    print '
*** EOF
',
                    break
                sys.stdout.write(x)
                sys.stdout.flush()
            except socket.timeout:
                pass
        if sys.stdin in r:
            x = sys.stdin.read(1)
            if len(x) == 0:
                break
            chan.send(x)

finally:
    # 重新设置终端属性
    termios.tcsetattr(sys.stdin, termios.TCSADRAIN, oldtty)
def windows_shell(chan):
    import threading

    sys.stdout.write("Line-buffered terminal emulation. Press F6 or ^Z to send EOF.

")

    def writeall(sock):
        while True:
            data = sock.recv(256)
            if not data:
                sys.stdout.write('
*** EOF ***

')
                sys.stdout.flush()
                break
            sys.stdout.write(data)
            sys.stdout.flush()

    writer = threading.Thread(target=writeall, args=(chan,))
    writer.start()

    try:
        while True:
            d = sys.stdin.read(1)
            if not d:
                break
            chan.send(d)
    except EOFError:
        # user hit ^Z or F6
        pass
注:密码验证 t.auth_password(username, pw)
详见:paramiko源码demo
数据库操作
Python 操作 Mysql 模块的安装
12345linux:yum install MySQL-pythonwindow:http://files.cnblogs.com/files/wupeiqi/py-mysql-win.zipSQL基本使用
1、数据库操作
123show databases;use [databasename];create database [name];2、数据表操作
12345678910show tables;create table students(idintnotnull auto_increment primary key,name char(8)notnull,sex char(4)notnull,age tinyint unsignednotnull,tel char(13) null default"-");
CREATE TABLE `wb_blog` (
    `id` smallint(8) unsigned NOT NULL,
    `catid` smallint(5) unsigned NOT NULL DEFAULT '0',
    `title` varchar(80) NOT NULL DEFAULT '',
    `content` text NOT NULL,
    PRIMARY KEY (`id`),
    UNIQUE KEY `catename` (`catid`)
) ;
3、数据操作
1234567insert into students(name,sex,age,tel) values('alex','man',18,'151515151')deletefromstudents whereid=2;update studentssetname='sb'whereid=1;select*fromstudents4、其他
123主键外键左右连接Python MySQL API
一、插入数据
123456789101112131415importMySQLdbconn=MySQLdb.connect(host='127.0.0.1',user='root',passwd='1234',db='mydb')cur=conn.cursor()reCount=cur.execute('insert into UserInfo(Name,Address) values(%s,%s)',('alex','usa'))# reCount = cur.execute('insert into UserInfo(Name,Address) values(%(id)s, %(name)s)',{'id':12345,'name':'wupeiqi'})conn.commit()cur.close()conn.close()printreCount 批量插入数据注意:cur.lastrowid
二、删除数据
1234567891011121314importMySQLdbconn=MySQLdb.connect(host='127.0.0.1',user='root',passwd='1234',db='mydb')cur=conn.cursor()reCount=cur.execute('delete from UserInfo')conn.commit()cur.close()conn.close()printreCount三、修改数据
12345678910111213importMySQLdbconn=MySQLdb.connect(host='127.0.0.1',user='root',passwd='1234',db='mydb')cur=conn.cursor()reCount=cur.execute('update UserInfo set Name = %s',('alin',))conn.commit()cur.close()conn.close()printreCount四、查数据
1234567891011121314151617181920212223242526272829303132333435363738394041424344# ############################## fetchone/fetchmany(num) ##############################importMySQLdbconn=MySQLdb.connect(host='127.0.0.1',user='root',passwd='1234',db='mydb')cur=conn.cursor()reCount=cur.execute('select * from UserInfo')printcur.fetchone()printcur.fetchone()cur.scroll(-1,mode='relative')printcur.fetchone()printcur.fetchone()cur.scroll(0,mode='absolute')printcur.fetchone()printcur.fetchone()cur.close()conn.close()printreCount# ############################## fetchall ##############################importMySQLdbconn=MySQLdb.connect(host='127.0.0.1',user='root',passwd='1234',db='mydb')#cur = conn.cursor(cursorclass = MySQLdb.cursors.DictCursor)cur=conn.cursor()reCount=cur.execute('select Name,Address from UserInfo')nRet=cur.fetchall()cur.close()conn.close()printreCountprintnRetforiinnRet:printi[0],i[1]