多线程使得程序中的多个任务可以同时执行
在一个程序中允许同时运行多个任务。在许多程序设计语言中,多线程都是通过调用依赖系统的过程或函数来实现的


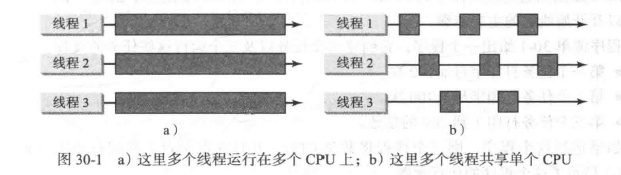
为什么需要多线程?多个线程如何在单处理器系统中同时运行?
多线程可以使您的程序更具响应性和交互性,并提高性能。在许多情况下需要多线程,例如动画和客户端/服务器计算。因为大多数时候CPU处于空闲状态 - 例如,CPU在用户输入数据时什么都不做 - 多个线程在单处理器系统中共享CPU时间是切实可行的。
1、创建任务和线程
一个任务类必须实现Runnable接口。任务必须从线程运行。

一旦定义了一个TaskClass,就可以用它的构造方法创建一个任务。
例子:
TaskClass task = new TaskClass();
任务必须在线程中执行。使用下面的语句创建任务的线程
Thread thread = new Thread(task);
然后调用start()方法告诉Java虚拟机该线程准备运行
thread.start()
例子:

public class TaskThreadDemo {

    public static void main(String [] args) {

        Runnable printA = new PrintChar('a', 100);
        Runnable printB = new PrintChar('b', 100);
        Runnable printNum = new PrintNum(100);


        Thread thread1 = new Thread(printA);
        Thread thread2 = new Thread(printB);
        Thread thread3 = new Thread(printNum);

        thread1.start();
        thread2.start();
        thread3.start();
    }
}

class PrintChar implements Runnable{
    private char charToPrint;
    private int times;
    public PrintChar(char c,int t) {
        charToPrint = c;
        times = t;
    }

    @Override
    public void run() {
        for(int i=0; i<times; i++) {
            System.out.print(charToPrint);
        }
    }
}

class PrintNum implements Runnable{
    private int lastNumber;
    public PrintNum(int n) {
        lastNumber = n;
    }
    @Override
    public void run() {
        for(int i=1; i<=lastNumber; i++) {
            System.out.print(" " + i);
        }
    }
}
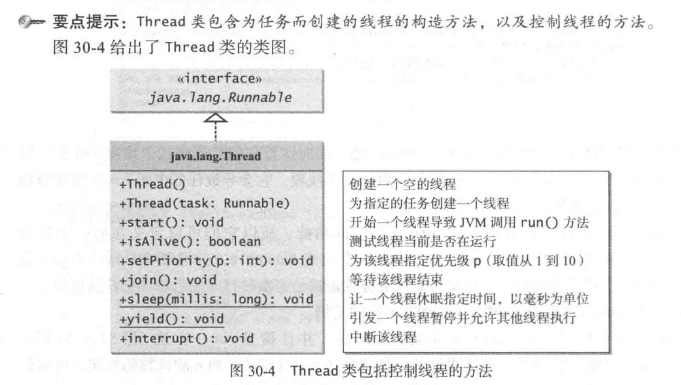
2、Thread类


3、线程池
之前运用实现Runnable接口来定义一个任务类,以及如何创建一个线程来运行一个任务

该方法对大量的任务而言是不够高效的,为每个任务开始一个新线程可能会限制吞吐量并且造成性能降低。
线程池是管理并发执行任务个数的理想方法。
Java提供Executor接口来执行线程池中的任务,提供ExecutorService接口来管理和控制任务。
Executorservice是Executor的子接口

为了创建一个Executor对象,可以使用Executor类中的静态方法
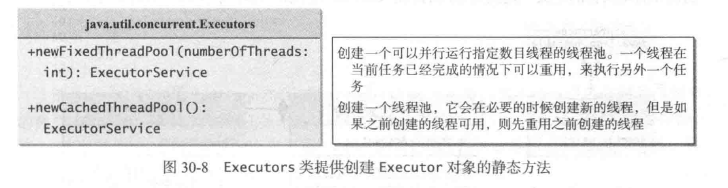

例子:
public class TaskThreadDemo {

    public static void main(String [] args) {
        ExecutorService executor = Executors.newFixedThreadPool(3);
//        ExecutorService executor = Executors.newCachedThreadPool();
        executor.execute(new PrintChar('a', 100));
        executor.execute(new PrintChar('b', 100));
        executor.execute(new PrintNum(100));

        executor.shutdown();

    }

}
4、线程同步
例子:
public class AccountWithoutSync {

    private static Account account = new Account();

    public static void main(String[] args) {

        ExecutorService executorService = Executors.newCachedThreadPool();

        for (int i = 0; i < 100; i++) {
            executorService.execute(new AddAPennyTask());
        }

        executorService.shutdown();

        //等待 全部任务 完成
        while(!executorService.isTerminated()) {

        }

        System.out.println(account.getBalance());

    }

    private static class AddAPennyTask implements Runnable{
        @Override
        public void run() {
            // TODO Auto-generated method stub
            account.deposit(1);
        }
    }


    public static class Account {
        private int balance = 0;

        public int getBalance() {
            return balance;
        }

        public void deposit(int amount) {
            int newBalance = balance + amount;
            try {
                Thread.sleep(5);
            }catch (InterruptedException e) {
                // TODO: handle exception
            }
            balance = balance + newBalance;
        }
    }

}

这个例子中出错了
原因是:
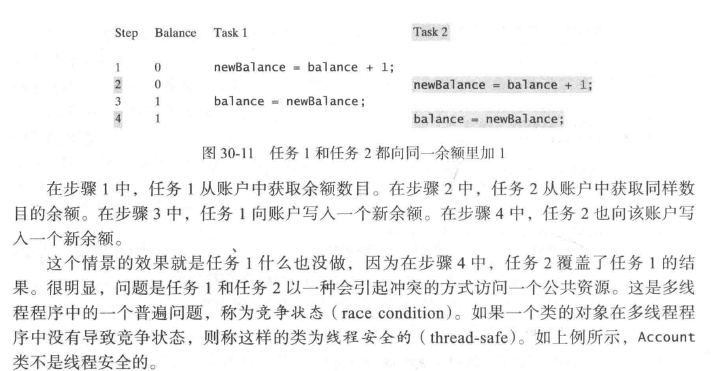
因为线程不安全,所以数据遭到破坏
synchronized关键字
为避免竞争状态,应该防止多个线程同时进入程序的某一特定部分,程序中的这部分称为临界区。
使用关键字synchronized来同步方法,以便一次只有一个线程可以访问这个方法
例子:


调用一个对象上的同步实例方法,需要给该对象加锁。而调用一个类上的同步静态方法,需要给该类加锁。
同步语句
当执行方法中某一个代码块时,同步语句不仅可用与this对象加锁,而且可用于对任何对象加锁。这个代码块称为同步块。同步语句的一般形式如下:

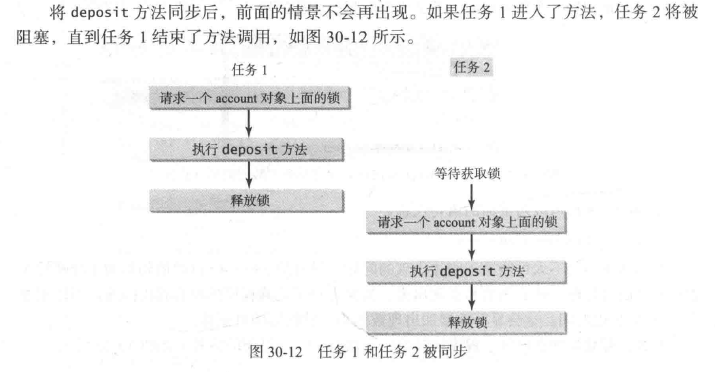
利用加锁同步
之前的用的同步实例方法

实际上 在执行之前都隐式地需要一个加在实例上的锁


例子:
部分代码:
public static class Account {
        private int balance = 0;

        private Lock lock = new ReentrantLock();  //创建一个锁

        public int getBalance() {
            return balance;
        }

        public void deposit(int amount) {
            lock.lock();//获取该锁
            try {
                int newBalance = balance + amount;

                Thread.sleep(5);
                balance = newBalance;
            }catch (InterruptedException e) {
                // TODO: handle exception
            }finally {
                lock.unlock();//释放该锁
            }

        }
    }
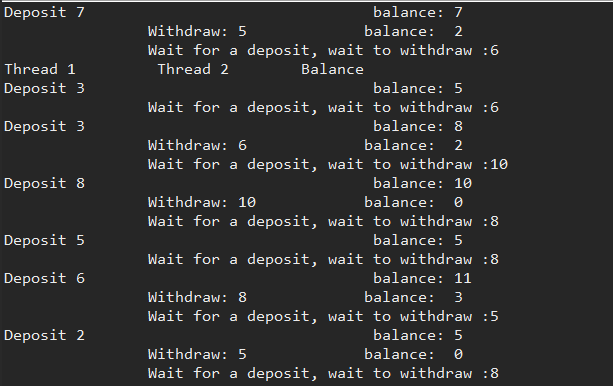
线程间协作


例子:

public class ThreadCooperation {
    private static Account account = new Account();

    public static void main(String [] args) {
        ExecutorService executorService = Executors.newFixedThreadPool(2);
        executorService.execute(new DepositTask());
        executorService.execute(new withdrawTask());
        executorService.shutdown();

        System.out.println("Thread 1 	 Thread 2 	 Balance");
        System.out.println();
    }

    public static class DepositTask implements Runnable{
        @Override
        public void run() {
            try {
                while(true) {
                    account.deposit((int)(Math.random() * 10) + 1);
                    Thread.sleep(1000);
                }
            } catch (InterruptedException e) {
                e.printStackTrace();
            }
        }
    }


    public static class withdrawTask implements Runnable{
        @Override
        public void run() {
            while(true) {
                account.withdraw((int)(Math.random() * 10) + 1);
            }
        }
    }


    public static class Account {

        private static Lock lock = new ReentrantLock();

        private static Condition newDeposit = lock.newCondition();  //线程间的协作

        private int balance = 0;

        public int getBalance() {
            return balance;
        }


        public void withdraw(int accountNumber) {
            lock.lock();
            try {
                while(balance < accountNumber) {
                    System.out.println("		Wait for a deposit, wait to withdraw :" + accountNumber);
                    newDeposit.await();
                }
                balance -= accountNumber;
                System.out.println("		Withdraw: " + accountNumber + "		" + "balance:  " + getBalance());
            }catch (Exception e) {
                // TODO: handle exception
                e.printStackTrace();
            }finally {
                lock.unlock();
            }
        }

        public void deposit(int accountNumber) {
            lock.lock();
            try {
                balance += accountNumber;
                System.out.println("Deposit " + accountNumber + "				 balance: " + getBalance());
                newDeposit.signalAll();
            }
            finally {
                lock.unlock();
            }

        }
    }

}


消费者/生产者
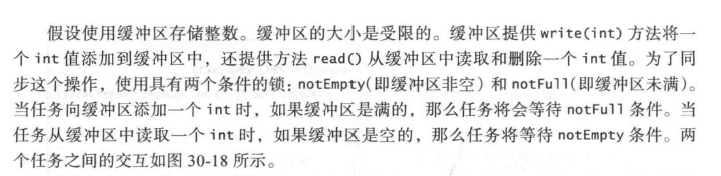
public class ComsumerProducer {

    private static Buffer buffer = new Buffer();


    public static void main(String [] args) {

        ExecutorService excurtor = Executors.newFixedThreadPool(2);
        excurtor.execute(new ProducerTask());
        excurtor.execute(new ConsumerTask());

        excurtor.shutdown();

    }

    private static class ProducerTask implements Runnable{

        @Override
        public void run() {
            // TODO Auto-generated method stub
            try {
                int i = 1;
                while(true) {
                    System.out.println("Producer writes " + i);
                    buffer.write(i++);
                    Thread.sleep((int)(Math.random() * 1000));
                }
            }catch (InterruptedException e) {
                // TODO: handle exception
                e.printStackTrace();
            }
        }
    }

    private static class ConsumerTask implements Runnable{

        @Override
        public void run() {
            // TODO Auto-generated method stub
            try {
                while(true) {
                    System.out.println("		Consumer reads " + buffer.read());
                    Thread.sleep((int)(Math.random() * 1000));
                }
            }catch (InterruptedException e) {
                // TODO: handle exception
                e.printStackTrace();
            }

        }

    }


    private static class Buffer{
        private static final int CAPACITY = 3;

        private LinkedList<Integer> queue = new LinkedList<>();

        private static Lock lock = new ReentrantLock();

        private static Condition notFull = lock.newCondition();

        private static Condition notEmpty = lock.newCondition();


        public void write(int value) {
            lock.lock();

            try{
                while(queue.size() == CAPACITY) {
                    System.out.println("Wait for notNull condition");
                    notFull.await();
                }
                queue.offer(value);
                notEmpty.signal();
            } catch (InterruptedException e) {

                e.printStackTrace();
            }finally {
                lock.unlock();
            }

        }


        public int read() {
            lock.lock();
            int value = 0;
            try {
                while(queue.isEmpty()) {
                    System.out.println("		Wait for notEmpty condition");
                    notEmpty.await();
                }
                value = queue.pop();
                notFull.signal();
            } catch (InterruptedException e) {
                    // TODO Auto-generated catch block
                e.printStackTrace();
            }finally {
                lock.unlock();
                return value;
            }

        }
    }

}

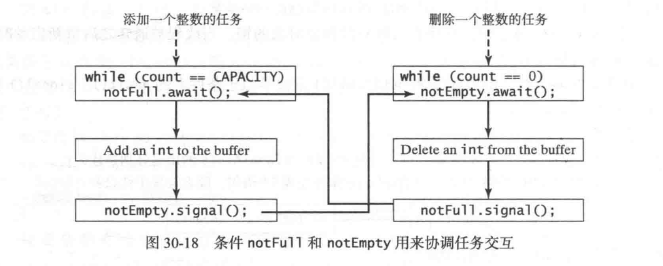
阻塞队列

阻塞队列在试图向一个满队列添加元素或者从空队列中删除元素时会导致线程阻塞。BlockingQueue接口继承了Queue,并且提供同步的put和take方法向队列尾部添加元素,以及从队列头部删除元素

java支持三个具体的阻塞队列ArrayBlockingQueue、LinkedBlockingQueue和PriorityBlockingQueue


例子:
用阻塞队列做的消费者/生产者
public class ConsumerProducerUsingBlockingQueue {

    private static ArrayBlockingQueue<Integer> buffer = new ArrayBlockingQueue<Integer>(2);

    public static void main(String [] args) {
        ExecutorService excutor = Executors.newFixedThreadPool(2);
        excutor.execute(new ProducerTask());
        excutor.execute(new ConsumerTask());
        excutor.shutdown();

    }


    private static class ProducerTask implements Runnable{

        @Override
        public void run() {
            // TODO Auto-generated method stub
            try {
                int i = 1;
                while(true) {
                    System.out.println("Producer writes " + i);
                    buffer.put(i++);
                    Thread.sleep((int)(Math.random() * 1000));
                }
            }catch (InterruptedException e) {
                // TODO: handle exception
                e.printStackTrace();
            }
        }
    }

    private static class ConsumerTask implements Runnable{
        @Override
        public void run() {
            // TODO Auto-generated method stub
            try {
                while(true) {
                    System.out.println("		Consumer reads " + buffer.take());
                    Thread.sleep((int)(Math.random() * 1000));
                }
            }catch (InterruptedException e) {
                // TODO: handle exception
                e.printStackTrace();
            }
        }

    }
}

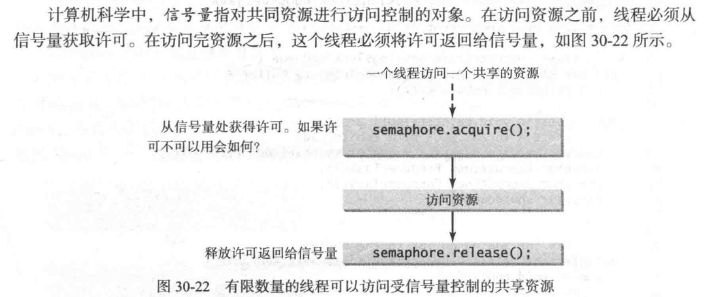
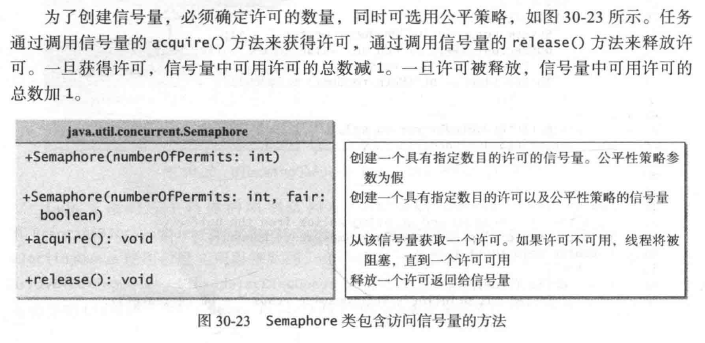
信号量

例子:


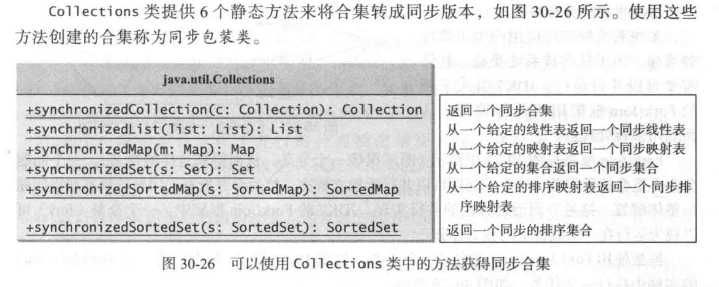
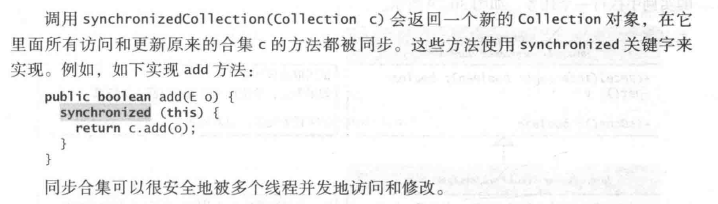
同步合集
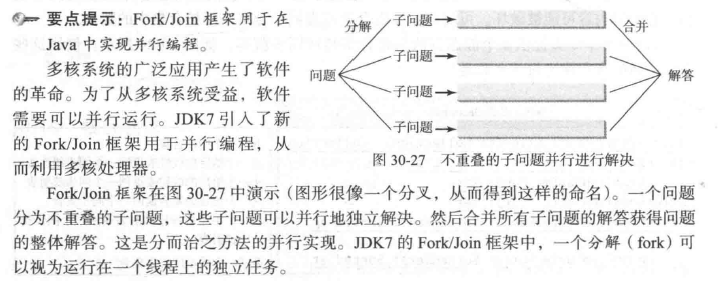
并行编程