一、SSM的基本说明和概念
1.1 什么是SSM
SSM是SpringMVC+Spring+Mybatis的简称。其中SpringMVC用来处理和用户请求,返回请求,是一个MVC框架;Mybatis是一个持久层框架,用来将数据保存到数据库;
Spring则是一个轻量级的java框架,主要功能是用来实现IOC和Aop,在这里他用来当做两个框架的粘合剂。
1.2 整合的思路
从上面的分析可以得到一个简单的框架示意图
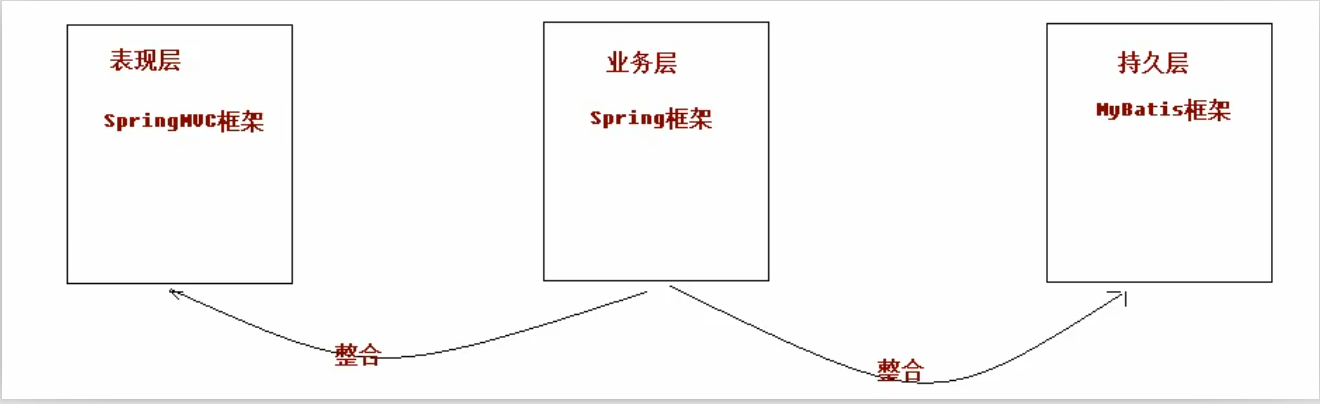
下面我们就按照这个思路进行整合。
二、创建项目,并搭建项目架构
3.1 创建项目
创建一个maven的基架项目,如下图所示:
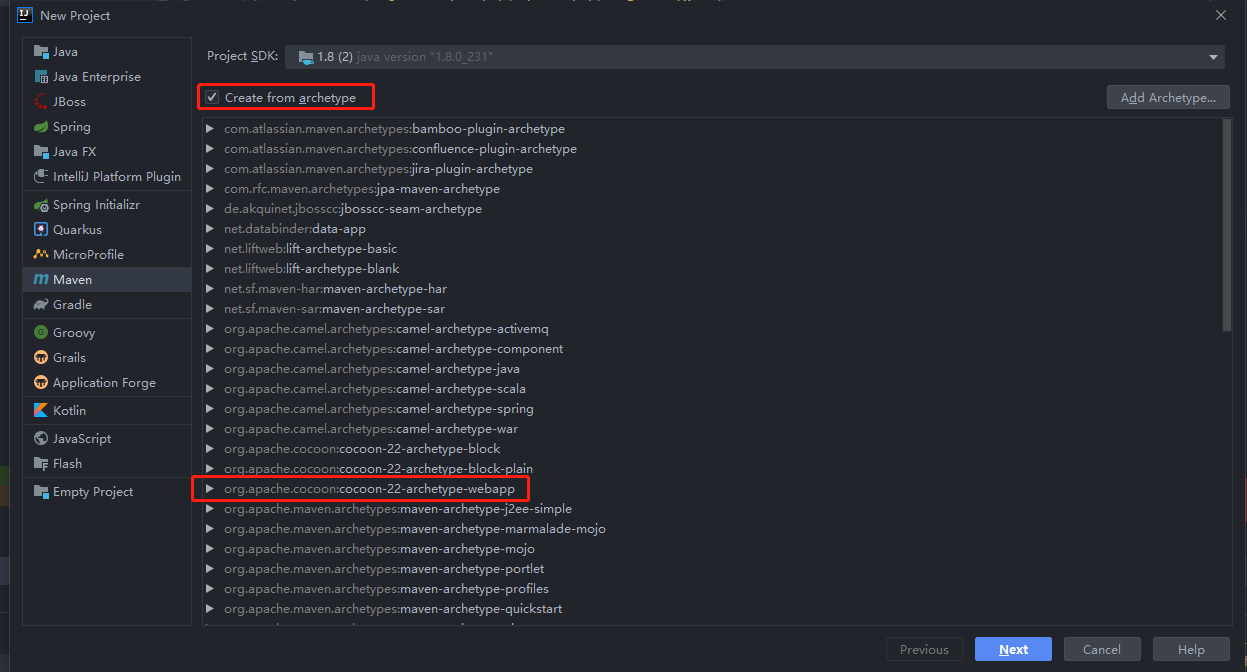
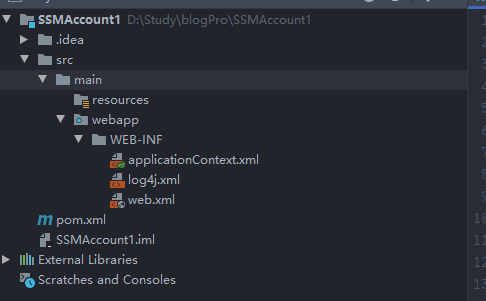
然后填写自己的groupid,然后一直next就可以了,然后项目就创建完毕了,如图所示:
3.2 在pom文件中引用包,填写项目目录
(1)引用的所有包如下:
  <properties>
    <spring.version>5.2.6.RELEASE</spring.version>
  </properties>
  <dependencies>
    <dependency>
      <groupId>org.mybatis</groupId>
      <artifactId>mybatis</artifactId>
      <version>3.5.4</version>
    </dependency>
    <dependency>
      <groupId>org.mybatis</groupId>
      <artifactId>mybatis-spring</artifactId>
      <version>2.0.2</version>
    </dependency>
    <dependency>
      <groupId>mysql</groupId>
      <artifactId>mysql-connector-java</artifactId>
      <version>5.1.1</version>
    </dependency>
    <dependency>
      <groupId>junit</groupId>
      <artifactId>junit</artifactId>
      <version>4.12</version>
    </dependency>
    <dependency>
      <groupId>log4j</groupId>
      <artifactId>log4j</artifactId>
      <version>1.2.17</version>
    </dependency>
    <dependency>
      <groupId>javax.servlet</groupId>
      <artifactId>servlet-api</artifactId>
      <version>2.5</version>
    </dependency>
    <dependency>
      <groupId>javax.servlet.jsp</groupId>
      <artifactId>jsp-api</artifactId>
      <version>2.1</version>
    </dependency>
    <dependency>
      <groupId>com.mchange</groupId>
      <artifactId>c3p0</artifactId>
      <version>0.9.5.5</version>
    </dependency>
    <dependency>
      <groupId>org.springframework</groupId>
      <artifactId>spring-web</artifactId>
      <version>${spring.version}</version>
    </dependency>
    <dependency>
      <groupId>org.springframework</groupId>
      <artifactId>spring-webmvc</artifactId>
      <version>${spring.version}</version>
    </dependency>
    <dependency>
      <groupId>org.springframework</groupId>
      <artifactId>spring-context</artifactId>
      <version>${spring.version}</version>
    </dependency>
    <dependency>
      <groupId>org.springframework</groupId>
      <artifactId>spring-test</artifactId>
      <version>${spring.version}</version>
      <scope>test</scope>
    </dependency>
    <dependency>
      <groupId>org.springframework</groupId>
      <artifactId>spring-jdbc</artifactId>
      <version>${spring.version}</version>
    </dependency>
    <dependency>
      <groupId>org.springframework</groupId>
      <artifactId>spring-tx</artifactId>
      <version>${spring.version}</version>
    </dependency>
    <dependency>
      <groupId>log4j</groupId>
      <artifactId>log4j</artifactId>
      <version>1.2.17</version>
    </dependency>
    <dependency>
      <groupId>com.fasterxml.jackson.core</groupId>
      <artifactId>jackson-core</artifactId>
      <version>2.11.1</version>
    </dependency>
    <dependency>
      <groupId>com.fasterxml.jackson.core</groupId>
      <artifactId>jackson-databind</artifactId>
      <version>2.11.1</version>
    </dependency>
  </dependencies>
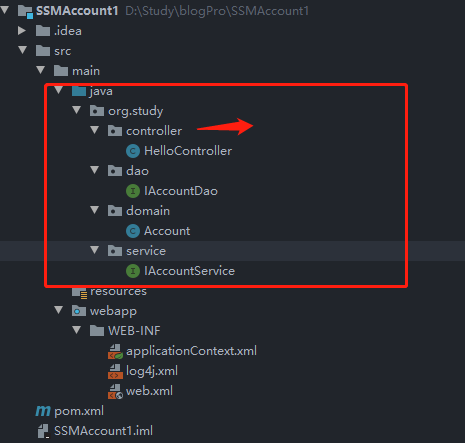
(2)搭建文件目录
按照java的约定,将java文件夹设置为源码目录,然后在该文件夹下建立我们的包名;接着分别建立dao、service、controller、domain等文件夹,将我们的项目分层;如下图所示:
三、搭建SpringMVC框架,并整合spring
3.1 搭建SpringMVC框架
修改webapp/WEB-INF文件夹下的web.xml文件;
(1)配置servlet,servlet用来拦截用户的所有请求,将用户所有的请求转到我们的controller中处理
  <servlet>
    <servlet-name>dispatcherServlet</servlet-name>
    <servlet-class>org.springframework.web.servlet.DispatcherServlet</servlet-class>
    <!--加载spring-mvc配置文件-->
    <init-param>
      <param-name>contextConfigLocation</param-name>
      <param-value>classpath:springmvc.xml</param-value>
    </init-param>
    <load-on-startup>1</load-on-startup>
  </servlet>
  <servlet-mapping>
    <servlet-name>dispatcherServlet</servlet-name>
    <url-pattern>/</url-pattern>
  </servlet-mapping>
在resource文件夹下创建spring-mvc配置文件,该文件配置了开启mvc支持,controller所在的类,视图文件所在文件夹等;
<?xml version="1.0" encoding="UTF-8"?>
<beans xmlns="http://www.springframework.org/schema/beans"
       xmlns:mvc="http://www.springframework.org/schema/mvc"
       xmlns:xsi="http://www.w3.org/2001/XMLSchema-instance"
       xmlns:context="http://www.springframework.org/schema/context"
       xsi:schemaLocation="
        http://www.springframework.org/schema/beans
        https://www.springframework.org/schema/beans/spring-beans.xsd
        http://www.springframework.org/schema/mvc
        https://www.springframework.org/schema/mvc/spring-mvc.xsd
        http://www.springframework.org/schema/context
        https://www.springframework.org/schema/context/spring-context.xsd">

    <!--启用mvc支持-->
    <mvc:annotation-driven/>

    <!--配置扫描包,只扫描controller注解-->
    <context:component-scan base-package="org.study.controller">
    </context:component-scan>

    <!--配置视图解析器-->
    <bean id="internalResourceViewResolver" class="org.springframework.web.servlet.view.InternalResourceViewResolver">
        <property name="prefix" value="/WEB-INF/pages/"/>
        <property name="suffix"  value=".jsp"/>
    </bean>
    <!--配置mvc静态资源-->
    <mvc:resources mapping="/js/**" location="/js/"/>
</beans>
(2)配置filter,解决中文乱码问题
  <!--配置中文乱码-->
  <filter>
    <filter-name>characterEncodingFilter</filter-name>
    <filter-class>org.springframework.web.filter.CharacterEncodingFilter</filter-class>
    <init-param>
      <param-name>encoding</param-name>
      <param-value>utf-8</param-value>
    </init-param>
  </filter>
  <filter-mapping>
    <filter-name>characterEncodingFilter</filter-name>
    <url-pattern>/*</url-pattern>
  </filter-mapping>
(3)验证mvc的运行
修改一个HelloController中代码,如下:
package org.study.controller;
import org.springframework.stereotype.Controller;
import org.springframework.web.bind.annotation.RequestMapping;
@Controller
@RequestMapping(path = "/test")
public class HelloController {
    @RequestMapping(path = "/hello")
    public String hello(){
        return "hello";
    }
}
在WEB-INF文件夹下新建一个pages文件夹(因为spring-mvc.xml配置了视图所在的文件夹),并创建一个hello.jsp文件,如下:
<%@ page contentType="text/html;charset=UTF-8" language="java" %>
<html>
<head>
    <title>Title</title>
</head>
<body>
<h3>hello mvc</h3>
</body>
</html>
运行项目,可以看到mvc运行成功:

3.2 搭建Spring框架
上面我们已经成功的让项目运行起来,接下来我们整合spring框架,让spring框架去管理我们的dao、service层
(1)在web.xml中加载spring-batis.xml
在web.xml添加listener,加载spring的配置文件,如下:
  <!--配置listener,加载spring的配置文件-->
  <listener>
    <listener-class>org.springframework.web.context.ContextLoaderListener</listener-class>
  </listener>
  <context-param>
    <param-name>contextConfigLocation</param-name>
    <param-value>classpath:spring-mybatis.xml</param-value>
  </context-param>
(2)创建spring-mybatis.xml
在resources文件夹下创建spring-mybatis.xml,并配置扫描的包
<?xml version="1.0" encoding="UTF-8"?>
<beans xmlns="http://www.springframework.org/schema/beans"
       xmlns:xsi="http://www.w3.org/2001/XMLSchema-instance"
       xmlns:context="http://www.springframework.org/schema/context"
       xmlns:aop="http://www.springframework.org/schema/aop" xmlns:ex="http://www.springframework.org/schema/tx"
       xmlns:tx="http://www.springframework.org/schema/tx"
       xsi:schemaLocation="http://www.springframework.org/schema/beans
        https://www.springframework.org/schema/beans/spring-beans.xsd
        http://www.springframework.org/schema/context
        https://www.springframework.org/schema/context/spring-context.xsd
        http://www.springframework.org/schema/aop
        https://www.springframework.org/schema/aop/spring-aop.xsd http://www.springframework.org/schema/tx http://www.springframework.org/schema/tx/spring-tx.xsd">
    <!--配置spring管理的包,管理service层的包,不管理controller-->
    <context:component-scan base-package="org.study.service">
        <context:exclude-filter type="annotation" expression="org.springframework.stereotype.Controller"/>
    </context:component-scan>
</beans>
此步骤配置扫描的包为dao层、和service层,不管理controller层;
至此我们编写一个简单的测试方法,让controller层调用service层,示例代码如下:
service代码:
@Service(value = "accountService")
public class AccountServiceImpl implements IAccountService {
    @Override
    public List<Account> getAccountList() {
        System.out.println("getAccountList service层调用了");
        return null;
    }
}
controller代码:
@Controller
@RequestMapping(path = "/test")
public class HelloController {
    @Autowired
    private IAccountService accountService;
    @RequestMapping(path = "/hello")
    public String hello() {
        accountService.getAccountList();
        return "hello";
    }
}
运行结果如下:

至此,我们的spring和springmvc的整合已经完成;
四、使用spring框架,整合mybatis框架
4.1 在spring-mybatis.xml中配置mybatis,配置文件如下:
    <!--读取数据库的配置文件-->
    <context:property-placeholder location="classpath:jdbcConfig.properties"/>
    <!--配置连接池-->
    <bean name="dataSource" class="com.mchange.v2.c3p0.ComboPooledDataSource">
        <property name="driverClass" value="${jdbc.driver}"/>
        <property name="jdbcUrl" value="${jdbc.url}"/>
        <property name="user" value="${jdbc.username}"/>
        <property name="password" value="${jdbc.password}"/>
    </bean>

    <!--配置sqlsessionFactory-->
    <bean id="sqlSessionFactory" class="org.mybatis.spring.SqlSessionFactoryBean">
        <property name="dataSource" ref="dataSource"/>
    </bean>

    <!--配置dao所在的包-->
    <bean name="mapperScanner" class="org.mybatis.spring.mapper.MapperScannerConfigurer">
        <property name="sqlSessionFactoryBeanName" value="sqlSessionFactory"/>
        <property name="basePackage" value="org.study.dao"/>
    </bean>

    <!--配置事务-->
    <bean name="transactionManager" class="org.springframework.jdbc.datasource.DataSourceTransactionManager">
        <property name="dataSource" ref="dataSource"/>
    </bean>
    <tx:annotation-driven transaction-manager="transactionManager"/>
在resources文件夹下创建jdbcConfig.properties文件,里面配置数据库相关内容:
jdbc.driver=com.mysql.jdbc.Driver
jdbc.url=jdbc:mysql://localhost:3306/testDB?useUnicode=true&characterEncoding=utf8
jdbc.username=root
jdbc.password=123456
至此我们的spring整合mybatis已经完成,接下来我们查询数据库数据,并展示到页面上;
4.2 查询数据并验证
最后,整个项目的目录结构如下
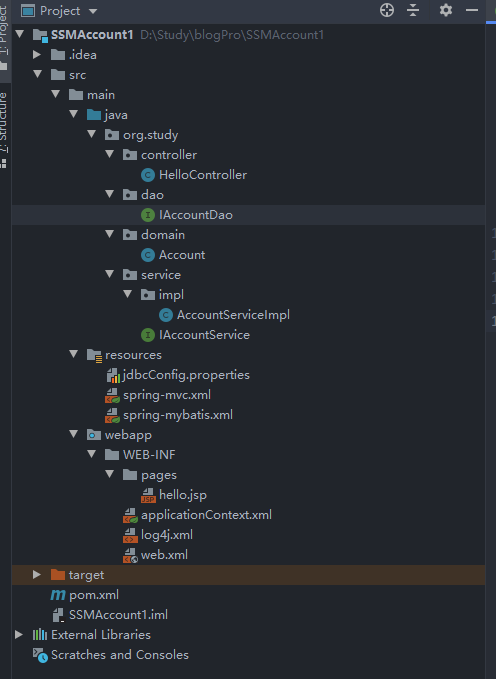
(1)dao层使用mybaits查询,代码如下
@Repository("accountDao")
public interface IAccountDao {
    @Select("select  * from userAccount")
    List<Account> getAccountList();
}
(2)service层代码如下:
@Service(value = "accountService")
public class AccountServiceImpl implements IAccountService {
    @Autowired
    private IAccountDao accountDao;
    @Override
    public List<Account> getAccountList() {
        System.out.println("getAccountList service层调用了");
        return accountDao.getAccountList();
    }
}
(3)controller和页面如下
@Controller
@RequestMapping(path = "/test")
public class HelloController {
    @Autowired
    private IAccountService accountService;
    @RequestMapping(path = "/hello")
    public String hello(Model model) {
        List<Account> accounts = accountService.getAccountList();
        model.addAttribute("accounts",accounts);
        return "hello";
    }
}
页面如下:
<%@ page contentType="text/html;charset=UTF-8" language="java"  %>
<%@ taglib prefix="c" uri="http://java.sun.com/jsp/jstl/core"%>
<html>
<head>
    <title>Title</title>
</head>
<body>
<h3>hello mvc</h3>
<table>
    <tr>
        <td>id</td>
        <td>name</td>
        <td>money</td>
    </tr>
<c:forEach items="${accounts }" var="account">
    <tr>
        <td>${account.id }</td>
        <td>${account.name }</td>
        <td>${account.money }</td>
    </tr>
</c:forEach>
</table>
</body>
</html>
(4)验证访问结果
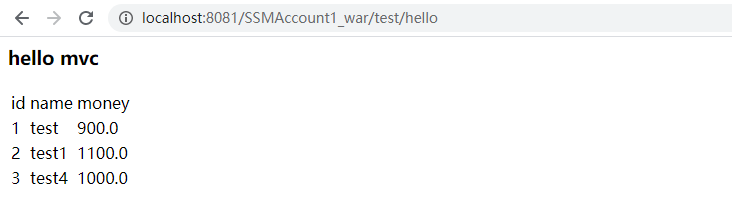
最终,我们的三个框架整合完毕,可以正常的工作了。
五、小结
1、整个项目的请求流程图如下
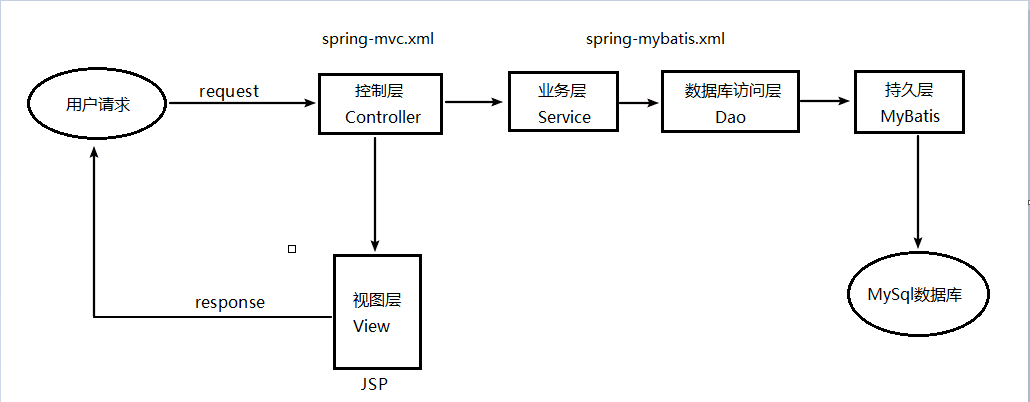
通过上图,我们可以清晰的看到各个流程对应代码中的层;
2、SSM框架主要是整合springmvc和mybatis
3、参考文章:
(1)https://www.cnblogs.com/wmyskxz/p/8916365.html