1.NFS共享存储服务开篇介绍
01.NFS共享存储服务是什么
NFS是network file system的缩写,中文意思是网络文件共享系统,它的主要功能是通过网络(一般是局域网)让不同的主机系统之间可以共享文件或目录
02.NFS共享存储服务的作用

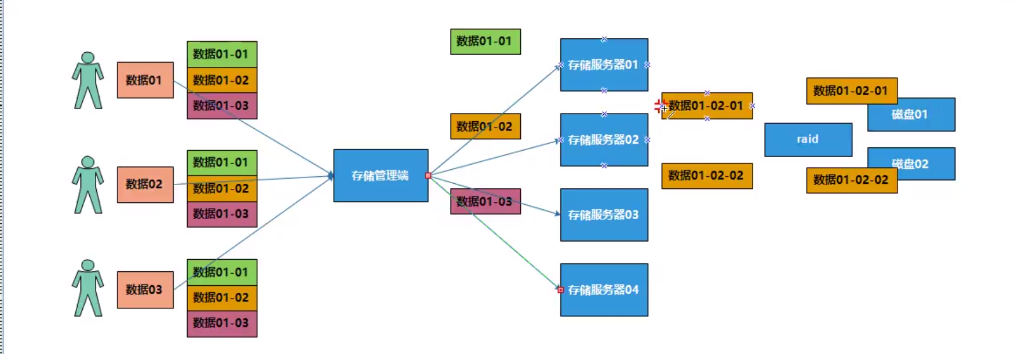
上图详细阐述了存储服务的作用:假设有用户A和用户B,A的数据存放在服务器A上,B的数据存放在服务器B上,用户A无法访问用户B的数据,同样B也无法访问A的数据,为了A和B之间数据能够相互访问,我们利用数据同步的方式将服务器A中 的数据与服务器B中的数据进行同步,此时A能访问B的数据,B也能访问A的数据,但对于用户C来说,要想访问其他用户的数据就得需要将其他用户的数据同步到自己的服务器中,如果架构中服务器数量相对庞大的时候,光数据同步就会导致服 务器的资源消耗过多,影响使用,所以我们利用NFS存储服务解决这个问题,在架构中再2添加一台服务器,用来充当NFS服务器,将要共享的数据统一存放到NFS服务器中,用户如果要访问,只需访问NFS服务器即可,
001.实现数据的共享存储
不用像数据同步似的,每台服务器都存储数据
002.便于数据操作管理
将数据统一存放到一台服务器中,便于数据的操作
003.节省购买服务器磁盘开销
数据不需要进行同步操作,只需要一台服务器提供数据存储功能即可,其他服务器的磁盘空间可以相对的进行减少
03.共享存储服务的种类
001.用于中小型企业
1) FTP(文件传输协议) 可以对不同的用户进行权限的划分
2) samba windows与linux之间数据传输(linux部署samba)
3) NFS 只能实现linux之间的数据传输,不能对具体的用户进行权限的划分
002.用于大型企业(门户网站):利用分布式存储(相当于磁盘阵列中的raid)-可以对不同的用户进行权限的划分
1)mooseFS
2)glusterFS
3)fastDFS-企业应用较多
2.NFS共享存储服务重要概念
01.NFS共享文件系统RPC服务介绍
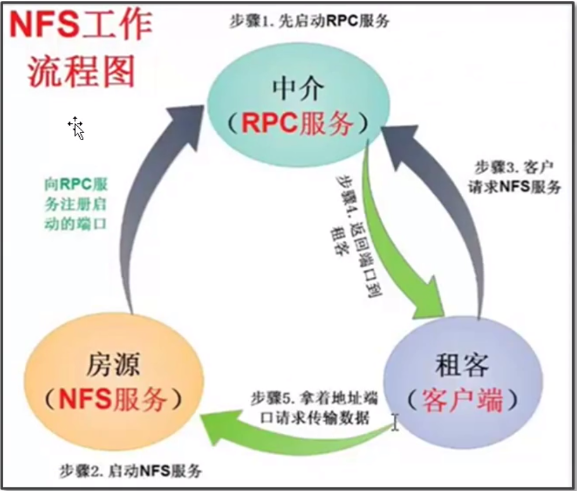
由上图可知,RPC服务先行启动,然后NFS服务再启动,启动完成,NFS服务会像RPC服务注册启动端口,然后两个服务处于待机状态,当有客户请求NFS服务的时候,RPC会像客户返回注册好的端口
客户拿着RPC返回的端口再去请求NFS传输数据
上述流程可以形象的用户租房的方式来理解,房东(NFS)会先到中介公司(RPC)将房屋信息进行注册,然后中介公司(RPC)将房屋信息对外公布,此时租客(客户端)找到中介请求租房,中介将房屋信息推给租客,租客联系到房东进行租房
02.NFS共享文件系统RPC服务由来
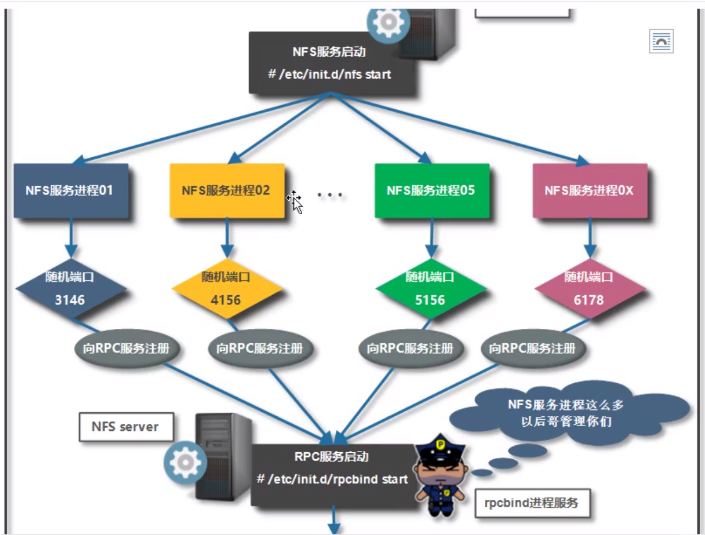

之所以有RPC服务的存在,是因为NFS服务在启动的时候会有很多进程,大部分进程的端口号是随机产生的,这就会产生问题,每次服务重启的时候.由于端口号发生了变化就会导致进程无法连接,所以我们就需要一个另外的服务对NFS的
上述进程进行统一的管理,次即为RPC服务的由来,RPC服务的端口是唯一不变的,NFS服务进程只需要每次重启的时候在RPC上进行注册,由RPC统一管理即可
3.NFS共享存储服务系统部署
01.NFS共享文件系统服务端部署过程
001.检查软件是否安装
1 [root@nfs01 ~]#  rpm -qa RPC      #-q查询软件包
2 [root@nfs01 ~]#  rpm -qa NFS      #-a查询所有软件包
3 [root@nfs01 ~]#  rpm -qf `which NFS`  #-f查询文件或命令属于哪个软件包
/usr/bin/which: no NFS in (/usr/local/sbin:/usr/local/bin:/usr/sbin:/usr/bin:/root/bin)
rpm: no arguments given for query5 [root@nfs01 ~]#  rpm -qa |gerp -E "RPC|NFS"        #grep -E "|" 同时过滤两个不同的字符串    -E参数也有另一层意思即可使用扩展的egrep命令
6 -bash: gerp: command not found
经查询系统中没有上述两个服务的存在.所以下一步需要对服务下载安装
002.进行服务软件安装
 1 [root@nfs01 ~]#  yum search NFS      #查找NFS服务的软件包23 nfs-utils.x86_64 : NFS utilities and supporting clients and daemons for the kernel NFS  #NFS的软件包
1 [root@nfs01 ~]#  yum search RPC
46 rpcbind.x86_64 : Universal Addresses to RPC Program Number Mapper               #RPC的软件包
  1 [root@nfs01 ~]#  yum install -y nfs-utils
157 Failed:
158   rpcbind.x86_64 0:0.2.0-49.el7
160 Complete!
161 [root@nfs01 ~]#  yum install -y rpcbind
197 Failed:
198   rpcbind.x86_64 0:0.2.0-49.el7
200 Complete!

[root@nfs01 ~]#  rpm -qa |grep -E "nfs|rpc"
xmlrpc-c-1.32.5-1905.svn2451.el7.x86_64
xmlrpc-c-client-1.32.5-1905.svn2451.el7.x86_64
libtirpc-0.2.4-0.16.el7.x86_64
libnfsidmap-0.25-19.el7.x86_64
nfs-utils-1.3.0-0.66.el7.x86_64
软件安装完毕.
003.编写服务配置文件
1 [root@nfs01 ~]#  vim /etc/exports
2 /date 172.16.1.0/24(rw,sync)
3 #/date   设置数据存储的目录
4 #172.16.1.0/24  设置网络的白名单(允许局域网中的主机链接到存储服务器进行数据存储)
5 #rw,sync  配置存储目录的权限信息
004.创建程序共享目录
 1 [root@nfs01 ~]#  id nfsnobody
 2 id: nfsnobody: no such user
 3 [root@nfs01 ~]#  ch
 4 chacl      chcon      chgrp      chmod      chronyc    chrt
 5 chage      chcpu      chkconfig  chown      chronyd    chsh
 6 chattr     chfn       chmem      chpasswd   chroot     chvt
 7 [root@nfs01 ~]#  lsattr /etc/passwd            #先将用户文件的锁止功能关闭,否则系统无法创建虚拟用户
 8 ----i----------- /etc/passwd
 9 [root@nfs01 ~]#  chattr -i /etc/passwd
10 [root@nfs01 ~]#  lsattr /etc/passwd
11 ---------------- /etc/passwd
12 [root@nfs01 ~]#  rpm -e nfs-utils
13 warning: file /var/lib/nfs/v4recovery: remove failed: No such file or directory
14 warning: file /var/lib/nfs/statd/sm.bak: remove failed: No such file or directory
15 warning: file /var/lib/nfs/statd/sm: remove failed: No such file or directory
16 warning: file /var/lib/nfs/statd: remove failed: No such file or directory
17 [root@nfs01 ~]#  yum install -y nfs-utils
1 [root@nfs01 ~]#  id nfsnobody       #当用户下载安装软件nfs时,系统会自动创建此虚拟用户
2 uid=65534(nfsnobody) gid=65534(nfsnobody) groups=65534(nfsnobody)
3 [root@nfs01 ~]#  mkdir -p /date
4 [root@nfs01 ~]#  chown nfsnobody.nfsnobody /date
5 [root@nfs01 ~]#  ll -d /date
6 drwxr-xr-x 2 nfsnobody nfsnobody 6 Aug  7 12:55 /date
005.启停测试服务进程
对于rpc和nfs服务来说,由于nfs服务需要将自己的端口交到rpc服务测进行注册,所以rpc服务是要先启动的,如果rpc服务没有先行启动起来,则nfs服务不会正常运行
 1 [root@nfs01 ~]#  systemctl start rpcbind.service           #启动rpc服务
 2 [root@nfs01 ~]#  systemctl enable rpc-rquotad.service        #rpc服务开机自启
 3 [root@nfs01 ~]#  systemctl restart rpcbind.service          #重启rpc服务
 4 [root@nfs01 ~]#  systemctl start nfs
 5 nfs-blkmap.service   nfs-idmap.service    nfs-rquotad.service  nfs-utils.service
 6 nfs-client.target    nfs-lock.service     nfs-secure.service
 7 nfs-config.service   nfslock.service      nfs-server.service
 8 nfs-idmapd.service   nfs-mountd.service   nfs.service
 9 [root@nfs01 ~]#  systemctl start nfs
10 [root@nfs01 ~]#  systemctl enable nfs
11 Created symlink from /etc/systemd/system/multi-user.target.wants/nfs-server.service to /usr/lib/systemd/system/nfs-server.service.
12 [root@nfs01 ~]#  systemctl restart nfs
13 [root@nfs01 ~]#
006.检查服务是否启动
[root@nfs01 ~]#  systemctl status rpcbind.service
● rpcbind.service - RPC bind service
   Loaded: loaded (/usr/lib/systemd/system/rpcbind.service; enabled; vendor preset: enabled)
   Active: active (running) since Fri 2020-08-07 13:26:56 CST; 57min ago                      #服务正常启动
 Main PID: 2496 (rpcbind)
   CGroup: /system.slice/rpcbind.service
           └─2496 /sbin/rpcbind -w

Aug 07 13:26:56 nfs01 systemd[1]: Starting RPC bind service...
Aug 07 13:26:56 nfs01 systemd[1]: Started RPC bind service.
[root@nfs01 ~]#  netstat -lntup|grep 111                                    #查看服务端口号,显示正常
tcp        0      0 0.0.0.0:111             0.0.0.0:*               LISTEN      2496/rpcbind
tcp6       0      0 :::111                  :::*                    LISTEN      2496/rpcbind
udp        0      0 0.0.0.0:111             0.0.0.0:*                           2496/rpcbind
udp6       0      0 :::111                  :::*                                2496/rpcbind
[root@nfs01 ~]#  systemctl status nfs
● nfs-server.service - NFS server and services
   Loaded: loaded (/usr/lib/systemd/system/nfs-server.service; enabled; vendor preset: disabled)
  Drop-In: /run/systemd/generator/nfs-server.service.d
           └─order-with-mounts.conf
   Active: active (exited) since Fri 2020-08-07 14:20:16 CST; 4min 36s ago
  Process: 2843 ExecStopPost=/usr/sbin/exportfs -f (code=exited, status=0/SUCCESS)
  Process: 2841 ExecStopPost=/usr/sbin/exportfs -au (code=exited, status=0/SUCCESS)
  Process: 2837 ExecStop=/usr/sbin/rpc.nfsd 0 (code=exited, status=0/SUCCESS)
  Process: 2874 ExecStartPost=/bin/sh -c if systemctl -q is-active gssproxy; then systemctl reload gssproxy ; fi (code=exited, status=0/SUCCESS)
  Process: 2857 ExecStart=/usr/sbin/rpc.nfsd $RPCNFSDARGS (code=exited, status=0/SUCCESS)
  Process: 2855 ExecStartPre=/usr/sbin/exportfs -r (code=exited, status=0/SUCCESS)
 Main PID: 2857 (code=exited, status=0/SUCCESS)
   CGroup: /system.slice/nfs-server.service

Aug 07 14:20:16 nfs01 systemd[1]: Starting NFS server and services...
Aug 07 14:20:16 nfs01 systemd[1]: Started NFS server and services.
[root@nfs01 ~]#  netstat -lntup|grep nfs                                     #服务将自己的端口号交由rpc服务进行管理,这条命令是查看不到的
02.NFS共享文件系统客户端部署过程
001.检查软件是否安装
[root@web01 ~]#  rpm -qa|grep "nfs"
[root@web01 ~]#  rpm -qa|grep nfs            #软件没有安装
[root@web01 ~]#  chattr /etc/passwd           #检查用户文件的权限
Must use '-v', =, - or +
[root@web01 ~]#  lsattr /etc/passwd
----i----------- /etc/passwd
[root@web01 ~]#  chattr -i /etc/passwd
002.进行服务软件安装
  1 [root@web01 ~]#  yum install -y nfs-utils
  2 Loaded plugins: fastestmirror
  3 Determining fastest mirrors
  4  * base: mirrors.aliyun.com
  5  * extras: mirrors.aliyun.com
  6  * updates: mirrors.aliyun.com
  7 base                                                                 | 3.6 kB  00:00:00
  8 epel                                                                 | 4.7 kB  00:00:00
  9 extras                                                               | 2.9 kB  00:00:00
 10 updates                                                              | 2.9 kB  00:00:00
 11 (1/4): epel/x86_64/updateinfo                                        | 1.0 MB  00:00:00
 12 (2/4): extras/7/x86_64/primary_db                                    | 205 kB  00:00:00
 13 (3/4): updates/7/x86_64/primary_db                                   | 3.7 MB  00:00:01
 14 (4/4): epel/x86_64/primary_db                                        | 6.9 MB  00:00:01
136
137 Installed:
138   nfs-utils.x86_64 1:1.3.0-0.66.el7
139
140 Dependency Installed:
141   gssproxy.x86_64 0:0.7.0-28.el7                 keyutils.x86_64 0:1.5.8-3.el7
142   libbasicobjects.x86_64 0:0.1.1-32.el7          libcollection.x86_64 0:0.7.0-32.el7
143   libevent.x86_64 0:2.0.21-4.el7                 libini_config.x86_64 0:1.3.1-32.el7
144   libnfsidmap.x86_64 0:0.25-19.el7               libpath_utils.x86_64 0:0.2.1-32.el7
145   libref_array.x86_64 0:0.1.5-32.el7             libtirpc.x86_64 0:0.2.4-0.16.el7
146   libverto-libevent.x86_64 0:0.2.5-4.el7         quota.x86_64 1:4.01-19.el7
147   quota-nls.noarch 1:4.01-19.el7                 rpcbind.x86_64 0:0.2.0-49.el7
148   tcp_wrappers.x86_64 0:7.6-77.el7
149
150 Complete!
003.进行服务应用测试(实现远程挂载共享目录)
[root@web01 /]#  mount -t nfs 172.16.1.31:/date /date      #-t指定文件类型  将备份服务器上的/date目录   挂载到本地/date目录下
[root@web01 /]#  df -h
Filesystem         Size  Used Avail Use% Mounted on
/dev/sda3           49G  2.2G   47G   5% /
devtmpfs           481M     0  481M   0% /dev
tmpfs              492M     0  492M   0% /dev/shm
tmpfs              492M  7.5M  485M   2% /run
tmpfs              492M     0  492M   0% /sys/fs/cgroup
/dev/sr0           4.2G  4.2G     0 100% /mnt
/dev/sda1          197M  102M   95M  52% /boot
tmpfs               99M     0   99M   0% /run/user/0
172.16.1.31:/date   49G  2.2G   47G   5% /date
[root@web01 /]#

在客户端操作目录, 跟在服务端操作一致,此时目录相当于进行了共享
4.NFS共享存储服务工作原理
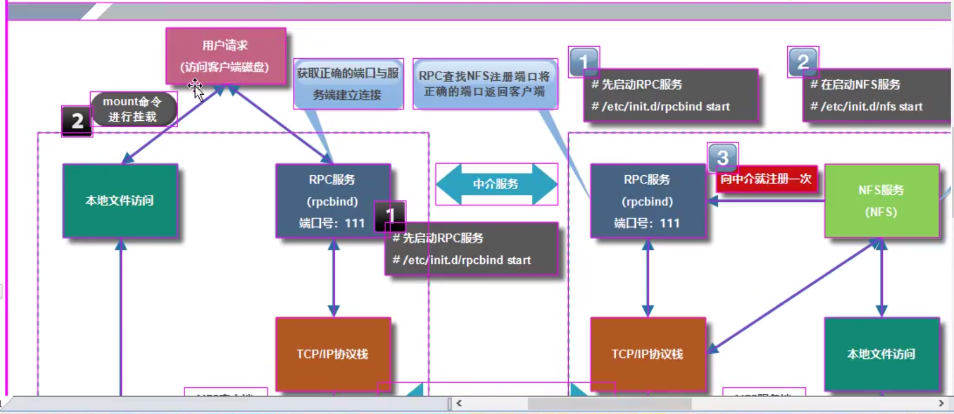
01.共享文件系统的工作原理(服务端3步,客户端3步)
001 服务端
1)先启动rpc服务,开启111端口
2)启动nfs服务
3)实现nfs服务进程和端口号的注册
上面系统在部署nfs服务的时候要查看nfs服务的进程号,发现利用netstat命令无法查看,此处涉及一个命令用来查看nfs服务进程
rpcinfo(检查nfs服务进程与端口注册信息)-本地服务端查看用localhost 远端客户端查看用地址
 1 [root@nfs01 ~]#  rpcinfo -p localhost          #在本低查看进程信息用localhost.在客户端查看直接用地址信息(172.16.1.31)
 2    program vers proto   port  service
 3     100000    4   tcp    111  portmapper
 4     100000    3   tcp    111  portmapper
 5     100000    2   tcp    111  portmapper
 6     100000    4   udp    111  portmapper
 7     100000    3   udp    111  portmapper
 8     100000    2   udp    111  portmapper
 9     100011    1   udp    875  rquotad
10     100011    2   udp    875  rquotad
11     100011    1   tcp    875  rquotad
12     100011    2   tcp    875  rquotad
13 [root@nfs01 ~]#  systemctl start nfs
14 [root@nfs01 ~]#  rpcinfo -p localhost
15    program vers proto   port  service
16     100000    4   tcp    111  portmapper
17     100000    3   tcp    111  portmapper
18     100000    2   tcp    111  portmapper
19     100000    4   udp    111  portmapper
20     100000    3   udp    111  portmapper
21     100000    2   udp    111  portmapper
22     100011    1   udp    875  rquotad
23     100011    2   udp    875  rquotad
24     100011    1   tcp    875  rquotad
25     100011    2   tcp    875  rquotad
26     100005    1   udp  20048  mountd
27     100005    1   tcp  20048  mountd
28     100005    2   udp  20048  mountd
29     100005    2   tcp  20048  mountd
30     100005    3   udp  20048  mountd
31     100005    3   tcp  20048  mountd
32     100003    3   tcp   2049  nfs
33     100003    4   tcp   2049  nfs
34     100227    3   tcp   2049  nfs_acl
35     100003    3   udp   2049  nfs
36     100003    4   udp   2049  nfs
37     100227    3   udp   2049  nfs_acl
38     100021    1   udp  59076  nlockmgr
39     100021    3   udp  59076  nlockmgr
40     100021    4   udp  59076  nlockmgr
41     100021    1   tcp  46055  nlockmgr
42     100021    3   tcp  46055  nlockmgr
43     100021    4   tcp  46055  nlockmgr
                                    #可以明显的看见当nfs服务开启的时候会出现很多进程信息
[root@nfs01 ~]#  systemctl restart nfs
[root@nfs01 ~]#  rpcinfo -p localhost
   program vers proto   port  service
    100000    4   tcp    111  portmapper
    100000    3   tcp    111  portmapper
    100000    2   tcp    111  portmapper
    100000    4   udp    111  portmapper
    100000    3   udp    111  portmapper
    100000    2   udp    111  portmapper
    100011    1   udp    875  rquotad
    100011    2   udp    875  rquotad
    100011    1   tcp    875  rquotad
    100011    2   tcp    875  rquotad
    100005    1   udp  20048  mountd
    100005    1   tcp  20048  mountd
    100005    2   udp  20048  mountd
    100005    2   tcp  20048  mountd
    100005    3   udp  20048  mountd
    100005    3   tcp  20048  mountd
    100003    3   tcp   2049  nfs
    100003    4   tcp   2049  nfs
    100227    3   tcp   2049  nfs_acl
    100003    3   udp   2049  nfs
    100003    4   udp   2049  nfs
    100227    3   udp   2049  nfs_acl
    100021    1   udp  43610  nlockmgr
    100021    3   udp  43610  nlockmgr
    100021    4   udp  43610  nlockmgr
    100021    1   tcp  36178  nlockmgr
    100021    3   tcp  36178  nlockmgr
    100021    4   tcp  36178  nlockmg
                                   #而且可以看见,当服务重启的时候一些进程的端口号发生了变化,说明nfs一些进程端口号是随机的,这就说明了rpc存在的必要性
002 客户端
1) 建立TCP连接(与上图中有点背驰,其实由实际操作我们也能知晓,在客户端进行配置的时候并没有刻意去开启nfs服务,说明软件安装好后是直接运行的,不需要再进行手动开启)
2) 客户端执行挂载命令.进行远程挂载
3) 可以实现数据远程传输存储(此时客户端能对服务端的存储目录进行操作)
5.NFS共享存储服务部署详解
6.NFS共享存储服务配置说明
01.配置文件格式说明

上图是配置文件的格式说明,对于配置文件来说我们可以利用man exports来查看关于一些参数的详细说明
 1 [root@nfs01 ~]#  man exports
 2 exports(5)                                     File Formats Manual                                    exports(5)
 3
 4 NAME
 5        exports - NFS server export table
 6
 7 DESCRIPTION
 8        The  file /etc/exports contains a table of local physical file systems on an NFS server that are accessi?
 9        ble to NFS clients.  The contents of the file are maintained by the server's system administrator.
10
11        Each file system in this table has a list of options and an access control list.  The table  is  used  by
12        exportfs(8) to give information to mountd(8).
13
14        The  file  format  is  similar to the SunOS exports file. Each line contains an export point and a white?
15        space-separated list of clients allowed to mount the file system at that point. Each listed client may be
16        immediately  followed  by  a  parenthesized,  comma-separated  list of export options for that client. No
17        whitespace is permitted between a client and its option list.
18
19        Also, each line may have one or more specifications for default options after the path name, in the  form
20        of  a  dash  ("-") followed by an option list. The option list is used for all subsequent exports on that
21        line only.
22
23        Blank lines are ignored.  A pound sign ("#") introduces a comment to the end of the line. Entries may  be
24        continued  across newlines using a backslash. If an export name contains spaces it should be quoted using
25        double quotes. You can also specify spaces or other unusual character in the export name  using  a  back?
26        slash followed by the character code as three octal digits.

66 ...skipping...
67               ted to vary in this way are ro, rw, no_root_squash, root_squash, and all_squash.
68
69    General Options
70        exportfs understands the following export options:
71
72        secure This option requires that requests originate on an Internet port less than IPPORT_RESERVED (1024).
73               This option is on by default. To turn it off, specify insecure.
74
75        rw     Allow both read and write requests on this NFS volume. The default  is  to  disallow  any  request
76               which changes the filesystem.  This can also be made explicit by using the ro option.
对于服务端来说,有时需要承载多个网段的传输信息,所以为了实现多个网段主机可以进行挂载,有以下两种方式
方法一:/data 172.16.1.0/24(rw,sync) 10.0.0.0/24(rw,sync)
[root@nfs01 ~]#  vim /etc/exports
/date 172.16.1.0/24(rw,sync) 10.0.0.0/24(rw,sync)

"/etc/exports" 1L, 50C written
[root@nfs01 ~]#  systemctl restart nfs
[root@nfs01 ~]#

[root@web01 ~]#  mount -t nfs 10.0.0.31:/date /date
[root@web01 ~]#  df -h
Filesystem       Size  Used Avail Use% Mounted on
/dev/sda3         49G  2.2G   47G   5% /
devtmpfs         481M     0  481M   0% /dev
tmpfs            492M     0  492M   0% /dev/shm
tmpfs            492M  7.5M  485M   2% /run
tmpfs            492M     0  492M   0% /sys/fs/cgroup
/dev/sr0         4.2G  4.2G     0 100% /mnt
/dev/sda1        197M  102M   95M  52% /boot
tmpfs             99M     0   99M   0% /run/user/0
10.0.0.31:/date   49G  2.2G   47G   5% /date
[root@web01 ~]#
方法二: /data 172.16.1.0/24(rw,sync)
/data 10.0.0.0/24(rw,sync)
总结说明:共享目录的权限和那些因素有关
1) 和存储目录的本身权限有关(默认权限是755 默认属主是:nfsnobody)
2) 和配置文件中的权限配置有关(rw/ro xxx_sqush anonuid/anongid)
3) 和客户端挂载命令的参数有关
02.配置文件参数设置
001 rw 存储目录有读写权限
002 ro 存储目录是只读权限
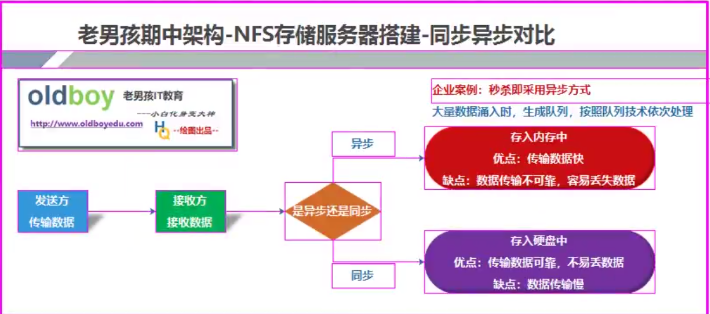
003 sync 同步方式存储数据(存入磁盘中-数据传输慢,但可靠)
004 rsync 异步方式存储数据(存入内存空闲再存入磁盘-数据传输块,但不可靠)
005 no_root_squash 不要将root用户身份进行转换
006 root_squash 将root用户身份进行转换
007 all_squash 将所有用户身份都进行转换
008 no_all_squash 不要将普通用户身份进行转换

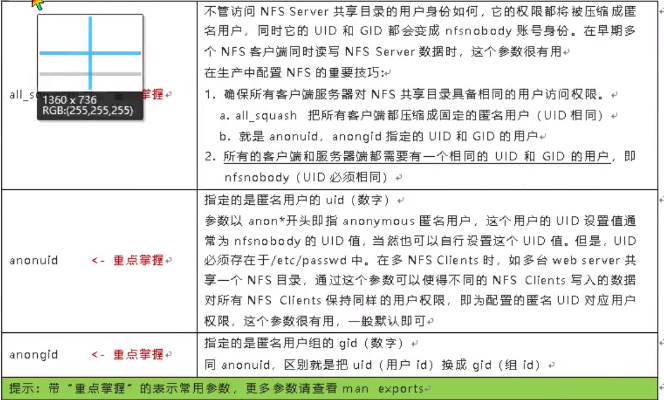
上述参数中需要重点理解的参数为后面四个参数
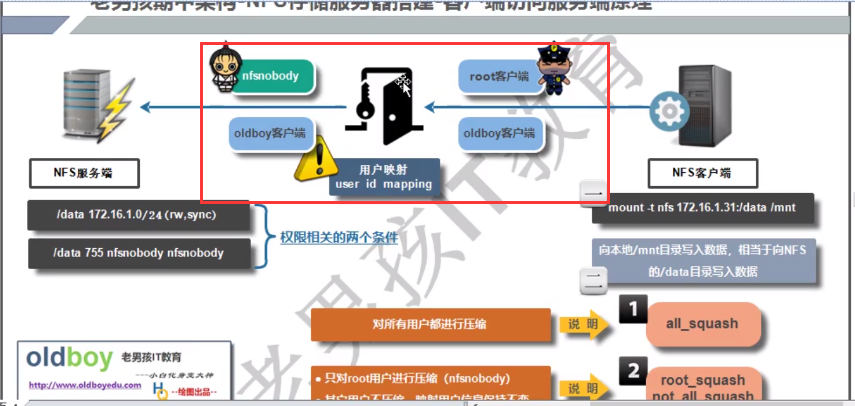
图中所示,对于客户端来说,当有文件需要传输的时候,服务端系统会根据配置文件中的参数对用户身份进行转换,一般默认情况下,为了数据的可靠传输,会将客户端数据属主属组信息转换为nfsnobody,但对于配置了参数的情况下面进行详细说明
操作演示all_aquash参数功能: 所有用户身份都进行转换-都将身份信息转换为nfsnobody
[root@nfs01 ~]#  vim /etc/exports
/date 172.16.1.0/24(rw,sync,all_squash)
~
"/etc/exports" 1L, 40C written
[root@nfs01 ~]#  systemctl restart nfs
[root@nfs01 ~]#  #  服务端参数配置

[root@web01 ~]#  umount /date
[root@web01 ~]#  mount -t nfs 172.16.1.31:/date /date
[root@web01 ~]#  df -h
Filesystem         Size  Used Avail Use% Mounted on
/dev/sda3           49G  2.2G   47G   5% /
devtmpfs           481M     0  481M   0% /dev
tmpfs              492M     0  492M   0% /dev/shm
tmpfs              492M  7.5M  485M   2% /run
tmpfs              492M     0  492M   0% /sys/fs/cgroup
/dev/sr0           4.2G  4.2G     0 100% /mnt
/dev/sda1          197M  102M   95M  52% /boot
tmpfs               99M     0   99M   0% /run/user/0
172.16.1.31:/date   49G  2.2G   47G   5% /date
[root@web01 ~]#  ll /date/
total 0
-rw-r--r-- 1 nfsnobody nfsnobody 0 Aug  7 14:48 1.txt
-rw-r--r-- 1 nfsnobody nfsnobody 0 Aug  7 14:48 2.txt
-rw-r--r-- 1 nfsnobody nfsnobody 0 Aug  7 14:48 3.txt
-rw-r--r-- 1 nfsnobody nfsnobody 0 Aug  7 14:48 4.txt
-rw-r--r-- 1 nfsnobody nfsnobody 0 Aug  7 14:48 5.txt
[root@web01 ~]#  su - oldboy
Last login: Mon May 25 23:10:44 CST 2020 from 10.0.0.1 on pts/0
[oldboy@web01 ~]$  cd /date
[oldboy@web01 /date]$  touch oldboy_date.txt
[oldboy@web01 /date]$  ll
total 0
-rw-r--r-- 1 nfsnobody nfsnobody 0 Aug  7 14:48 1.txt
-rw-r--r-- 1 nfsnobody nfsnobody 0 Aug  7 14:48 2.txt
-rw-r--r-- 1 nfsnobody nfsnobody 0 Aug  7 14:48 3.txt
-rw-r--r-- 1 nfsnobody nfsnobody 0 Aug  7 14:48 4.txt
-rw-r--r-- 1 nfsnobody nfsnobody 0 Aug  7 14:48 5.txt
-rw-rw-r-- 1 nfsnobody nfsnobody 0 Aug  7 17:40 oldboy_date.txt    #oldboy用户创建的文件身份转换成了nfsnobody
[oldboy@web01 /date]$  su
Password:
su: Authentication failure
[oldboy@web01 /date]$  su -
Password:
Last login: Fri Aug  7 12:07:51 CST 2020 from 10.0.0.1 on pts/0
Last failed login: Fri Aug  7 17:40:41 CST 2020 on pts/0
There was 1 failed login attempt since the last successful login.
[root@web01 ~]#  cd /date
[root@web01 /date]#  touch root_date.txt
[root@web01 /date]#  ll
total 0
-rw-r--r-- 1 nfsnobody nfsnobody 0 Aug  7 14:48 1.txt
-rw-r--r-- 1 nfsnobody nfsnobody 0 Aug  7 14:48 2.txt
-rw-r--r-- 1 nfsnobody nfsnobody 0 Aug  7 14:48 3.txt
-rw-r--r-- 1 nfsnobody nfsnobody 0 Aug  7 14:48 4.txt
-rw-r--r-- 1 nfsnobody nfsnobody 0 Aug  7 14:48 5.txt
-rw-rw-r-- 1 nfsnobody nfsnobody 0 Aug  7 17:40 oldboy_date.txt
-rw-r--r-- 1 nfsnobody nfsnobody 0 Aug  7 17:41 root_date.txt    #root用户创建的文件身份也转换成了nfsnobody
[root@web01 /date]#
操作演示no_all_squash参数功能:root用户身份信息不受影响正常转换为nfsnobody,但一般用户不会进行身份转换,此时会导致一般用户无法创建数据
[root@nfs01 ~]#  vim /etc/exports
/date 172.16.1.0/24(rw,sync,no_all_squash)
~
"/etc/exports" 2L, 44C written
[root@nfs01 ~]#  systemctl restart nfs


[root@web01 ~]#  ll /date
total 0
[root@web01 ~]#  umount /date
[root@web01 ~]#  mount -t nfs 172.16.1.31:/date /date
[root@web01 ~]#  ll -d /date
drwxr-xr-x 2 nfsnobody nfsnobody 6 Aug  7 17:48 /date
[root@web01 ~]#  cd /date
[root@web01 /date]#  touch root_date.txt          #root用户拥有绝对权限,它不受no_all_squash的影响,能正常转换用户身份
[root@web01 /date]#  ll
total 0
-rw-r--r-- 1 nfsnobody nfsnobody 0 Aug  7 17:55 root_date.txt
[root@web01 /date]#  su - oldboy
Last login: Fri Aug  7 17:54:02 CST 2020 on pts/0
[oldboy@web01 ~]$  cd /date
[oldboy@web01 /date]$  touch oldboy_date.txt        #由于配置参数中指明不将普通用户的身份进行转换,所以此时文件就会oldboy的身份进行传输,由于oldboy对于/date来说属于其他用户.而其他用户对于/date只能执行,不能写入,所以权限阻止
touch: cannot touch ‘oldboy_date.txt’: Permission denied
[oldboy@web01 /date]$  #此时如果oldboy如果想在共享目录中创建文件,需要共享目录对于其他用户添加w权限,但这也意味着任何一个用户对于此目录都有修改权限,对于目录的安全性将大打折扣
操作演示root_squash参数功能:root用户身份会发生转变,而一般用户身份则不会
[root@nfs01 ~]#  vim /etc/exports
/date 172.16.1.0/24(rw,sync,root_squash)
~
"/etc/exports" 2L, 42C written
[root@nfs01 ~]#  systemctl restart nfs
[root@nfs01 ~]#  cat /etc/exports
/date 172.16.1.0/24(rw,sync,root_squash)

[root@web01 /date]#  cd
[root@web01 ~]#  umount /date
[root@web01 ~]#  mount -t nfs 172.16.1.31:/date /date
[root@web01 ~]#  ll -d /date
drwxr-xr-x 2 nfsnobody nfsnobody 27 Aug  7 17:55 /date
[root@web01 ~]#  cd /date
[root@web01 /date]#  ll
total 0
-rw-r--r-- 1 nfsnobody nfsnobody 0 Aug  7 17:55 root_date.txt
[root@web01 /date]#
m -rf root_date.txt
[root@web01 /date]#  ll
total 0
[root@web01 /date]#  touch root_date.txt          #由于配置了root_squash,root用户自然会进行用户身份转换
[root@web01 /date]#  ll
total 0
-rw-r--r-- 1 nfsnobody nfsnobody 0 Aug  7 19:30 root_date.txt
[root@web01 /date]#  su - oldboy
Last login: Fri Aug  7 17:56:10 CST 2020 on pts/0
[oldboy@web01 ~]$  cd /date
[oldboy@web01 /date]$  touch oldboy_date.txt        #对于一般用户来说没有all_squash的功能,它的用户身份就不会发生改变,所以权限会阻止
touch: cannot touch ‘oldboy_date.txt’: Permission denied
[oldboy@web01 /date]$  cd
[oldboy@web01 ~]$  ll -d /date
drwxr-xr-x 2 nfsnobody nfsnobody 27 Aug  7 19:30 /date
[oldboy@web01 ~]$
操作演示no_root_squash参数功能:root用户能创建删除数据,不受参数影响,一般用户无法创建数据
[root@nfs01 ~]#  vim /etc/exports
/date 172.16.1.0/24(rw,sync,no_root_squash)

"/etc/exports" 2L, 45C written
[root@nfs01 ~]#  systemctl restart nfs
[root@nfs01 ~]#

[root@web01 /date]#  ll
total 0
[root@web01 /date]#  cd
[root@web01 ~]#  umount /date
[root@web01 ~]#  mount -t nfs 172.16.1.31:/date /date
[root@web01 ~]#  cd /date
[root@web01 /date]#  touch root_date.txt            #root用户不受参数影响,能正常创建数据,且属主属组变为root
[root@web01 /date]#  ll
total 0
-rw-r--r-- 1 root root 0 Aug  7 19:41 root_date.txt
[root@web01 /date]#  su - oldboy
Last login: Fri Aug  7 19:30:37 CST 2020 on pts/0
[oldboy@web01 ~]$  cd /date
[oldboy@web01 /date]$  touch oldboy_date.txt          #一般用户也是一样不能创建数据
touch: cannot touch ‘oldboy_date.txt’: Permission denied
[oldboy@web01 /date]$
03.配置文件案列说明
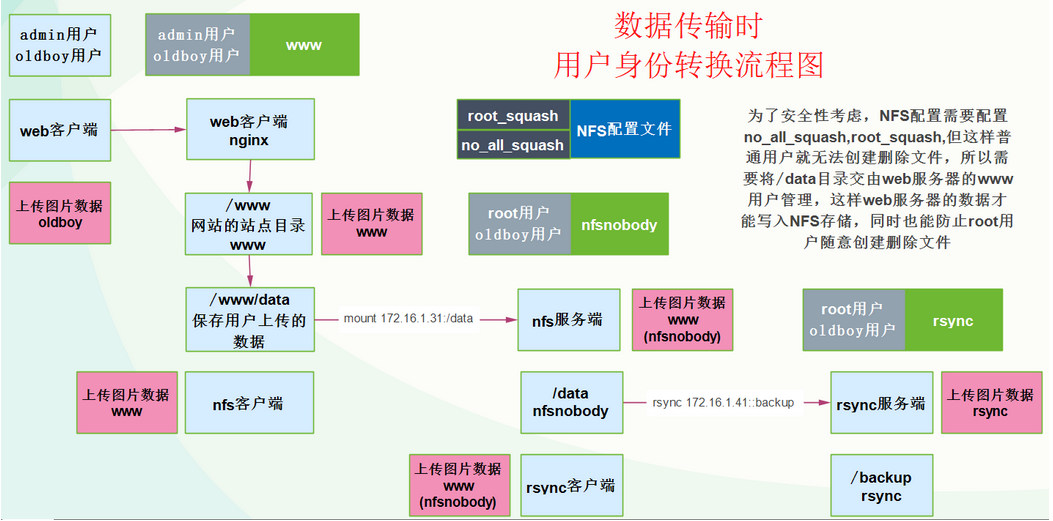
企业互联网公司如何配置NFS,各种*_squash配置参数使用分析
当配置成no_all_squash.普通用户会无法创建删除文件,会出现权限阻止的情况,但若是使用all_squash时,所有用户都可以创建删除文件,此时对于系统来说不安全,所以对于all_squash参数来说要慎用.或直接不用
no_all_squash 需要配置
但当我们配置了no_all_squash时同样会出现以下问题,web服务器使用的用户是www,当用户上传数据时是以www用户身份上传的,而www用户是个普通用户身份,此时就会导致用户无法上传数据,那如何解决这个问题呢?观察/date目录的 属性我们不难发现.www用户对于/date目录来说是其他用户,我们只要将属主属组都改为www,那么www用户对于/date目录来说就有了操作权限,此时www用户无法操作目录的问题就迎刃而解了,所以我们要在服务端和客户端都建立一个 一样的www用户(uid和gid必须一致,否则权限阻止)
[root@nfs01 ~]#  vim /etc/exports
/date 172.16.1.0/24(rw,sync,no_all_squash)          #配置参数为no_all_squash

"/etc/exports" 3L, 45C written

[root@nfs01 ~]#  useradd www
[root@nfs01 ~]#  id www
uid=2008(www) gid=2008(www) groups=2008(www)          #确保两边的用户uid和gid一致,否则权限阻止,

[root@web01 ~]#  useradd www
[root@web01 ~]#  id www
uid=2008(www) gid=2008(www) groups=2008(www)


[root@nfs01 ~]#  chown -R www.www /date             #修改目录的属主属组信息变更为www用户
[root@nfs01 ~]#  ll /date
total 0
-rw-r--r-- 1 www www 0 Aug  7 19:41 root_date.txt

[root@web01 ~]#  su - www
[www@web01 ~]$  cd /date
[www@web01 /date]$  touch www_date.txt              #www用户创建删除文件没有问题
[www@web01 /date]$  ll
total 0
-rw-r--r-- 1 www www 0 Aug  7 19:41 root_date.txt
-rw-rw-r-- 1 www www 0 Aug  7 22:34 www_date.txt
[www@web01 /date]$  exit
logout
[root@web01 ~]#  su - oldboy
Last login: Fri Aug  7 19:41:36 CST 2020 on pts/0
[oldboy@web01 ~]$  cd /date
[oldboy@web01 /date]$  touch oldboy_date.txt           #其他用户创建删除文件权限受阻
touch: cannot touch ‘oldboy_date.txt’: Permission denied
[oldboy@web01 /date]$
当我们配置成no_root_squash,no_all_squash时,虽然创建的文件属主属组信息变为了root ,但由于root用户拥有一切权限,照样可以删除创建文件
[root@nfs01 ~]#  vim /etc/exports
/date 172.16.1.0/24(rw,sync,no_root_squash,no_all_squash)
"/etc/exports" 4L, 61C written
[root@nfs01 ~]#  systemctl restart nfs

[root@web01 /date]#  ll
total 0
-rw-r--r-- 1 www www 0 Aug  7 19:41 root_date.txt
-rw-rw-r-- 1 www www 0 Aug  7 22:34 www_date.txt
[root@web01 /date]#
m -rf *              #no_root_squash时,创建删除文件是root身份,此时可以删除创建
[root@web01 /date]#  touch 01.txt
[root@web01 /date]#  ll
total 0
-rw-r--r-- 1 root root 0 Aug  7 23:00 01.txt
[root@web01 /date]#
但当我们修改了/date的属主属组后,在对配置文件设置root_squash,和no_all_squash时,此时在看root用户,由于root配置了转换用户,所有root转换过后用户变为了nfsnobody,但此时目录的属主属组是www,所以root转换过后就没了权限
[root@nfs01 ~]#  vim /etc/exports
/date 172.16.1.0/24(rw,sync,root_squash,no_all_squash)          #配置文件中 root_aquash no_all_squash

"/etc/exports" 4L, 58C written
[root@nfs01 ~]#  systemctl restart nfs

[root@web01 /date]#  touch root_date.txt
touch: cannot touch ‘root_date.txt’: Permission denied          #root用户权限被阻止
[root@web01 /date]#  cd
[root@web01 ~]#  su - www
Last login: Fri Aug  7 22:33:21 CST 2020 on pts/0
[www@web01 ~]$  cd /date
[www@web01 /date]$  touch www_date.txt
[www@web01 /date]$  ll
total 0
-rw-r--r-- 1 root root 0 Aug  7 23:00 01.txt
-rw-rw-r-- 1 www  www  0 Aug  7 23:11 www_date.txt            #www用户正常创建文件
[www@web01 /date]$  exit
logout
[root@web01 ~]#  su - oldboy
Last login: Fri Aug  7 22:34:34 CST 2020 on pts/0
[oldboy@web01 ~]$  cd /date
[oldboy@web01 /date]$  touch oldboy_date.txt
touch: cannot touch ‘oldboy_date.txt’: Permission denied         #普通用户创建文件权限阻止
我们可以在一些文件中看到关于root用户映射的虚拟用户情况
[root@nfs01 ~]#  cat /var/lib/nfs/etab
/date    172.16.1.0/24(rw,sync,wdelay,hide,nocrossmnt,secure,root_squash,no_all_squash,no_subtree_check,secure_locks,acl,no_pnfs,anonuid=65534,anongid=65534,sec=sys,rw,secure,root_squash,no_all_squash)
[root@nfs01 ~]#  grep 65534 /etc/passwd
nfsnobody:x:65534:65534:Anonymous NFS User:/var/lib/nfs:/sbin/nologin
[root@nfs01 ~]#  #上述文件中记载的是关于nfs配置文件的一些默认配置,我们可以发现anonuid和anongid正好对应于nfsnobodyid号,由此处我们可以看出当root配置了root_aquash是其实是转换成了nfsnobody
由于www用户是虚拟用户,没有家目录,无法登录,删除数据只能通过在服务端操作/date目录.但又不现实,此时就需要root用户来完成这项工作.但由于root没有权限,由上述情况可以判断,root之所以美而有权限,是因为映射成了nfsnobody
只要将root映射成www,就能解决root用户的权限问题
[root@nfs01 ~]#  id www
uid=2008(www) gid=2008(www) groups=2008(www)
[root@nfs01 ~]#  vim /etc/exports
/date 172.16.1.0/24(rw,sync,root_squash,no_all_squash,anonuid=2008,anongid=2008)            #修改root用户映射关系,将root映射成www

"/etc/exports" 4L, 84C written
[root@nfs01 ~]#  cat /var/lib/nfs/etab
/date    172.16.1.0/24(rw,sync,wdelay,hide,nocrossmnt,secure,root_squash,no_all_squash,no_subtree_check,secure_locks,acl,no_pnfs,anonuid=65534,anongid=65534,sec=sys,rw,secure,root_squash,no_all_squash)
[root@nfs01 ~]#  systemctl restart nfs
[root@nfs01 ~]#  cat /var/lib/nfs/etab                                                         #映射关系成立
/date    172.16.1.0/24(rw,sync,wdelay,hide,nocrossmnt,secure,root_squash,no_all_squash,no_subtree_check,secure_locks,acl,no_pnfs,anonuid=2008,anongid=2008,sec=sys,rw,secure,root_squash,no_all_squash)
[root@nfs01 ~]#

[root@web01 /date]#
m -rf www_date.txt
rm: cannot remove ‘www_date.txt’: Permission denied                #没做映射之前root无法对文件进行修改
[root@web01 /date]#  touch root_date.txt
[root@web01 /date]#
m -rf root_date.txt                       #做完映射后root可以对文件进行修改
[root@web01 /date]#
04.权限参数设置梳理
总结:为了保证网站存储服务器用户数据安全性:(以下两项也是默认配置)
no_all_squash 需要进行配置 但共享目录的权限需要修改为www(一定要保证客户端与服务端的id号一致,否则会出现权限阻止)
root_squash 需要进行配置 此项会将root用户转换成nfsnobody用户(不包括后面映射修改的内容),此时/date的管理者是www.nfsnobody对www管理的目录没有操作权限,相对应root也就对目录没有操作权限
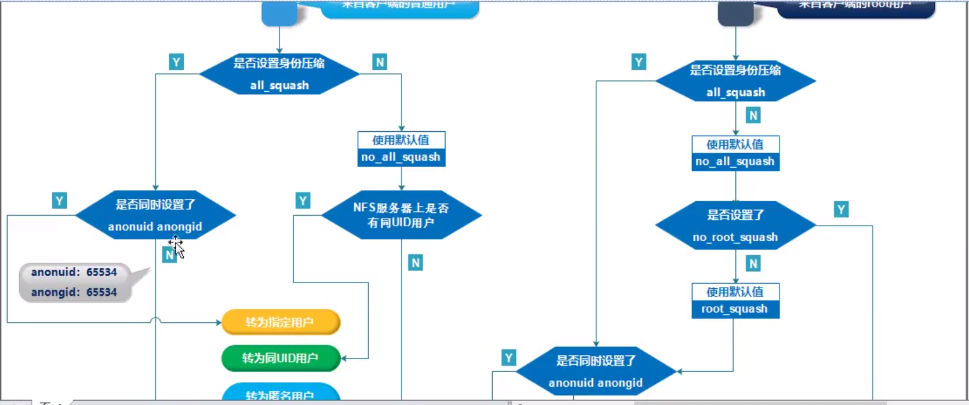
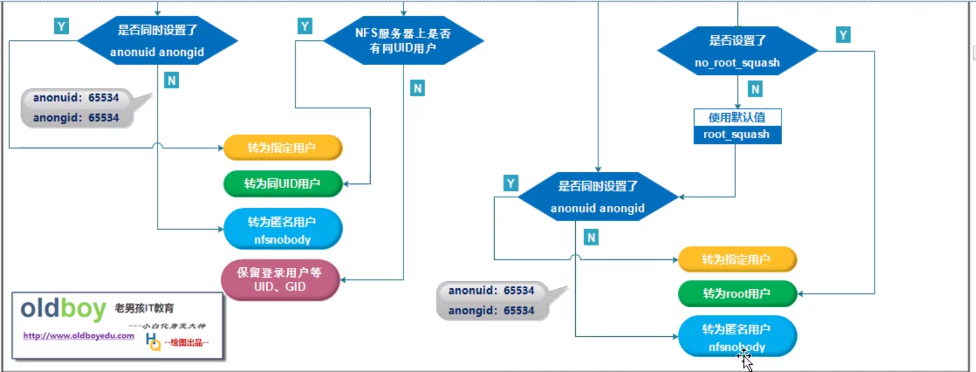
来自客户端的普通用户.系统查看配置文件是否设置all_squash参数,没有设置则使用默认值no_all_squash,然后查看在NFS服务器上是否有与用户同UID的用户(www),如果有,则转换为同UID用户(www),若没有则保留用户自己的UID和GID
来自客户端的普通用户,系统查看配置文件是否设置all_squash参数,设置了参数,则查看是否设置了anonuid和anongid,设置了则将用户转换为指定用户(www),没有设置,则转换为默认虚拟用户nfsnobody
来自客户端的root用户.系统查看配置文件是否设置all_squash参数,设置了参数,则查看是否同时设置了anonuid和anongid,设置了则转换为指定用户(www).没有设置则转换为默认虚拟用户nfsnobody
来自客户端的root用户,系统查看配置文件是否设置all_squash参数,没有设置则是用默认值no_all_squash,然后查看是否设置了no_root_squash.设置了则转换为root.没有设置则使用默认值root_squash,然后再看anonuid和anongid,上述描述
企业中.如何编辑nfs配置文件
1.通用方法
/data 172.16.1.0/24(rw,sync)
2.特殊情况(部分人员不能操作存储目录,可以看目录中的数据)
/data 10.0.0.0/24(ro,sync)
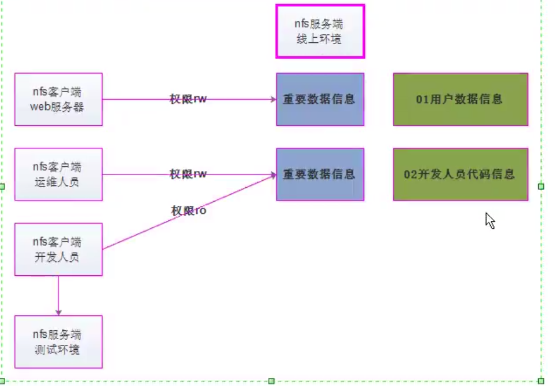
对于某些用户需要设置一些操作权限
3.修改默认的虚拟用户(映射后的用户变为指定的用户)
/data 172.16.1.0/24(rw,sync,anonuid=1002,anongid=1002)
05.相关重要文件说明
/var/libnfs/etab:nfs服务的默认配置记录信息
此文件中记载的是nfs服务的一些默认参数,只供参考使用,相当于日志文件的作用,不具备影响系统配置文件的作用
[root@nfs01 ~]#  cat /var/lib/nfs/etab
/date    172.16.1.0/24(rw,sync,wdelay,hide,nocrossmnt,secure,root_squash,no_all_squash,no_subtree_check,secure_locks,acl,no_pnfs,anonuid=65534,anongid=65534,sec=sys,rw,secure,root_squash,no_all_squash)
06.nfs服务相关问题
nfs服务器重启,挂载后创建数据比较慢,如何解决??
导致上述问题的原因是在于nfs重启的方式不正确
重启服务分以下两种方式:
1. restart 强制重启 强制挡开所有连接(不管链路上有没有数据传输) 用户体验不好
2. reload 平滑重启 强制断开没有数据传输的连接,有数据传输的待传完在断开 提升用户体验
7.NFS共享存储服务挂载知识
01. 客户端挂载命令说明
mount -t nfs 172.16.1.31:/date /date

NFS服务挂载不上排查方法:
  服务端进行排查:
    1.检查nfs进程信息是否注册:如果没有nfs注册信息,则可能是服务启动顺序不对,rpc要先启动,或者是没有启动nfs服务
[root@nfs01 ~]#  rpcinfo -p localhost      #查看本地nfs服务注册信息
   program vers proto   port  service
100003    3   tcp   2049  nfs
    100003    4   tcp   2049  nfs
    100227    3   tcp   2049  nfs_acl
    100003    3   udp   2049  nfs
    100003    4   udp   2049  nfs
    100227    3   udp   2049  nfs_acl
2.没有可用的存储目录:下述命令如果没有结果输出,则配置文件编写有问题,或者重启nfs服务
[root@nfs01 ~]#  showmount -e localhost      #查看本地挂载目录信息
Export list for localhost:
/date 172.16.1.0/24
     3.在服务端进行挂载测试:在本地挂载测试,看是否能够在存储目录中创建和删除数据
  客户端进行排查:
    1.检查nfs进程信息是否注册:如果没有nfs注册信息,则可能是服务启动顺序不对,rpc要先启动,或者是没有启动nfs服务
[root@web01 ~]#  rpcinfo -p 172.16.1.31
   program vers proto   port  service
100003    3   tcp   2049  nfs
    100003    4   tcp   2049  nfs
    100227    3   tcp   2049  nfs_acl
    100003    3   udp   2049  nfs
    100003    4   udp   2049  nfs
    100227    3   udp   2049  nfs_acl
2.没有可用的存储目录:下述命令如果没有结果输出,则配置文件编写有问题,或者重启nfs服务
[root@web01 ~]#  showmount -e 172.16.1.31
Export list for 172.16.1.31:
/date 172.16.1.0/24
3.网络问题:ping 172.16.1.31 telnet 172.16.1.31 111
02. 客户端自动挂载说明
001 方法一:利用rc.local
[root@web01 /date]#  echo "mount -t nfs 172.16.1.31:/date /date" >>/etc/rc.local
[root@web01 /date]#  cat /etc/rc.local
#!/bin/bash
# THIS FILE IS ADDED FOR COMPATIBILITY PURPOSES
#
# It is highly advisable to create own systemd services or udev rules
# to run scripts during boot instead of using this file.
#
# In contrast to previous versions due to parallel execution during boot
# this script will NOT be run after all other services.
#
# Please note that you must run 'chmod +x /etc/rc.d/rc.local' to ensure
# that this script will be executed during boot.

touch /var/lock/subsys/local
animalsay """
==============================
注意事项说明:
01 不可进行关机操作
02 不能随意删除文件
03 不能未经授权登录root进行操作
==============================
""" > /etc/motd
mount /dev/sdc1 /mount01
mount /dev/sdc2 /mount02
mount -t nfs 172.16.1.31:/date /date
002 方法二:利用fstab文件
[root@web01 /date]#  vim /etc/fstab

#
# /etc/fstab
# Created by anaconda on Tue Apr  7 12:04:29 2020
#
# Accessible filesystems, by reference, are maintained under '/dev/disk'
# See man pages fstab(5), findfs(8), mount(8) and/or blkid(8) for more info
#
UUID=6ded57b7-11ed-4f04-bc78-27dffb16d434 /        xfs      defaults    0    0
UUID=c4641595-e167-43b4-846e-cb89b3278112 /boot    xfs      defaults    0    0
UUID=66b44c4d-b2bb-435e-9f26-9b47387a25d5 swap     swap     defaults    0    0
/dev/sr0                                  /mnt     iso9660  defaults    0    0
#/dev/sdc5                                /mount05 xfs      defaults    0    0
#UUID=ad2d4210-c765-45c4-8954-68a6932e1e1f /mount06 xfs      defaults    0    0
#/dev/sdc7                                 /mount07 xfs      defaults    0    0
172.16.1.31:/date                          /date    nfs      defaults    0    0

"/etc/fstab" 16L, 815C written
[root@web01 /date]#
centos7无法实现网络存储服务自动挂载的原因
在7中各开机启动的服务都是并行运行的,即同时启动,快慢只取决于服务自己启动的时间,fstab文件运行启动的时间会比netwo网络服务启动的时间早,由于172.16.1.31:/date这个目录是需要网络传输的,但由于此时网络还没有建立
所以就会导致,无法挂载.而remote-fs.target的作用就是在服务全部启动好以后再重启启动fstab文件,此时上述问题就解决了
[root@web01 ~]#  systemctl status re
reboot.target             remote-fs-pre.target      rescue.service
remote-cryptsetup.target  remote-fs.target          rescue.target
[root@web01 ~]#  systemctl status remote-fs.target                     #服务已经开启
● remote-fs.target - Remote File Systems
   Loaded: loaded (/usr/lib/systemd/system/remote-fs.target; enabled; vendor preset: enabled)
   Active: active since Sat 2020-08-08 14:05:12 CST; 2min 41s ago
     Docs: man:systemd.special(7)

Aug 08 14:05:12 web01 systemd[1]: Reached target Remote File Systems.
Aug 08 14:05:12 web01 systemd[1]: Starting Remote File Systems.
[root@web01 ~]#

需求问题:如何找到一台服务器开机运行了那些服务(enable)

[root@web01 ~]#  ll /etc/systemd/system/multi-user.target.wants/                  #此文件用来查看系统中有多少程序在开机自启
total 0
lrwxrwxrwx. 1 root root 41 Apr  7 12:05 abrt-ccpp.service -> /usr/lib/systemd/system/abrt-ccpp.service
lrwxrwxrwx. 1 root root 37 Apr  7 12:05 abrtd.service -> /usr/lib/systemd/system/abrtd.service
lrwxrwxrwx. 1 root root 41 Apr  7 12:05 abrt-oops.service -> /usr/lib/systemd/system/abrt-oops.service
lrwxrwxrwx. 1 root root 43 Apr  7 12:05 abrt-vmcore.service -> /usr/lib/systemd/system/abrt-vmcore.service
lrwxrwxrwx. 1 root root 41 Apr  7 12:05 abrt-xorg.service -> /usr/lib/systemd/system/abrt-xorg.service
lrwxrwxrwx. 1 root root 38 Apr  7 12:05 auditd.service -> /usr/lib/systemd/system/auditd.service
lrwxrwxrwx. 1 root root 39 Apr  7 12:05 chronyd.service -> /usr/lib/systemd/system/chronyd.service
lrwxrwxrwx. 1 root root 37 Apr  7 12:05 crond.service -> /usr/lib/systemd/system/crond.service
lrwxrwxrwx. 1 root root 42 Apr  7 12:05 irqbalance.service -> /usr/lib/systemd/system/irqbalance.service
lrwxrwxrwx. 1 root root 46 Apr  7 12:05 NetworkManager.service -> /usr/lib/systemd/system/NetworkManager.service
lrwxrwxrwx  1 root root 41 Aug  7 14:33 nfs-client.target -> /usr/lib/systemd/system/nfs-client.target
lrwxrwxrwx. 1 root root 39 Apr  7 12:05 postfix.service -> /usr/lib/systemd/system/postfix.service
lrwxrwxrwx. 1 root root 40 Apr  7 12:05 remote-fs.target -> /usr/lib/systemd/system/remote-fs.target
lrwxrwxrwx. 1 root root 46 Apr  7 12:05 rhel-configure.service -> /usr/lib/systemd/system/rhel-configure.service
lrwxrwxrwx  1 root root 39 Aug  7 14:33 rpcbind.service -> /usr/lib/systemd/system/rpcbind.service
lrwxrwxrwx. 1 root root 39 Apr  7 12:05 rsyslog.service -> /usr/lib/systemd/system/rsyslog.service
lrwxrwxrwx. 1 root root 36 Apr 12 16:15 sshd.service -> /usr/lib/systemd/system/sshd.service
lrwxrwxrwx. 1 root root 37 Apr  7 12:05 tuned.service -> /usr/lib/systemd/system/tuned.service
lrwxrwxrwx. 1 root root 40 Apr  7 12:05 vmtoolsd.service -> /usr/lib/systemd/system/vmtoolsd.service
总结:要想实现NFS存储客户端实现开机挂载
