MyBatis-Plus 是一个 MyBatis 的增强工具,在 MyBatis 的基础上只做增强不做改变,为简化开发、提高效率而生,官方文档地址:https://mp.baomidou.com/guide/ 。其具体的使用可以查看 MyBatis-Plus 基本用法,本文介绍的是 MyBatis-Plus 代码生成器的使用。
数据库脚本
DROP TABLE IF EXISTS `user`;
CREATE TABLE `user` (
	`id` BIGINT PRIMARY KEY AUTO_INCREMENT COMMENT '主键ID',
	`user_name` VARCHAR ( 20 ) NOT NULL COMMENT '用户名',
	`password` VARCHAR ( 20 ) NOT NULL COMMENT '密码',
	`name` VARCHAR ( 30 ) COMMENT '姓名',
	`age` INT COMMENT '年龄',
	`email` VARCHAR ( 50 ) COMMENT '邮箱'
) COMMENT '测试表';


INSERT INTO `user`(`id`, `user_name`, `password`, `name`, `age`, `email`) VALUES
(1, 'zhangsan', '123456', '张三', 18, 'test1@itcast.cn'),
(2, 'lisi', '123456', '李四', '20', 'test2@itcast.cn'),
(3, 'wangwu', '123456', '王五', '28', 'test3@itcast.cn'),
(4, 'zhaoliu', '123456', '赵六', '21', 'test4@itcast.cn'),
(5, 'sunqi', '123456', '孙七', '24', 'test5@itcast.cn');
代码生成器使用
☕️ 在 pom.xml 文件中添加 jar 包依赖
<parent>
    <groupId>org.springframework.boot</groupId>
    <artifactId>spring-boot-starter-parent</artifactId>
    <version>2.3.4.RELEASE</version>
    <relativePath/>
</parent>

<dependencies>
    <!-- web -->
    <dependency>
        <groupId>org.springframework.boot</groupId>
        <artifactId>spring-boot-starter-web</artifactId>
    </dependency>

    <!-- mysql -->
    <dependency>
        <groupId>mysql</groupId>
        <artifactId>mysql-connector-java</artifactId>
        <scope>runtime</scope>
    </dependency>

    <!-- MyBatis-Plus-->
    <!-- 不需要引入 MyBatis 依赖,MyBatis-Plus 已经集成了 -->
    <dependency>
        <groupId>com.baomidou</groupId>
        <artifactId>mybatis-plus-boot-starter</artifactId>
        <version>3.3.2</version>
    </dependency>

    <!-- mybatis-plus 的代码生成器 -->
    <dependency>
        <groupId>com.baomidou</groupId>
        <artifactId>mybatis-plus-generator</artifactId>
        <version>3.3.2</version>
    </dependency>

    <!-- 代码生成器的模板引擎 -->
    <dependency>
        <groupId>org.apache.velocity</groupId>
        <artifactId>velocity-engine-core</artifactId>
        <version>2.2</version>
    </dependency>

    <!-- lombok -->
    <dependency>
        <groupId>org.projectlombok</groupId>
        <artifactId>lombok</artifactId>
        <optional>true</optional>
    </dependency>
</dependencies>
☕️ 编写代码生成器配置 MyBatisPlusGenerator
package com.example.util;

import com.baomidou.mybatisplus.annotation.DbType;
import com.baomidou.mybatisplus.annotation.IdType;
import com.baomidou.mybatisplus.generator.AutoGenerator;
import com.baomidou.mybatisplus.generator.config.*;
import com.baomidou.mybatisplus.generator.config.rules.DateType;
import com.baomidou.mybatisplus.generator.config.rules.NamingStrategy;

public class MyBatisPlusGenerator {

    public static void main(String[] args) {
        // 1. 全局配置
        GlobalConfig config = new GlobalConfig();
        config.setActiveRecord(false)  // 是否支持AR模式
                // 作者
                .setAuthor("xxx")
                // 生成文件所在项目路径
                .setOutputDir("F:\JavaDemoLearning\mybatisplus\src\main\java")
                // 是否覆盖文件
                .setFileOverride(true)
                // 主键策略
                .setIdType(IdType.AUTO)
                // 生成后是否打开文件夹
                // .setOpen(false)
                // 设置日期格式
                .setDateType(DateType.ONLY_DATE)
                // 自定义生成的类名
                .setMapperName("%sMapper")
                .setXmlName("%sMapper")
                .setServiceName("%sService")
                .setServiceImplName("%sServiceImpl")
                .setControllerName("%sController")
                // XML 映射文件中是否生成基本的 resultMap
                .setBaseResultMap(true)
                // XML 映射文件中是否生成基本的 columList
                .setBaseColumnList(true);

        // 2. 数据源配置
        DataSourceConfig dsConfig = new DataSourceConfig();
        dsConfig.setDbType(DbType.MYSQL)  // 设置数据库类型
                .setDriverName("com.mysql.cj.jdbc.Driver")
                .setUrl("jdbc:mysql://localhost:3306/learning?characterEncoding=utf-8&useSSL=false&serverTimezone=Hongkong")
                .setUsername("root")
                .setPassword("123456");

        // 3. 策略配置globalConfiguration中
        StrategyConfig stConfig = new StrategyConfig();
        stConfig.setCapitalMode(true)  // 全局大写命名
                // 数据库表映射到实体的命名策略,驼峰式命名映射
                .setNaming(NamingStrategy.underline_to_camel)
                // 是否使用 lombok 注解
                .setEntityLombokModel(true)
                // 需要生成的表, 支持多表一起生成,以数组形式填写
                .setInclude(new String[]{"user"});

        // 4. 包名策略配置
        PackageConfig pkConfig = new PackageConfig();
        pkConfig.setParent("com.example") // 设置包路径
                .setMapper("mapper")
                .setService("service")
                .setController("controller")
                .setEntity("entity")
                .setXml("mapper");

        // 5. 整合配置
        AutoGenerator ag = new AutoGenerator();
        ag.setGlobalConfig(config)
                .setDataSource(dsConfig)
                .setStrategy(stConfig)
                .setPackageInfo(pkConfig);

        // 6. 执行
        ag.execute();
        System.out.println("======= 代码生成完毕 ========");
    }
}
☕️ 运行代码
运行 MyBatisPlusGenerator,自动生成的代码目录如下:
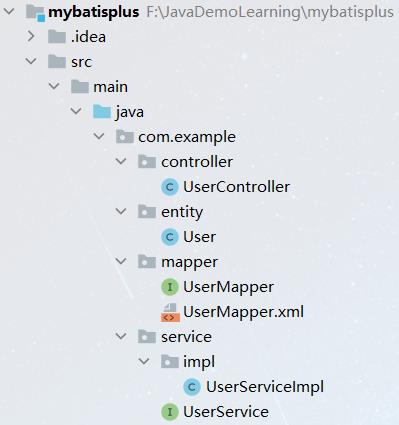
MyBatis-Plus 的代码生成器会自动生成实体类、Mapper 层、Service 层和 Controller 层代码,可根据我们的需求进行调整,自动生成的代码如下:
⭐️ 自动生成的实体类
package com.example.entity;

import com.baomidou.mybatisplus.annotation.IdType;
import com.baomidou.mybatisplus.annotation.TableId;
import java.io.Serializable;
import lombok.Data;
import lombok.EqualsAndHashCode;

/**
 * <p>
 * 测试表
 * </p>
 *
 * @author xxx
 * @since 2020-10-09
 */
@Data
@EqualsAndHashCode(callSuper = false)
public class User implements Serializable {

    private static final long serialVersionUID=1L;

    /**
     * 主键ID
     */
    @TableId(value = "id", type = IdType.AUTO)
    private Long id;

    /**
     * 用户名
     */
    private String userName;

    /**
     * 密码
     */
    private String password;

    /**
     * 姓名
     */
    private String name;

    /**
     * 年龄
     */
    private Integer age;

    /**
     * 邮箱
     */
    private String email;
}
⭐️ 自动生成的 Mapper 层接口及其 XML 映射文件
package com.example.mapper;

import com.example.entity.User;
import com.baomidou.mybatisplus.core.mapper.BaseMapper;

/**
 * <p>
 * 测试表 Mapper 接口
 * </p>
 *
 * @author xxx
 * @since 2020-10-09
 */
public interface UserMapper extends BaseMapper<User> {

}
<?xml version="1.0" encoding="UTF-8"?>
<!DOCTYPE mapper PUBLIC "-//mybatis.org//DTD Mapper 3.0//EN" "http://mybatis.org/dtd/mybatis-3-mapper.dtd">
<mapper namespace="com.example.mapper.UserMapper">

    <!-- 通用查询映射结果 -->
    <resultMap id="BaseResultMap" type="com.example.entity.User">
        <id column="id" property="id" />
        <result column="user_name" property="userName" />
        <result column="password" property="password" />
        <result column="name" property="name" />
        <result column="age" property="age" />
        <result column="email" property="email" />
    </resultMap>

    <!-- 通用查询结果列 -->
    <sql id="Base_Column_List">
        id, user_name, password, name, age, email
    </sql>
</mapper>
⭐️ 自动生成的 Service 层接口及其实现类
package com.example.service;

import com.example.entity.User;
import com.baomidou.mybatisplus.extension.service.IService;

/**
 * <p>
 * 测试表 服务类
 * </p>
 *
 * @author xxx
 * @since 2020-10-09
 */
public interface UserService extends IService<User> {

}
package com.example.service.impl;

import com.example.entity.User;
import com.example.mapper.UserMapper;
import com.example.service.UserService;
import com.baomidou.mybatisplus.extension.service.impl.ServiceImpl;
import org.springframework.stereotype.Service;

/**
 * <p>
 * 测试表 服务实现类
 * </p>
 *
 * @author xxx
 * @since 2020-10-09
 */
@Service
public class UserServiceImpl extends ServiceImpl<UserMapper, User> implements UserService {

}
⭐️ 自动生成的 Controller 层
package com.example.controller;


import org.springframework.web.bind.annotation.RequestMapping;
import org.springframework.stereotype.Controller;

/**
 * <p>
 * 测试表 前端控制器
 * </p>
 *
 * @author xxx
 * @since 2020-10-09
 */
@Controller
@RequestMapping("/user")
public class UserController {

}