一、准备工作
- yum list mysql* 查看服务器是否安装了MySQL
[root@nt ~]# yum list mysql*
已加载插件:fastestmirror, langpacks
Loading mirror speeds from cached hostfile
 * base: mirrors.bfsu.edu.cn
 * epel: mirrors.bfsu.edu.cn
 * extras: mirrors.aliyun.com
 * updates: mirrors.aliyun.com
已安装的软件包
mysql80-community-release.noarch                 el7-4                         installed
- yum remove 文件 移除已安装的MySQL
[root@nt ~]# yum remove mysql80-community-release.noarch
已加载插件:fastestmirror, langpacks
正在解决依赖关系
--> 正在检查事务
---> 软件包 mysql80-community-release.noarch.0.el7-4 将被 删除
--> 解决依赖关系完成
- yum list mysql* 再次检查
- rpm -qa|grep mysql 查看是否还有 mysql软件
二、官网下载MySQL yum仓库
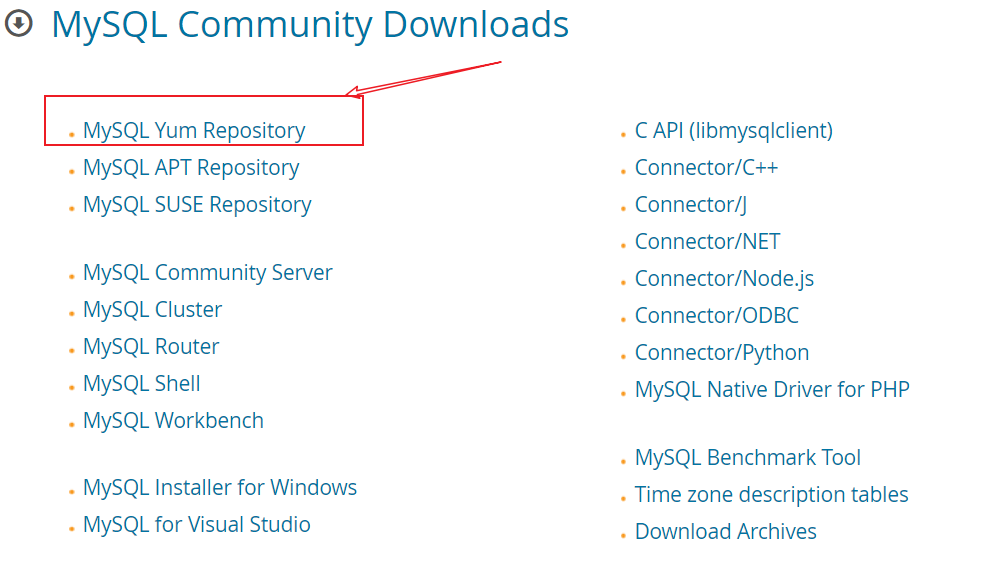
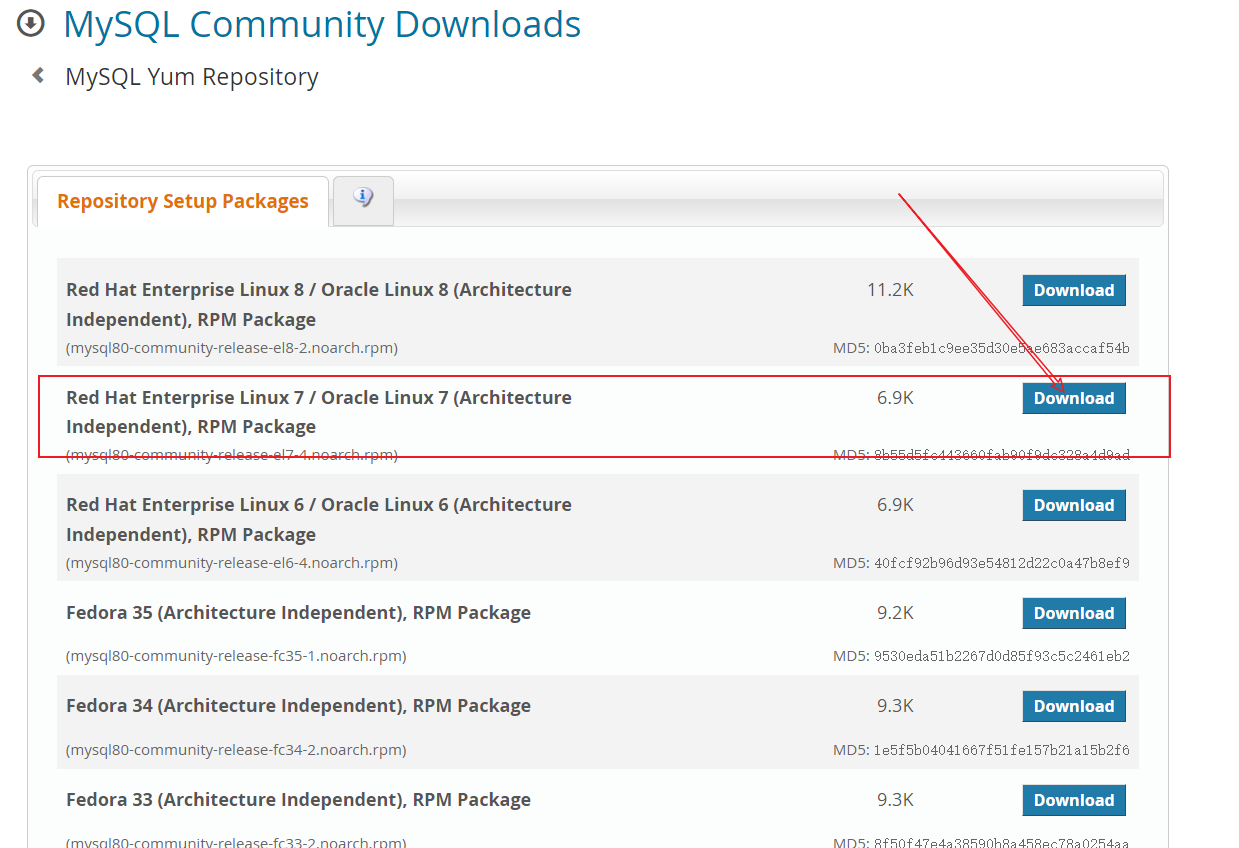
https://dev.mysql.com/downloads/repo/yum/
https://dev.mysql.com/doc/refman/8.0/en/linux-installation-yum-repo.html
- 上传到 Linux下的 /opt 目录下
三、安装
- 执行命令安装MySQL yum install mysql80-community-release-el7-4.noarch.rpm
- 查看yum仓库是否成功添加 yum repolist enabled |grep "mysql.-community."
- 安装MySQL服务 yum install mysql-community-server
tips
MySQL默认会安装最新版的也就是8.0,要安装5.7需要修改文件
[root@nt ~]# rpm -qa|grep mysql
[root@nt ~]# cd /opt/
[root@nt opt]# ls
appfile  mysql80-community-release-el7-4.noarch.rpm  rh
[root@nt opt]# yum repolist enabled |grep "mysql.*-community.*"
[root@nt opt]# yum install mysql80-community-release-el7-4.noarch.rpm
已加载插件:fastestmirror, langpacks
正在检查 mysql80-community-release-el7-4.noarch.rpm: mysql80-community-release-el7-4.noarch
mysql80-community-release-el7-4.noarch.rpm 将被安装
正在解决依赖关系
--> 正在检查事务
---> 软件包 mysql80-community-release.noarch.0.el7-4 将被 安装
--> 解决依赖关系完成

依赖关系解决

=========================================================================================================
 Package                       架构       版本         源                                           大小
=========================================================================================================
正在安装:
 mysql80-community-release     noarch     el7-4        /mysql80-community-release-el7-4.noarch     5.2 k

事务概要
=========================================================================================================
安装  1 软件包

总计:5.2 k
安装大小:5.2 k
Is this ok [y/d/N]: y
Downloading packages:
Running transaction check
Running transaction test
Transaction test succeeded
Running transaction
  正在安装    : mysql80-community-release-el7-4.noarch                                               1/1
  验证中      : mysql80-community-release-el7-4.noarch                                               1/1

已安装:
  mysql80-community-release.noarch 0:el7-4

完毕!
[root@nt opt]# yum repolist enabled |grep "mysql.*-community.*"
mysql-connectors-community/x86_64 MySQL Connectors Community                 221
mysql-tools-community/x86_64      MySQL Tools Community                      135
mysql80-community/x86_64          MySQL 8.0 Community Server                 301
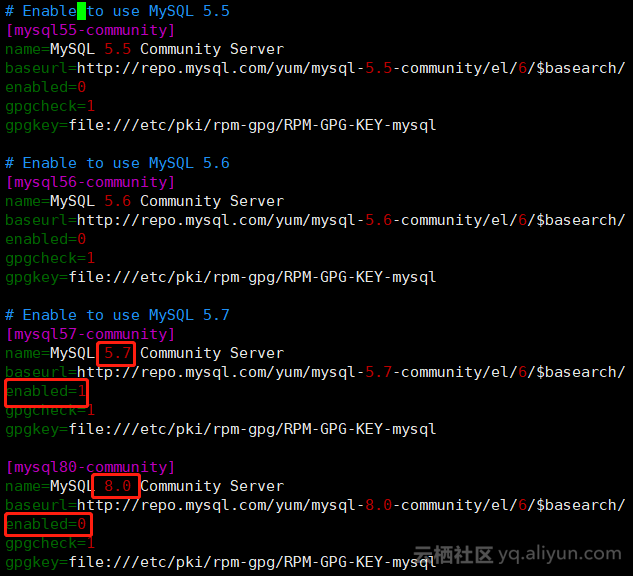
a. 安装 MySQL5.7
- 要安装57需要修改文件 vim /etc/yum.repos.d/mysql-community.repo
- 安装MySQL服务 yum install mysql-community-server
- 启动 MySQL服务 systemctl start mysqld.service
[root@nt opt]# vim /etc/yum.repos.d/mysql-community.repo
[root@nt opt]# yum install mysql-community-server
已加载插件:fastestmirror, langpacks
Loading mirror speeds from cached hostfile
 * base: mirrors.bfsu.edu.cn
 * epel: mirrors.bfsu.edu.cn
 * extras: mirrors.aliyun.com
 * updates: mirrors.aliyun.com
mysql-connectors-community                                                        | 2.6 kB  00:00:00
mysql-tools-community                                                             | 2.6 kB  00:00:00
mysql57-community                                                                 | 2.6 kB  00:00:00
正在解决依赖关系
--> 正在检查事务
---> 软件包 mysql-community-server.x86_64.0.5.7.36-1.el7 将被 安装
--> 正在处理依赖关系 mysql-community-common(x86-64) = 5.7.36-1.el7,它被软件包 mysql-community-server-5.7.36-1.el7.x86_64 需要
--> 正在处理依赖关系 mysql-community-client(x86-64) >= 5.7.9,它被软件包 mysql-community-server-5.7.36-1.el7.x86_64 需要
--> 正在检查事务
---> 软件包 mysql-community-client.x86_64.0.5.7.36-1.el7 将被 安装
--> 正在处理依赖关系 mysql-community-libs(x86-64) >= 5.7.9,它被软件包 mysql-community-client-5.7.36-1.el7.x86_64 需要
---> 软件包 mysql-community-common.x86_64.0.5.7.36-1.el7 将被 安装
--> 正在检查事务
---> 软件包 mariadb-libs.x86_64.1.5.5.60-1.el7_5 将被 取代
--> 正在处理依赖关系 libmysqlclient.so.18()(64bit),它被软件包 2:postfix-2.10.1-7.el7.x86_64 需要
--> 正在处理依赖关系 libmysqlclient.so.18(libmysqlclient_18)(64bit),它被软件包 2:postfix-2.10.1-7.el7.x86_64 需要
---> 软件包 mysql-community-libs.x86_64.0.5.7.36-1.el7 将被 舍弃
--> 正在检查事务
---> 软件包 mysql-community-libs-compat.x86_64.0.5.7.36-1.el7 将被 舍弃
---> 软件包 postfix.x86_64.2.2.10.1-7.el7 将被 升级
---> 软件包 postfix.x86_64.2.2.10.1-9.el7 将被 更新
--> 解决依赖关系完成

依赖关系解决

=========================================================================================================
 Package                            架构          版本                    源                        大小
=========================================================================================================
正在安装:
 mysql-community-libs               x86_64        5.7.36-1.el7            mysql57-community        2.4 M
      替换  mariadb-libs.x86_64 1:5.5.60-1.el7_5
 mysql-community-libs-compat        x86_64        5.7.36-1.el7            mysql57-community        1.2 M
      替换  mariadb-libs.x86_64 1:5.5.60-1.el7_5
 mysql-community-server             x86_64        5.7.36-1.el7            mysql57-community        174 M
为依赖而安装:
 mysql-community-client             x86_64        5.7.36-1.el7            mysql57-community         25 M
 mysql-community-common             x86_64        5.7.36-1.el7            mysql57-community        310 k
为依赖而更新:
 postfix                            x86_64        2:2.10.1-9.el7          base                     2.4 M

事务概要
=========================================================================================================
安装  3 软件包 (+2 依赖软件包)
升级           ( 1 依赖软件包)

总计:206 M
总下载量:203 M
Is this ok [y/d/N]: y
Downloading packages:
警告:/var/cache/yum/x86_64/7/mysql57-community/packages/mysql-community-common-5.7.36-1.el7.x86_64.rpm: 头V3 DSA/SHA256 Signature, 密钥 ID 5072e1f5: NOKEY
mysql-community-common-5.7.36-1.el7.x86_64.rpm 的公钥尚未安装
(1/5): mysql-community-common-5.7.36-1.el7.x86_64.rpm                             | 310 kB  00:00:06
(2/5): mysql-community-libs-5.7.36-1.el7.x86_64.rpm                               | 2.4 MB  00:00:16
(3/5): mysql-community-libs-compat-5.7.36-1.el7.x86_64.rpm                        | 1.2 MB  00:00:10
(4/5): mysql-community-client-5.7.36-1.el7.x86_64.rpm                             |  25 MB  00:02:37
(5/5): mysql-community-server-5.7.36-1.el7.x86_64.rpm                             | 174 MB  00:19:56
---------------------------------------------------------------------------------------------------------
总计                                                                     169 kB/s | 203 MB  00:20:29
从 file:///etc/pki/rpm-gpg/RPM-GPG-KEY-mysql 检索密钥
导入 GPG key 0x5072E1F5:
 用户ID     : "MySQL Release Engineering <mysql-build@oss.oracle.com>"
 指纹       : a4a9 4068 76fc bd3c 4567 70c8 8c71 8d3b 5072 e1f5
 软件包     : mysql80-community-release-el7-4.noarch (installed)
 来自       : /etc/pki/rpm-gpg/RPM-GPG-KEY-mysql
是否继续?[y/N]:y
Running transaction check
Running transaction test
Transaction test succeeded
Running transaction
  正在安装    : mysql-community-common-5.7.36-1.el7.x86_64                                           1/8
  正在安装    : mysql-community-libs-5.7.36-1.el7.x86_64                                             2/8
  正在安装    : mysql-community-client-5.7.36-1.el7.x86_64                                           3/8
  正在安装    : mysql-community-libs-compat-5.7.36-1.el7.x86_64                                      4/8
  正在更新    : 2:postfix-2.10.1-9.el7.x86_64                                                        5/8
  正在安装    : mysql-community-server-5.7.36-1.el7.x86_64                                           6/8
  清理        : 2:postfix-2.10.1-7.el7.x86_64                                                        7/8
  正在删除    : 1:mariadb-libs-5.5.60-1.el7_5.x86_64                                                 8/8
  验证中      : mysql-community-libs-5.7.36-1.el7.x86_64                                             1/8
  验证中      : 2:postfix-2.10.1-9.el7.x86_64                                                        2/8
  验证中      : mysql-community-common-5.7.36-1.el7.x86_64                                           3/8
  验证中      : mysql-community-server-5.7.36-1.el7.x86_64                                           4/8
  验证中      : mysql-community-client-5.7.36-1.el7.x86_64                                           5/8
  验证中      : mysql-community-libs-compat-5.7.36-1.el7.x86_64                                      6/8
  验证中      : 2:postfix-2.10.1-7.el7.x86_64                                                        7/8
  验证中      : 1:mariadb-libs-5.5.60-1.el7_5.x86_64                                                 8/8

已安装:
  mysql-community-libs.x86_64 0:5.7.36-1.el7       mysql-community-libs-compat.x86_64 0:5.7.36-1.el7
  mysql-community-server.x86_64 0:5.7.36-1.el7

作为依赖被安装:
  mysql-community-client.x86_64 0:5.7.36-1.el7        mysql-community-common.x86_64 0:5.7.36-1.el7

作为依赖被升级:
  postfix.x86_64 2:2.10.1-9.el7

替代:
  mariadb-libs.x86_64 1:5.5.60-1.el7_5

完毕!
[root@nt opt]# systemctl status mysqld.service
● mysqld.service - MySQL Server
   Loaded: loaded (/usr/lib/systemd/system/mysqld.service; enabled; vendor preset: disabled)
   Active: inactive (dead)
     Docs: man:mysqld(8)
           http://dev.mysql.com/doc/refman/en/using-systemd.html
[root@nt opt]# systemctl start mysqld.service
b. 启动 MySQL5.7
- 记得启动MySQL 服务 systemctl start mysqld.service
- 查看初始的密码账号 grep 'temporary password' /var/log/mysqld.log
- 提示密码设置策略 set global validate_password_policy=0;
validate_password_policy默认值1
底:0 or LOW | length 只要求长度(默认8位)
中: 1 or MEDIUM | length :numeric,lowercase/uppercase,and special characters
要求长度 数字 大小写 特殊字符
高: 2 or STRONG | length :lowercase/uppercse,and special characters;dictionary file
要求长度 数字 大小写 特殊字符 字段文件
- 设置密码 set password for 'root'@'localhost' =password('12345678');
- 运行flush privileges;使密码设置生效
[root@nt opt]# systemctl start mysqld.service
[root@nt opt]# grep 'temporary password' /var/log/mysqld.log
2021-12-21T03:00:18.314227Z 1 [Note] A temporary password is generated for root@localhost: j!zk)XDR!6iB
[root@nt opt]# mysql -uroot -p
Enter password:
Welcome to the MySQL monitor.  Commands end with ; or \g.
Your MySQL connection id is 2
Server version: 5.7.36

Copyright (c) 2000, 2021, Oracle and/or its affiliates.

Oracle is a registered trademark of Oracle Corporation and/or its
affiliates. Other names may be trademarks of their respective
owners.

Type 'help;' or '\h' for help. Type '\c' to clear the current input statement.

mysql> set global validate_password_policy=0;
Query OK, 0 rows affected (0.00 sec)
mysql> set password for 'root'@'localhost' =password('12345678')
    -> ;
Query OK, 0 rows affected, 1 warning (0.00 sec)
mysql> flush privileges;
Query OK, 0 rows affected (0.01 sec)
c. 修改 tomcat 的字符集
- linux命令修改MySQL配置文件: vim /etc/my.cnf
- 重启MySQL 服务:systemctl restart mysqld.service
- mysql 命令查看字符集 show variables like '%char%';
[root@nt opt]# vim  /etc/my.cnf
 28 # 设置数据库为 utf8编码
 29 character-set-server=utf8
 30 # 设置 MySQL忽略大小写
 31 lower_case_table_names=1
[root@nt opt]# systemctl restart mysqld.service
[root@nt opt]# mysql -uroot -p
Enter password:
Welcome to the MySQL monitor.  Commands end with ; or \g.
Your MySQL connection id is 2
Server version: 5.7.36

Copyright (c) 2000, 2021, Oracle and/or its affiliates.

Oracle is a registered trademark of Oracle Corporation and/or its
affiliates. Other names may be trademarks of their respective
owners.

Type 'help;' or '\h' for help. Type '\c' to clear the current input statement.

mysql> show variables like '%char%';
+--------------------------------------+----------------------------+
| Variable_name                        | Value                      |
+--------------------------------------+----------------------------+
| character_set_client                 | utf8                       |
| character_set_connection             | utf8                       |
| character_set_database               | utf8                       |
| character_set_filesystem             | binary                     |
| character_set_results                | utf8                       |
| character_set_server                 | utf8                       |
| character_set_system                 | utf8                       |
| character_sets_dir                   | /usr/share/mysql/charsets/ |
| validate_password_special_char_count | 1                          |
+--------------------------------------+----------------------------+
9 rows in set (0.01 sec)
d. 开启远程服务器
- linux 登入MySQL后,更改MySQL数据库里的"user"表里的"host"项,从"localhost"改为'%'
show databases;
use mysql
show tables;
select host from user where user='root';
GRANT ALL PRIVILEGES ON *.* TO 'root'@'%' IDENTIFIED BY '密码' WITH GRANT OPTION;
flush privileges;
select host,user from user;
source /pinyougoudb.sql # 导入sql文件
mysql>  use mysql
Reading table information for completion of table and column names
You can turn off this feature to get a quicker startup with -A

Database changed
mysql> show tables;
+---------------------------+
| Tables_in_mysql           |
+---------------------------+
| columns_priv              |
| db                        |
| engine_cost               |
| event                     |
| func                      |
| general_log               |
| gtid_executed             |
| help_category             |
| help_keyword              |
| help_relation             |
| help_topic                |
| innodb_index_stats        |
| innodb_table_stats        |
| ndb_binlog_index          |
| plugin                    |
| proc                      |
| procs_priv                |
| proxies_priv              |
| server_cost               |
| servers                   |
| slave_master_info         |
| slave_relay_log_info      |
| slave_worker_info         |
| slow_log                  |
| tables_priv               |
| time_zone                 |
| time_zone_leap_second     |
| time_zone_name            |
| time_zone_transition      |
| time_zone_transition_type |
| user                      |
+---------------------------+
31 rows in set (0.01 sec)

mysql> select host from user where user='root';
+-----------+
| host      |
+-----------+
| localhost |
+-----------+
1 row in set (0.01 sec)

mysql> GRANT ALL PRIVILEGES ON *.* TO 'root'@'%' IDENTIFIED BY '12345678' WITH GRANT OPTION;
Query OK, 0 rows affected, 1 warning (0.00 sec)

mysql> flush privileges;
Query OK, 0 rows affected (0.00 sec)

mysql> select host,user from user;
+-----------+---------------+
| host      | user          |
+-----------+---------------+
| %         | root          |
| localhost | mysql.session |
| localhost | mysql.sys     |
+-----------+---------------+
3 rows in set (0.00 sec)
e. 设置 MySQL开机自启
- systemctl list-unit-files 【| grep 服务名】 (查看服务开机启动状态, grep 可以进行过滤)
- systemctl enable 服务名 (设置服务开机启动)
- systemctl disable 服务名 (关闭服务开机启动)
- systemctl is-enabled 服务名 (查询某个服务是否是自启动的)
[root@nt opt]# systemctl enable mysqld.service
[root@nt opt]# systemctl is-enabled mysqld.service
enabled