前言
上次我详细介绍了如何用笔记本搜索到蓝牙模块并与之通信:http://www.cnblogs.com/zjutlitao/p/3886826.html,这次将介绍如何让安卓手机的蓝牙和该蓝牙模块进行通信。

简单一步搞定
参看:【只需简单一步,android自带的示例程序 BluetoothChat 变蓝牙串口助手 :http://www.amobbs.com/thread-5426293-1-1.html】,只要把Android自带的BluetoothChat例程稍微改一下就能搞定:
BluetoothChatService.java的第49行
private static final UUID MY_UUID = UUID.fromString("fa87c0d0-afac-11de-8a39-0800200c9a66");
中的字符串不同,于是把他替换成蓝牙串口服务 (SPP) 的 UUID
private static final UUID MY_UUID = UUID.fromString("00001101-0000-1000-8000-00805F9B34FB");

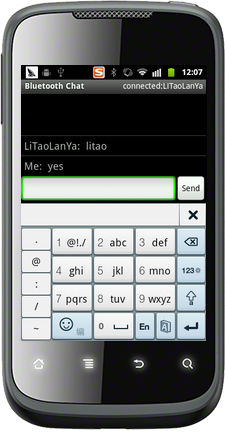

实现了搜索设备,链接设备,并和设备完成了通信~[图中我用串口助手通过蓝牙模块向外发送"litao"字符串,这时手机收到了数据;当用手机发送"yes"字符串时,串口收到了"yes"]
安卓蓝牙详解
蓝牙主要涉及的操作有:1、开启蓝牙 2、关闭蓝牙 3、能被搜到 4、获取配对设备 5、数据传输【参考DLUTBruceZhang的专栏·部分摘抄:Android 通信--蓝牙】
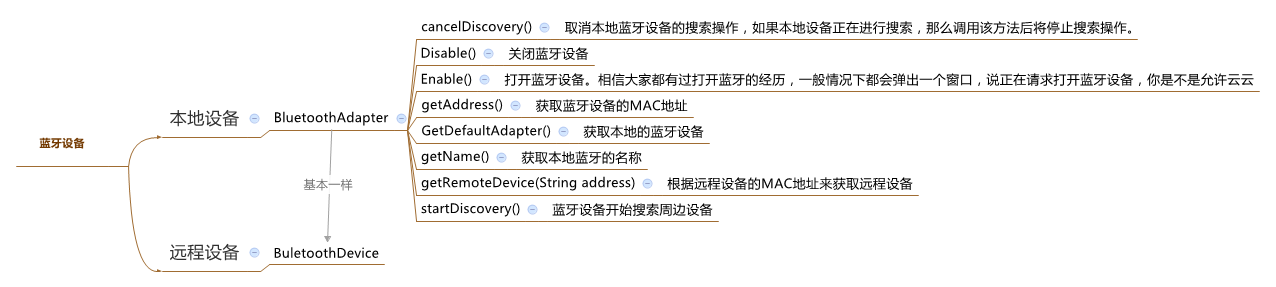
1、蓝牙设备-->蓝牙设备主要包括本地设备和远程设备,和他们相关的函数如下图:
 1  // 获取本地的蓝牙适配器实例
 2  BluetoothAdapter adapter = BluetoothAdapter.getDefaultAdapter();
 3  if(adapter!=null)
 4  {
 5      if(!adapter.isEnabled())
 6      {
 7          //通过这个方法来请求打开我们的蓝牙设备
 8          Intent intent = new Intent(BluetoothAdapter.ACTION_REQUEST_ENABLE);
 9          startActivity(intent);
10      }
11  }
12  else
13  {
14      System.out.println("本地设备驱动异常!");
15  }
2、搜索周边设备startDiscovery()-->这里startDiscovery是BluetoothAdapter的成员函数,其可以执行一个异步方式获得周边蓝牙设备,因为是一个异步的方法所以我们不需要考虑线程被阻塞问题,整个过程大约需要12秒时间,这时我们可以注册一个 BroadcastReceiver 对象来接收查找到的蓝牙设备信息,我们通过Filter来过滤ACTION_FOUND这个 Intent动作以获取每个远程设备的详细信息,通过Intent字段EXTRA_DEVICE 和 EXTRA_CLASS可以获得包含了每个BluetoothDevice 对象和对象的该设备类型 BluetoothClass。
 1 //实现一个BluetoothReciever继承BroadcastReceiver来接收查找到的蓝牙设备信息
 2 private class BluetoothReciever extends BroadcastReceiver {
 3      @Override
 4      public void onReceive(Context context, Intent intent) {
 5          // TODO Auto-generated method stub
 6          String action = intent.getAction();
 7          if (BluetoothDevice.ACTION_FOUND.equals(action)) {
 8              BluetoothDevice device = intent
 9                      .getParcelableExtra(BluetoothDevice.EXTRA_DEVICE);
10              System.out.println(device.getAddress());
11          }
12      }
13 }
14 //注册这个Receiver
15 IntentFilter intentFilter = new IntentFilter(BluetoothDevice.ACTION_FOUND);
16 bluetoothReceive = new BluetoothReciever();
17 registerReceiver(bluetoothReceive, intentFilter);
18 //因为在注册一个Receiver后,程序并不知道该何时去回收它,所以需要我们自己重写Activity类的onDestroy()方法。
19 protected void onDestroy() {
20     // TODO Auto-generated method stub
21     unregisterReceiver(bluetoothReceive);
22     super.onDestroy();
23 }
3、被周边设备所发现-->如果需要用户确认操作,不需要获取底层蓝牙服务实例,可以通过一个Intent来传递ACTION_REQUEST_DISCOVERABLE参数, 这里通过startActivity来请求开启。
1 Intent discoverableIntent = new Intent(BluetoothAdapter.ACTION_REQUEST_DISCOVERABLE);
2 //50这个参数代表的是蓝牙设备能在多少秒内被发现
3 discoverableIntent.putExtra(BluetoothAdapter.EXTRA_DISCOVERABLE_DURATION, 50);
4 startActivity(discoverableIntent);
4、配对-->通过下面的方法遍历所有配对设备,一会我们还会针对刚开始的例子进行详细讲解里面的具体过程。
 1 //通过getBondedDevices方法来获取已经与本设备配对的设备
 2 Set<BluetoothDevice> device= adapter.getBondedDevices();
 3 if(device.size()>0)
 4 {
 5     for(Iterator iterator=device.iterator();iterator.hasNext();)
 6     {
 7         BluetoothDevice bluetoothDevice=(BluetoothDevice)iterator.next();
 8         System.out.println(bluetoothDevice.getAddress());
 9     }
10 }
5、通信-->蓝牙的通信过程和TCP的server和client类似,这里就不详细介绍了,我参考的这篇文章讲的很详细,如果不懂可以参考下:http://blog.csdn.net/dlutbrucezhang/article/details/8955104#。此外,一会我还会针对具体的例子讲解其流程。
6、权限-->当然,想使用蓝牙还得再AndroidManifest.xml中添加上权限:
1 <uses-permission android:name="android.permission.BLUETOOTH_ADMIN" />
2 <uses-permission android:name="android.permission.BLUETOOTH" />
BluetoothChat例子分析
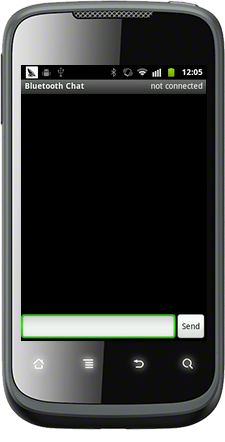
1、BluetoothChat.java-->如下图在BluetoothChat中进行了获得蓝牙设备、开启蓝牙设备、并启动BluetoothChatService进行连接,然后用Handler mHandler进行接收从BluetoothCharService的消息并作出相应的处理。在这里的list是为了显示蓝牙设备的通话信息,一条一条显示;edittext用来获取本地输入的消息,按回车或者send按钮都可以触发sendMessage进行发送消息;此外,由于需要手动搜索蓝牙设备并选择要链接的蓝牙设备,所以这里重写了菜单按钮监听,包括onCreateOptionsMenu和onOptionsItemSelected,在onOptionsItemSelected中对san和discoverable进行分别处理。
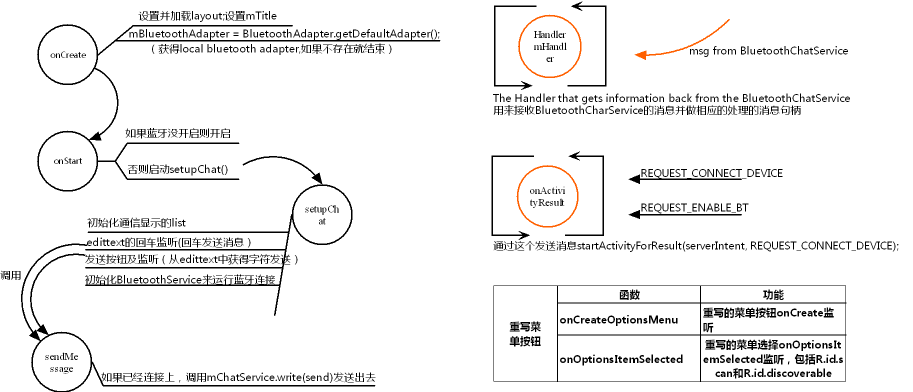
下面是onCreate中的获取本地蓝牙设备,并确认是否支持,如果不支持就退出程序。
1 // Get local Bluetooth adapter
2 mBluetoothAdapter = BluetoothAdapter.getDefaultAdapter();
3
4 // If the adapter is null, then Bluetooth is not supported
5 if (mBluetoothAdapter == null) {
6     Toast.makeText(this, "Bluetooth is not available", Toast.LENGTH_LONG).show();
7     finish();
8     return;
9 }
下面是onStart中如果蓝牙没有打开就发送Intent意图,请求打开蓝牙,setupChat()将会被执行在onActivityResult中。
1 // If BT is not on, request that it be enabled.
2 // setupChat() will then be called during onActivityResult
3 if (!mBluetoothAdapter.isEnabled()) {
4     Intent enableIntent = new Intent(BluetoothAdapter.ACTION_REQUEST_ENABLE);
5     startActivityForResult(enableIntent, REQUEST_ENABLE_BT);
6 // Otherwise, setup the chat session
7 } else {
8     if (mChatService == null) setupChat();
9 }
下面是onActivityResult函数,其中包括2个处理:①处理REQUEST_CONNECT_DEVICE请求连接设备;②处理REQUEST_ENABLE_BT请求打开蓝牙
 1 public void onActivityResult(int requestCode, int resultCode, Intent data) {
 2     if(D) Log.d(TAG, "onActivityResult " + resultCode);
 3     switch (requestCode) {
 4     case REQUEST_CONNECT_DEVICE:
 5         // When DeviceListActivity returns with a device to connect
 6         if (resultCode == Activity.RESULT_OK) {
 7             // Get the device MAC address
 8             String address = data.getExtras()
 9                                  .getString(DeviceListActivity.EXTRA_DEVICE_ADDRESS);
10             // Get the BLuetoothDevice object
11             BluetoothDevice device = mBluetoothAdapter.getRemoteDevice(address);
12             // Attempt to connect to the device
13             mChatService.connect(device);
14         }
15         break;
16     case REQUEST_ENABLE_BT:
17         // When the request to enable Bluetooth returns
18         if (resultCode == Activity.RESULT_OK) {
19             // Bluetooth is now enabled, so set up a chat session
20             setupChat();
21         } else {
22             // User did not enable Bluetooth or an error occured
23             Log.d(TAG, "BT not enabled");
24             Toast.makeText(this, R.string.bt_not_enabled_leaving, Toast.LENGTH_SHORT).show();
25             finish();
26         }
27     }
28 }
在setupChat中对发送按钮进行点击事件,其实比较简繁就是获取editText中的内容然后调用sendMessage发送。如上图所示,对editText的回车监听也和这个类似,这里就不多介绍了。
 1 // Initialize the send button with a listener that for click events【发送按钮及事件】
 2 mSendButton = (Button) findViewById(R.id.button_send);
 3 mSendButton.setOnClickListener(new OnClickListener() {
 4     public void onClick(View v) {
 5         // Send a message using content of the edit text widget【从textview中获取字符然后调用sendMseeage发送出去】
 6         TextView view = (TextView) findViewById(R.id.edit_text_out);
 7         String message = view.getText().toString();
 8         sendMessage(message);
 9     }
10 });
下面是重写的菜单按钮监听,当选择的是scan按钮时,发送REQUEST_CONNECT_DEVICE意图。当选择discoverable按钮时,则确认是否能被搜到。这里需要特别说明下:这个菜单要在res/menu中写。
 1 public boolean onOptionsItemSelected(MenuItem item) {
 2     switch (item.getItemId()) {
 3     case R.id.scan:
 4         // Launch the DeviceListActivity to see devices and do scan
 5         Intent serverIntent = new Intent(this, DeviceListActivity.class);
 6         startActivityForResult(serverIntent, REQUEST_CONNECT_DEVICE);
 7         return true;
 8     case R.id.discoverable:
 9         // Ensure this device is discoverable by others
10         ensureDiscoverable();
11         return true;
12     }
13     return false;
14 }
2、BluetoothChatService-->上面说过在setupChat中最后实例并初始化BluetoothChatService进行蓝牙连接,下面来大致分析下该类的构成及功能:该类主要实现连接蓝牙的3个状态,分别用3个线程来处理:①AcceptThread线程,就像service-client中的accept函数,一直等待,知道接受一个连接;②ConnectThread线程负责连接;③ConnectedThread线程负责和远程蓝牙设备进行通信,并将收到和要发送的信息通过handles进行传递。这里我们主要分析连接之后的数据交换过程,对于等待连接、尝试连接这里不做详解~
ConnectedThread线程主要负责数据收发,其把从远端收来的数据和要发向远端的数据都会通过handle发送给UI用于在list中显示。对于收数据,这里采用利用线程一直收,一旦收到数据就通过mHandler传递到BluetoothChat进行处理,对于发送数据,没必要采用线程轮流发,而是直接一个函数,什么时候需要就直接调用发送就可以。
 1 // 利用线程一直收数据
 2 // 将数据都是放在mHandler中,在BluetoothChat中对信息解析并处理
 3 public void run() {
 4     Log.i(TAG, "BEGIN mConnectedThread");
 5     byte[] buffer = new byte[1024];
 6     int bytes;
 7
 8     // Keep listening to the InputStream while connected
 9     while (true) {
10         try {
11             // Read from the InputStream
12             // bytes是返回读取的字符数量,其中数据存在buffer中
13             bytes = mmInStream.read(buffer);
14             String readMessage = new String(buffer, 0, bytes);
15             if (D)
16                 Log.i(TAG, "read: " + bytes + "  mes: " + readMessage);
17             // Send the obtained bytes to the UI Activity
18             mHandler.obtainMessage(BluetoothChat.MESSAGE_READ, bytes,
19                     -1, buffer).sendToTarget();
20         } catch (IOException e) {
21             Log.e(TAG, "disconnected", e);
22             connectionLost();
23             break;
24         }
25     }
26 }
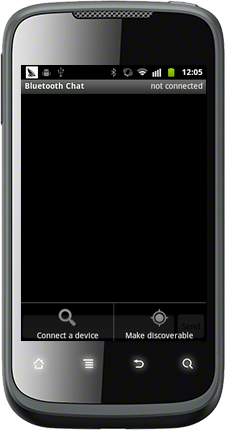
3、DeviceListActivity-->这个类主要负责搜索蓝牙设备并用列表显示出来。那么我们首先来分析一下它所包含的2个list:可见这里面并不是一个list,其中pairedListView是曾经配对过的设备,这些设备可能现在没有被搜到,但是也会显示出来;newDevicesListView是新发现的蓝牙设备,但是如果曾经有配对过的就不加入这个list中(所以,一定要弄清这两个list否则你会很晕的!),他们采用同一个选项监听:mDeviceClickListener,在他们共同的list点击监听中,当点击某一个item时,程序获得item的string信息,然后转换为MAC地址,通过Intent传到另一个Activity中,进行相应处理。
1 // Find and set up the ListView for paired devices
2 ListView pairedListView = (ListView) findViewById(R.id.paired_devices);
3 pairedListView.setAdapter(mPairedDevicesArrayAdapter);
4 pairedListView.setOnItemClickListener(mDeviceClickListener);
5
6 // Find and set up the ListView for newly discovered devices
7 ListView newDevicesListView = (ListView) findViewById(R.id.new_devices);
8 newDevicesListView.setAdapter(mNewDevicesArrayAdapter);
9 newDevicesListView.setOnItemClickListener(mDeviceClickListener);
 1 // The on-click listener for all devices in the ListViews
 2 //选择list中的设备,然后通过inet传出
 3 private OnItemClickListener mDeviceClickListener = new OnItemClickListener() {
 4     public void onItemClick(AdapterView<?> av, View v, int arg2, long arg3) {
 5         // Cancel discovery because it's costly and we're about to connect
 6         mBtAdapter.cancelDiscovery();
 7
 8         // Get the device MAC address, which is the last 17 chars in the View
 9         String info = ((TextView) v).getText().toString();
10         String address = info.substring(info.length() - 17);
11
12         // Create the result Intent and include the MAC address
13         Intent intent = new Intent();
14         intent.putExtra(EXTRA_DEVICE_ADDRESS, address);
15
16         // Set result and finish this Activity
17         setResult(Activity.RESULT_OK, intent);
18         finish();
19     }
20 };
对于scan按钮,是用来启动搜索蓝牙设备的:从下面可以看出该按钮的点击事件中,主要是调用了doDiscovery()函数,而在doDiscovery()函数中,主要进行的其实就只有一个蓝牙设备自带的成员函数:mBtAdapter.startDiscovery();这是大家可能有点摸不着头脑,怎么写这一个函数就能获得蓝牙设备了,那我搜索到的设备信息是在哪里被保存的呢?我觉得是时候说一下蓝牙搜索其他设备的过程了!
1 // Initialize the button to perform device discovery
2 Button scanButton = (Button) findViewById(R.id.button_scan);
3 scanButton.setOnClickListener(new OnClickListener() {
4     public void onClick(View v) {
5         doDiscovery();
6         v.setVisibility(View.GONE);
7     }
8 });
在【安卓蓝牙详解】的第2点我已经简单介绍了startDiscovery()函数,这里再结合该程序介绍一下吧!这里startDiscovery是BluetoothAdapter的成员函数,其可以执行一个异步方式获得周边蓝牙设备,因为是一个异步的方法所以我们不需要考虑线程被阻塞问题,整个过程大约需要12秒时间,这时我们可以注册一个 BroadcastReceiver 对象来接收查找到的蓝牙设备信息,我们通过Filter来过滤ACTION_FOUND这个 Intent动作以获取每个远程设备的详细信息,通过Intent字段EXTRA_DEVICE 和 EXTRA_CLASS可以获得包含了每个BluetoothDevice 对象和对象的该设备类型 BluetoothClass。因此下面我们在onCreate后面注册一个BroadcastReceiver 对象来接收查找到的蓝牙设备信息,通过Filter来过滤ACTION_FOUND和ACTION_DISCOVERY_FINISHED这两个Intent动作,来获取每个远程设备的详细信息。
 1 // Register for broadcasts when a device is discovered
 2 IntentFilter filter = new IntentFilter(BluetoothDevice.ACTION_FOUND);
 3 this.registerReceiver(mReceiver, filter);
 4
 5 // Register for broadcasts when discovery has finished
 6 filter = new IntentFilter(BluetoothAdapter.ACTION_DISCOVERY_FINISHED);
 7 this.registerReceiver(mReceiver, filter);
 8
 9 // Get the local Bluetooth adapter
10 mBtAdapter = BluetoothAdapter.getDefaultAdapter();
下面就是实现的BroadcastReceiver,承接上面的在scan按钮触发doDiscovery()函数之后整个逻辑我们不知道了的疑惑,现在我们就明白了,当doDiscovery()被执行时,下面的BroadcastReceiver将能够收取在onCreate中阐明的ACTION_FOUND和ACTION_DISCOVERY_FINISHED这两个Intent动作,如下当Intent是ACTION_FOUND时通过BluetoothDevice device = intent.getParcelableExtra(BluetoothDevice.EXTRA_DEVICE);获得蓝牙设备,如果这个设备没被配对过,则加入到newDevice数组。
 1 // The BroadcastReceiver that listens for discovered devices and
 2 // changes the title when discovery is finished
 3 //【查找蓝牙设备】
 4 private final BroadcastReceiver mReceiver = new BroadcastReceiver() {
 5     @Override
 6     public void onReceive(Context context, Intent intent) {
 7         String action = intent.getAction();
 8         // When discovery finds a device
 9         if (BluetoothDevice.ACTION_FOUND.equals(action)) {
10             // Get the BluetoothDevice object from the Intent
11             BluetoothDevice device = intent.getParcelableExtra(BluetoothDevice.EXTRA_DEVICE);
12             // If it's already paired, skip it, because it's been listed already
13             if (device.getBondState() != BluetoothDevice.BOND_BONDED) {
14                 mNewDevicesArrayAdapter.add(device.getName() + "
" + device.getAddress());
15             }
16         // When discovery is finished, change the Activity title
17         } else if (BluetoothAdapter.ACTION_DISCOVERY_FINISHED.equals(action)) {
18             setProgressBarIndeterminateVisibility(false);
19             setTitle(R.string.select_device);
20             if (mNewDevicesArrayAdapter.getCount() == 0) {
21                 String noDevices = getResources().getText(R.string.none_found).toString();
22                 mNewDevicesArrayAdapter.add(noDevices);
23             }
24         }
25     }
26 };
最后在onCreate后还有点是将曾经配对过的蓝牙设备加入pairedListView中显示(再次提醒要区分好pairedListView和newDevicesListView这两个list!)
 1 // If there are paired devices, add each one to the ArrayAdapter
 2 // 如果有蓝牙设备就加入list中,这里mPairedDevicesArrayAdapter是列表的数组
 3 if (pairedDevices.size() > 0) {
 4     findViewById(R.id.title_paired_devices).setVisibility(View.VISIBLE);
 5     for (BluetoothDevice device : pairedDevices) {
 6         mPairedDevicesArrayAdapter.add(device.getName() + "
" + device.getAddress());
 7     }
 8 } else {
 9     String noDevices = getResources().getText(R.string.none_paired).toString();
10     mPairedDevicesArrayAdapter.add(noDevices);
11 }
相关链接
本文链接:http://www.cnblogs.com/zjutlitao/p/4231635.html
更多精彩:http://www.cnblogs.com/zjutlitao/p/
参考文章:http://blog.csdn.net/dlutbrucezhang/article/details/8955104#
参考文章:http://www.amobbs.com/thread-5426293-1-1.html
一些资料:http://pan.baidu.com/s/1kTzdIR1 zptn