win
Nginx+Tomcat的集群配置:
1)在一台电脑上安装两个tomcat
2)修改tomcat的配置文件,将端口进行修改:
3)将项目分别发布到两个tomcat中:
4)安装Nginx:
6)Tomcat集群的session共享:
linux
ubuntu安装nginx
方法1:基于APT源安装
方法2:命令行+压缩文件安装
配置
修改端口
常用命令
日志切割备份
centos安装
Linux上搭建Nginx+Tomcat集群:
在Linux上安装多个Tomcat:
启动
关闭nginx
动态加载配置文件
docker安装nginx
编写docker-compose.yml文件
创建默认文件
构建Nginx容器
容器操作
nginx配置
安装vim
# Nginx安装整合
参考:
- 学习视频
- https://www.cnblogs.com/EasonJim/p/7806879.html
- http://www.cnblogs.com/piscesLoveCc/p/5794926.html
- http://www.linuxidc.com/Linux/2016-08/134080.htm
- https://segmentfault.com/a/1190000002797601
- https://www.jianshu.com/p/99aac00aa3b7
各种环境的nginx的关于安装的汇总...有点乱
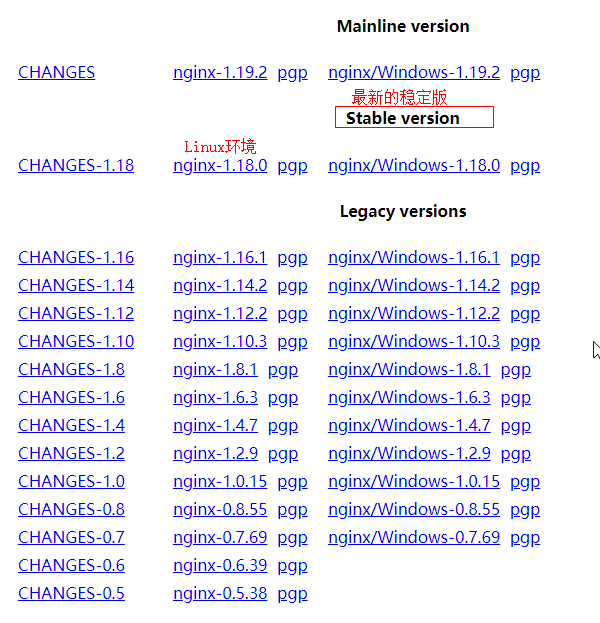
Nginx版本
- Mainline version-开发版
- Stable version-稳定版
- Legacy version-历史稳定版本
可以到 http://nginx.org/en/download.html 下载需要的版本
win
Nginx+Tomcat的集群配置:
1、2步骤解压java/Nginx中的window集群就可以使用了;
3要使用单独的Nginx压缩包;
1)在一台电脑上安装两个tomcat
需要在一台电脑模拟:在E盘解压两个tomcat,分别命名为tomcat1,tomcat2.
2)修改tomcat的配置文件,将端口进行修改:
分别完成如下配置:(需要将tomcat带有端口号的地方改成不同的端口即可.)分别打开两个tomcat的conf下的server.xml
- tomcat1/conf/server.xml
<Server port="8005" shutdown="SHUTDOWN">
     <!--端口号8080-->
    <Connector port="8080" protocol="HTTP/1.1"
               connectionTimeout="20000"
               redirectPort="8443" />
    <Connector port="8009" protocol="AJP/1.3" redirectPort="8443" />
<Engine name="Catalina" defaultHost="localhost">- tomcat2/conf/server.xml:所有端口+10
<Server port="8015" shutdown="SHUTDOWN">
    <!--端口号8090-->
  <Connector port="8090" protocol="HTTP/1.1"
               connectionTimeout="20000"
               redirectPort="8453" />
    <Connector port="8019" protocol="AJP/1.3" redirectPort="8453" />
    <Engine name="Catalina" defaultHost="localhost">
3)将项目分别发布到两个tomcat中:
- 打开eclipse;
- 选中项目,右键export--war file--选择位置;
- 复制项目到Tomcat的webapps下;
测试:
a.启动Tomcat:bin/startup.bat
b.浏览器:localhost:8080/项目名;
4)安装Nginx:
1.解压nginx-1.8.0;
2.双击nginx.exe
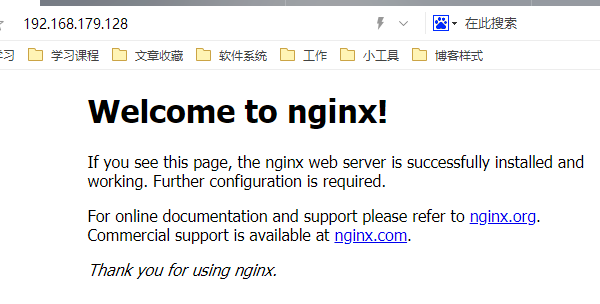
启动完以后访问http://localhost
 5)配置Nginx:
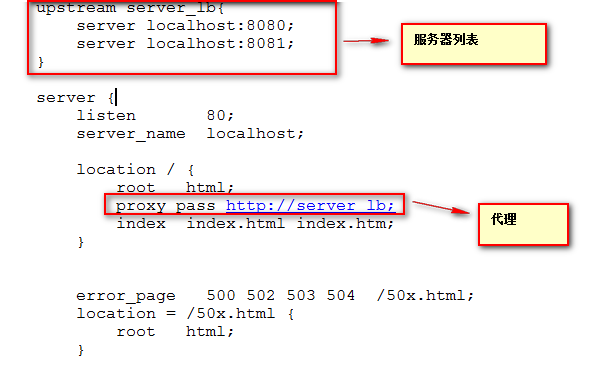
修改nginx-1.8.0/conf/nginx.conf文件:

1.需要在http节点上添加一个:
            upstream servlet_yujia{      //upstream后跟自己起的名称
                server 127.0.0.1:8080;    //代理的服务器的接口
                server 127.0.0.1:8090;
            }
2.修改location /下的反向代理 :
            proxy_pass http://servlet_yujia    //http:后跟名称
6)Tomcat集群的session共享:
1.一种解决办法:一个用户进来以后只在tomcat1上进行操作,另一个用户进行只在tomcat2上进行操作.
2.session的共享
一种使用tomcat广播机制完成session的共享(不推荐的方式)
一种使用redis服务器的方式完成session的共享(推荐的方式)
- 解决方式1:只能在window下好使(下方有7)
web服务器解决(广播机制)
注意:tomcat下性能低,但是在weblogic上很好
修改两个地方:
1.修改每个tomcat的server.xml 支持共享
    将引擎标签下的
    <Cluster className="org.apache.catalina.ha.tcp.SimpleTcpCluster"/>
    注释去掉
2.修改每个项目的配置文件 web.xml(/tomcat/webapps/项目/WEB-INF/web.xml)中添加一个节点
    <distributable/>
3.重启Tomcat
现在再访问项目,在不同Tomcat中的项目的id不变;
- 解决方式2:
可以将session的id放入redis中 - 解决方式3:在linux使用多
保证一个ip地址永远的访问一台web服务器,就不存在session共享问题了
在nginx的配置文件中upstream中添加ip_hash;
linux
环境确认:可能会有影响
1、确认系统网络
2、确认yum可用
3、确认关闭iptables规则
4、确认停用selinux
ubuntu安装nginx
方法1:基于APT源安装
sudo apt-get install nginx- /usr/sbin/nginx:主程序
- /etc/nginx:存放配置文件
- /usr/share/nginx:存放静态文件
- /var/log/nginx:存放日志
Linux系统的配置文件一般放在
/etc,日志一般放在/var/log,运行的程序一般放在/usr/sbin或者/usr/bin。
如果要更清楚Nginx的配置项放在什么地方,可以打开/etc/nginx/nginx.conf
通过这种方式安装的,会自动创建服务,会自动在/etc/init.d/nginx新建服务脚本
- 查看加载的是哪个配置文件
sudo nginx -t或者ps -ef | grep nginx- 启动/停用服务
sudo service nginx {start|stop|restart|reload|force-reload|status|configtest|rotate|upgrade}方法2:命令行+压缩文件安装
- 官方下载页面:http://nginx.org/en/download.html
- configure配置文件详解:http://nginx.org/en/docs/configure.html
- 检查Linux内核
# inux的内核版本要在2.6以上
uname -a- 安装依赖
#1.安装gcc g++的依赖库
sudo apt-get install build-essential
sudo apt-get install libtool
#2.安装pcre依赖库([http://www.pcre.org/](http://www.pcre.org/))
sudo apt-get update
sudo apt-get install libpcre3 libpcre3-dev
#3.安装zlib依赖库([http://www.zlib.net](http://www.zlib.net/))
sudo apt-get install zlib1g-dev
#4.安装SSL依赖库(16.04默认已经安装了)
sudo apt-get install openssl- 安装Nginx
Nginx的官网下载地址是:http://nginx.org/en/download.html ,点击进入,

#下载最新版本:复制上面的Linux的下载链接,wget下载(我当时是1.13.6版本)   进入到想要放置文件的目录
wget http://nginx.org/download/nginx-1.13.6.tar.gz
#解压:
tar -zxvf nginx-1.13.6.tar.gz
#进入解压目录:
cd nginx-1.13.6
#配置:
./configure --prefix=/usr/local/nginx
  #  --with-http_stub_status_module    加入http_stub_status(用来做连接数检测)模块
  #  --with-http_ssl_module  http_ssl(https协议)模块
  #  --with-debug 打开debug开关
#编译:
make
#安装:安装在/usr/local/nginx
sudo make install
#启动:
sudo /usr/local/nginx/sbin/nginx -c /usr/local/nginx/conf/nginx.conf
注意:-c 指定配置文件的路径,不加的话,nginx会自动加载默认路径的配置文件,可以通过-h查看帮助命令。
#查看进程:
ps -ef | grep nginx
配置
- 配置软链接:就可以不用路径直接输入nginx启动
sudo ln -s /usr/local/nginx/sbin/nginx /usr/bin/nginx- 配置开机启动服务
在/etc/init.d/下创建nginx文件,sudo vim /etc/init.d/nginx,内容如下:
#!/bin/sh

### BEGIN INIT INFO
# Provides:      nginx
# Required-Start:    $local_fs $remote_fs $network $syslog $named
# Required-Stop:     $local_fs $remote_fs $network $syslog $named
# Default-Start:     2 3 4 5
# Default-Stop:      0 1 6
# Short-Description: starts the nginx web server
# Description:       starts nginx using start-stop-daemon
### END INIT INFO

PATH=/usr/local/sbin:/usr/local/bin:/sbin:/bin:/usr/sbin:/usr/bin
DAEMON=/usr/local/nginx/sbin/nginx
NAME=nginx
DESC=nginx

# Include nginx defaults if available
if [ -r /etc/default/nginx ]; then
    . /etc/default/nginx
fi

STOP_SCHEDULE="${STOP_SCHEDULE:-QUIT/5/TERM/5/KILL/5}"

test -x $DAEMON || exit 0

. /lib/init/vars.sh
. /lib/lsb/init-functions

# Try to extract nginx pidfile
PID=$(cat /usr/local/nginx/conf/nginx.conf | grep -Ev '^s*#' | awk 'BEGIN { RS="[;{}]" } { if ($1 == "pid") print $2 }' | head -n1)
if [ -z "$PID" ]; then
    PID=/run/nginx.pid
fi

if [ -n "$ULIMIT" ]; then
    # Set ulimit if it is set in /etc/default/nginx
    ulimit $ULIMIT
fi

start_nginx() {
    # Start the daemon/service
    #
    # Returns:
    #   0 if daemon has been started
    #   1 if daemon was already running
    #   2 if daemon could not be started
    start-stop-daemon --start --quiet --pidfile $PID --exec $DAEMON --test > /dev/null
        || return 1
    start-stop-daemon --start --quiet --pidfile $PID --exec $DAEMON --
        $DAEMON_OPTS 2>/dev/null
        || return 2
}

test_config() {
    # Test the nginx configuration
    $DAEMON -t $DAEMON_OPTS >/dev/null 2>&1
}

stop_nginx() {
    # Stops the daemon/service
    #
    # Return
    #   0 if daemon has been stopped
    #   1 if daemon was already stopped
    #   2 if daemon could not be stopped
    #   other if a failure occurred
    start-stop-daemon --stop --quiet --retry=$STOP_SCHEDULE --pidfile $PID --name $NAME
    RETVAL="$?"
    sleep 1
    return "$RETVAL"
}

reload_nginx() {
    # Function that sends a SIGHUP to the daemon/service
    start-stop-daemon --stop --signal HUP --quiet --pidfile $PID --name $NAME
    return 0
}

rotate_logs() {
    # Rotate log files
    start-stop-daemon --stop --signal USR1 --quiet --pidfile $PID --name $NAME
    return 0
}

upgrade_nginx() {
    # Online upgrade nginx executable
    # http://nginx.org/en/docs/control.html
    #
    # Return
    #   0 if nginx has been successfully upgraded
    #   1 if nginx is not running
    #   2 if the pid files were not created on time
    #   3 if the old master could not be killed
    if start-stop-daemon --stop --signal USR2 --quiet --pidfile $PID --name $NAME; then
        # Wait for both old and new master to write their pid file
        while [ ! -s "${PID}.oldbin" ] || [ ! -s "${PID}" ]; do
            cnt=`expr $cnt + 1`
            if [ $cnt -gt 10 ]; then
                return 2
            fi
            sleep 1
        done
        # Everything is ready, gracefully stop the old master
        if start-stop-daemon --stop --signal QUIT --quiet --pidfile "${PID}.oldbin" --name $NAME; then
            return 0
        else
            return 3
        fi
    else
        return 1
    fi
}

case "$1" in
    start)
        log_daemon_msg "Starting $DESC" "$NAME"
        start_nginx
        case "$?" in
            0|1) log_end_msg 0 ;;
            2)   log_end_msg 1 ;;
        esac
        ;;
    stop)
        log_daemon_msg "Stopping $DESC" "$NAME"
        stop_nginx
        case "$?" in
            0|1) log_end_msg 0 ;;
            2)   log_end_msg 1 ;;
        esac
        ;;
    restart)
        log_daemon_msg "Restarting $DESC" "$NAME"

        # Check configuration before stopping nginx
        if ! test_config; then
            log_end_msg 1 # Configuration error
            exit $?
        fi

        stop_nginx
        case "$?" in
            0|1)
                start_nginx
                case "$?" in
                    0) log_end_msg 0 ;;
                    1) log_end_msg 1 ;; # Old process is still running
                    *) log_end_msg 1 ;; # Failed to start
                esac
                ;;
            *)
                # Failed to stop
                log_end_msg 1
                ;;
        esac
        ;;
    reload|force-reload)
        log_daemon_msg "Reloading $DESC configuration" "$NAME"

        # Check configuration before stopping nginx
        #
        # This is not entirely correct since the on-disk nginx binary
        # may differ from the in-memory one, but that's not common.
        # We prefer to check the configuration and return an error
        # to the administrator.
        if ! test_config; then
            log_end_msg 1 # Configuration error
            exit $?
        fi

        reload_nginx
        log_end_msg $?
        ;;
    configtest|testconfig)
        log_daemon_msg "Testing $DESC configuration"
        test_config
        log_end_msg $?
        ;;
    status)
        status_of_proc -p $PID "$DAEMON" "$NAME" && exit 0 || exit $?
        ;;
    upgrade)
        log_daemon_msg "Upgrading binary" "$NAME"
        upgrade_nginx
        log_end_msg $?
        ;;
    rotate)
        log_daemon_msg "Re-opening $DESC log files" "$NAME"
        rotate_logs
        log_end_msg $?
        ;;
    *)
        echo "Usage: $NAME {start|stop|restart|reload|force-reload|status|configtest|rotate|upgrade}" >&2
        exit 3
        ;;
esac- 设置服务脚本有执行权限
sudo chmod +x /etc/init.d/nginx- 注册服务
cd /etc/init.d/
sudo update-rc.d nginx defaults- 启动/停用服务
sudo service nginx {start|stop|restart|reload|force-reload|status|configtest|rotate|upgrade}修改端口
nginx默认使用的端口是80,如果端口已经被占据,那么需要修改默认端口!默认的配置在安装文件夹下的conf文件夹下的ngixn.conf文件中,目录为 /usr/local/nginx/conf
vim /usr/local/nginx/conf/ngixn.conf
# 将 server中的listen 中对应的就是端口号了
比如,改为8080

常用命令
- 启动方式
#默认方式启动:
/usr/local/nginx/sbin/nginx
#指定配置文件启动
/usr/local/nginx/sbing/nginx -c /tmp/nginx.conf
##-c 指定配置文件的路径,不加的话,nginx会自动加载默认路径的配置文件,可以通过-h查看帮助命令。
#指定nginx程序目录启动
/usr/local/nginx /sbin/nginx -p /usr/local/nginx/- 停止方式
#快速停止
/usr/local/nginx/sbin/nginx -s stop
#优雅停止
/usr/local/nginx/sbin/nginx -s quit- 热装载配置文件 ,不用停止可以刷新配置
/usr/local/nginx/sbin/nginx -s reload- 重新打开日志文件
/usr/local/nginx/sbin/nginx -s reopen- 检测当前使用的是哪个配置文件,配置是否正确
/usr/local/nginx/sbin/nginx -t #可以在配置文件加点乱码测试一下日志切割备份
默认日志是在/usr/local/nginx/logs/文件夹中,默认写在access.log中
mv access.log access.log.bak
/usr/local/nginx/sbin/nginx -s reopen   # 重新打开日志文件,写入新文件中(若是不运行一下,写入的还是旧文件,就是上面的.bat的文件)
centos安装
预处理:
关闭iptables:
    iptables -L  #查看是否开启
    iptables -F #关闭
    iptables -t nat -L   #查看net中是否有规则
    iptables -t nat -F  #关闭nat规则
停用selinux:
    getenforce #查看是否关闭  disabled 代表关闭了
    setenforce 0 #关闭
安装
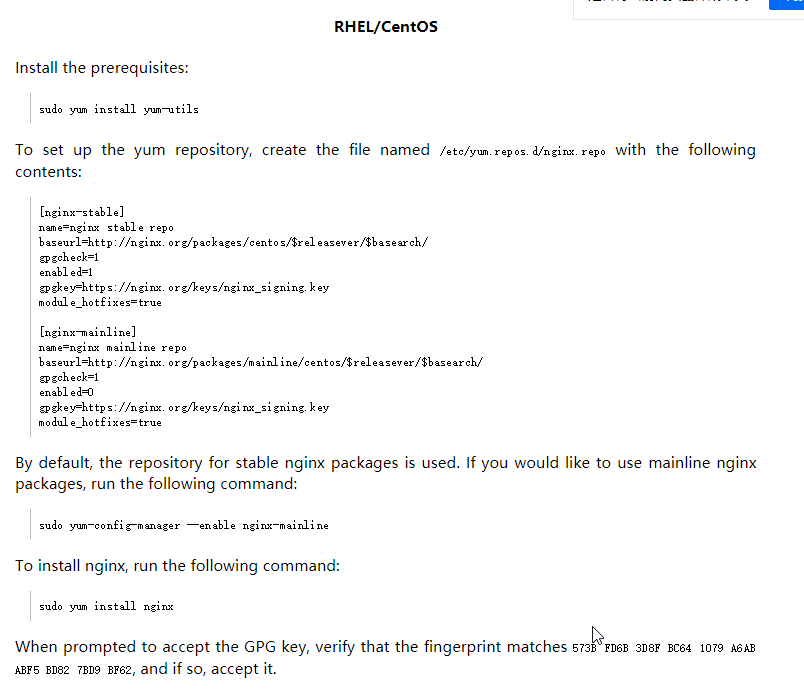
在http://nginx.org/en/download.html 的Pre-Built Packages的stable and mainline连接进入就可以看到官方提供的yum的安装方法.此处使用的是RHEL/CentOS的安装方法

#yum -y install gcc gcc-c++ autoconf pcre pcre-devel make automake
# yum -y install wget httpd-tools vim

# 首先运行
sudo yum install yum-utils

# 创建一个nginx的配置文件
vim /etc/yum.repos.d/nginx.repo

# 配置
[nginx-stable]
name=nginx stable repo
baseurl=http://nginx.org/packages/centos/$releasever/$basearch/
gpgcheck=1
enabled=1
gpgkey=https://nginx.org/keys/nginx_signing.key
module_hotfixes=true

[nginx-mainline]
name=nginx mainline repo
baseurl=http://nginx.org/packages/mainline/centos/$releasever/$basearch/
gpgcheck=1
enabled=0
gpgkey=https://nginx.org/keys/nginx_signing.key
module_hotfixes=true


# 获取所有的版本
sudo yum list | grep nginx

# 下载最新稳定版
sudo yum install nginx

# 查看安装版本
nginx -v

# 查看编译参数
nginx -V
Linux上搭建Nginx+Tomcat集群:
在Linux上安装多个Tomcat:
- 解压tomcat
分别解压tomcat到/usr/local/tomcat1 和 tomcat2 - 修改tomcat2中server.xml:
将修改后的端口添加到防火墙中. - Linux上安装Nginx:
1.先将 nginx上传到linux上
2.解压nginx(放在usr/local中 或放在自己建立的software中)
tar -xvf 文件;3.进入目录 cd xxx
4.安装依赖包
yum install gcc-c++
yum install -y pcre pcre-devel
yum install -y zlib zlib-devel
yum install -y openssl openssl-devel
5.执行编译
先进入 nginx的目录
执行 ./configure可以通过在upstream下设置一个ip_hash解决session共享问题
ip_hash指令能够将某个客户端IP的请求通过哈希算法定位到同一台后端服务器上
启动
在nginx目录下有一个sbin目录,sbin目录下有一个nginx可执行程序。
./nginx


关闭nginx
关闭命令:相当于找到nginx进程kill。
./nginx -s stop退出命令:等程序执行完毕后关闭,建议使用此命令。
./nginx -s quit动态加载配置文件
可以不关闭nginx的情况下更新配置文件。
./nginx -s reloaddocker安装nginx
编写docker-compose.yml文件
version: '3.6'
services:
  nginx:
    restart: always
    image: daocloud.io/library/nginx:latest #镜像
    container_name: nginx # 容器名
    ports:
      - 80:80
    volumes: #映射文件,
      - /etc/apt:/etc/apt/ # apt-get 镜像映射
      - /usr/local/software_data/nginx/config/conf.d/:/etc/nginx/conf.d/  # 将配置文件映射到宿主机上
      - /usr/local/software_data/nginx/config/nginx.conf:/etc/nginx/nginx.conf # nginx默认配置
      - /usr/local/software_data/nginx/data/html/:/usr/share/nginx/html  # 将html静态页面映射出来
      - /usr/local/software_data/nginx/log/:/var/log/nginx   # 将日志映射出来
上面的映射可以不设置,但是若是重新构建容器,之前的配置就没了,建议还是映射出来吧
- 进入文件夹
/opt/docker_nginx/docker-compose.yml,将上面的内容复制进去
创建默认文件
若是没有进行映射,不需要进行创建
conf.d配置创建:
- 按照上面的配置,创建对应的
conf.d文件夹 - 进入文件夹,创建
defualt.conf文件 - 设置文件内容(注释不需要加)
server {# server块
    listen 80; # 代表nginx监听的端口号
    server_name  localhost;
    location / { # 代表nginx接收请求的ip
        root   /usr/share/nginx/html; # 将接收到的请求根据/usr/share/nginx/html去查找静态资源
        index  index.html index.htm; # 默认去上述的路径中找到index.html 或index.htm文件
    }
    error_page 500 502 503 504 /50x.html; # 当返回这几个状态码的时候,统一调用的页面,调用的是 /50x.html页面,然后在下面就配置了 /50x.html
    location = 50x.html { # 配置/50x.html的位置
        root /usr/share/nginx/html;
    }

}
创建nginx.conf
- 按照上面的路径,创建
nginx.conf文件 - 设置文件内容
user  nginx;
worker_processes  1;

error_log  /var/log/nginx/error.log warn;
pid        /var/run/nginx.pid;

events {
    worker_connections  1024;
}

http {
    include       /etc/nginx/mime.types;
    default_type  application/octet-stream;

    log_format  main  '$remote_addr - $remote_user [$time_local] "$request" '
                      '$status $body_bytes_sent "$http_referer" '
                      '"$http_user_agent" "$http_x_forwarded_for"';

    access_log  /var/log/nginx/access.log  main;

    sendfile        on;
    #tcp_nopush     on;

    keepalive_timeout  65;

    #gzip  on;

    include /etc/nginx/conf.d/*.conf;
}
构建Nginx容器
- 运行
docker-compose up -d - 打开浏览器,访问这个服务器的80端口,就能进入docker的首页
若是没有使用volumes映射conf.d文件夹,那么nginx容器内部的conf.d文件夹中会有一个
default.conf文件,在容器外访问 80端口的时候,会调用这个配置,进入nginx的初始页面.若是使用volumes映射了conf.d文件夹,那么,将会在磁盘的对应的路径中生成conf.d文件夹,但是这个路径中默认是没有
default.conf文件的,现在访问nginx页面,会进不去,因为在conf.d文件夹下没有默认配置,找不到对应的配置,需要我们手动创建一个default.conf文件.
容器操作
- 进入nginx容器:
docker exec -it nginx bash - 退出容器
exit - 重新构建容器:
# 需要在这个容器的docker-compose.yml文件目录下
docker-compose down
docker-compose build #重新构建
docker-compose up -d
- 重启容器
方法1:
docker restart nginx
方法2:
在nginx的 docker-compose.yml文件夹下运行
docker-compose restart- 启动/停止容器
上面的命令将 restart换为 start/stop 即可
nginx配置
默认在容器的
/etc/nginx中
- 进入nginx容器:
docker exec -it nginx bash - 进入:
cd /etc/nginx - 打开配置文件:
cat nginx.conf
/etc/nginx/nginx.conf文件
user  nginx;
worker_processes  1; # worker_processes的值越大,Nginx的并发能力越强

error_log  /var/log/nginx/error.log warn; # 代表nginx的错误日志存放的位置
pid        /var/run/nginx.pid;  # nginx运行的标志

# 以上统称为全局块,
events { # events块
    worker_connections  1024; # worker_connections数值越大,nginx并发能力越强
}


http { # http块
    include       /etc/nginx/mime.types; #include代表引入一个外部的文件 ->mime.types中放着大量的媒体类型
    default_type  application/octet-stream;

    include /etc/nginx/conf.d/*.conf; # 引入了conf.d目录下的以.conf为结尾的配置文件,在整个http块中,主要关注这个就够了,后期主要就是在编写这个目录下的配置文件
}
/etc/nginx/conf.d/defualt.conf文件
这个文件是在http快中引入的,相当于在nginx.conf文件中替换了http中的include /etc/nginx/conf.d/*.conf;
server {# server块
    listen       80; # 代表nginx监听的端口号
    listen  [::]:80;
    server_name  localhost;
    location / { # 代表nginx接收请求的ip
        root   /usr/share/nginx/html; # 将接收到的请求根据/usr/share/nginx/html去查找静态资源
        index  index.html index.htm; # 默认去上述的路径中找到index.html 或index.htm文件
    }

    error_page   500 502 503 504  /50x.html;
    location = /50x.html {
        root   /usr/share/nginx/html;
    }

}真正要关注的是nginx.conf中http块中的include中的/etc/nginx/conf.d/中的所有的conf文件的server块

安装vim
容器中默认一般是没有安装vim/vi的,编辑不方便
apt-get update # 更新
apt-get install vim # 安装
注意,有的时候容器中缺少太多的组件,所以vim可能安装失败,比如
root@cbca72d2dee0:/# apt-get install vim
Reading package lists... Done
Building dependency tree
Reading state information... Done
Some packages could not be installed. This may mean that you have
requested an impossible situation or if you are using the unstable
distribution that some required packages have not yet been created
or been moved out of Incoming.
The following information may help to resolve the situation:

The following packages have unmet dependencies:
 vim : Depends: libpython2.7 (>= 2.7) but it is not going to be installed
       Depends: libtinfo5 but it is not going to be installed
E: Unable to correct problems, you have held broken packages.
提示libpython2.7 (>= 2.7)和libtinfo5,这种安装一下libtinfo5就行了
apt-get install libtinfo5
# 安装的中途会让我们确认,不同的组件的要求不同,比如这个的要求是
To continue type in the phrase 'Yes, do as I say!'
?]

# 所以需要输入的是
Yes, do as I say!

# 下载完之后,再安装vim
apt-get install vim
 # 中间会让输入  y 确认