第二十一讲!
1、上机动手实战演练基于_version进行乐观锁并发控制
(1)先构造一条数据出来
PUT /test_index/test_type/7
{
"test_field": "test test"
}
(2)模拟两个客户端,都获取到了同一条数据
GET test_index/test_type/7
{
"_index": "test_index",
"_type": "test_type",
"_id": "7",
"_version": 1,
"found": true,
"_source": {
"test_field": "test test"
}
}
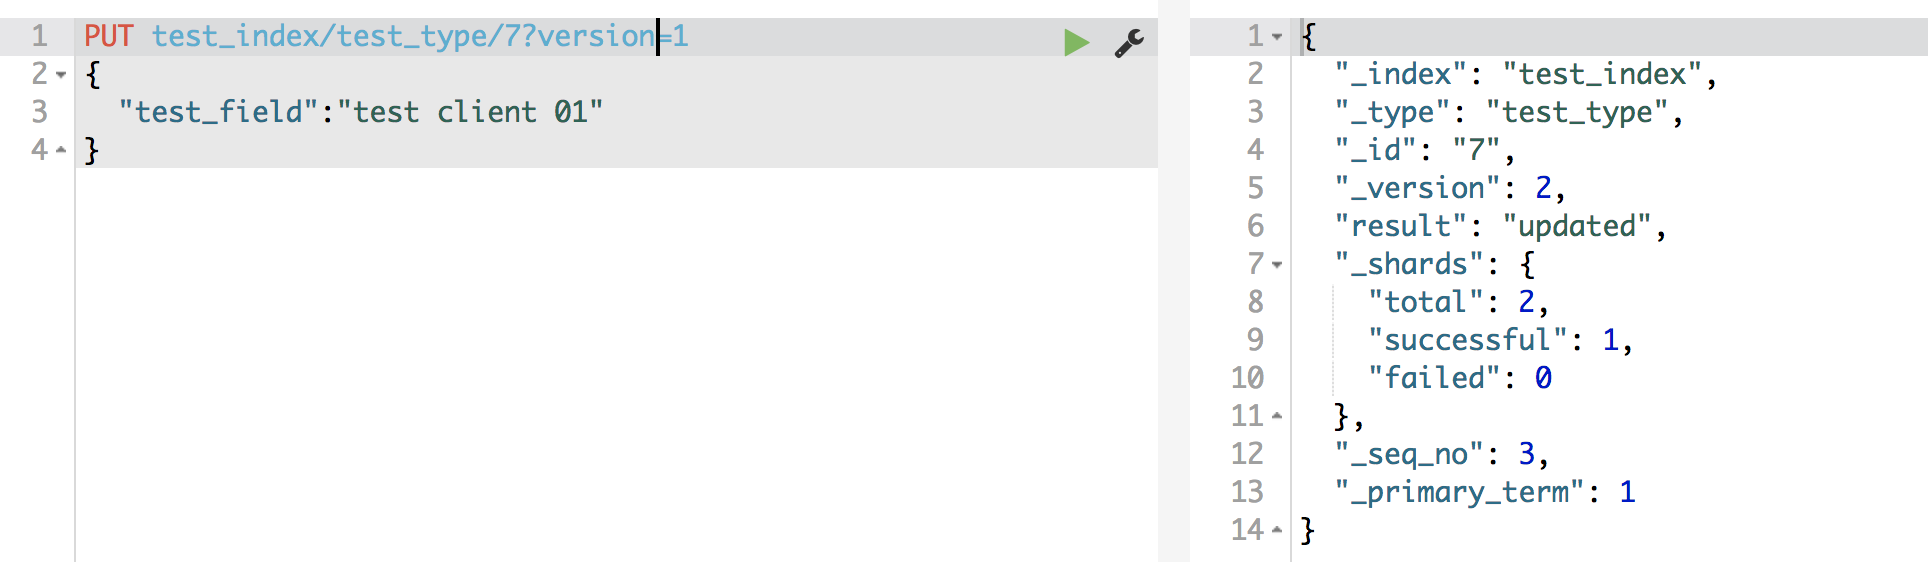
(3)其中一个客户端,先更新了一下这个数据
同时带上数据的版本号,确保说,es中的数据的版本号,跟客户端中的数据的版本号是相同的,才能修改
PUT /test_index/test_type/7?version=1
{
"test_field": "test client 1"
}
{
"_index": "test_index",
"_type": "test_type",
"_id": "7",
"_version": 2,
"result": "updated",
"_shards": {
"total": 2,
"successful": 1,
"failed": 0
},
"created": false
}
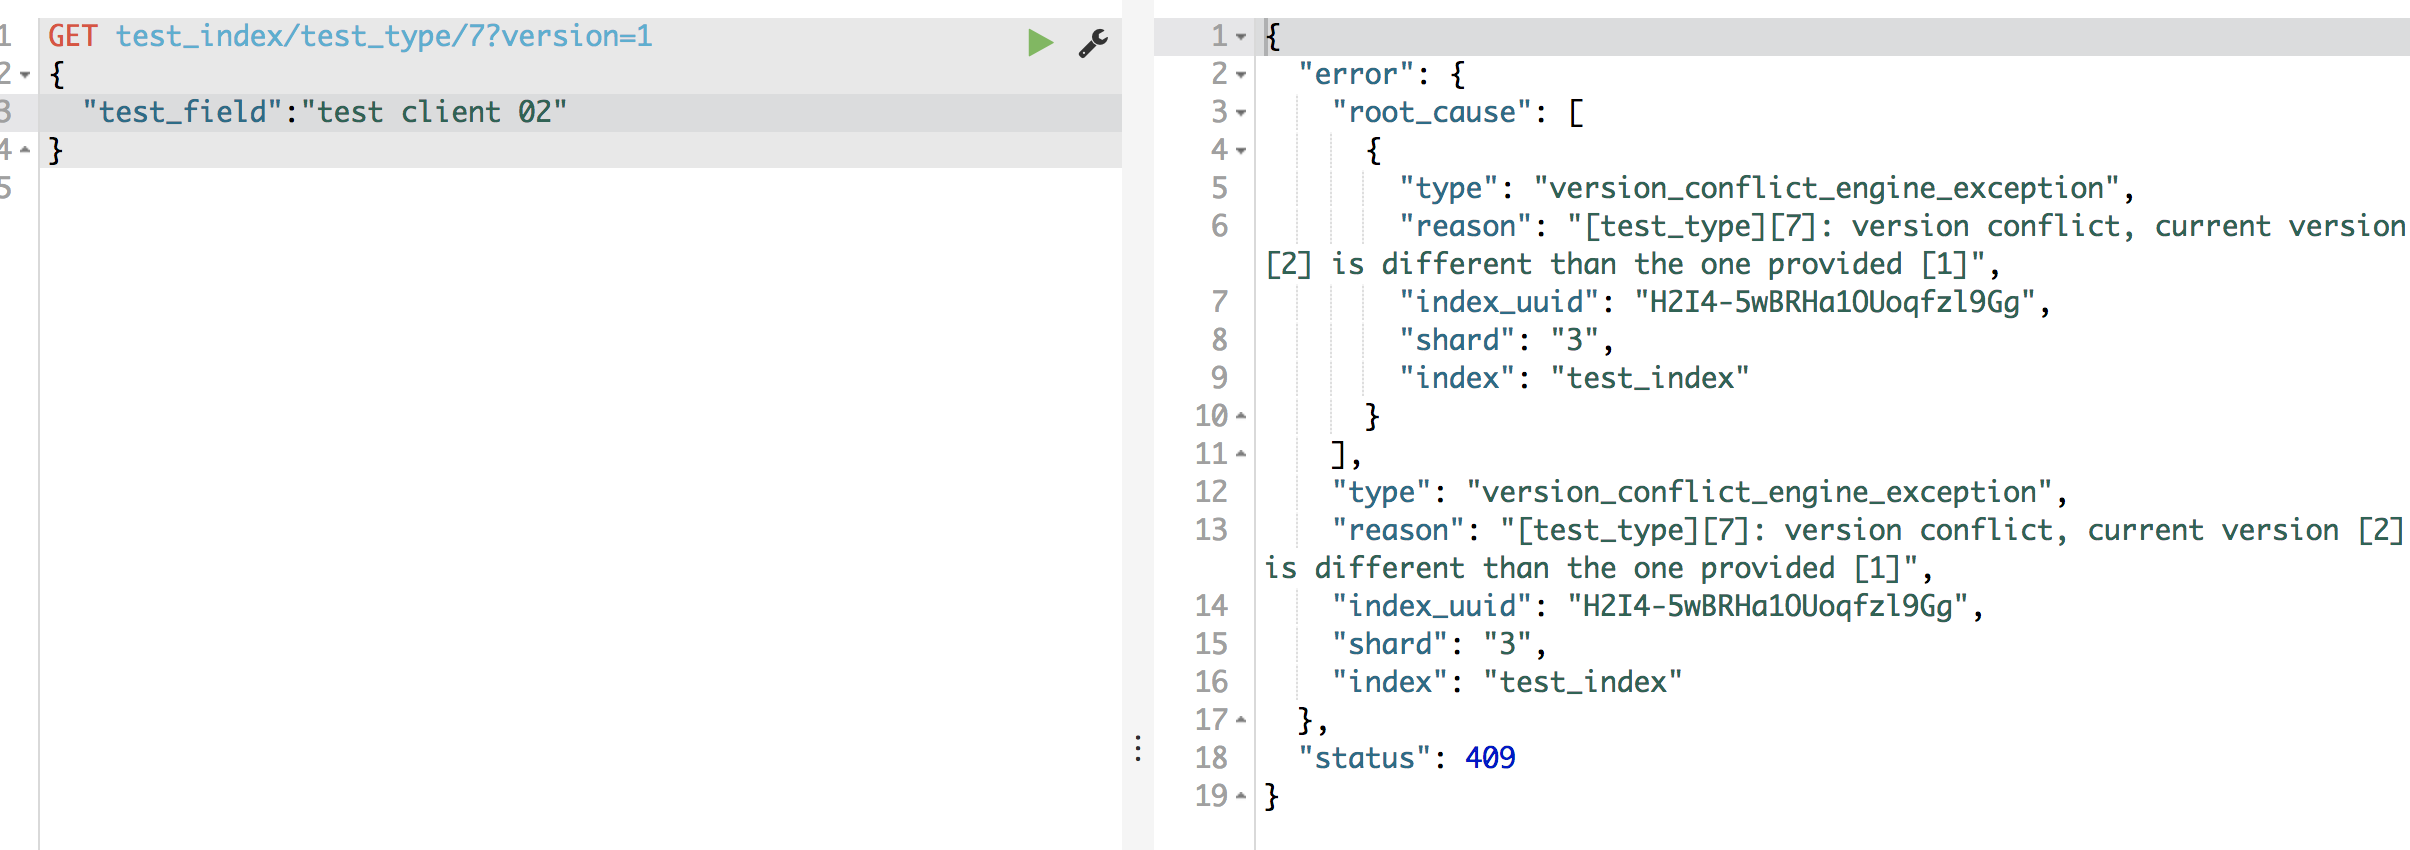
(4)另外一个客户端,尝试基于version=1的数据去进行修改,同样带上version版本号,进行乐观锁的并发控制
PUT /test_index/test_type/7?version=1
{
"test_field": "test client 2"
}
{
"error": {
"root_cause": [
{
"type": "version_conflict_engine_exception",
"reason": "[test_type][7]: version conflict, current version [2] is different than the one provided [1]",
"index_uuid": "6m0G7yx7R1KECWWGnfH1sw",
"shard": "3",
"index": "test_index"
}
],
"type": "version_conflict_engine_exception",
"reason": "[test_type][7]: version conflict, current version [2] is different than the one provided [1]",
"index_uuid": "6m0G7yx7R1KECWWGnfH1sw",
"shard": "3",
"index": "test_index"
},
"status": 409
}
(5)在乐观锁成功阻止并发问题之后,尝试正确的完成更新
GET /test_index/test_type/7
{
"_index": "test_index",
"_type": "test_type",
"_id": "7",
"_version": 2,
"found": true,
"_source": {
"test_field": "test client 1"
}
}
基于最新的数据和版本号,去进行修改,修改后,带上最新的版本号,可能这个步骤会需要反复执行好几次,才能成功,特别是在多线程并发更新同一条数据很频繁的情况下
PUT /test_index/test_type/7?version=2
{
"test_field": "test client 2"
}
{
"_index": "test_index",
"_type": "test_type",
"_id": "7",
"_version": 3,
"result": "updated",
"_shards": {
"total": 2,
"successful": 1,
"failed": 0
},
"created": false
}
带上版本号更新
乐观锁生效
基于最新的数据和版本号去更新修改
第二十二讲!
课程大纲
1、上机动手实战演练基于external version进行乐观锁并发控制
external version
es提供了一个feature,就是说,你可以不用它提供的内部_version版本号来进行并发控制,可以基于你自己维护的一个版本号来进行并发控制。举个列子,加入你的数据在mysql里也有一份,然后你的应用系统本身就维护了一个版本号,无论是什么自己生成的,程序控制的。这个时候,你进行乐观锁并发控制的时候,可能并不是想要用es内部的_version来进行控制,而是用你自己维护的那个version来进行控制。
?version=1
?version=1&version_type=external
version_type=external,唯一的区别在于,_version,只有当你提供的version与es中的_version一模一样的时候,才可以进行修改,只要不一样,就报错;当version_type=external的时候,只有当你提供的version比es中的_version大的时候,才能完成修改
es,_version=1,?version=1,才能更新成功
es,_version=1,?version>1&version_type=external,才能成功,比如说?version=2&version_type=external
(1)先构造一条数据
PUT /test_index/test_type/8
{
"test_field": "test"
}
{
"_index": "test_index",
"_type": "test_type",
"_id": "8",
"_version": 1,
"result": "created",
"_shards": {
"total": 2,
"successful": 1,
"failed": 0
},
"created": true
}
(2)模拟两个客户端同时查询到这条数据
GET /test_index/test_type/8
{
"_index": "test_index",
"_type": "test_type",
"_id": "8",
"_version": 1,
"found": true,
"_source": {
"test_field": "test"
}
}
(3)第一个客户端先进行修改,此时客户端程序是在自己的数据库中获取到了这条数据的最新版本号,比如说是2
PUT /test_index/test_type/8?version=2&version_type=external
{
"test_field": "test client 1"
}
{
"_index": "test_index",
"_type": "test_type",
"_id": "8",
"_version": 2,
"result": "updated",
"_shards": {
"total": 2,
"successful": 1,
"failed": 0
},
"created": false
}
(4)模拟第二个客户端,同时拿到了自己数据库中维护的那个版本号,也是2,同时基于version=2发起了修改
PUT /test_index/test_type/8?version=2&version_type=external
{
"test_field": "test client 2"
}
{
"error": {
"root_cause": [
{
"type": "version_conflict_engine_exception",
"reason": "[test_type][8]: version conflict, current version [2] is higher or equal to the one provided [2]",
"index_uuid": "6m0G7yx7R1KECWWGnfH1sw",
"shard": "1",
"index": "test_index"
}
],
"type": "version_conflict_engine_exception",
"reason": "[test_type][8]: version conflict, current version [2] is higher or equal to the one provided [2]",
"index_uuid": "6m0G7yx7R1KECWWGnfH1sw",
"shard": "1",
"index": "test_index"
},
"status": 409
}
(5)在并发控制成功后,重新基于最新的版本号发起更新
GET /test_index/test_type/8
{
"_index": "test_index",
"_type": "test_type",
"_id": "8",
"_version": 2,
"found": true,
"_source": {
"test_field": "test client 1"
}
}
PUT /test_index/test_type/8?version=3&version_type=external
{
"test_field": "test client 2"
}
{
"_index": "test_index",
"_type": "test_type",
"_id": "8",
"_version": 3,
"result": "updated",
"_shards": {
"total": 2,
"successful": 1,
"failed": 0
},
"created": false
}
第二十三讲!
课程大纲
1、什么是partial update?
PUT /index/type/id,创建文档&替换文档,就是一样的语法
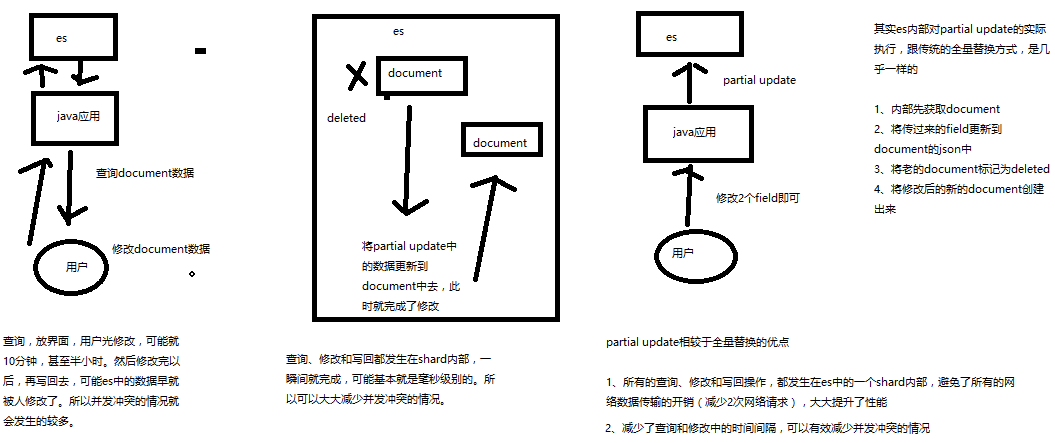
一般对应到应用程序中,每次的执行流程基本是这样的:
(1)应用程序先发起一个get请求,获取到document,展示到前台界面,供用户查看和修改
(2)用户在前台界面修改数据,发送到后台
(3)后台代码,会将用户修改的数据在内存中进行执行,然后封装好修改后的全量数据
(4)然后发送PUT请求,到es中,进行全量替换
(5)es将老的document标记为deleted,然后重新创建一个新的document
partial update
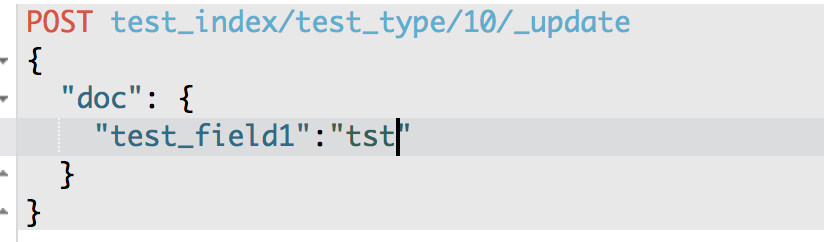
post /index/type/id/_update
{
"doc": {
"要修改的少数几个field即可,不需要全量的数据"
}
}
看起来,好像就比较方便了,每次就传递少数几个发生修改的field即可,不需要将全量的document数据发送过去
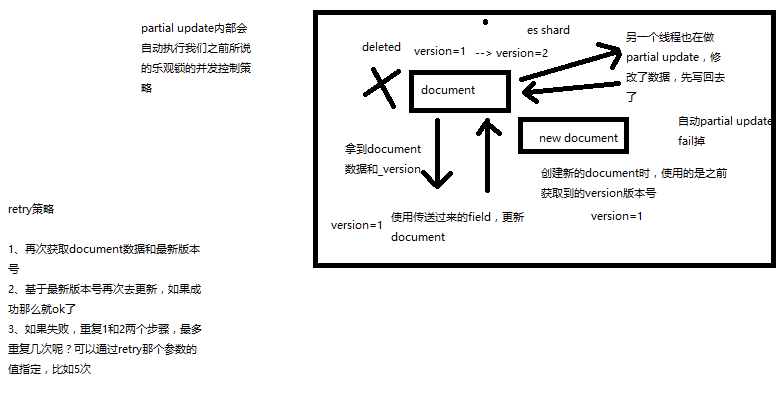
2、图解partial update实现原理以及其优点
partial update,看起来很方便的操作,实际内部的原理是什么样子的,然后它的优点是什么
3、上机动手实战演练partial update
PUT /test_index/test_type/10
{
"test_field1": "test1",
"test_field2": "test2"
}
POST /test_index/test_type/10/_update
{
"doc": {
"test_field2": "updated test2"
}
}
查询 修改和写回都发生在shard内部
第二十四讲!
课程大纲
es,其实是有个内置的脚本支持的,可以基于groovy脚本实现各种各样的复杂操作
基于groovy脚本,如何执行partial update
es scripting module,我们会在高手进阶篇去讲解,这里就只是初步讲解一下
PUT /test_index/test_type/11
{
"num": 0,
"tags": []
}
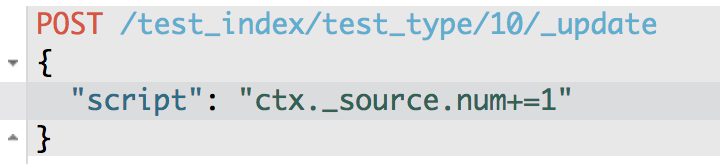
(1)内置脚本
POST /test_index/test_type/11/_update
{
"script" : "ctx._source.num+=1"
}
{
"_index": "test_index",
"_type": "test_type",
"_id": "11",
"_version": 2,
"found": true,
"_source": {
"num": 1,
"tags": []
}
}
(2)外部脚本
ctx._source.tags+=new_tag
POST /test_index/test_type/11/_update
{
"script": {
"lang": "groovy",
"file": "test-add-tags",
"params": {
"new_tag": "tag1"
}
}
}

(3)用脚本删除文档
ctx.op = ctx._source.num == count ? 'delete' : 'none'
POST /test_index/test_type/11/_update
{
"script": {
"lang": "groovy",
"file": "test-delete-document",
"params": {
"count": 1
}
}
}
(4)upsert操作
POST /test_index/test_type/11/_update
{
"doc": {
"num": 1
}
}
{
"error": {
"root_cause": [
{
"type": "document_missing_exception",
"reason": "[test_type][11]: document missing",
"index_uuid": "6m0G7yx7R1KECWWGnfH1sw",
"shard": "4",
"index": "test_index"
}
],
"type": "document_missing_exception",
"reason": "[test_type][11]: document missing",
"index_uuid": "6m0G7yx7R1KECWWGnfH1sw",
"shard": "4",
"index": "test_index"
},
"status": 404
}
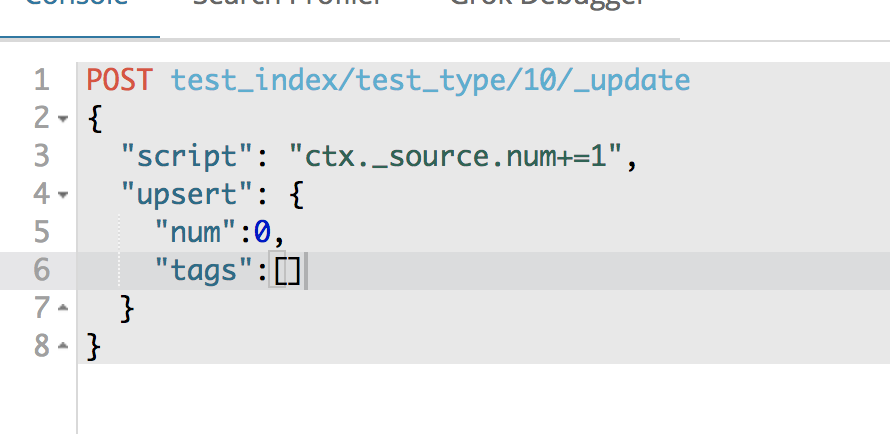
如果指定的document不存在,就执行upsert中的初始化操作;如果指定的document存在,就执行doc或者script指定的partial update操作
POST /test_index/test_type/11/_update
{
"script" : "ctx._source.num+=1",
"upsert": {
"num": 0,
"tags": []
}
}
第二十五讲!
课程大纲
(1)partial update内置乐观锁并发控制
(2)retry_on_conflict
(3)_version
post /index/type/id/_update?retry_on_conflict=5&version=6
retry策略:
再次获取 document数据和最新版本号
第二十六讲!
课程大纲
1、批量查询的好处
就是一条一条的查询,比如说要查询100条数据,那么就要发送100次网络请求,这个开销还是很大的
如果进行批量查询的话,查询100条数据,就只要发送1次网络请求,网络请求的性能开销缩减100倍
2、mget的语法
(1)一条一条的查询
GET /test_index/test_type/1
GET /test_index/test_type/2
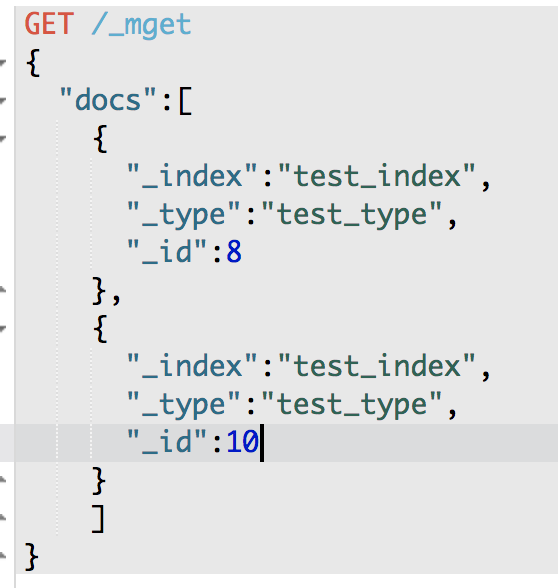
(2)mget批量查询
GET /_mget
{
"docs" : [
{
"_index" : "test_index",
"_type" : "test_type",
"_id" : 1
},
{
"_index" : "test_index",
"_type" : "test_type",
"_id" : 2
}
]
}
{
"docs": [
{
"_index": "test_index",
"_type": "test_type",
"_id": "1",
"_version": 2,
"found": true,
"_source": {
"test_field1": "test field1",
"test_field2": "test field2"
}
},
{
"_index": "test_index",
"_type": "test_type",
"_id": "2",
"_version": 1,
"found": true,
"_source": {
"test_content": "my test"
}
}
]
}
(3)如果查询的document是一个index下的不同type种的话
GET /test_index/_mget
{
"docs" : [
{
"_type" : "test_type",
"_id" : 1
},
{
"_type" : "test_type",
"_id" : 2
}
]
}
(4)如果查询的数据都在同一个index下的同一个type下,最简单了
GET /test_index/test_type/_mget
{
"ids": [1, 2]
}
3、mget的重要性
可以说mget是很重要的,一般来说,在进行查询的时候,如果一次性要查询多条数据的话,那么一定要用batch批量操作的api
尽可能减少网络开销次数,可能可以将性能提升数倍,甚至数十倍,非常非常之重要
第二十七讲!
课程大纲
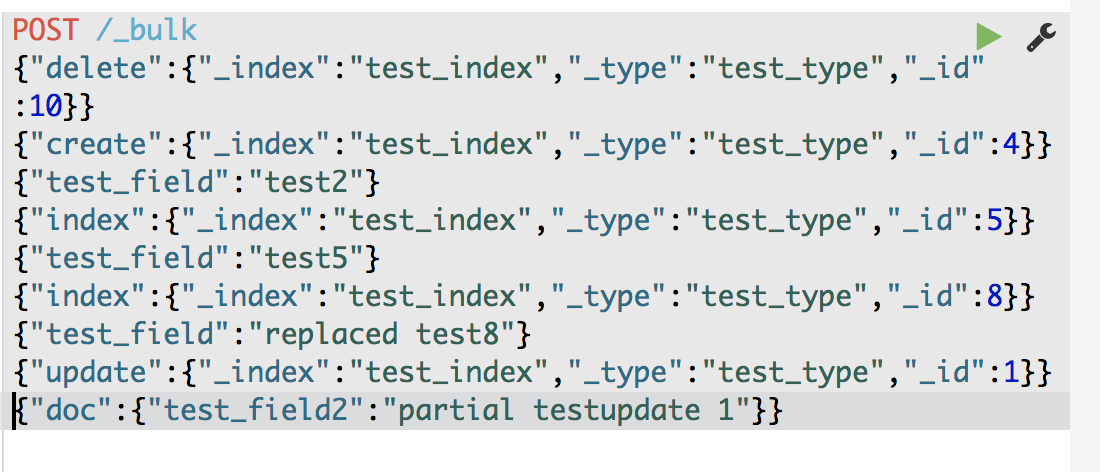
1、bulk语法
POST /_bulk
{ "delete": { "_index": "test_index", "_type": "test_type", "_id": "3" }}
{ "create": { "_index": "test_index", "_type": "test_type", "_id": "12" }}
{ "test_field": "test12" }
{ "index": { "_index": "test_index", "_type": "test_type", "_id": "2" }}
{ "test_field": "replaced test2" }
{ "update": { "_index": "test_index", "_type": "test_type", "_id": "1", "_retry_on_conflict" : 3} }
{ "doc" : {"test_field2" : "bulk test1"} }
每一个操作要两个json串,语法如下:
{"action": {"metadata"}}
{"data"}
举例,比如你现在要创建一个文档,放bulk里面,看起来会是这样子的:
{"index": {"_index": "test_index", "_type", "test_type", "_id": "1"}}
{"test_field1": "test1", "test_field2": "test2"}
有哪些类型的操作可以执行呢?
(1)delete:删除一个文档,只要1个json串就可以了
(2)create:PUT /index/type/id/_create,强制创建
(3)index:普通的put操作,可以是创建文档,也可以是全量替换文档
(4)update:执行的partial update操作
bulk api对json的语法,有严格的要求,每个json串不能换行,只能放一行,同时一个json串和一个json串之间,必须有一个换行
{
"error": {
"root_cause": [
{
"type": "json_e_o_f_exception",
"reason": "Unexpected end-of-input: expected close marker for Object (start marker at [Source: org.elasticsearch.transport.netty4.ByteBufStreamInput@5a5932cd; line: 1, column: 1])
at [Source: org.elasticsearch.transport.netty4.ByteBufStreamInput@5a5932cd; line: 1, column: 3]"
}
],
"type": "json_e_o_f_exception",
"reason": "Unexpected end-of-input: expected close marker for Object (start marker at [Source: org.elasticsearch.transport.netty4.ByteBufStreamInput@5a5932cd; line: 1, column: 1])
at [Source: org.elasticsearch.transport.netty4.ByteBufStreamInput@5a5932cd; line: 1, column: 3]"
},
"status": 500
}
{
"took": 41,
"errors": true,
"items": [
{
"delete": {
"found": true,
"_index": "test_index",
"_type": "test_type",
"_id": "10",
"_version": 3,
"result": "deleted",
"_shards": {
"total": 2,
"successful": 1,
"failed": 0
},
"status": 200
}
},
{
"create": {
"_index": "test_index",
"_type": "test_type",
"_id": "3",
"_version": 1,
"result": "created",
"_shards": {
"total": 2,
"successful": 1,
"failed": 0
},
"created": true,
"status": 201
}
},
{
"create": {
"_index": "test_index",
"_type": "test_type",
"_id": "2",
"status": 409,
"error": {
"type": "version_conflict_engine_exception",
"reason": "[test_type][2]: version conflict, document already exists (current version [1])",
"index_uuid": "6m0G7yx7R1KECWWGnfH1sw",
"shard": "2",
"index": "test_index"
}
}
},
{
"index": {
"_index": "test_index",
"_type": "test_type",
"_id": "4",
"_version": 1,
"result": "created",
"_shards": {
"total": 2,
"successful": 1,
"failed": 0
},
"created": true,
"status": 201
}
},
{
"index": {
"_index": "test_index",
"_type": "test_type",
"_id": "2",
"_version": 2,
"result": "updated",
"_shards": {
"total": 2,
"successful": 1,
"failed": 0
},
"created": false,
"status": 200
}
},
{
"update": {
"_index": "test_index",
"_type": "test_type",
"_id": "1",
"_version": 3,
"result": "updated",
"_shards": {
"total": 2,
"successful": 1,
"failed": 0
},
"status": 200
}
}
]
}
bulk操作中,任意一个操作失败,是不会影响其他的操作的,但是在返回结果里,会告诉你异常日志
POST /test_index/_bulk
{ "delete": { "_type": "test_type", "_id": "3" }}
{ "create": { "_type": "test_type", "_id": "12" }}
{ "test_field": "test12" }
{ "index": { "_type": "test_type" }}
{ "test_field": "auto-generate id test" }
{ "index": { "_type": "test_type", "_id": "2" }}
{ "test_field": "replaced test2" }
{ "update": { "_type": "test_type", "_id": "1", "_retry_on_conflict" : 3} }
{ "doc" : {"test_field2" : "bulk test1"} }
POST /test_index/test_type/_bulk
{ "delete": { "_id": "3" }}
{ "create": { "_id": "12" }}
{ "test_field": "test12" }
{ "index": { }}
{ "test_field": "auto-generate id test" }
{ "index": { "_id": "2" }}
{ "test_field": "replaced test2" }
{ "update": { "_id": "1", "_retry_on_conflict" : 3} }
{ "doc" : {"test_field2" : "bulk test1"} }
2、bulk size最佳大小
bulk request会加载到内存里,如果太大的话,性能反而会下降,因此需要反复尝试一个最佳的bulk size。一般从1000~5000条数据开始,尝试逐渐增加。另外,如果看大小的话,最好是在5~15MB之间。
第二十八讲!
课程大纲
1、阶段性总结
1~8讲:快速入门了一下,最基本的原理,最基本的操作
9~13讲:在入门之后,对ES的分布式的基本原理,进行了相对深入一些的剖析
14~27讲:围绕着document这个东西,进行操作,进行讲解和分析
2、什么是distributed document store
到目前为止,你觉得你在学什么东西,给大家一个直观的感觉,好像已经知道了es是分布式的,包括一些基本的原理,然后花了不少时间在学习document本身相关的操作,增删改查。一句话点出来,给大家归纳总结一下,其实我们应该思考一下,es的一个最最核心的功能,已经被我们相对完整的讲完了。
Elasticsearch在跑起来以后,其实起到的第一个最核心的功能,就是一个分布式的文档数据存储系统。ES是分布式的。文档数据存储系统。文档数据,存储系统。
文档数据:es可以存储和操作json文档类型的数据,而且这也是es的核心数据结构。
存储系统:es可以对json文档类型的数据进行存储,查询,创建,更新,删除,等等操作。其实已经起到了一个什么样的效果呢?其实ES满足了这些功能,就可以说已经是一个NoSQL的存储系统了。
围绕着document在操作,其实就是把es当成了一个NoSQL存储引擎,一个可以存储文档类型数据的存储系统,在操作里面的document。
es可以作为一个分布式的文档存储系统,所以说,我们的应用系统,是不是就可以基于这个概念,去进行相关的应用程序的开发了。
什么类型的应用程序呢?
(1)数据量较大,es的分布式本质,可以帮助你快速进行扩容,承载大量数据
(2)数据结构灵活多变,随时可能会变化,而且数据结构之间的关系,非常复杂,如果我们用传统数据库,那是不是很坑,因为要面临大量的表
(3)对数据的相关操作,较为简单,比如就是一些简单的增删改查,用我们之前讲解的那些document操作就可以搞定
(4)NoSQL数据库,适用的也是类似于上面的这种场景
举个例子,比如说像一些网站系统,或者是普通的电商系统,博客系统,面向对象概念比较复杂,但是作为终端网站来说,没什么太复杂的功能,就是一些简单的CRUD操作,而且数据量可能还比较大。这个时候选用ES这种NoSQL型的数据存储,比传统的复杂的功能务必强大的支持SQL的关系型数据库,更加合适一些。无论是性能,还是吞吐量,可能都会更好。
第二十九讲!
课程大纲
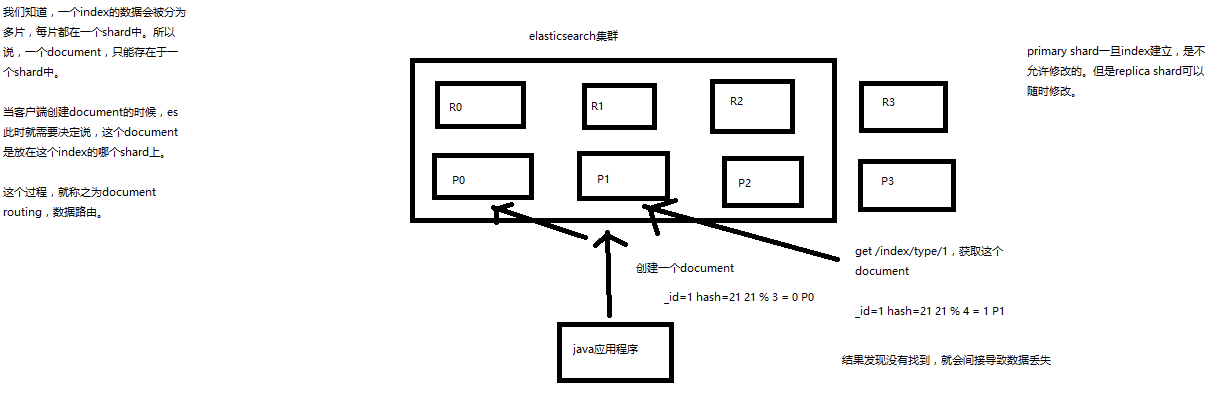
(1)document路由到shard上是什么意思?
数据路由:当客户端创建document的时候,es此时需要决定将这个document放到index的哪个shard上面,这个过程就叫做document routing,数据路由
(2)路由算法:shard = hash(routing) % number_of_primary_shards
举个例子,一个index有3个primary shard,P0,P1,P2
每次增删改查一个document的时候,都会带过来一个routing number,默认就是这个document的_id(可能是手动指定,也可能是自动生成)
routing = _id,假设_id=1
会将这个routing值,传入一个hash函数中,产出一个routing值的hash值,hash(routing) = 21
然后将hash函数产出的值对这个index的primary shard的数量求余数,21 % 3 = 0
就决定了,这个document就放在P0上。
决定一个document在哪个shard上,最重要的一个值就是routing值,默认是_id,也可以手动指定,相同的routing值,每次过来,从hash函数中,产出的hash值一定是相同的
无论hash值是几,无论是什么数字,对number_of_primary_shards求余数,结果一定是在0~number_of_primary_shards-1之间这个范围内的。0,1,2。
(3)_id or custom routing value
默认的routing就是_id
也可以在发送请求的时候,手动指定一个routing value,比如说put /index/type/id?routing=user_id
手动指定routing value是很有用的,可以保证说,某一类document一定被路由到一个shard上去,那么在后续进行应用级别的负载均衡,以及提升批量读取的性能的时候,是很有帮助的
(4)primary shard数量不可变的谜底
shard不可变是因为hash 路由算法都固定了 要是primary shard 的数量多了document的获取结果可能出错 找不到对应的document
第三十讲!
document的crud内部实现原理
课程大纲
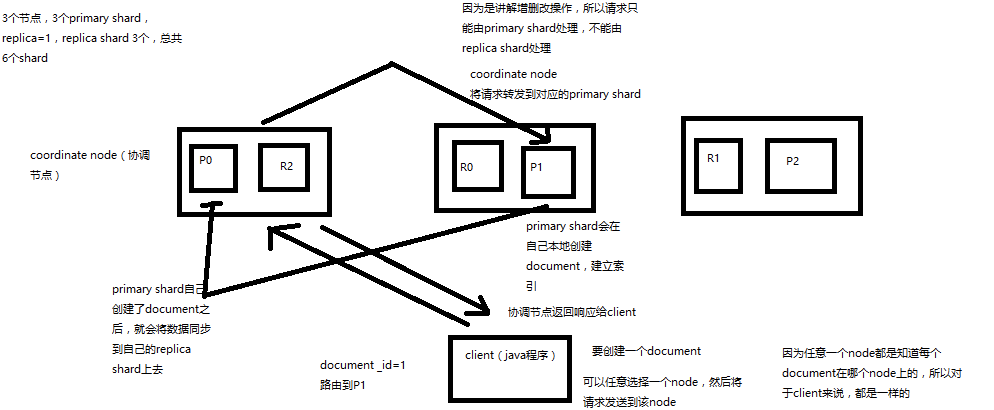
(增删改操作只能有primary shard处理 不能有replica shard 处理 先由primary shard 处理 然后将操作同步到对应的replica shard)
分清楚 node 、shard的区别
(1)客户端选择一个node发送请求过去,这个node就是coordinating node(协调节点)
(2)coordinating node,对document进行路由,将请求转发给对应的node(有primary shard)
(3)实际的node上的primary shard处理请求,然后将数据同步到replica node
(4)coordinating node,如果发现primary node和所有replica node都搞定之后,就返回响应结果给客户端