最近这一段时间对我的博客园样式做了一些调整。总体样式改变了不少。在这里就分享下我的过程。
一、博客园后台管理
1、申请 JS 权限
这是第一步,如果需要定制的样式就需要先申请 JS 权限。
登录博客园后,管理=》设置,这这个面板里面有申请的按钮。
申请后等待审核,审核通过后就可以设置了。
2、侧边栏基本设置
这一部分主要是对侧边栏选项卡、数据条数等的显示控制。
在:管理=》选项,这个面板中设置(这里根据自己喜好设置)
3、设置板块功能分析
设置面板有几个地方可以写代码分别介绍下。
1)、页面定制 CSS 代码
这里可以对页面中的任何地方的样式进行设置,在设置前首相需要对页面的结构了解清楚
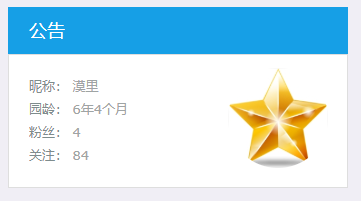
2)、博客侧边栏公告
这部分主要是针对侧边栏的公告设置的
3)、页首 HTML 代码
这里输入的代码会插入在页首,在 id 为 “page_begin_html” 的容器内
4)、页脚 HTML 代码
这里输入的代码会插入在页尾,在 id 为 “page_end_html” 的容器内
二、侧边栏样式调整
我对侧边栏做的调整有两处地方。
1、公告栏添加头像
在:选项=》博客侧边栏公告,这里对公告内容样式调整
<div align="center" style="postion">
  <a href="https://www.cnblogs.com/zhurong/">
    <img style="position: absolute;right: 20px;top: 14px; 100px;height: 100px;border-radius: 50%;"
      src="//pic.cnblogs.com/avatar/592961/20180802101346.png">
  </a>
</div>
这个调整是在公告栏里面加入自己的头像,并可以点击到博客地址。
效果:
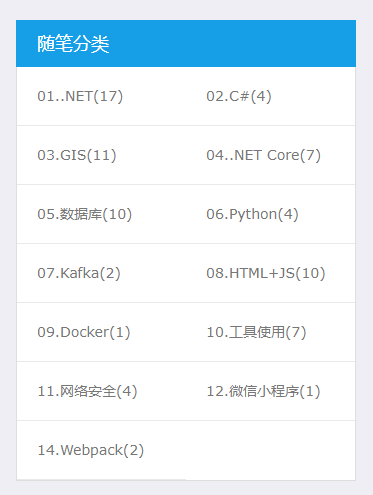
2、随笔分类换行
我随笔分类名字都比较短,就想把这些两个两个一行,同时也对整个页面中内容布局大小做了调整。
主要是在:选项=》 “页面定制 CSS 代码” 中输入以下代码:
/*内容、右侧菜单样式*/
#main {
  width: 1300px;
}

#mainContent {
  width: 940px;
}

#sideBar {
  width: 340px;
}

#blog-news {
  position: relative;
}

#sidebar_postcategory ul {
  display: flex;
  flex-direction: row;
  flex-wrap: wrap;
}

#sidebar_postcategory li {
  width: 139px;
}

#under_post_news,
#under_post_kb {
  border: 0;
  padding: 0;
}
效果:
三、回到顶部、进度条
1、回到顶部
这一部分代码主要是放在了:选项=》“页首 HTML 代码” 这里面,
具体代码:
<!-- 回到顶部 -->
<style>
  #back-top {
    position: fixed;
    bottom: 5rem;
    right: 5rem;
    z-index: 10;
  }

  #back-top span {
    width: 50px;
    height: 64px;
    display: block;
    background: url(http://images.cnblogs.com/cnblogs_com/seanshao/855033/o_rocket.png) no-repeat center center;
  }

  #back-top a {
    outline: none
  }
</style>
<script type="text/javascript">
  $(function () {
    // 默认是隐藏“回到顶部”按钮
    $("#back-top").hide();
    // 滚动距离顶部 500 像素时 淡入、淡出
    $(window).scroll(function () {
      if ($(this).scrollTop() > 500) {
        $('#back-top').fadeIn();
      } else {
        $('#back-top').fadeOut();
      }
    });
    // 回到顶部,点击事件
    $('#back-top a').click(function () {
      $('body,html').animate({
        scrollTop: 0
      }, 800);
      return false;
    });
  });
</script>
<p id="back-top" style="display:none" title="回到页面顶部"><a href="#top"><span></span></a></p>
这个样式是当距离顶部一定距离才显示这个按钮。
2、进度条
进度条我是放在了页面底部,所以代码放在了:选项=》“页脚 HTML 代码”,主要代码是:
<!-- 进度条 -->
<style>
  progress {
    position: fixed;
    left: 0;
    right: 0;
    bottom: 0;
    width: 100%;
    text-align: center;
    height: 0.5rem;
    border: 1px solid #999;
    border-radius: 1rem;
    z-index: 5;
    -webkit-apperance: none;
  }

  ::-webkit-progress-bar {
    background-color: #eee;
    border-radius: 1rem;
  }

  ::-webkit-progress-value {
    background-color: #169fe6ad;
    border-radius: 1rem;
  }
</style>
<script>
  // 生成元素并添加到文档尾部
  var progress = document.createElement('progress');
  progress.id = 'progress';
  document.body.appendChild(progress);

  // 计算当前页面的高度并赋值给进度条
  var H;
  window.onload = function () {
    progress.max = H = home.scrollHeight;
    progress.value = 0;
  }

  // 监听滚动,实时计算滚动条进度值
  window.onscroll = function () {
    var h = document.documentElement.scrollTop || document.body.scrollTop;
    progress.value = h;
    var radio = (h / H >= 1) ? 1 : h / H;
    progress.innerHTML = progress.title = Math.floor(100 * radio) + '%';
  }
</script>
进度条的位置、样式可以根据自己喜好进行设置。
四、目录
想使自己写的文章能够自动生成统一的目录样式、功能,需要设置两个地方:
1、后台管理自动生成目录
这里是把文章中的 h 标签提前处理,生成标签。
功能:
- 最多可生成3级标题
- 文章中的标题必须是 h1、h2、h3 这三个的组合
(这里是根据当前代码设定的,可以根据实际情况修改代码,以达到其他效果)
具体的代码:
<!-- 目录索引列表生成 -->
<script>
  function GenerateContentList() {
    if ($('#cnblogs_post_body').length == 0) {
      return;
    }
    // 先取出三级标题标签
    var jquery_h1_list = $('#cnblogs_post_body h1');
    var jquery_h2_list = $('#cnblogs_post_body h2');
    var jquery_h3_list = $('#cnblogs_post_body h3');

    var content = '<div id="navCategory">';
    content += '<p style="font-size:18px"><b>目录</b></p>';
    content += '<ul id="left_menu" class="first_class_ul">';

    // 一级标题开始
    if (jquery_h1_list.length > 0) {
      for (var i = 0; i < jquery_h1_list.length; i++) {
        var li_content = '<li><a href="#_label' + i + '">' + $(jquery_h1_list[i]).text() + '</a></li>';
        var nextH1Index = i + 1;
        if (nextH1Index == jquery_h1_list.length) {
          nextH1Index = 0;
        }
        var jquery_h2_list = $(jquery_h1_list[i]).nextUntil(jquery_h1_list[nextH1Index], "h2");
        if (jquery_h2_list.length > 0) {
          li_content += '<ul class="second_class_ul">';
        }
        for (var j = 0; j < jquery_h2_list.length; j++) {
          li_content += '<li><a href="#_label2_' + i + '_' + j + '">' + $(jquery_h2_list[j]).text() + '</a></li>';
          var nextH2Index = j + 1;
          var next;
          if (nextH2Index == jquery_h2_list.length) {
            if (i + 1 == jquery_h1_list.length) {
              next = jquery_h1_list[0];
            } else {
              next = jquery_h1_list[i + 1];
            }
          } else {
            next = jquery_h2_list[nextH2Index];
          }
          var jquery_h3_list = $(jquery_h2_list[j]).nextUntil(next, "h3");
          if (jquery_h3_list.length > 0) {
            li_content += '<ul class="third_class_ul">';
          }
          for (var k = 0; k < jquery_h3_list.length; k++) {
            li_content += '<li><a href="#_label3_' + i + '_' + j + '_' + k + '">' + $(jquery_h3_list[k]).text() +
              '</a></li>';
          }
          if (jquery_h3_list.length > 0) {
            li_content += '</ul>';
          }
          li_content += '</li>';
        }
        if (jquery_h2_list.length > 0) {
          li_content += '</ul>';
        }
        li_content += '</li>';
        content += li_content;
      }
      content += '</ul>';
      content += '</div>';
    } else if (jquery_h2_list.length > 0) {
      for (var i = 0; i < jquery_h2_list.length; i++) {
        var li_content = '<li><a href="#_label' + i + '">' + $(jquery_h2_list[i]).text() + '</a></li>';
        var nextH1Index = i + 1;
        if (nextH1Index == jquery_h2_list.length) {
          nextH1Index = 0;
        }
        var jquery_h3_list = $(jquery_h2_list[i]).nextUntil(jquery_h2_list[i + 1], "h3");
        if (jquery_h3_list.length > 0) {
          li_content += '<ul class="third_class_ul">';
        }
        for (var j = 0; j < jquery_h3_list.length; j++) {
          li_content += '<li><a href="#_label2_' + i + '_' + j + '">' + $(jquery_h3_list[j]).text() + '</a></li>';
        }
        if (jquery_h3_list.length > 0) {
          li_content += '</ul>';
        }
        li_content += '</li>';
        content += li_content;
      }
      content += '</ul>';
      content += '</div>';
    } else if (jquery_h3_list.length > 0) {
      for (var i = 0; i < jquery_h3_list.length; i++) {
        var li_content = '<li><a href="#_label' + i + '">' + $(jquery_h3_list[i]).text() + '</a></li>';
        content += li_content;
      }
      content += '</ul>';
      content += '</div>';
    } else {
      return;
    }
    $($('#cnblogs_post_body')[0]).prepend(content);
  }
  GenerateContentList();
</script>
这里只是生产了标题,还要设置其样式,样式放在了:选项=》“页面定制 CSS 代码”:
/** 左侧目录 */
#navCategory {
  position: fixed;
  z-index: 99;
  top: 325px;
  left: 20px;
  max-width: 300px;
}

#left_menu {
  text-align: left;
  border-left: 1px solid #ddd;
  font-size: 14px;
  margin-left: 20px !important;
}

#left_menu ul {
  margin: 0 0 10px 20px;
}

#left_menu li {
  list-style: none !important;
}

#left_menu a {
  display: inline-table;
  margin-left: 5px;
  white-space: nowrap;
  text-decoration: none;
  color: #313131;
  outline: 0;
  text-decoration: none !important;
}

#left_menu a:hover {
  color: #eb5055;
  border-bottom: none !important;
}

#left_menu>li::before {
  position: relative;
  top: 0;
  left: -4px;
  display: inline-block;
  width: 7px;
  height: 7px;
  content: "";
  border-radius: 50%;
  background-color: #eb5055;
}
2、文章中设置锚点
上面只是生成了具体的目录,但是点击没有效果,这里就需要对文章中的 h 标签的 id 进行设置。
注意:上面生成目录的代码中,在一级目录中里面包含了 <a> ,设置了其属性 src ,我这里选的是 "_label" 作为前缀,
不同等级命名规则:
- 一级:_label0(第一个一级标签),_label1(第二个一级标签)
- 二级:_label2_0_0(二级标签,第一个一级标签下的第一个二级标签)
- 三级:_label3_0_0_0(三级标签,第一个级标签下的第一个二级标签下的第一个三级标签)
这里之所以用 0 是上面代码循环从 0 开始