springmvc工作原理以及源码分析(基于spring3.1.0)
springmvc是一个基于spring的web框架.本篇文章对它的工作原理以及源码进行深入分析.
一、springmvc请求处理流程
二、springmvc的工作机制
三、springmvc核心源码分析
四、谈谈springmvc的优化
一、springmvc请求处理流程
引用spring in action上的一张图来说明了springmvc的核心组件和请求处理流程:
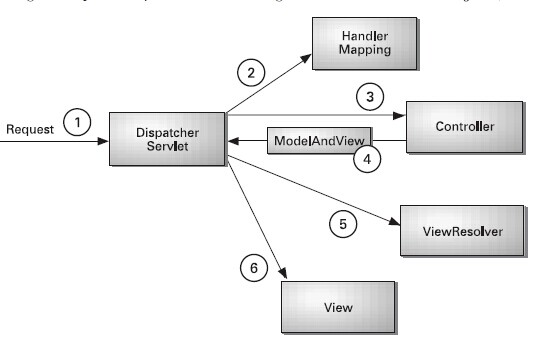
①:DispatcherServlet是springmvc中的前端控制器(front controller),负责接收request并将request转发给对应的处理组件.
②:HanlerMapping是springmvc中完成url到controller映射的组件.DispatcherServlet接收request,然后从HandlerMapping查找处理request的controller.
③:Cntroller处理request,并返回ModelAndView对象,Controller是springmvc中负责处理request的组件(类似于struts2中的Action),ModelAndView是封装结果视图的组件.
④ ⑤ ⑥:视图解析器解析ModelAndView对象并返回对应的视图给客户端.
二、springmvc的工作机制
在容器初始化时会建立所有url和controller的对应关系,保存到Map<url,controller>中.tomcat启动时会通知spring初始化容器(加载bean的定义信息和初始化所有单例bean),然后springmvc会遍历容器中的bean,获取每一个controller中的所有方法访问的url,然后将url和controller保存到一个Map中;
这样就可以根据request快速定位到controller,因为最终处理request的是controller中的方法,Map中只保留了url和controller中的对应关系,所以要根据request的url进一步确认controller中的method,这一步工作的原理就是拼接controller的url(controller上@RequestMapping的值)和方法的url(method上@RequestMapping的值),与request的url进行匹配,找到匹配的那个方法;
确定处理请求的method后,接下来的任务就是参数绑定,把request中参数绑定到方法的形式参数上,这一步是整个请求处理过程中最复杂的一个步骤。springmvc提供了两种request参数与方法形参的绑定方法:
① 通过注解进行绑定,@RequestParam
② 通过参数名称进行绑定.
使用注解进行绑定,我们只要在方法参数前面声明@RequestParam("a"),就可以将request中参数a的值绑定到方法的该参数上.使用参数名称进行绑定的前提是必须要获取方法中参数的名称,Java反射只提供了获取方法的参数的类型,并没有提供获取参数名称的方法.springmvc解决这个问题的方法是用asm框架读取字节码文件,来获取方法的参数名称.asm框架是一个字节码操作框架,关于asm更多介绍可以参考它的官网.个人建议,使用注解来完成参数绑定,这样就可以省去asm框架的读取字节码的操作.
三、源代码的分析
我们根据工作机制中三部分来分析springmvc的源代码.
其一,ApplicationContext初始化时建立所有url和controller类的对应关系(用Map保存);
其二,根据请求url找到对应的controller,并从controller中找到处理请求的方法;
其三,request参数绑定到方法的形参,执行方法处理请求,并返回结果视图.
第一步、建立Map<urls,controller>的关系
我们首先看第一个步骤,也就是建立Map<url,controller>关系的部分.第一部分的入口类为ApplicationObjectSupport的setApplicationContext方法.setApplicationContext方法中核心部分就是初始化容器initApplicationContext(context),子类AbstractDetectingUrlHandlerMapping实现了该方法,所以我们直接看子类中的初始化容器方法.
public void initApplicationContext() throws ApplicationContextException {
super.initApplicationContext();
detectHandlers();
}
/**
* 建立当前ApplicationContext中的所有controller和url的对应关系
*/
protected void detectHandlers() throws BeansException {
if (logger.isDebugEnabled()) {
logger.debug("Looking for URL mappings in application context: " + getApplicationContext());
}
// 获取ApplicationContext容器中所有bean的Name
String[] beanNames = (this.detectHandlersInAncestorContexts ?
BeanFactoryUtils.beanNamesForTypeIncludingAncestors(getApplicationContext(), Object.class) :
getApplicationContext().getBeanNamesForType(Object.class));
    // 遍历beanNames,并找到这些bean对应的url
    for (String beanName : beanNames) {
// 找bean上的所有url(controller上的url+方法上的url),该方法由对应的子类实现
String[] urls = determineUrlsForHandler(beanName);
if (!ObjectUtils.isEmpty(urls)) {
// 保存urls和beanName的对应关系,put it to Map<urls,beanName>,该方法在父类AbstractUrlHandlerMapping中实现
registerHandler(urls, beanName);
}
else {
if (logger.isDebugEnabled()) {
logger.debug("Rejected bean name '" + beanName + "': no URL paths identified");
}
}
}
}
/** 获取controller中所有方法的url,由子类实现,典型的模板模式 /
protected abstract String[] determineUrlsForHandler(String beanName);
determineUrlsForHandler(String beanName)方法的作用是获取每个controller中的url,不同的子类有不同的实现,这是一个典型的模板设计模式.因为开发中我们用的最多的就是用注解来配置controller中的url,DefaultAnnotationHandlerMapping是AbstractDetectingUrlHandlerMapping的子类,处理注解形式的url映射.所以我们这里以DefaultAnnotationHandlerMapping来进行分析.我们看DefaultAnnotationHandlerMapping是如何查beanName上所有映射的url.
/
* 获取controller中所有的url
*/
protected String[] determineUrlsForHandler(String beanName) {
// 获取ApplicationContext容器
ApplicationContext context = getApplicationContext();
//从容器中获取controller
Class<?> handlerType = context.getType(beanName);
// 获取controller上的@RequestMapping注解
RequestMapping mapping = context.findAnnotationOnBean(beanName, RequestMapping.class);
if (mapping != null) { // controller上有注解
this.cachedMappings.put(handlerType, mapping);
// 返回结果集
Set
// controller的映射url
String[] typeLevelPatterns = mapping.value();
if (typeLevelPatterns.length > 0) { // url>0
// 获取controller中所有方法及方法的映射url
String[] methodLevelPatterns = determineUrlsForHandlerMethods(handlerType, true);
for (String typeLevelPattern : typeLevelPatterns) {
if (!typeLevelPattern.startsWith("/")) {
typeLevelPattern = "/" + typeLevelPattern;
}
boolean hasEmptyMethodLevelMappings = false;
for (String methodLevelPattern : methodLevelPatterns) {
if (methodLevelPattern == null) {
hasEmptyMethodLevelMappings = true;
}
else {
// controller的映射url+方法映射的url
String combinedPattern = getPathMatcher().combine(typeLevelPattern, methodLevelPattern);
// 保存到set集合中
addUrlsForPath(urls, combinedPattern);
}
}
if (hasEmptyMethodLevelMappings ||
org.springframework.web.servlet.mvc.Controller.class.isAssignableFrom(handlerType)) {
addUrlsForPath(urls, typeLevelPattern);
}
}
// 以数组形式返回controller上的所有url
return StringUtils.toStringArray(urls);
}
else {
// controller上的@RequestMapping映射url为空串,直接找方法的映射url
return determineUrlsForHandlerMethods(handlerType, false);
}
} // controller上没@RequestMapping注解
else if (AnnotationUtils.findAnnotation(handlerType, Controller.class) != null) {
// 获取controller中方法上的映射url
return determineUrlsForHandlerMethods(handlerType, false);
}
else {
return null;
}
}
到这里HandlerMapping组件就已经建立所有url和controller的对应关系。
第二步、根据访问url找到对应controller中处理请求的方法.
下面我们开始分析第二个步骤,第二个步骤是由请求触发的,所以入口为DispatcherServlet.DispatcherServlet的核心方法为doService(),doService()中的核心逻辑由doDispatch()实现,我们查看doDispatch()的源代码.
/** 中央控制器,控制请求的转发 **/
protected void doDispatch(HttpServletRequest request, HttpServletResponse response) throws Exception {
HttpServletRequest processedRequest = request;
HandlerExecutionChain mappedHandler = null;
int interceptorIndex = -1;
    try {
        ModelAndView mv;
        boolean errorView = false;
        try {
// 1.检查是否是文件上传的请求
processedRequest = checkMultipart(request);
            // 2.取得处理当前请求的controller,这里也称为hanlder,处理器,第一个步骤的意义就在这里体现了.这里并不是直接返回controller,而是返回的HandlerExecutionChain请求处理器链对象,该对象封装了handler和interceptors.
            mappedHandler = getHandler(processedRequest, false);
// 如果handler为空,则返回404
if (mappedHandler == null || mappedHandler.getHandler() == null) {
noHandlerFound(processedRequest, response);
return;
}
//3. 获取处理request的处理器适配器handler adapter
HandlerAdapter ha = getHandlerAdapter(mappedHandler.getHandler());
// 处理 last-modified 请求头
String method = request.getMethod();
boolean isGet = "GET".equals(method);
if (isGet || "HEAD".equals(method)) {
long lastModified = ha.getLastModified(request, mappedHandler.getHandler());
if (logger.isDebugEnabled()) {
String requestUri = urlPathHelper.getRequestUri(request);
logger.debug("Last-Modified value for [" + requestUri + "] is: " + lastModified);
}
if (new ServletWebRequest(request, response).checkNotModified(lastModified) && isGet) {
return;
}
}
            // 4.拦截器的预处理方法
            HandlerInterceptor[] interceptors = mappedHandler.getInterceptors();
            if (interceptors != null) {
                for (int i = 0; i < interceptors.length; i++) {
                    HandlerInterceptor interceptor = interceptors[i];
                    if (!interceptor.preHandle(processedRequest, response, mappedHandler.getHandler())) {
                        triggerAfterCompletion(mappedHandler, interceptorIndex, processedRequest, response, null);
                        return;
                    }
                    interceptorIndex = i;
                }
            }

            // 5.实际的处理器处理请求,返回结果视图对象
            mv = ha.handle(processedRequest, response, mappedHandler.getHandler());

            // 结果视图对象的处理
            if (mv != null && !mv.hasView()) {
                mv.setViewName(getDefaultViewName(request));
            }

            // 6.拦截器的后处理方法
            if (interceptors != null) {
                for (int i = interceptors.length - 1; i >= 0; i--) {
                    HandlerInterceptor interceptor = interceptors[i];
                    interceptor.postHandle(processedRequest, response, mappedHandler.getHandler(), mv);
                }
            }
        }
        catch (ModelAndViewDefiningException ex) {
            logger.debug("ModelAndViewDefiningException encountered", ex);
            mv = ex.getModelAndView();
        }
        catch (Exception ex) {
            Object handler = (mappedHandler != null ? mappedHandler.getHandler() : null);
            mv = processHandlerException(processedRequest, response, handler, ex);
            errorView = (mv != null);
        }


        if (mv != null && !mv.wasCleared()) {
            render(mv, processedRequest, response);
            if (errorView) {
                WebUtils.clearErrorRequestAttributes(request);
            }
        }
        else {
            if (logger.isDebugEnabled()) {
                logger.debug("Null ModelAndView returned to DispatcherServlet with name '" + getServletName() +
                        "': assuming HandlerAdapter completed request handling");
            }
        }

        // 请求成功响应之后的方法
        triggerAfterCompletion(mappedHandler, interceptorIndex, processedRequest, response, null);
    }
第2步:getHandler(processedRequest)方法实际上就是从HandlerMapping中找到url和controller的对应关系.这也就是第一个步骤:建立Map<url,Controller>的意义.我们知道,最终处理request的是controller中的方法,我们现在只是知道了controller,还要进一步确认controller中处理request的方法.由于下面的步骤和第三个步骤关系更加紧密,直接转到第三个步骤.
第三步、反射调用处理请求的方法,返回结果视图
上面的方法中,第2步其实就是从第一个步骤中的Map<urls,beanName>中取得controller,然后经过拦截器的预处理方法,到最核心的部分--第5步调用controller的方法处理请求.在第2步中我们可以知道处理request的controller,第5步就是要根据url确定controller中处理请求的方法,然后通过反射获取该方法上的注解和参数,解析方法和参数上的注解,最后反射调用方法获取ModelAndView结果视图。因为上面采用注解url形式说明的,所以我们这里继续以注解处理器适配器来说明.第5步调用的就是AnnotationMethodHandlerAdapter的handle().handle()中的核心逻辑由invokeHandlerMethod(request, response, handler)实现。
/** 获取处理请求的方法,执行并返回结果视图 /
protected ModelAndView invokeHandlerMethod(HttpServletRequest request, HttpServletResponse response, Object handler)
throws Exception {
// 1.获取方法解析器
ServletHandlerMethodResolver methodResolver = getMethodResolver(handler);
// 2.解析request中的url,获取处理request的方法
Method handlerMethod = methodResolver.resolveHandlerMethod(request);
// 3.方法调用器
ServletHandlerMethodInvoker methodInvoker = new ServletHandlerMethodInvoker(methodResolver);
ServletWebRequest webRequest = new ServletWebRequest(request, response);
ExtendedModelMap implicitModel = new BindingAwareModelMap();
// 4.执行方法
Object result = methodInvoker.invokeHandlerMethod(handlerMethod, handler, webRequest, implicitModel);
// 5.封装结果视图
ModelAndView mav =
methodInvoker.getModelAndView(handlerMethod, handler.getClass(), result, implicitModel, webRequest);
methodInvoker.updateModelAttributes(handler, (mav != null ? mav.getModel() : null), implicitModel, webRequest);
return mav;
}
这一部分的核心就在2和4了.先看第2步,通过request找controller的处理方法.实际上就是拼接controller的url和方法的url,与request的url进行匹配,找到匹配的方法.
/ 根据url获取处理请求的方法 **/
public Method resolveHandlerMethod(HttpServletRequest request) throws ServletException {
// 如果请求url为,localhost:8080/springmvc/helloWorldController/say.action, 则lookupPath=helloWorldController/say.action
String lookupPath = urlPathHelper.getLookupPathForRequest(request);
Comparator
Map<RequestSpecificMappingInfo, Method> targetHandlerMethods = new LinkedHashMap<RequestSpecificMappingInfo, Method>();
Set
String resolvedMethodName = null;
// 遍历controller上的所有方法,获取url匹配的方法
for (Method handlerMethod : getHandlerMethods()) {
RequestSpecificMappingInfo mappingInfo = new RequestSpecificMappingInfo(this.mappings.get(handlerMethod));
boolean match = false;
if (mappingInfo.hasPatterns()) {// 获取方法上的url
for (String pattern : mappingInfo.getPatterns()) { // 方法上可能有多个url,springmvc支持方法映射多个url
if (!hasTypeLevelMapping() && !pattern.startsWith("/")) {
pattern = "/" + pattern;
}
// 获取controller上的映射和url和方法上的url,拼凑起来与lookupPath是否匹配
String combinedPattern = getCombinedPattern(pattern, lookupPath, request);
if (combinedPattern != null) {
if (mappingInfo.matches(request)) {
match = true;
mappingInfo.addMatchedPattern(combinedPattern);
}
else {
if (!mappingInfo.matchesRequestMethod(request)) {
allowedMethods.addAll(mappingInfo.methodNames());
}
break;
}
}
}
mappingInfo.sortMatchedPatterns(pathComparator);
}
else if (useTypeLevelMapping(request)) {
// other
}
通过上面的代码,已经可以找到处理request的controller中的方法了,现在看如何解析该方法上的参数,并调用该方法。也就是执行方法这一步.执行方法这一步最重要的就是获取方法的参数,然后我们就可以反射调用方法了.
public final Object invokeHandlerMethod(Method handlerMethod, Object handler,
NativeWebRequest webRequest, ExtendedModelMap implicitModel) throws Exception {
Method handlerMethodToInvoke = BridgeMethodResolver.findBridgedMethod(handlerMethod);
try {
boolean debug = logger.isDebugEnabled();
// 处理方法上的其他注解
for (String attrName : this.methodResolver.getActualSessionAttributeNames()) {
Object attrValue = this.sessionAttributeStore.retrieveAttribute(webRequest, attrName);
if (attrValue != null) {
implicitModel.addAttribute(attrName, attrValue);
}
}
for (Method attributeMethod : this.methodResolver.getModelAttributeMethods()) {
Method attributeMethodToInvoke = BridgeMethodResolver.findBridgedMethod(attributeMethod);
Object[] args = resolveHandlerArguments(attributeMethodToInvoke, handler, webRequest, implicitModel);
if (debug) {
logger.debug("Invoking model attribute method: " + attributeMethodToInvoke);
}
String attrName = AnnotationUtils.findAnnotation(attributeMethod, ModelAttribute.class).value();
if (!"".equals(attrName) && implicitModel.containsAttribute(attrName)) {
continue;
}
ReflectionUtils.makeAccessible(attributeMethodToInvoke);
Object attrValue = attributeMethodToInvoke.invoke(handler, args);
if ("".equals(attrName)) {
Class resolvedType = GenericTypeResolver.resolveReturnType(attributeMethodToInvoke, handler.getClass());
attrName = Conventions.getVariableNameForReturnType(attributeMethodToInvoke, resolvedType, attrValue);
}
if (!implicitModel.containsAttribute(attrName)) {
implicitModel.addAttribute(attrName, attrValue);
}
}
// 核心代码,获取方法上的参数值
Object[] args = resolveHandlerArguments(handlerMethodToInvoke, handler, webRequest, implicitModel);
if (debug) {
logger.debug("Invoking request handler method: " + handlerMethodToInvoke);
}
ReflectionUtils.makeAccessible(handlerMethodToInvoke);
return handlerMethodToInvoke.invoke(handler, args);
}
resolveHandlerArguments方法实现代码比较长,它最终要实现的目的就是:完成request中的参数和方法参数上数据的绑定.
springmvc中提供两种request参数到方法中参数的绑定方式:
① 通过注解进行绑定,@RequestParam
② 通过参数名称进行绑定.
使用注解进行绑定,我们只要在方法参数前面声明@RequestParam("a"),就可以将request中参数a的值绑定到方法的该参数上.使用参数名称进行绑定的前提是必须要获取方法中参数的名称,Java反射只提供了获取方法的参数的类型,并没有提供获取参数名称的方法.springmvc解决这个问题的方法是用asm框架读取字节码文件,来获取方法的参数名称.asm框架是一个字节码操作框架,关于asm更多介绍可以参考它的官网.个人建议,使用注解来完成参数绑定,这样就可以省去asm框架的读取字节码的操作.
private Object[] resolveHandlerArguments(Method handlerMethod, Object handler,
NativeWebRequest webRequest, ExtendedModelMap implicitModel) throws Exception {
// 1.获取方法参数类型的数组
Class[] paramTypes = handlerMethod.getParameterTypes();
// 声明数组,存参数的值
Object[] args = new Object[paramTypes.length];
//2.遍历参数数组,获取每个参数的值
for (int i = 0; i < args.length; i++) {
MethodParameter methodParam = new MethodParameter(handlerMethod, i);
methodParam.initParameterNameDiscovery(this.parameterNameDiscoverer);
GenericTypeResolver.resolveParameterType(methodParam, handler.getClass());
String paramName = null;
String headerName = null;
boolean requestBodyFound = false;
String cookieName = null;
String pathVarName = null;
String attrName = null;
boolean required = false;
String defaultValue = null;
boolean validate = false;
int annotationsFound = 0;
Annotation[] paramAnns = methodParam.getParameterAnnotations();
// 处理参数上的注解
for (Annotation paramAnn : paramAnns) {
if (RequestParam.class.isInstance(paramAnn)) {
RequestParam requestParam = (RequestParam) paramAnn;
paramName = requestParam.value();
required = requestParam.required();
defaultValue = parseDefaultValueAttribute(requestParam.defaultValue());
annotationsFound++;
}
else if (RequestHeader.class.isInstance(paramAnn)) {
RequestHeader requestHeader = (RequestHeader) paramAnn;
headerName = requestHeader.value();
required = requestHeader.required();
defaultValue = parseDefaultValueAttribute(requestHeader.defaultValue());
annotationsFound++;
}
else if (RequestBody.class.isInstance(paramAnn)) {
requestBodyFound = true;
annotationsFound++;
}
else if (CookieValue.class.isInstance(paramAnn)) {
CookieValue cookieValue = (CookieValue) paramAnn;
cookieName = cookieValue.value();
required = cookieValue.required();
defaultValue = parseDefaultValueAttribute(cookieValue.defaultValue());
annotationsFound++;
}
else if (PathVariable.class.isInstance(paramAnn)) {
PathVariable pathVar = (PathVariable) paramAnn;
pathVarName = pathVar.value();
annotationsFound++;
}
else if (ModelAttribute.class.isInstance(paramAnn)) {
ModelAttribute attr = (ModelAttribute) paramAnn;
attrName = attr.value();
annotationsFound++;
}
else if (Value.class.isInstance(paramAnn)) {
defaultValue = ((Value) paramAnn).value();
}
else if ("Valid".equals(paramAnn.annotationType().getSimpleName())) {
validate = true;
}
}
if (annotationsFound > 1) {
throw new IllegalStateException("Handler parameter annotations are exclusive choices - " +
"do not specify more than one such annotation on the same parameter: " + handlerMethod);
}
        if (annotationsFound == 0) {// 如果没有注解
            Object argValue = resolveCommonArgument(methodParam, webRequest);
            if (argValue != WebArgumentResolver.UNRESOLVED) {
                args[i] = argValue;
            }
            else if (defaultValue != null) {
                args[i] = resolveDefaultValue(defaultValue);
            }
            else {
                Class paramType = methodParam.getParameterType();
// 将方法声明中的Map和Model参数,放到request中,用于将数据放到request中带回页面
if (Model.class.isAssignableFrom(paramType) || Map.class.isAssignableFrom(paramType)) {
args[i] = implicitModel;
}
else if (SessionStatus.class.isAssignableFrom(paramType)) {
args[i] = this.sessionStatus;
}
else if (HttpEntity.class.isAssignableFrom(paramType)) {
args[i] = resolveHttpEntityRequest(methodParam, webRequest);
}
else if (Errors.class.isAssignableFrom(paramType)) {
throw new IllegalStateException("Errors/BindingResult argument declared " +
"without preceding model attribute. Check your handler method signature!");
}
else if (BeanUtils.isSimpleProperty(paramType)) {
paramName = "";
}
else {
attrName = "";
}
}
}
// 从request中取值,并进行赋值操作
if (paramName != null) {
// 根据paramName从request中取值,如果没有通过RequestParam注解指定paramName,则使用asm读取class文件来获取paramName
args[i] = resolveRequestParam(paramName, required, defaultValue, methodParam, webRequest, handler);
}
else if (headerName != null) {
args[i] = resolveRequestHeader(headerName, required, defaultValue, methodParam, webRequest, handler);
}
else if (requestBodyFound) {
args[i] = resolveRequestBody(methodParam, webRequest, handler);
}
else if (cookieName != null) {
args[i] = resolveCookieValue(cookieName, required, defaultValue, methodParam, webRequest, handler);
}
else if (pathVarName != null) {
args[i] = resolvePathVariable(pathVarName, methodParam, webRequest, handler);
}
else if (attrName != null) {
WebDataBinder binder =
resolveModelAttribute(attrName, methodParam, implicitModel, webRequest, handler);
boolean assignBindingResult = (args.length > i + 1 && Errors.class.isAssignableFrom(paramTypes[i + 1]));
if (binder.getTarget() != null) {
doBind(binder, webRequest, validate, !assignBindingResult);
}
args[i] = binder.getTarget();
if (assignBindingResult) {
args[i + 1] = binder.getBindingResult();
i++;
}
implicitModel.putAll(binder.getBindingResult().getModel());
}
}
// 返回参数值数组
return args;
}
关于asm框架获取方法参数的部分,这里就不再进行分析了.感兴趣的话F3进去就能看到这个过程.
到这里,方法的参数值列表也获取到了,就可以直接进行方法的调用了.整个请求过程中最复杂的一步就是在这里了.ok,到这里整个请求处理过程的关键步骤都分析完了.理解了springmvc中的请求处理流程,整个代码还是比较清晰的.
四、谈谈springmvc的优化
上面我们已经对springmvc的工作原理和源码进行了分析,在这个过程发现了几个优化点:
1.controller如果能保持单例,尽量使用单例,这样可以减少创建对象和回收对象的开销.也就是说,如果controller的类变量和实例变量可以以方法形参声明的尽量以方法的形参声明,不要以类变量和实例变量声明,这样可以避免线程安全问题.
2.处理request的方法中的形参务必加上@RequestParam注解,这样可以避免springmvc使用asm框架读取class文件获取方法参数名的过程.即便springmvc对读取出的方法参数名进行了缓存,如果不要读取class文件当然是更加好.
3.阅读源码的过程中,发现springmvc并没有对处理url的方法进行缓存,也就是说每次都要根据请求url去匹配controller中的方法url,如果把url和method的关系缓存起来,会不会带来性能上的提升呢?有点恶心的是,负责解析url和method对应关系的ServletHandlerMethodResolver是一个private的内部类,不能直接继承该类增强代码,必须要该代码后重新编译.当然,如果缓存起来,必须要考虑缓存的线程安全问题.