官网地址(https://www.elastic.co/guide/cn/elasticsearch/guide/current/index.html)而且是中文的
Elastic的快速入门
1、基础概念
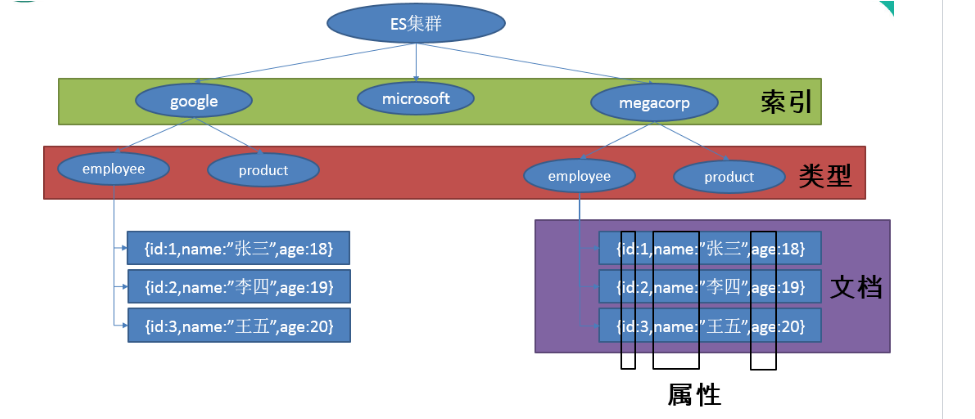
面向文档,JSON作为序列化格式,ElasticSearch的基本概念
索引(名词):
如前所述,一个 索引 类似于传统关系数据库中的一个 数据库 ,是一个存储关系型文档的地方。 索引 (index) 的复数词为 indices 或 indexes 。
索引(动词):
索引一个文档 就是存储一个文档到一个 索引 (名词)中以便它可以被检索和查询到。这非常类似于 SQL 语句中的 INSERT 关键词,除了文档已存在时新文档会替换旧文档情况之外。
类型:相当于数据库中的表
文档:相当于数据库中的行,即每条数据都叫一个文档
属性:相当于数据库中的列,即文档的属性
2、测试
下载POSTMAN(https://www.getpostman.com/downloads/),并使用POSTMAN测试
具体查看官方示例(https://www.elastic.co/guide/cn/elasticsearch/guide/current/_indexing_employee_documents.html)
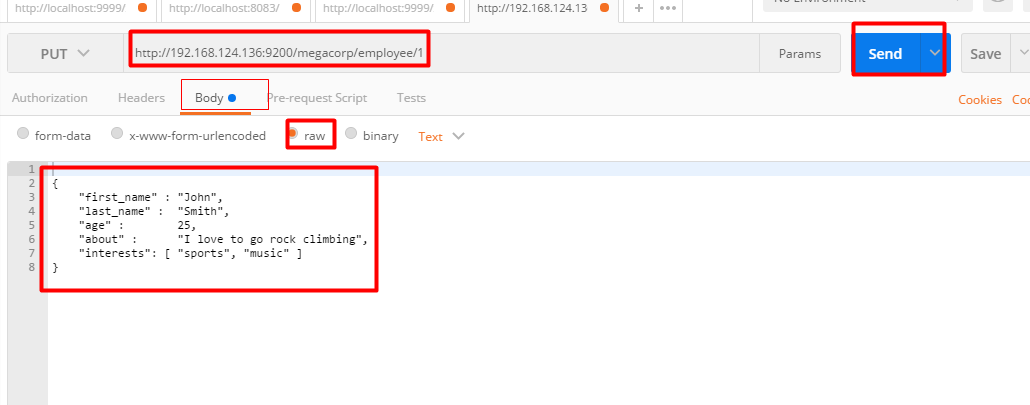
重点:PUT请求+请求体
官网介绍:

你也许已经注意到 索引 这个词在 Elasticsearch 语境中包含多重意思, 所以有必要做一点儿说明:

索引(名词):

如前所述,一个 索引 类似于传统关系数据库中的一个 数据库 ,是一个存储关系型文档的地方。 索引 (index) 的复数词为 indices 或 indexes 。

索引(动词):

索引一个文档 就是存储一个文档到一个 索引 (名词)中以便它可以被检索和查询到。这非常类似于 SQL 语句中的 INSERT 关键词,除了文档已存在时新文档会替换旧文档情况之外。

倒排索引:

关系型数据库通过增加一个 索引 比如一个 B树(B-tree)索引 到指定的列上,以便提升数据检索速度。Elasticsearch 和 Lucene 使用了一个叫做 倒排索引 的结构来达到相同的目的。

+ 默认的,一个文档中的每一个属性都是 被索引 的(有一个倒排索引)和可搜索的。一个没有倒排索引的属性是不能被搜索到的。我们将在 倒排索引 讨论倒排索引的更多细节。
根据官网举一个例子
https://www.elastic.co/guide/cn/elasticsearch/guide/current/_indexing_employee_documents.html
PUT /megacorp/employee/1
{
    "first_name" : "John",
    "last_name" :  "Smith",
    "age" :        25,
    "about" :      "I love to go rock climbing",
    "interests": [ "sports", "music" ]
}
执行结果

检索文档
官方文档
https://www.elastic.co/guide/cn/elasticsearch/guide/current/_retrieving_a_document.html
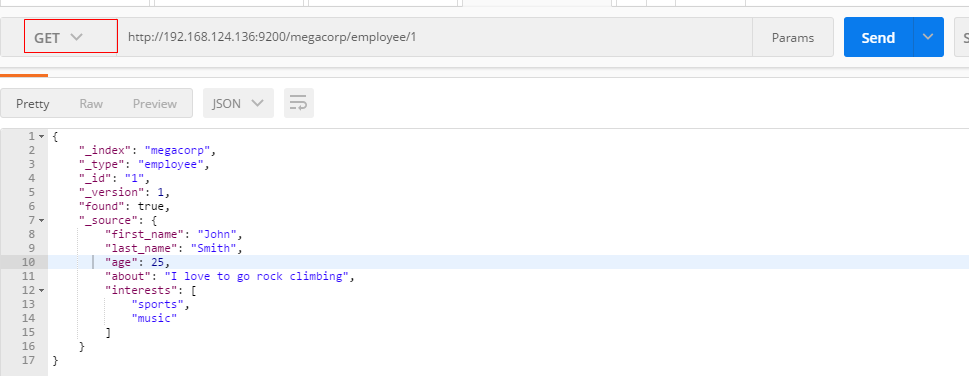
重点:GET请求+URI+index+type+ID
GET /megacorp/employee/1
轻量检索
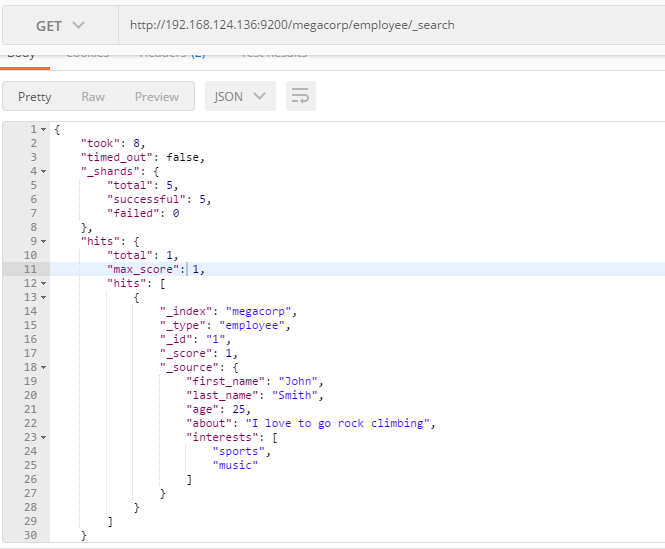
重点:GET请求+index+type+_search+条件(非必须)
https://www.elastic.co/guide/cn/elasticsearch/guide/current/_search_lite.html
搜索所有雇员: _search
GET /megacorp/employee/_search
搜索结果:
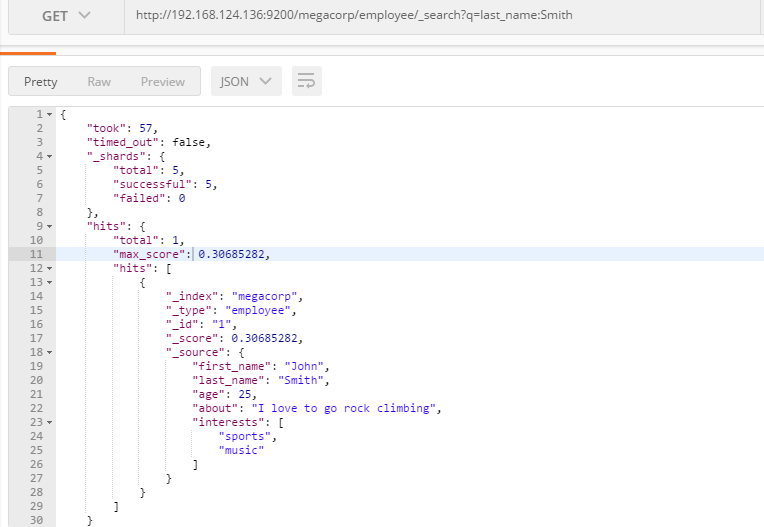
高亮搜索:URL参数
GET /megacorp/employee/_search?q=last_name:Smith
使用查询表达式
https://www.elastic.co/guide/cn/elasticsearch/guide/current/_search_with_query_dsl.html
重点:GET+URI+index+type+_search+请求体【match】
Query-string 搜索通过命令非常方便地进行临时性的即席搜索 ,但它有自身的局限性(参见 轻量 搜索 )。Elasticsearch 提供一个丰富灵活的查询语言叫做 查询表达式 ,它支持构建更加复杂和健壮的查询。
领域特定语言 (DSL), 指定了使用一个 JSON 请求。我们可以像这样重写之前的查询所有 Smith 的搜索 :
GET /megacorp/employee/_search
{
    "query" : {
        "match" : {
            "last_name" : "Smith"
        }
    }
}
返回结果与之前的查询一样,但还是可以看到有一些变化。其中之一是,不再使用 query-string 参数,而是一个请求体替代。这个请求使用 JSON 构造,并使用了一个 match 查询(属于查询类型之一,后续将会了解)。
、更加复杂的查询
重点:GET+URI+index+type+_search + 请求体【match+filter】
现在尝试下更复杂的搜索。 同样搜索姓氏为 Smith 的雇员,但这次我们只需要年龄大于 30 的。查询需要稍作调整,使用过滤器 filter ,它支持高效地执行一个结构化查询。
GET /megacorp/employee/_search
{
    "query" : {
        "bool": {
            "must": {
                "match" : {
                    "last_name" : "smith"
                }
            },
            "filter": {
                "range" : {
                    "age" : { "gt" : 30 }
                }
            }
        }
    }
}

6、全文搜索
官方文档
https://www.elastic.co/guide/cn/elasticsearch/guide/current/_full_text_search.html
重点:GET+index+type+_search+请求体【match】 ==》看相关性得分
截止目前的搜索相对都很简单:单个姓名,通过年龄过滤。现在尝试下稍微高级点儿的全文搜索——一项传统数据库确实很难搞定的任务。
搜索下所有喜欢攀岩(rock climbing)的雇员:
GET /megacorp/employee/_search
{
    "query" : {
        "match" : {
            "about" : "rock climbing"
        }
    }
}
显然我们依旧使用之前的 match 查询在about 属性上搜索 “rock climbing” 。得到两个匹配的文档:
{
   ...
   "hits": {
      "total":      2,
      "max_score":  0.16273327,
      "hits": [
         {
            ...
            "_score":         0.16273327,
            "_source": {
               "first_name":  "John",
               "last_name":   "Smith",
               "age":         25,
               "about":       "I love to go rock climbing",
               "interests": [ "sports", "music" ]
            }
         },
         {
            ...
            "_score":         0.016878016,
            "_source": {
               "first_name":  "Jane",
               "last_name":   "Smith",
               "age":         32,
               "about":       "I like to collect rock albums",
               "interests": [ "music" ]
            }
         }
      ]
   }
}
"_score":相关性得分
Elasticsearch 默认按照相关性得分排序,即每个文档跟查询的匹配程度。第一个最高得分的结果很明显:John Smith 的 about属性清楚地写着 “rock climbing” 。
但为什么 Jane Smith 也作为结果返回了呢?原因是她的 about 属性里提到了 “rock” 。因为只有 “rock” 而没有 “climbing” ,所以她的相关性得分低于 John 的。
这是一个很好的案例,阐明了 Elasticsearch 如何 在 全文属性上搜索并返回相关性最强的结果。Elasticsearch中的 相关性 概念非常重要,也是完全区别于传统关系型数据库的一个概念,数据库中的一条记录要么匹配要么不匹配。
7、短语搜索
官方文档
https://www.elastic.co/guide/cn/elasticsearch/guide/current/_phrase_search.html
重点:GET+index+type+_search+请求体【match_phrase 】
找出一个属性中的独立单词是没有问题的,但有时候想要精确匹配一系列单词或者短语 。 比如, 我们想执行这样一个查询,仅匹配同时包含 “rock” 和 “climbing” ,并且 二者以短语 “rock climbing” 的形式紧挨着的雇员记录。
为此对 match 查询稍作调整,使用一个叫做 match_phrase 的查询:
GET /megacorp/employee/_search
{
    "query" : {
        "match_phrase" : {
            "about" : "rock climbing"
        }
    }
}
返回的信息
{
   ...
   "hits": {
      "total":      1,
      "max_score":  0.23013961,
      "hits": [
         {
            ...
            "_score":         0.23013961,
            "_source": {
               "first_name":  "John",
               "last_name":   "Smith",
               "age":         25,
               "about":       "I love to go rock climbing",
               "interests": [ "sports", "music" ]
            }
         }
      ]
   }
}
8、高亮搜索
官当文档
https://www.elastic.co/guide/cn/elasticsearch/guide/current/highlighting-intro.html
重点:GET+index+type+_search+请求体【match_phrase+highlight】==>返回关键字加了em标签
许多应用都倾向于在每个搜索结果中 高亮 部分文本片段,以便让用户知道为何该文档符合查询条件。在 Elasticsearch 中检索出高亮片段也很容易。
再次执行前面的查询,并增加一个新的 highlight 参数:
GET /megacorp/employee/_search
{
    "query" : {
        "match_phrase" : {
            "about" : "rock climbing"
        }
    },
    "highlight": {
        "fields" : {
            "about" : {}
        }
    }
}
当执行该查询时,返回结果与之前一样,与此同时结果中还多了一个叫做 highlight 的部分。这个部分包含了 about 属性匹配的文本片段,并以 HTML 标签 <em></em> 封装:
{
   ...
   "hits": {
      "total":      1,
      "max_score":  0.23013961,
      "hits": [
         {
            ...
            "_score":         0.23013961,
            "_source": {
               "first_name":  "John",
               "last_name":   "Smith",
               "age":         25,
               "about":       "I love to go rock climbing",
               "interests": [ "sports", "music" ]
            },
            "highlight": {
               "about": [
                  "I love to go <em>rock</em> <em>climbing</em>"
               ]
            }
         }
      ]
   }
}
9、分析
官方文档
https://www.elastic.co/guide/cn/elasticsearch/guide/current/_analytics.html#_analytics
重点:GET+index+type+_search+请求体【aggs-field】
aggs:聚合
终于到了最后一个业务需求:支持管理者对雇员目录做分析。 Elasticsearch 有一个功能叫聚合(aggregations),允许我们基于数据生成一些精细的分析结果。聚合与 SQL 中的 GROUP BY 类似但更强大。
举个例子,挖掘出雇员中最受欢迎的兴趣爱好:
GET /megacorp/employee/_search
{
  "aggs": {
    "all_interests": {
      "terms": { "field": "interests" }
    }
  }
}
会报错
Fielddata is disabled on text fields by default. Set fielddata=true on [inte
默认情况下,字段数据在文本字段上禁用。设置字段数据= TRUE
首先开启数据结构
PUT megacorp/_mapping/employee/
{
  "properties": {
    "interests": {
      "type":     "text",
      "fielddata": true
    }
  }
}
然后在进行请求
{
   ...
   "hits": { ... },
   "aggregations": {
      "all_interests": {
         "buckets": [
            {
               "key":       "music",
               "doc_count": 2
            },
            {
               "key":       "forestry",
               "doc_count": 1
            },
            {
               "key":       "sports",
               "doc_count": 1
            }
         ]
      }
   }
}
可以看到,两位员工对音乐感兴趣,一位对林地感兴趣,一位对运动感兴趣。这些聚合并非预先统计,而是从匹配当前查询的文档中即时生成。
如果想知道叫 Smith 的雇员中最受欢迎的兴趣爱好,可以直接添加适当的查询来组合查询:
GET /megacorp/employee/_search
{
  "query": {
    "match": {
      "last_name": "smith"
    }
  },
  "aggs": {
    "all_interests": {
      "terms": {
        "field": "interests"
      }
    }
  }
}
all_interests 聚合已经变为只包含匹配查询的文档:
 ...
  "all_interests": {
     "buckets": [
        {
           "key": "music",
           "doc_count": 2
        },
        {
           "key": "sports",
           "doc_count": 1
        }
     ]
  }
聚合还支持分级汇总 。比如,查询特定兴趣爱好员工的平均年龄:
GET /megacorp/employee/_search
{
    "aggs" : {
        "all_interests" : {
            "terms" : { "field" : "interests" },
            "aggs" : {
                "avg_age" : {
                    "avg" : { "field" : "age" }
                }
            }
        }
    }
}
输出基本是第一次聚合的加强版。依然有一个兴趣及数量的列表,只不过每个兴趣都有了一个附加的 avg_age 属性,代表有这个兴趣爱好的所有员工的平均年龄。
即使现在不太理解这些语法也没有关系,依然很容易了解到复杂聚合及分组通过 Elasticsearch 特性实现得很完美。可提取的数据类型毫无限制。
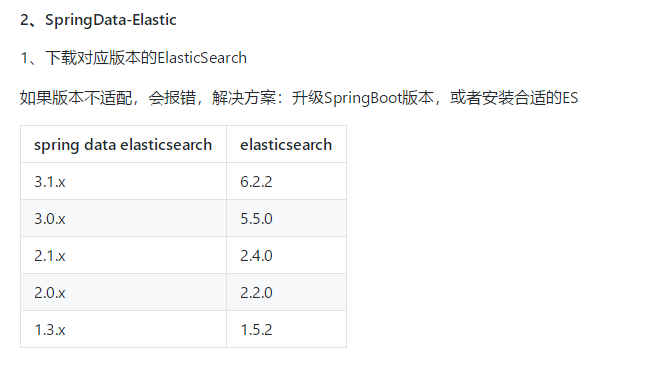
4、SpringBoot+ElasticSearch
1、新建项目SpringBoot1.5+Web+Nosql-->ElasticSearch
2、springBoot默认支持两种技术和ES进行交互
1、Jest【需要导入使用】
利用JestClient和服务器的9200端口进行http通信
2、SpringData ElasticSearch【默认】
1)、客户端:Client节点信息: clusterNodes: clusterName
2)、ElasticsearchTemplate操作es
3)、编写ElasticsearchRepository子接口
1、Jest
1、注释SpringDataElasticSearch的依赖,并导入Jest【5.xx】的相关依赖
<!--<dependency>-->
            <!--<groupId>org.springframework.boot</groupId>-->
            <!--<artifactId>spring-boot-starter-data-elasticsearch</artifactId>-->
        <!--</dependency>-->
        <dependency>
            <groupId>io.searchbox</groupId>
            <artifactId>jest</artifactId>
            <version>5.3.3</version>
        </dependency>
2、修改配置文件application.yml
spring:
  elasticsearch:
    jest:
      uris: http://10.138.223.126:9200
3、创建 bean.Article
package com.wdjr.springboot.bean;

import io.searchbox.annotations.JestId;

public class Article {

    @JestId
    private Integer id;
    private String autor;
    private String title;
    private String content;

    public Integer getId() {
        return id;
    }

    public void setId(Integer id) {
        this.id = id;
    }

    public String getAutor() {
        return autor;
    }

    public void setAutor(String autor) {
        this.autor = autor;
    }

    public String getTitle() {
        return title;
    }

    public void setTitle(String title) {
        this.title = title;
    }

    public String getContent() {
        return content;
    }

    public void setContent(String content) {
        this.content = content;
    }
}
4、运行程序
5、编写Jest Cilent的测试类
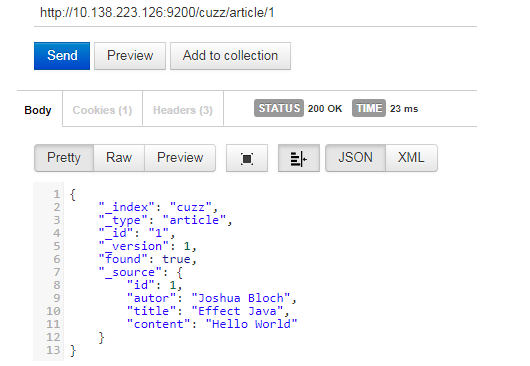
向wdjr-article中插入数据
@Test
public void contextLoads() {
    // 给Es中索引(保存)一个文档
    Article article = new Article();
    article.setId(1);
    article.setTitle("Effect Java");
    article.setAutor("Joshua Bloch");
    article.setContent("Hello World");
    // 构建一个索引功能
    Index index = new Index.Builder(article).index("cuzz").type("article").build();

    try {
        //执行
        jestClient.execute(index);
    } catch (IOException e) {
        e.printStackTrace();
    }
}
查询数据
@Test
public void search(){
    // 查询表达式
    String json = "{
" +
        "    "query" : {
" +
        "        "match" : {
" +
        "            "content" : "Hello"
" +
        "        }
" +
        "    }
" +
        "}";
    // 构建搜索操作
    Search search = new Search.Builder(json).addIndex("cuzz").addType("article").build();

    // 执行
    try {
        SearchResult result = jestClient.execute(search);
        System.out.println(result.getJsonString());
    } catch (IOException e) {
        e.printStackTrace();
    }
}
2、在Docker中安装适合版本的ES【2.4.6】
docker pull elasticsearch:2.4.6
docker run -e ES_JAVA_OPTS="-Xms256m -Xmx256m" -d -p 9201:9200 -p 9301:9300 --name ES02 id
3、编写配置文件
spring:
  data:
    elasticsearch:
      cluster-name: elasticsearch
      cluster-nodes: 10.138.223.126:9301
4、修改pom文件,把使用data-elasticsearch,把刚才注释删除
<dependency>
            <groupId>org.springframework.boot</groupId>
            <artifactId>spring-boot-starter-data-elasticsearch</artifactId>
        </dependency>
5、操作ElasticSearch有两种方式
1)、编写一个ElasticsearchRepositry
2)、编写一个ElasticsearchTemplate
6、ElasticsearchRepositry的操作
1)、新建一个bean/Book类,注意:@Document(indexName = "cuzz", type="book")
/**
 * @Author: cuzz
 * @Date: 2018/9/27 18:32
 * @Description:
 */
@Document(indexName = "cuzz",type="book")
@Data
public class Book {
    private Integer id;
    private String bookName;
    private String auto;


    public Book() {
        super();
    }

    public Book(Integer id, String bookName, String auto) {
        super();
        this.id = id;
        this.bookName = bookName;
        this.auto = auto;
    }
}
2)、新建一个repositry/BookRepositry
方法编写参考官方文档
/**
 * @Author: cuzz
 * @Date: 2018/9/27 18:33
 * @Description:
 */
public interface BookRepository extends ElasticsearchRepository<Book, Integer> {
    //自定义查询方法
    public List<Book> findByBookNameLike(String bookName);
}
3)、编写测试类
@Autowired
BookRepositry bookRepositry;
@Test
public void testSearch(){
    for (Book book : bookRepositry.findByBookNameLike("Effect")) {
        System.out.println(book);
    }
}