Android自定义的评分控件,类似RatingBar那样的,使用星星图标(full、half、empty)作为rating值的“评分/打分控件”。
效果图
图1:
RatingStarView控件支持的特性:
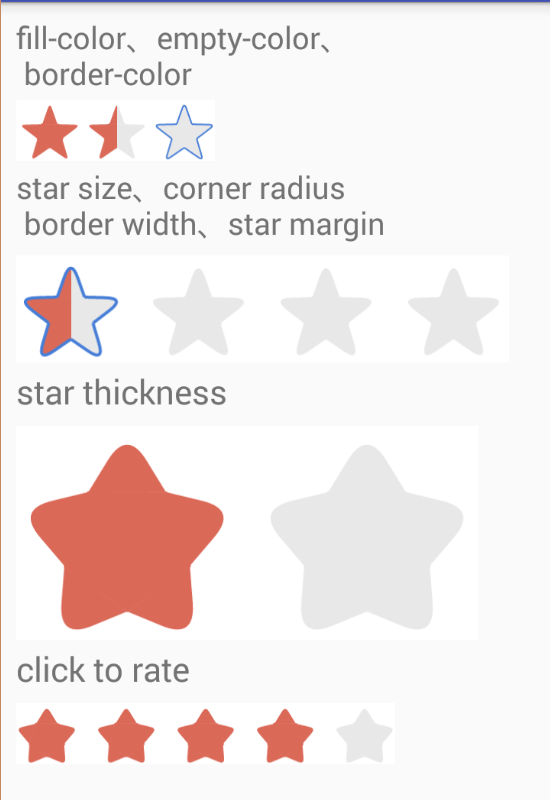
- 半颗星支持(实际支持任意小数)
- 填充色、底色、描边色
- 指定高度,宽度自适应
- 拐角弧度、描边宽度、星星间距
- 肥胖指数(star thickness),越胖越可爱
- 点击评分(不支持半颗星)
实现思路
下面是RatingStarView的实现设计。
如何画一颗星
Star标准坐标
可以在抽象的xOy坐标系中计算得到一个star的“标准坐标”。这个坐标可以作为后续有关坐标计算(偏移和缩放)的基准。
图2:
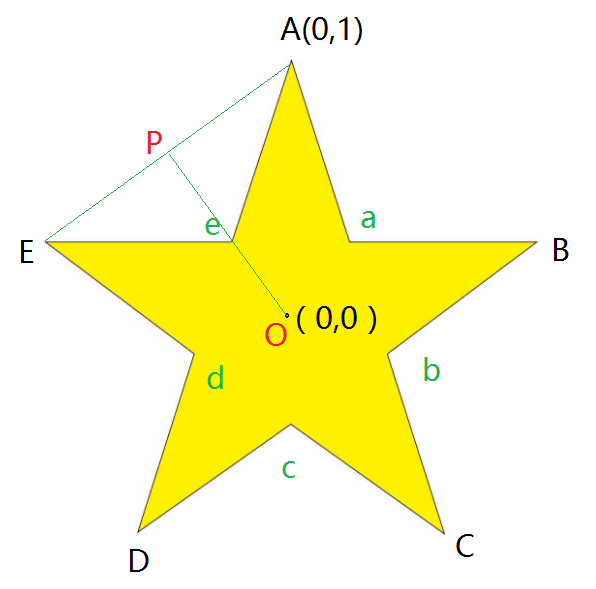
以上面的图为例,这里其中心点O为原点。
这里为了描述方便,称A,B,C,D,E为5个外点(Outer Corner Vertex),a,b,c,d,e 五个点为内点(Inner Corner Vertex)。
这里坐标值的选取完全出于计算方便来考虑,实现方式毕竟很多,大家可以选取其它坐标方式,比如原点O的位置在其它处,或者星星的范围由高度、宽度表示等。
5个外顶点
A拐点的坐标为(0,1),其它几个点的坐标根据几何公式是可以固定下来的。为了简化计算,可以将这几个值作为常量保存,之后的其它值的计算基于它们。下面代码为了程序上的便利E点坐标x,y值是起始元素:
private static final float[] starVertexes = new float[]{
        -0.9511f, 0.3090f,         // E (left)
        0.0000f, 1.0000f,         // A (top vertex)
        0.9511f, 0.3090f,         // B (right)
        0.5878f, -0.8090f,        // C (bottom right)
        -0.5878f, -0.8090f,        // D (bottom left)
};
使用常量简化五角星坐标计算时的cos、sin操作。因为几何上这些点的坐标是固定的。之后可以通过简单的+-*/操作来变换坐标系,以及star的大小。
常量也不会保持得太多,比如a,b,c,d,e的计算是根据A,B,C,D,E来的。
5个内拐点
这里为star引入“胖度系数(star thickness)”的说法,用来控制星星的可爱程度。
很明显,胖度是由a,b,c,d,e五个内点的位置决定的。
但在计算上,这里采取另一种方式:
设置变量thickness来表示肥胖系数,5个内点的位置由原点O和此内点临近的两个外点计算得到。
还是上面的图2,
AE的中点是P,那么e肯定在OP上,如果取OP上的其它点,作为EPA这样的多边形路径(其它五个内点类似)就可以打造出不同肥胖度的星星了。
这里因为原点O是星星的中心,在标准坐标系下,根据胖度系数thickness,结合ABCDE这几个外点,就可以计算出abcde这几个内点了,而且当thickness不同时,星星胖度不同。
根据thickness和ABCDE计算abcde的过程必须是在“标准坐标系”下,也就是X+轴向右,Y+向上,而且O原点是星星中心!!
坐标转换
每一个要显示的star由一个StarModel类来表示,它持有一个星星的坐标信息并完成相应的计算。
其代码是整个RatingStarView关于坐标部分的核心,完整代码见下面的源码地址。
拐点(顶点)表示
星星的顶点可以用一个PointF进行表示,不过这里为了方便将多个点作为一个链表使用,定义了下面的VertexF来保存顶点数据:
class VertexF {
    public VertexF() {
    }

    public VertexF(float x, float y) {
        this.x = x;
        this.y = y;
    }

    public float x;
    public float y;

    public VertexF next;
}
10个拐点的计算
StarModel类使用静态的数组保存ABCDE五个外点的标准坐标系下的坐标初始值。
因为thickness系数必须在标准坐标系下计算,这里选择StarModel的构造函数中接受thickness参数,而且初始化中完成所有10个拐点的计算。
转换到Android坐标系
手机设备下,Android的Y+是向下的,所以需要一个adjustCoordinate()的方法来完成星星坐标系的转换。
同时它还将星星的x,y都变为正数——这样它才是可见的。
注意Android中,childView绘制自身内容时,其使用的x,y坐标单位是pixel,而且是相对其父ViewGroup的相对坐标。
偏移和缩放
RatingStarView在显示若干个star时,需要可以控制其位置和大小。
所以StarModel在标准坐标系转换完为Android下坐标系后(在父布局中的相对坐标),还需要可以被偏移和缩放。
偏移
只需要对10个拐点坐标进行+、-操作即可。
有关Star的大小这里使用height来衡量,因为绘制肯定是完整的星星,这样height和width是有一个比例的。选取height或width作为其大小衡量本身都可以。
缩放
首先以star的height作为衡量,那么在标准坐标系进行转换后可以认为star是具备一个默认的缩放系数的:就是它的高度AD(或AC)线段的垂直距离。
之后要为star设置新的高度时(也就是改变其大小范围——外接矩形边框outerRect),根据高度的变化进行乘除运算即可——要注意的是坐标问题,这个留给写代码时思考。:)
自定义View实现
以上是关于坐标和坐标相关的计算,主要由StarModel类完成,它持有要显示的每一个star的数据。
绘制的功能由RatingStarView实现,它继承了View类:
public class RatingStarView extends View;View大小测量
自定义控件第一步解决自身大小的测量问题。
前面提到了star的大小由其height决定。
为了同时显示多个star,而且考虑文章开头宣称的那些特性,RatingStarView如何测量自身大小的逻辑也就确定了。
要注意,View测量时的一般准则是需要遵循的:MATCH_PARENT这样的不限定大小的情况——此时还是优先确定height。
在onMeasure()中:
@Override
protected void onMeasure(int widthMeasureSpec, int heightMeasureSpec) {
    int widthMode = MeasureSpec.getMode(widthMeasureSpec);
    int heightMode = MeasureSpec.getMode(heightMeasureSpec);
    int widthSize = MeasureSpec.getSize(widthMeasureSpec);
    int heightSize = MeasureSpec.getSize(heightMeasureSpec);

    float width;
    int height; // must have height

    if (heightMode == MeasureSpec.EXACTLY) {
        height = heightSize;
    } else {
        height = DEFAULT_STAR_HEIGHT;
        if (heightMode == MeasureSpec.AT_MOST) {
            height = Math.min(height, heightSize);
        }
    }

    float starHeight = height - getPaddingBottom() - getPaddingTop();

    if (widthMode == MeasureSpec.EXACTLY) {
        // Parent has told us how big to be. So be it.
        width = widthSize;
    } else {
        // get the perfect width
        width = getPaddingLeft() + getPaddingRight();
        if (starNum > 0) {
            if (starHeight > 0) {
                width += starMargin * (starNum - 1);
                width += StarModel.getStarWidth(starHeight) * starNum;
            }
        }

        if (widthMode == MeasureSpec.AT_MOST) {
            width = Math.min(widthSize, width);
        }
    }

    int widthInt = (int) (width);
    if (widthInt < width) {
        widthInt++;
    }

    setMeasuredDimension(widthInt, height);
}
计算时原则是先确定View的height,作为star的高度。
考虑padding,starMargin(星星间距)。
因为是float值相关计算,测量最终大小应该取“向上”的整数。
布局
RatingStarView不是ViewGroup,它不需要布局childView。
但需要根据自身大小确定要显示的各个star的坐标数据。
在onSizeChanged()中监听View大小变化,并计算要显示的star(多个)的坐标数据,也就是private ArrayList<StarModel> starList:
@Override
protected void onSizeChanged(int w, int h, int oldw, int oldh) {
    super.onSizeChanged(w, h, oldw, oldh);
    if (h != oldh) {
        calcStars();
    }
}
/**
* Create all stars data, according to the contentWidth/contentHeight.
*/
private void calcStars() {
int paddingLeft = getPaddingLeft();
int paddingTop = getPaddingTop();
int paddingRight = getPaddingRight();
int paddingBottom = getPaddingBottom();
int contentWidth = getWidth() - paddingLeft - paddingRight;
int contentHeight = getHeight() - paddingTop - paddingBottom;
int left = paddingLeft;
int top = paddingTop;
// according to the View's height , make star height.
int starHeight = contentHeight;
if (contentHeight > contentWidth) {
starHeight = contentWidth;
}
if (starHeight <= 0) return;
float startWidth = StarModel.getStarWidth(starHeight);
// starCount * startWidth + (starCount - 1) * starMargin = contentWidth
int starCount = (int) ((contentWidth + starMargin) / (startWidth + starMargin));
if (starCount > starNum) {
starCount = starNum;
}
starList = new ArrayList<>(starCount);
for (int i = 0; i < starCount; i++) {
StarModel star = new StarModel(starThicknessFactor);
starList.add(star);
star.setDrawingOuterRect(left, top, starHeight);
left += startWidth + 0.5f + starMargin;
}
...
}绘制
绘制五角星
Canvas.drawPath()可以用来绘制若干个点组成的闭合path。
方法原型:
/**
 * Draw the specified path using the specified paint. The path will be
 * filled or framed based on the Style in the paint.
 *
 * @param path  The path to be drawn
 * @param paint The paint used to draw the path
 */
public void drawPath(@NonNull Path path, @NonNull Paint paint)但为了绘制“圆角五角星”,需要设置paint的“路径效果”:
/**
 * Set or clear the patheffect object.
 * <p />
 * Pass null to clear any previous patheffect.
 * As a convenience, the parameter passed is also returned.
 *
 * @param effect May be null. The patheffect to be installed in the paint
 * @return       effect
 */
public PathEffect setPathEffect(PathEffect effect)这里设置public class CornerPathEffect extends PathEffect即可。
满星和空星

paint可设置其Style。
fullStar:Paint.Style.FILL_AND_STROKE
emptyStar:Paint.Style.STROKE
半星
Canvas支持图层操作。
可以在第一层绘制空星。
然后在新的图层中绘制满星——并利用canvas.clipRect(clip);来裁剪出一半星星。因为
clipRect是一个矩形,所以其实可以绘制任意小数的星星——只不过0.5(半星)最好看。
Property和Attributes
良好的控件需要支持java代码和xml中创建及设置它的各个方面。
RatingStarView支持:
- 设置Star数量
- 设置Rating (float值,一个star做1看待)
- 设置thickness
- 其它的间距、大小、宽度、颜色等
它是开源的,你可以自行修改和扩展
事件
RatingStarView支持点击评分,不支持半星——半星这种是许多用户评分后的均值。
在onTouchEvent()中记录点击的x,y坐标:
@Override
public boolean onTouchEvent(MotionEvent event) {
   if (event.getAction() == MotionEvent.ACTION_DOWN) {
       clickedX = event.getX();
       clickedY = event.getY();
   }
   return super.onTouchEvent(event);
}
RatingStarView自己实现View.OnClickListener,监听自身点击。
在onClick()回调中根据显示的starList,以及自身大小来改变Rating.
默认它只用来展示评分(只读),可以通过enableSelectRating属性开启点击评分。
快速使用
gradle依赖
见这里
"https://jitpack.io/#everhad/AndroidRatingStar/v1.0.1".
Add the JitPack repository to your build file
allprojects {
    repositories {
        ...
        maven { url 'https://jitpack.io' }
    }
}
Add the dependency
dependencies {
    compile 'com.github.everhad:AndroidRatingStar:v1.0.1'
}
在 'layout.xml'中
<com.idlestar.ratingstar.RatingStarView
     app:cornerRadius="4dp"
     app:starMargin="12dp"
     app:strokeWidth="2px"
     app:strokeColor="#457DD7"
     app:starForegroundColor="#DB6958"
     app:starBackgroundColor="#E8E8E8"
     app:starNum="5"
     app:rating="1"
     app:enableSelectRating="true"
     app:starThickness="0.7"
     android:layout_marginTop="8dp"
     app:drawStrokeForEmptyStar="false"
     app:drawStrokeForHalfStar="true"
     android:paddingTop="2dp"
     android:paddingLeft="0dp"
     android:paddingRight="0dp"
     android:background="#fff"
     android:layout_width="wrap_content"
     android:layout_height="40dp" />
在java代码中
@Override
protected void onCreate(Bundle savedInstanceState) {
  super.onCreate(savedInstanceState);
  setContentView(R.layout.activity_main);

  RatingStarView rsv_rating = (RatingStarView) findViewById(R.id.rsv_rating);
  rsv_rating.setRating(1.5f);
}
源码
完整代码见这里:
https://github.com/everhad/AndroidRatingStar
希望它能节约你的时间(去和UI要各种icon定制RatingBar)