进行以下方式发送邮件之前,需要对接收邮件的邮箱进行设置如下:
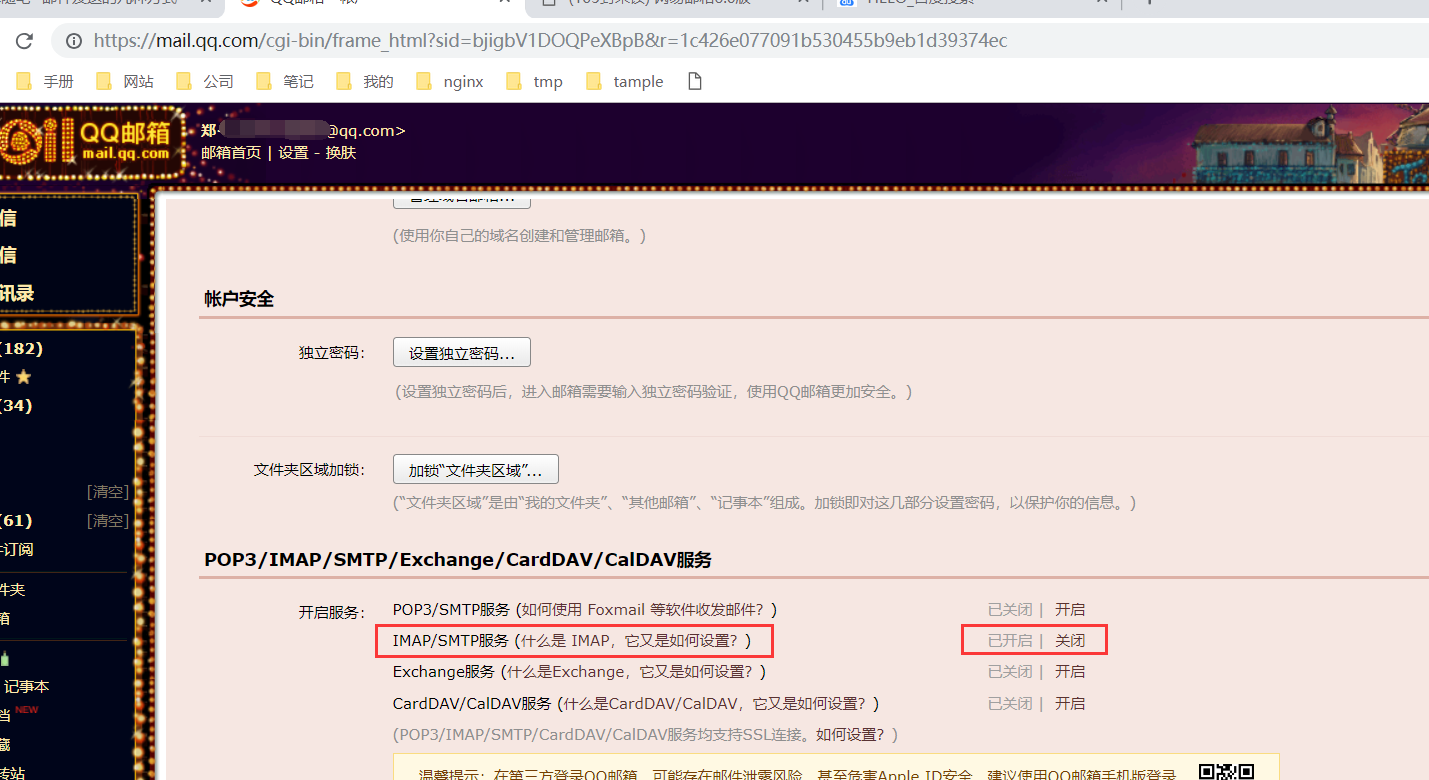
1、开启IMAP/SMTP服务:

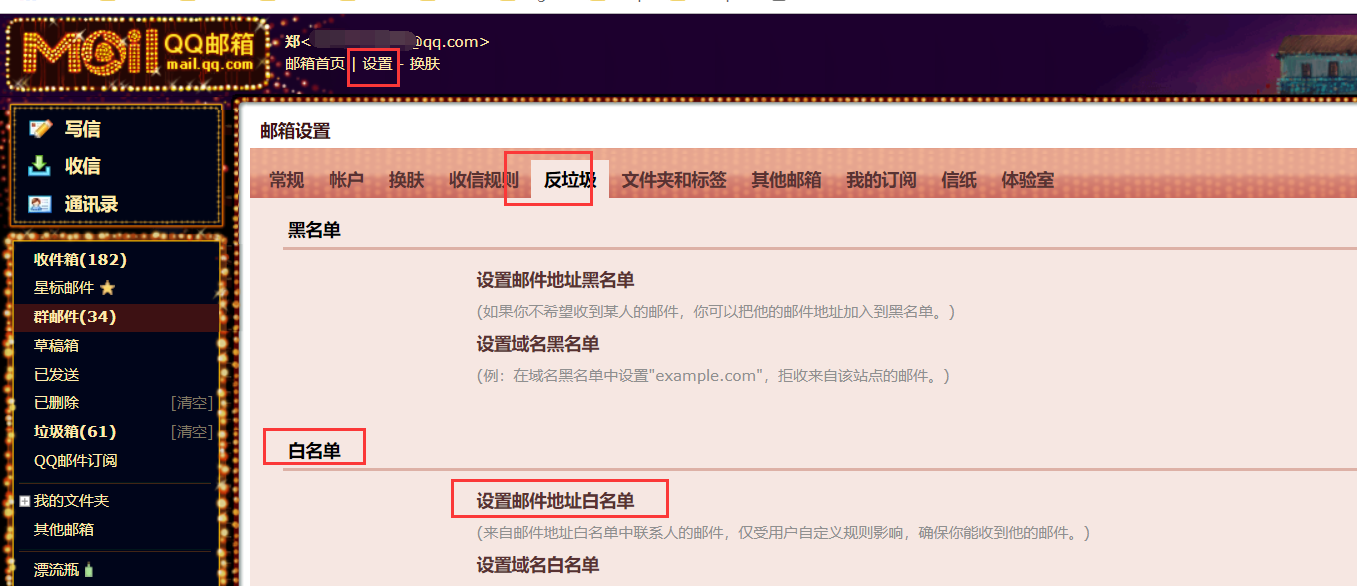
2、设置白名单,这一步我在测试时没有设置也能收到邮件,所以根据具体情况而定:
一、使用telnet命令(依赖postfix等服务)
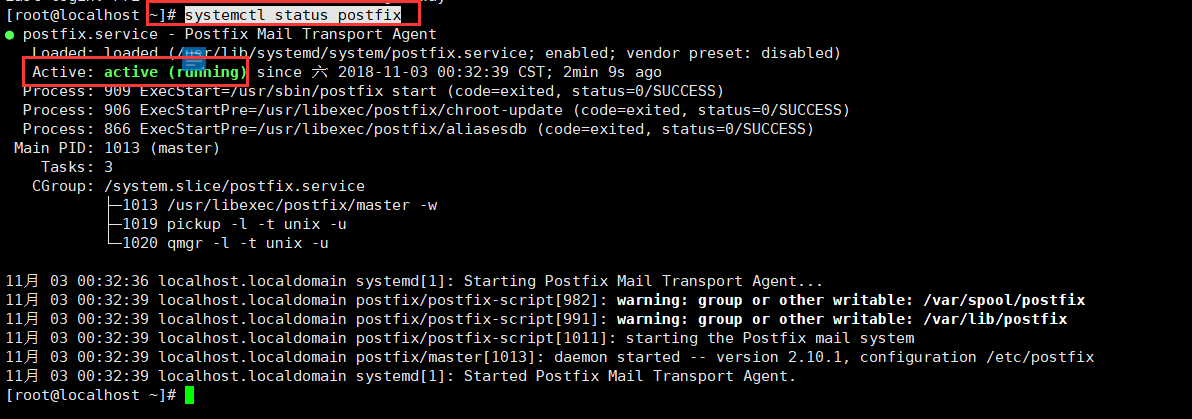
1、确保postfix已经运行
systemctl status postfix
2、确保telnet已经安装,没有安装执行
yum install -y telnet
3、执行telnet连接25号端口
telnet 127.0.0.1 25

依次输入以下命令:
HELO actmyself.com
MAIL FROM: <zcz@actmyself.com>
RCPT TO: <要发送的邮箱地址@qq.com>
DATA
Subject: test message
From: <zcz@actmyself.com>
To: <要发送的邮箱地址@qq.com>
Hello,
this is a test
good bye
.
QUIT
执行完以上操作,即可在邮箱中收到邮件

二、使用mail命令(依赖postfix等服务)
1、设置/etc/mail.rc,这里的发件人邮箱以163为例,qq邮箱可能不同
vim /etc/mail.rc

set from=发件人邮箱@163.com
set smtp=smtp.163.com
set smtp-auth-user=发件人邮箱@163.com
set smtp-auth-password=邮箱密码
set smtp-auth=login
2、使用mail进行邮件发送:
echo "Content" | mail -s "Title" 收件人邮箱@qq.com
3、获取到邮件:

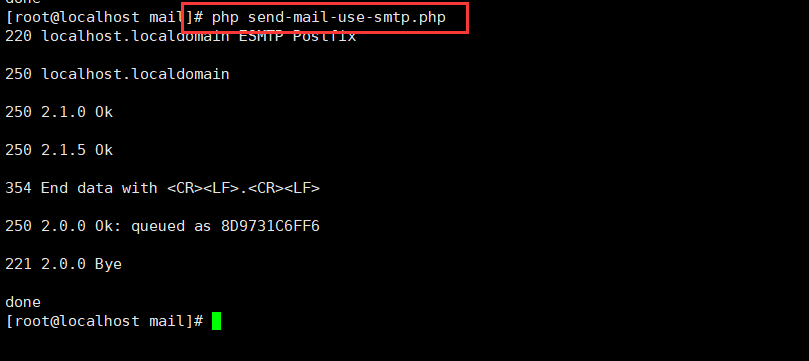
三、使用代码实现SMTP协议(依赖postfix等服务):send-mail-use-smtp.php
<?php

$remote_address = 'tcp://127.0.0.1:25';
$client = stream_socket_client($remote_address);
$response = fread($client, 1024);
echo $response, PHP_EOL;

$request = "HELO actmyself.com
";
fwrite($client, $request);
$response = fread($client, 1024);
echo $response, PHP_EOL;

$request = "MAIL FROM: <zcz@actmyself.com>
";
fwrite($client, $request);
$response = fread($client, 1024);
echo $response, PHP_EOL;

$request = "RCPT TO: <1178218582@qq.com>
";
fwrite($client, $request);
$response = fread($client, 1024);
echo $response, PHP_EOL;

$request = "DATA
";
fwrite($client, $request);
$response = fread($client, 1024);
echo $response, PHP_EOL;

$request = "Subject: test message
";
fwrite($client, $request);
$request = "From: <zcz@actmyself.com>
";
fwrite($client, $request);
$request = "To: <1178218582@qq.com>
";
fwrite($client, $request);
$request = "
Hello,
this is a test
good bye
.
";
fwrite($client, $request);
$response = fread($client, 1024);
echo $response, PHP_EOL;

$request = "QUIT
";
fwrite($client, $request);
$response = fread($client, 1024);
echo $response, PHP_EOL;

fclose($client);
echo 'done', PHP_EOL;
执行即可收到邮件:
四、使用php提供的mail函数(功能简单、依赖postfix等服务):send-mail.php
<?php
$to = '收件人的邮箱@qq.com';
$subject = '测试使用php mail函数发送邮件';
$message = '测试,勿回';

$success = mail($to, $subject, $message);

echo ($success ? '投递成功' : '投递失败'), PHP_EOL;
执行即可收到邮件:

五、使用第三方库(多功能,如群发、添加附件,依赖postfix等服务):swiftmailer(官方文档:https://swiftmailer.symfony.com/docs/index.html)
1、Postfix邮件服务器搭建:
1.1、安装:
yum install -y postfix
1.2、设置配置:
需要设置以下参数:
postconf -n

配置文件为:/etc/postfix/main.cf,执行以下操作,然后配置上述选项
vim /etc/postfix/main.cf
重启postfix:
systemctl restart postfix
设置hostname:
hostnamectl set-hostname zhengchuzhou.xyz

设置邮件域名,可以在dnspod上注册:https://www.dnspod.cn/,ip可以通过curl http://ip.cn获取


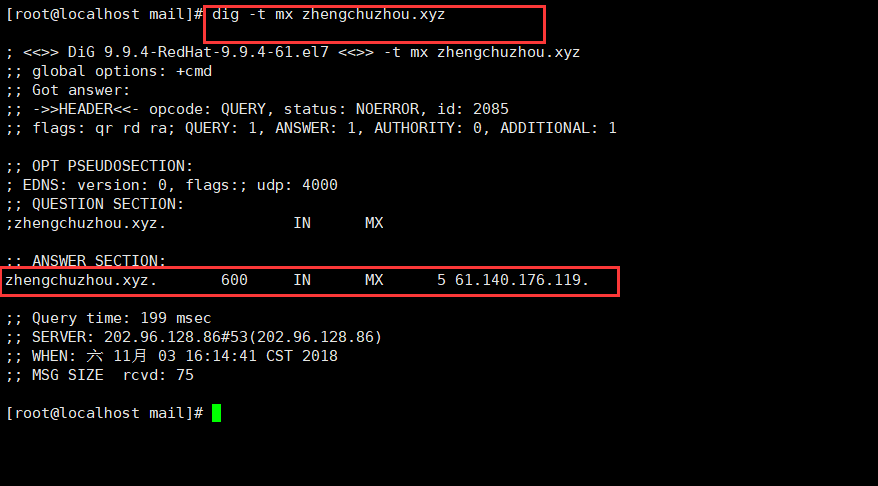
查看设置是否生效:
dig -t mx zhengchuzhou.xyz
2、swiftmailer发送普通文字邮件
2.1、创建新目录send-mail
2.2、composer安装swiftmailer,在send-mail中执行:
composer require "swiftmailer/swiftmailer:^6.0"
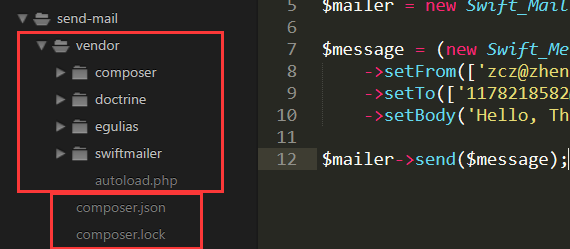
2.3、创建demo.php,代码如下:
<?php
require_once 'vendor/autoload.php';

$transport = (new Swift_SmtpTransport('127.0.0.1', 25));
$mailer = new Swift_Mailer($transport);

$message = (new Swift_Message('Wonderful Subject1'))
    ->setFrom(['zcz@zhengchuzhou.xyz' => 'zcz'])
    ->setTo(['1178218582@qq.com'])
    ->setBody('Hello, This is a test');

$mailer->send($message);
2.4、执行该文件,即可收到邮件
3、swiftmailer发送包含html代码的邮件
3.1、代码如下:demo2.php
<?php
require_once 'vendor/autoload.php';

$transport = (new Swift_SmtpTransport('127.0.0.1', 25));
$mailer = new Swift_Mailer($transport);

$html_body = <<<'EOT'
<p style="color:red">Hello</p>
My <em>amazing</em> body
EOT;

$message = (new Swift_Message('Wonderful Subject1'))
    ->setFrom(['zcz@zhengchuzhou.xyz' => 'zcz'])
    ->setTo(['1178218582@qq.com'])
    ->setBody($html_body, 'text/html');

$mailer->send($message);
3.2、其他步骤同2,执行后收到邮件如下:

4、swiftmailer发送包含图片的邮件:
4.1、代码如下,demo3.php:
<?php
require_once 'vendor/autoload.php';

$transport = (new Swift_SmtpTransport('127.0.0.1', 25));
$mailer = new Swift_Mailer($transport);

$html_body = <<<'EOT'
<p style="color:red">Hello</p>
My <em>amazing</em> body
EOT;

$message = (new Swift_Message('Wonderful Subject1'))
    ->setFrom(['zcz@zhengchuzhou.xyz' => 'zcz'])
    ->setTo(['1178218582@qq.com'])
    ->setBody($html_body, 'text/html');
$attachment = Swift_Attachment::fromPath('1.jpg', 'image/jpeg');
$message->attach($attachment);

$mailer->send($message);
4.2、其他步骤同2,执行后收到的邮件如下:

5、swiftmailer群发邮件:
5.1、代码如下,demo4.php:
<?php
require_once 'vendor/autoload.php';

$transport = (new Swift_SmtpTransport('127.0.0.1', 25));
$mailer = new Swift_Mailer($transport);

$html_body = <<<'EOT'
<p style="color:red">Hello</p>
My <em>amazing</em> body
EOT;

$message = (new Swift_Message('Wonderful Subject1'))
    ->setFrom(['zcz@zhengchuzhou.xyz' => 'zcz'])
    ->setTo(['1178218582@qq.com', '15521218742@163.com'])
    ->setBody($html_body, 'text/html');
$attachment = Swift_Attachment::fromPath('1.jpg', 'image/jpeg');
$message->attach($attachment);

$mailer->send($message);
5.2、其他同上
六、使用第三方服务(安全、高效,不依赖postfix等服务):Mailgun、AWS SES、QQ企业邮箱
七、异常及日志:
1、安装monolog:github地址:https://github.com/Seldaek/monolog
composer require monolog/monolog
2、使用logrotate对日志进行切割:
2.1、logrotate依赖crond,需要确保crond已经开启:
systemctl status crond

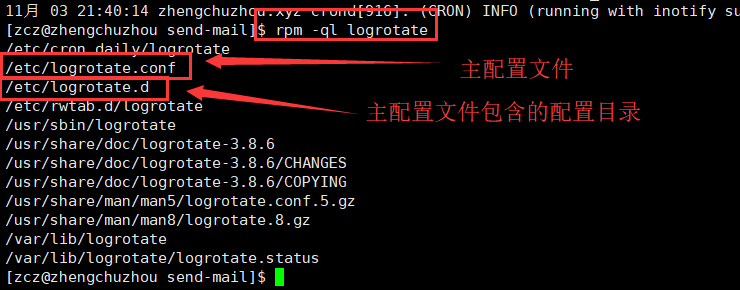
2.2、查看logrotate的配置文件:
rpm -ql logrotate
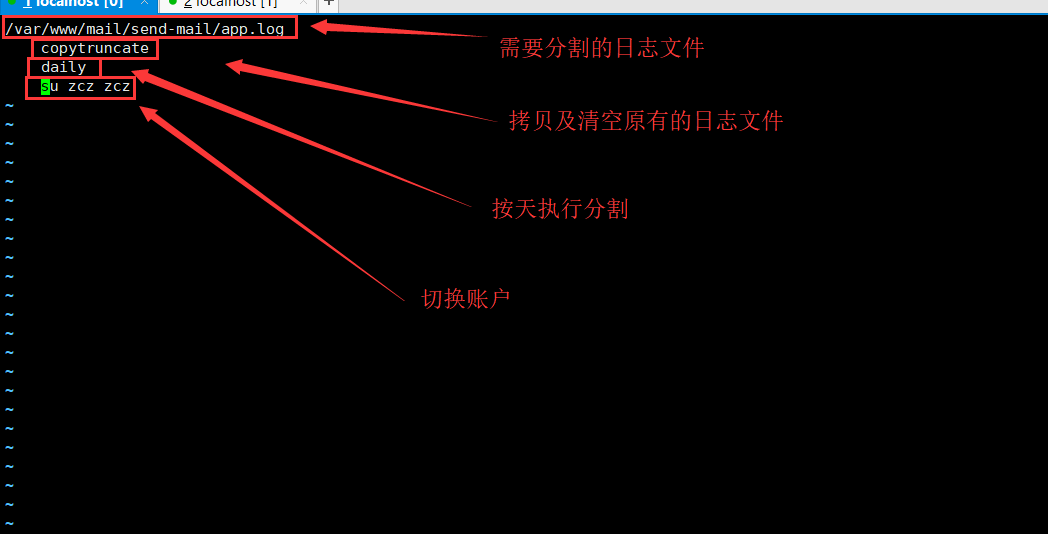
2.3、在/etc/logrotate.d下编写分隔配置文件:send-mail
/var/www/mail/send-mail/app.log
{
copytruncate
daily
su zcz zcz
}
2.4、验证:
强制执行logrotate:
sudo logrotate -f /etc/logrotate.d/send-mail
即可看到日志文件被分割:

3、使用supervisor管理进程:
3.1、查看配置:
rpm -ql supervisor | grep etc

3.2、在/etc/supervisord.d下配置send-mail.ini文件:
[program: send-mail]
command=/usr/bin/php /var/www/mail/send-mail/consume_with_logger.php
autorestart=true
user=zcz

3.3、启动supervisord及查看supervisord
sudo systemctl start supervisord
sudo systemctl status supervisord

3.4、验证
杀死进程然后查看进程是否还存在,发现依然存在,但pid发生变化,可见supervisord已经起到作用
