一、Docker简介
1.1、Docker是什么:
- 使用最广泛的开源容器引擎
- 一种操作系统级的虚拟化技术
- 依赖于Linux内核特性:Namespace(资源隔离)和Cgroups(资源限制)
- 一个简单的应用程序打包工具
1.2、Docker设计目标:
- 提供简单的应用程序打包工具
- 开发人员和运维人员职责逻辑分离
- 多环境保持一
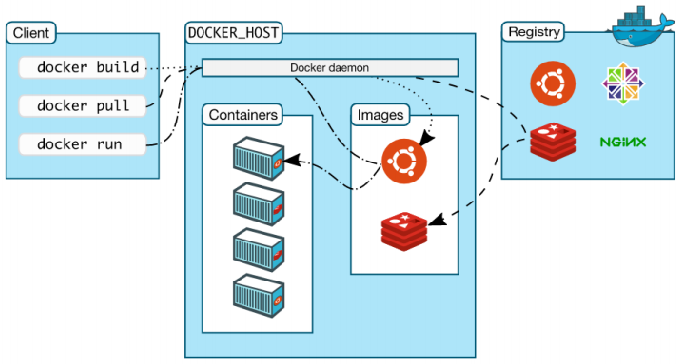
1.3、Docker基本组成:
- Docker Client:客户端
- Ddocker Daemon:守护进程
- Docker Images:镜像
- Docker Container:容器
- Docker Registry:镜像仓库
各种关系如下图:
1.4、Docker既然是虚拟化技术,那不免和VM进行一番比较,话不多说,直接看图吧:
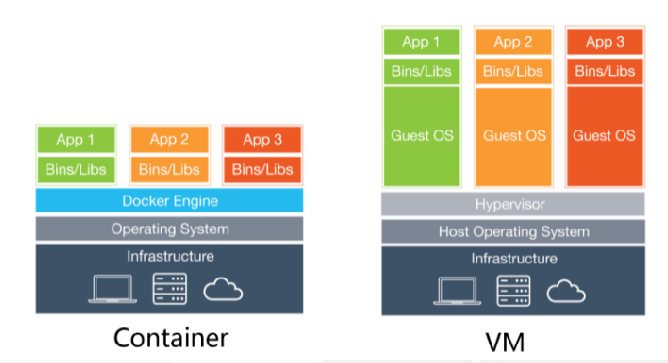

Docker容器技术是一个与传统的虚拟化技术有些本质上的差别,传统的虚拟化技术,是站硬件物理资源的基础上,虚拟出多个OS,然后在OS的基础上构建相对独立的程序运行环境,而Docker则是在OS的基础上进行虚拟,所以,Docker轻量很多,因此其资源占用、性能消耗相比传统虚拟化都有很大的优势。
Docker容器很快,启动和停止可以在秒级实现,比传统的虚拟化技术要快很多,docker核心解决的问题是利用容器来实现类似VM的功能,从而节省更多的硬件资源,docker容器除了运行其中的应用之外,基本不消耗额外的系统资源,从而在保证性能的同时,减小系统开销,同时,它还可以达到“一次封装,到处运行”的目的。
1.5、Docker应用场景:
- 应用程序打包和发布
- 应用程序隔离
- 持续集成
- 部署微服务
- 快速搭建测试环境
- 提供PaaS产品(平台即服务)
二、Docker三个容器隔离核心技术:Namespace、Cgroups、Rootfs
2.1、Namespace:Linux 容器中用来实现“隔离”的技术手段
虚拟化的技术就是用来解决宿主机与虚拟机之间的耦合问题(简称“解耦”),传统虚拟化技术是属于完全解耦的,而docker这种虚拟化技术是属于半解耦的。
- 耦合:就是指两个或两个以上的体系或两种运动形式间通过相互作用而彼此影响以至联合起来的现象;
- 解耦:接触耦合、冲突现象;
Docker是如何解耦的呢?这就需要使用到这里所说的:Namespace(命名空间)。
Namespace(命名空间):是Linux为我们提供的用于分离进程树、网络接口、挂载点以及进程间通信等资源的方法。
Namespace(命名空间)在docker中主要实现了六项隔离,如图:

Docker通过使用Namespace(命名空间)这项技术实现了容器与容器之间、容器与docker host之间的隔离。
当Docker创建一个容器时,它会创建新的以上六种NameSpace的实例,然后把容器中的所有进程放到这些NameSpace之中,使得容器这个父进程只对自己的子进程有感知,而对于宿主机其他进程一无所知,从而产生一种它就是一个独立的系统的“错觉”。
如果docker 宿主机是centos系统,运行docker容器时,容器也是centos 系统,所必需的目录、文件就是通过docker宿主机进行软连接提供的,包括宿主机的内核;但如果运行的docker容器是Ubuntu系统,其中目录、文件与centos 系统始终是会有一些区别的,那么这就需要使用到——Busybox(欺骗层)。
如果需要使用虚拟机来部署一些服务时,这些服务对内核版本有要求,那么就不太适合使用docker这种虚拟化技术,建议使用KVM等虚拟化技术。
docker这种服务本身并不占用端口,只是保持后台运行。
2.2、Cgroup:控制程序对资源的占用
Cgroup的具体作用如下:
- 限制资源的使用:Cgroup可以对进程组使用的资源总额进行限制;
- 优先级控制:通过分配CPU时间片数量及磁盘IO带宽大小,实际上就是相当于控制子进程运行的优先级。
- 资源统计:Cgroup可以统计系统资源使用量,比如CPU使用时间,内存使用量等。可用于按量计费。
- 进程控制:恢复执行进程;
使用Cgroup,我们可以更具体地控制对系统资源的分配、优先顺序、拒绝、管理和监控。可更好地根据任务和用户分配硬件资源,提高总体的效率,这样可以在docker容器中的服务受到外部干扰时,可以将其限制在容器之中,而不会影响宿主机或其他容器的运行,提高了安全性。
那么,docker是如何来定义容器使用的资源呢?
(1)Cgroup的应用举例
1、对CPU进行限制:
- 先来看看其不进行CPU限制时,宿主机和Docker它是什么样子的?
1 root@ubuntu:~# cat /sys/fs/cgroup/cpu/cpu.shares            # 查看宿主机CPU的权重
2 1024
3 root@ubuntu:~# docker run -it --rm --name mybsx  busybox
4 / # cat /sys/fs/cgroup/cpu/cpu.shares
5 1024                                                        # 可以看到和宿主机是一样的:Docker容器默认的CPU权重也是1024
6 / # exit
- 再看基于busybox镜像运行一个容器,要求CPU使用权重为512:
1 root@ubuntu:~# docker run -it --rm --name mybusybox1 -c 512 busybox
2 / # cat /sys/fs/cgroup/cpu/cpu.shares
3 512                                                         # 可以看到效果了
4 / # exit
5 root@ubuntu:~#
6 # 基于centos镜像运行一个名为test1的容易,其CPU使用的权重为512
7 # 设置方法相对来说,十分简单,就是添加了一个“-c”的选项而已!
- 其它部分相关限制参数如下:
1 --cpuset-cpus=""        允许使用的CPU集,值可以为0-3或0,3
2 -c,--cpu-shares=0       CPU权重
3 --cpu-period=0          CPU CFS周期,范围从100ms~1s,即[1000, 1000000]
4 --cpu-quota=0           CPU CFS配额,必须不小于1ms,即大于等于1000
5 --cpuset-mems=""        允许在容器上执行的内存节点,只对NUMA系统有效
6 --cpus=1.5              指定容器可以使用的CPU资源量。如果设置--cpus="1.5",则容器最多可以使用1.5个CPU。
7 --cap-add=sys_nice      开启Docker容器CAP_SYS_NICE功能,允许容器引发进程良好值,设置实时调度策略,设置CPU亲和性以及其他操作。
8 --cpu-rt-runtime=value  容器可以在Docker守护程序的实时调度程序周期内以实时优先级运行的最大微秒数,需要开启CAP_SYS_NICE功能 。
9 --ulimit rtprio=99      容器允许的最大实时优先级,需要开启CAP_SYS_NICE功能。
2、基于busybox镜像运行一个容器,要求MEM为200M,MEM-SWAP为200M:
- 以下是宿主机和Docker容器内存、交换空间的未限制的情况:
 1 # 物理情况:
 2 root@ubuntu:~# cat /sys/fs/cgroup/memory/memory.limit_in_bytes
 3 9223372036854771712
 4 root@ubuntu:~# cat /sys/fs/cgroup/memory/memory.memsw.limit_in_bytes
 5 9223372036854771712
 6 root@ubuntu:~#
 7 # 容器情况:
 8 root@ubuntu:~# docker container run -it --rm --name b1 busybox
 9 / # cat /sys/fs/cgroup/memory/memory.limit_in_bytes
10 9223372036854771712
11 / # cat /sys/fs/cgroup/memory/memory.memsw.limit_in_bytes
12 9223372036854771712
13 / # exit
14 root@ubuntu:~#
- 以下是对容器中的内存和交互空间进行限制:
1 root@ubuntu:~# docker container run -it --rm --name b1 -m200M --memory-swap 400M  busybox
2 / # cat /sys/fs/cgroup/memory/memory.limit_in_bytes
3 209715200                                                    # 内存限制:单位是——bytes
4 / # cat /sys/fs/cgroup/memory/memory.memsw.limit_in_bytes
5 419430400                                                    # 交换空间限制:单位是——bytes
6 / #
3、基于busybox镜像运行一个容器,要求写入速度为40M:
- 默认运行一个容器,不进行限制:
1 root@ubuntu:~# docker container run -it --rm --name b1  busybox
2 / # time dd if=/dev/zero of=a.txt bs=1M count=200 oflag=direct
3 200+0 records in
4 200+0 records out
5 209715200 bytes (200.0MB) copied, 0.175974 seconds, 1.1GB/s
6 real    0m 0.17s
7 user    0m 0.00s
8 sys    0m 0.15s
9 / #
- 可以看到,如果不对其进行限制,那么会使用宿主机最大的写速度,那么怎么限制呢?
1 root@ubuntu:~# docker container run -it --rm --name b1 --device-write-bps /dev/sda:40MB  busybox
2 / # time dd if=/dev/zero of=a.txt bs=1M count=200 oflag=direct
3 200+0 records in
4 200+0 records out
5 209715200 bytes (200.0MB) copied, 4.933736 seconds, 40.5MB/s    # 写入速度被限制在了40MB左右
6 real    0m 4.93s
7 user    0m 0.00s
8 sys    0m 0.14s
9 / #
三、Dockerfile文件详解
Dockerfiile是什么、其基本结构是什么,已经各种常用的指令有哪些(包括这些指令使用方法),请看如下地址:https://www.cnblogs.com/panwenbin-logs/p/8007348.html
我也应用其中一张图片说明情况:
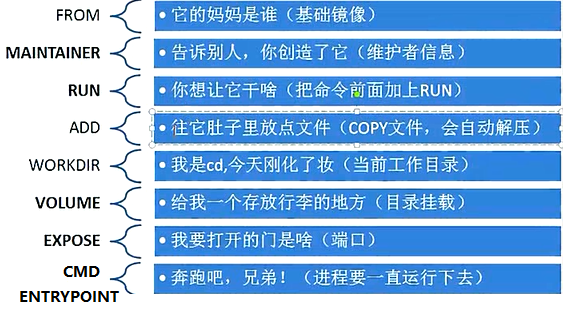
下面我主要想谈谈 :Dockerfile 中的 CMD 与 ENTRYPOINT 两条指令
CMD 和 ENTRYPOINT 指令都是用来指定容器启动时运行的命令。
单从功能上来看,这两个命令几乎是重复的。单独使用其中的一个就可以实现绝大多数的用例。但是既然 doker 同时提供了它们,为了在使用中不至于混淆,本文试图把它们的用法理清楚。
exec 模式和 shell 模式
CMD 和 ENTRYPOINT 指令都支持 exec 模式和 shell 模式的写法,所以要理解 CMD 和 ENTRYPOINT 指令的用法,就得先区分 exec 模式和 shell 模式。这两种模式主要用来指定容器中的不同进程为 1 号进程。了解 linux 的朋友应该清楚 1 号进程在系统中的重要地位。笔者也在《在 docker 容器中捕获信号》一文中介绍过 1 号进程对容器中信号处理的重要性,感兴趣的朋友可以移步这里进行了解。下面我们通过 CMD 指令来学习 exec 模式和 shell 模式的特点。
exec 模式
使用 exec 模式时,容器中的任务进程就是容器内的 1 号进程,看下面的例子:
 1 root@ubuntu:~/test01# cat Dockerfile
 2 FROM busybox
 3 CMD [ "top" ]
 4 root@ubuntu:~/test01#
 5 root@ubuntu:~/test01# docker build -t test01 .
 6 Sending build context to Docker daemon  2.048kB
 7 Step 1/2 : FROM busybox
 8  ---> 42b97d3c2ae9
 9 Step 2/2 : CMD [ "top" ]
10  ---> Running in 3abe67d620dd
11 Removing intermediate container 3abe67d620dd
12  ---> 570d8d5676ad
13 Successfully built 570d8d5676ad
14 Successfully tagged test01:latest
15 root@ubuntu:~/test01#
16 root@ubuntu:~/test01# docker run -d --name r1 test01
17 724ca03f8840521c76a1a5cc435cb5bc55f49b19986810ff241a83fd4c9bab26
18 root@ubuntu:~/test01# docker ps
19 CONTAINER ID        IMAGE               COMMAND             CREATED             STATUS              PORTS               NAMES
20 724ca03f8840        test01              "top"               4 seconds ago       Up 3 seconds                            r1
21 root@ubuntu:~/test01# docker exec -it r1 sh
22 / # ps
23 PID   USER     TIME  COMMAND
24     1 root      0:00 top                # 这里进程为:1
25     6 root      0:00 sh
26    11 root      0:00 ps
27 / #

从图中我们看到运行 top 命令的进程 ID 为 1。
exec 模式是建议的使用模式,因为当运行任务的进程作为容器中的 1 号进程时,我们可以通过 docker 的 stop 命令优雅的结束容器(详情请参考《在 docker 容器中捕获信号》)。
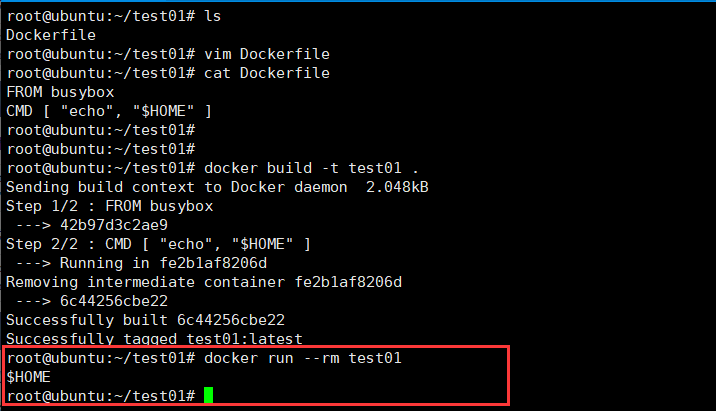
exec 模式的特点是不会通过 shell 执行相关的命令,所以像 $HOME 这样的环境变量是取不到的:
1 FROM busybox
2 CMD [ "echo", "$HOME" ]
把上面的代码保存到 test1 目录的 Dockerfile 中,然后进入 test1 目录构建镜像并启动一个容器:
1 # docker build --no-cache -t test1 .
2 # docker run --rm test1
通过 exec 模式执行 shell 可以获得环境变量:(下面我也不一一验证了,贴一下原作者的图文吧)
FROM ubuntu
CMD [ "sh", "-c", "echo $HOME" ]
把上面的代码保存到 test1 目录的 Dockerfile 中,然后进入 test1 目录构建镜像并启动一个容器:
1 # docker build --no-cache -t test1 .
2 # docker run --rm test1

这次正确取到了 $HOME 环境变量的值。
shell 模式
使用 shell 模式时,docker 会以 /bin/sh -c "task command" 的方式执行任务命令。也就是说容器中的 1 号进程不是任务进程而是 bash 进程,看下面的例子:
FROM ubuntu
CMD top
把上面的代码保存到 test2 目录的 Dockerfile 中,然后进入 test2 目录构建镜像并启动一个容器:
1 # docker build -t test2 .
2 # docker run -itd --name testcon2 test2
然后查看容器中的进程 ID:
1 # docker exec testcon2 ps aux

1 号进程执行的命令居然是 /bin/sh -c top。而我们指定的 top 命令的进程 ID 为 7。这是由 docker 内部决定的,目的是让我们执行的命令或者脚本可以取到环境变量。
CMD 指令
CMD 指令的目的是:为容器提供默认的执行命令。
CMD 指令有三种使用方式,其中的一种是为 ENTRYPOINT 提供默认的参数:
CMD ["param1","param2"]
另外两种使用方式分别是 exec 模式和 shell 模式:
CMD ["executable","param1","param2"] // 这是 exec 模式的写法,注意需要使用双引号。
CMD command param1 param2 // 这是 shell 模式的写法。
注意命令行参数可以覆盖 CMD 指令的设置,但是只能是重写,却不能给 CMD 中的命令通过命令行传递参数。
一般的镜像都会提供容器启动时的默认命令,但是有些场景中用户并不想执行默认的命令。用户可以通过命令行参数的方式覆盖 CMD 指令提供的默认命令。比如通过下面命令创建的镜像:
FROM ubuntu
CMD [ "top" ]
在启动容器时我们通过命令行指定参数 ps aux 覆盖默认的 top 命令:

从上图可以看到,命令行上指定的 ps aux 命令覆盖了 Dockerfile 中的 CMD [ "top" ]。实际上,命令行上的命令同样会覆盖 shell 模式的 CMD 指令。
ENTRYPOINT 指令
ENTRYPOINT 指令的目的也是为容器指定默认执行的任务。
ENTRYPOINT 指令有两种使用方式,就是我们前面介绍的 exec 模式和 shell 模式:
ENTRYPOINT ["executable", "param1", "param2"] // 这是 exec 模式的写法,注意需要使用双引号。
ENTRYPOINT command param1 param2 // 这是 shell 模式的写法。
exec 模式和 shell 模式的基本用法和 CMD 指令是一样的,下面我们介绍一些比较特殊的用法。
指定 ENTRYPOINT 指令为 exec 模式时,命令行上指定的参数会作为参数添加到 ENTRYPOINT 指定命令的参数列表中。用下面的代码构建镜像 test1:
FROM ubuntu
ENTRYPOINT [ "top", "-b" ]
运行下面的命令:
1 # docker run --rm test1 -c
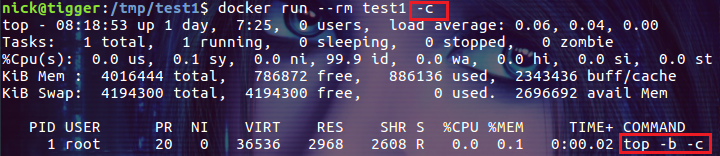
我们在命令行上添加的参数被追加到了 top 命令的参数列表中。
由 CMD 指令指定默认的可选参数:
FROM ubuntu
ENTRYPOINT [ "top", "-b" ]
CMD [ "-c" ]
使用这段代码构建镜像 test2 并不带命令行参数启动容器:
# docker run --rm test2
这时容器中运行的命令为:top -b -c。
如果我们指定命令行参数:
# docker run --rm test2 -n 1
-n 1 会覆盖 通过 CMD [ "-c" ] 指定的参数,容器执行的命令为:top -b -n 1
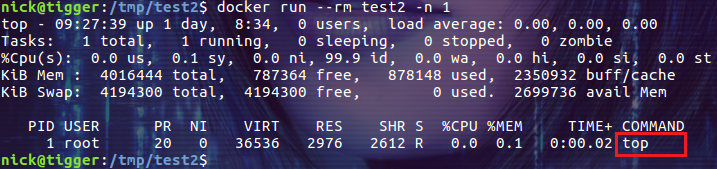
注意上图的输出显示 -c 参数被覆盖了。
指定 ENTRYPOINT 指令为 shell 模式时,会完全忽略命令行参数:
FROM ubuntu
ENTRYPOINT echo $HOME
把上面的代码编译成镜像 test2,分别不带命令行参数和使用命令行参数 ls 执行命令:
我们看到 ls 命令没有被执行,这说明命令行参数被 ENTRYPOINT 指令的 shell 模式忽略了。
覆盖默认的 ENTRYPOINT 指令:
ENTRYPOINT 指令也是可以被命令行覆盖的,只不过不是默认的命令行参数,而是需要显式的指定 --entrypoint 参数。比如我们通过下面的方式覆盖上面镜像中的 echo $HOME 命令:
# docker run --rm --entrypoint hostname test2

Dockerfile 中至少要有一个
如果镜像中既没有指定 CMD 也没有指定 ENTRYPOINT 那么在启动容器时会报错。这不算是什么问题,因为现在能见到的绝大多数镜像都默认添加了 CMD 或 ENTRYPOINT 指令。
指定任意一个,效果差不多
从结果上看,CMD 和 ENTRYPOINT 是一样的,我们可以通过它们实现相同的目的。下面我们分别用 CMD 和 ENTRYPOINT 设置 top -b 命令,然后观察容器运行时的 metadata 信息:
 或者:
或者:
虽然实现方式不同,但最终容器运行的命令是一样的。
同时使用 CMD 和 ENTRYPOINT 的情况
对于 CMD 和 ENTRYPOINT 的设计而言,多数情况下它们应该是单独使用的。当然,有一个例外是 CMD 为 ENTRYPOINT 提供默认的可选参数。
我们大概可以总结出下面几条规律:
• 如果 ENTRYPOINT 使用了 shell 模式,CMD 指令会被忽略。
• 如果 ENTRYPOINT 使用了 exec 模式,CMD 指定的内容被追加为 ENTRYPOINT 指定命令的参数。
• 如果 ENTRYPOINT 使用了 exec 模式,CMD 也应该使用 exec 模式。
真实的情况要远比这三条规律复杂,好在 docker 给出了官方的解释,如下图所示:
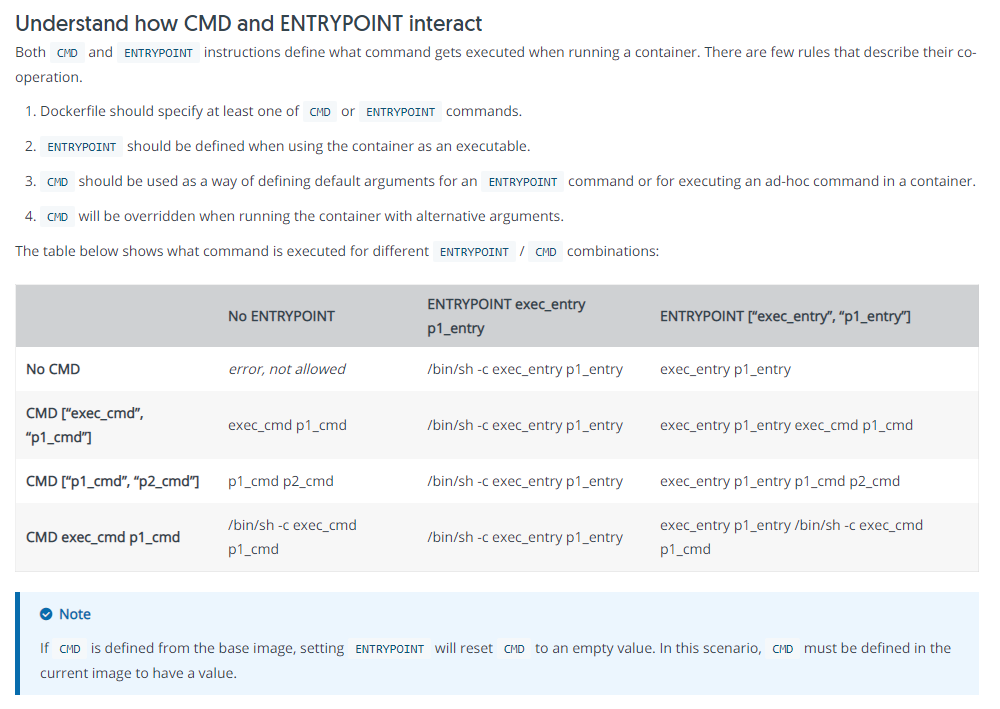
当我们无法理解容器中运行命令的行为时,说不定通过这个表格可以解开疑惑!注:有空好好的读读 —— https://docs.docker.com/engine/reference/builder/
总结
对于 Dockerfile 来说,CMD 和 ENTRYPOINT 是非常重要的指令。它们不是在构建镜像的过程中执行,而是在启动容器时执行,所以主要用来指定容器默认执行的命令。但是提供两个功能类似的指令,必然会给用户带来理解上的困惑和使用中的混淆。希望本文能够帮助大家理解二者的区别与联系,并更好的使用二者。(参考地址:https://www.cnblogs.com/sparkdev/p/8461576.html)
这里严重提出:dockerfile中的语句能合并的合并:
- ENV 定义好多行:一行写一个;
- RUN命令也是
不行:越看越不对劲啊——还是有很多东西要实践:比如这篇文章:http://www.dockone.io/article/2338 ;好了不扯了,做作业吧!!!
DockerFile 制作Nginx镜像
本次实验使用的基础镜像为:CentOS7
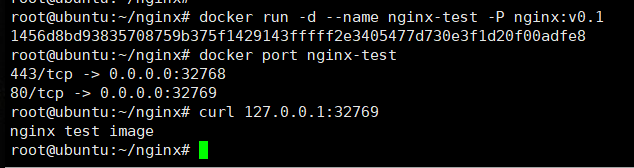
1 root@ubuntu:~/nginx# cat Dockerfile
2 FROM centos:7
3 LABEL author=zhengweimin email=307762192@qq.com
4 RUN yum install epel-release -y && yum install nginx -y && yum clean all && rm -rf /usr/share/nginx/html/index.html && echo 'nginx test image' > /usr/share/nginx/html/index.html
5 EXPOSE 80 443
6 ENTRYPOINT ["/usr/sbin/nginx"]
7 CMD ["-g","daemon off;"]
具体过程如下:


 1 root@ubuntu:~/nginx# docker build -t nginx:v0.2 .
 2 Sending build context to Docker daemon  2.048kB
 3 Step 1/6 : FROM centos:7
 4  ---> 8652b9f0cb4c
 5 Step 2/6 : LABEL author=zhengweimin email=307762192@qq.com
 6  ---> Using cache
 7  ---> 468418ed292a
 8 Step 3/6 : RUN yum install epel-release -y && yum install nginx -y && yum clean all && rm -rf /usr/share/nginx/html/index.html && echo 'nginx test image' > /usr/share/nginx/html/index.html
 9  ---> Using cache
10  ---> 2c0fc5a0f9cb
11 Step 4/6 : EXPOSE 80 443
12  ---> Using cache
13  ---> 09d78c1fec67
14 Step 5/6 : ENTRYPOINT ["/usr/sbin/nginx"]
15  ---> Using cache
16  ---> 423a5a3b9c34
17 Step 6/6 : CMD ["-g","daemon off;"]
18  ---> Using cache
19  ---> 802f05f49216
20 Successfully built 802f05f49216
21 Successfully tagged nginx:v0.2
22 root@ubuntu:~/nginx# cat Dockerfile
23 FROM centos:7
24 LABEL author=zhengweimin email=307762192@qq.com
25 RUN yum install epel-release -y && yum install nginx -y && yum clean all && rm -rf /usr/share/nginx/html/index.html && echo 'nginx test image' > /usr/share/nginx/html/index.html
26 EXPOSE 80 443
27 ENTRYPOINT ["/usr/sbin/nginx"]
28 CMD ["-g","daemon off;"]
29 root@ubuntu:~/nginx#
我这里就偷懒了,直接echo一个测试页面内容除了——如果又特别需要的可以使用ADD命令或者后面的挂载方式,测试结果如下图:
DockerFile 制作Tomcat镜像
本次实验使用的基础镜像为:CentOS7:
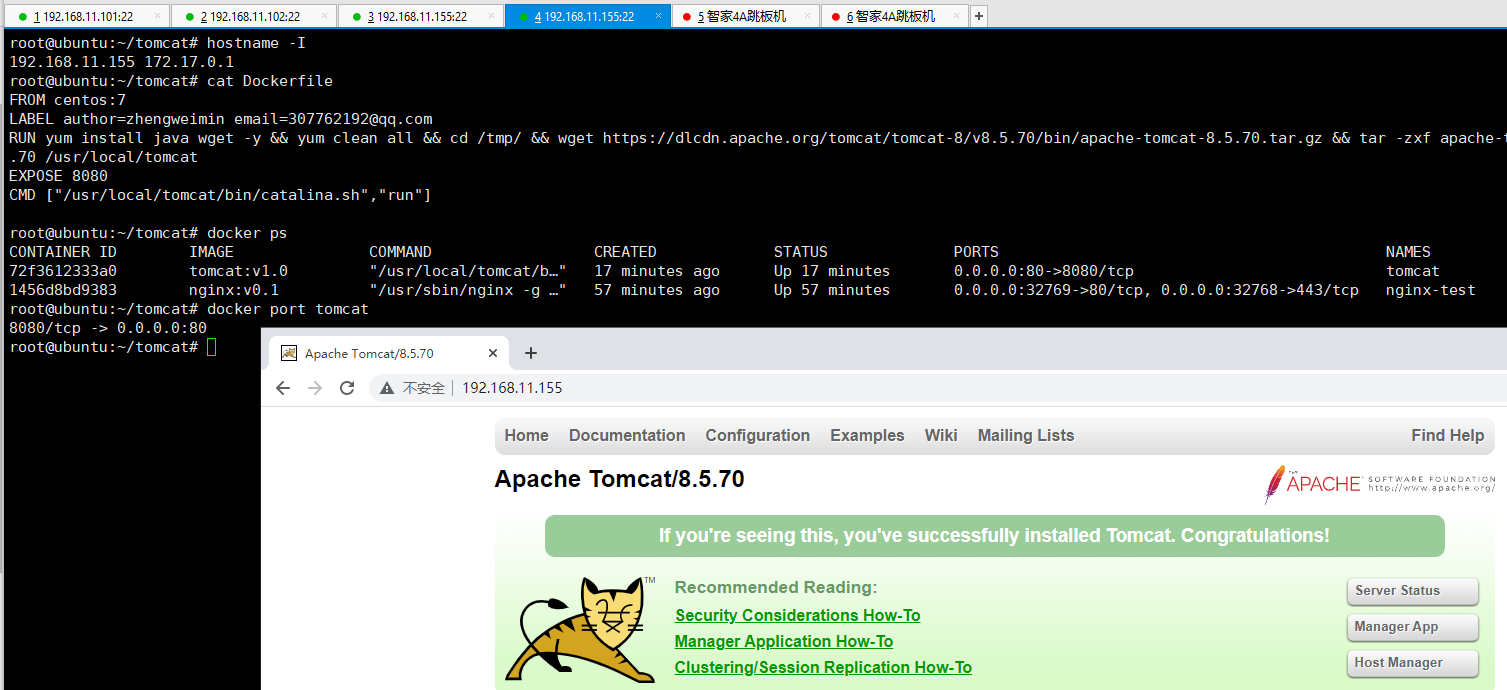
1 root@ubuntu:~/tomcat# cat Dockerfile
2 FROM centos:7
3 LABEL author=zhengweimin email=307762192@qq.com
4 RUN yum install java wget -y && yum clean all && cd /tmp/ && wget https://dlcdn.apache.org/tomcat/tomcat-8/v8.5.70/bin/apache-tomcat-8.5.70.tar.gz && tar -zxf apache-tomcat-8.5.70.tar.gz && mv apache-tomcat-8.5.70 /usr/local/tomcat
5 EXPOSE 8080
6 CMD ["/usr/local/tomcat/bin/catalina.sh","run"]
具体过程如下:
 1 root@ubuntu:~/tomcat# cat Dockerfile
 2 FROM centos:7
 3 LABEL author=zhengweimin email=307762192@qq.com
 4 RUN yum install java wget -y && yum clean all && cd /tmp/ && wget https://dlcdn.apache.org/tomcat/tomcat-8/v8.5.70/bin/apache-tomcat-8.5.70.tar.gz && tar -zxf apache-tomcat-8.5.70.tar.gz && mv apache-tomcat-8.5.70 /usr/local/tomcat
 5 EXPOSE 8080
 6 CMD ["/usr/local/tomcat/bin/catalina.sh","run"]
 7
 8 root@ubuntu:~/tomcat#
 9 root@ubuntu:~/tomcat#
10 root@ubuntu:~/tomcat# docker build -t tomcat:v1.0 .
11 Sending build context to Docker daemon  10.57MB
12 Step 1/5 : FROM centos:7
13  ---> 8652b9f0cb4c
14 Step 2/5 : LABEL author=zhengweimin email=307762192@qq.com
15  ---> Using cache
16  ---> 468418ed292a
17 Step 3/5 : RUN yum install java wget -y && yum clean all && cd /tmp/ && wget https://dlcdn.apache.org/tomcat/tomcat-8/v8.5.70/bin/apache-tomcat-8.5.70.tar.gz && tar -zxf apache-tomcat-8.5.70.tar.gz && mv apache-tomcat-8.5.70 /usr/local/tomcat
18  ---> Using cache
19  ---> 0f3bc411dbf8
20 Step 4/5 : EXPOSE 8080
21  ---> Using cache
22  ---> 5387693a44e6
23 Step 5/5 : CMD ["/usr/local/tomcat/bin/catalina.sh","run"]
24  ---> Using cache
25  ---> 0de0026ae082
26 Successfully built 0de0026ae082
27 Successfully tagged tomcat:v1.0
28 root@ubuntu:~/tomcat#
29 root@ubuntu:~/tomcat# docker images
30 REPOSITORY          TAG                 IMAGE ID            CREATED             SIZE
31 tomcat              v1.0                0de0026ae082        14 seconds ago      452MB
32 nginx               v0.1                802f05f49216        45 minutes ago      262MB
33 test01              latest              6c44256cbe22        42 hours ago        1.24MB
34 test01              v1.0                570d8d5676ad        43 hours ago        1.24MB
35 nginx               latest              822b7ec2aaf2        6 days ago          133MB
36 alpine              latest              14119a10abf4        12 days ago         5.6MB
37 busybox             latest              42b97d3c2ae9        2 weeks ago         1.24MB
38 centos              7                   8652b9f0cb4c        9 months ago        204MB
39 root@ubuntu:~/tomcat# docker run -d --name tomcat -p 80:8080 tomcat
40 Unable to find image 'tomcat:latest' locally
41 ^C
42 root@ubuntu:~/tomcat# docker run -d --name tomcat -p 80:8080 tomcat:v1.0
43 72f3612333a04bb7f37118635dfdf05e3dd85c0189987aa91e26e5d3d0af498f
44 root@ubuntu:~/tomcat# docker port tomcat
45 8080/tcp -> 0.0.0.0:80
46 root@ubuntu:~/tomcat#
我这里还是偷懒了,直接echo一个测试页面内容除了——如果又特别需要的可以使用ADD命令或者后面的挂载方式,测试结果如下图:
至于:把镜像做成一个一个的层次(你可以先做个有java环境的镜像,后面再基于这个镜像做tomcat、es等镜像),你自己去拆开吧!!!
四、Docker 数据的持久化:-v参数的使用
容器是随时启动和销毁特别频繁的情况,既然不知道什么时候就创建和销毁了,哪有如何对数据持久化的应用进行支持呢?这里就用到了数据卷的情况:-v参数的使用
首先可以通过如下命令查看一个运行中的容器数据集的情况: docker inspect “运行中容器的ID” | grep -A6 GraphDriver
 1 root@ubuntu:~/nginx# docker ps
 2 CONTAINER ID        IMAGE               COMMAND                  CREATED             STATUS              PORTS                                           NAMES
 3 72f3612333a0        tomcat:v1.0         "/usr/local/tomcat/b…"   3 hours ago         Up 3 hours          0.0.0.0:80->8080/tcp                            tomcat
 4 1456d8bd9383        nginx:v0.1          "/usr/sbin/nginx -g …"   3 hours ago         Up 3 hours          0.0.0.0:32769->80/tcp, 0.0.0.0:32768->443/tcp   nginx-test
 5 root@ubuntu:~/nginx#
 6 root@ubuntu:~/nginx# docker inspect 1456d8bd9383|grep -A6 GraphDriver
 7         "GraphDriver": {
 8             "Data": {
 9                 "LowerDir": "/var/lib/docker/overlay2/63cb9358243364a39135062dfd5d2dabd83aca095eebabceb1d0fe4f6396a5e9-init/diff:/var/lib/docker/overlay2/d1bba47ac437e8c1b92b93a3aab164fdce18a7dae35c4404818eb1f052f61190/diff:/var/lib/docker/overlay2/9b87230847651bea971d0810f081a98e1a69911fe7a33c9496134753b352a18e/diff",
10                 "MergedDir": "/var/lib/docker/overlay2/63cb9358243364a39135062dfd5d2dabd83aca095eebabceb1d0fe4f6396a5e9/merged",
11                 "UpperDir": "/var/lib/docker/overlay2/63cb9358243364a39135062dfd5d2dabd83aca095eebabceb1d0fe4f6396a5e9/diff",
12                 "WorkDir": "/var/lib/docker/overlay2/63cb9358243364a39135062dfd5d2dabd83aca095eebabceb1d0fe4f6396a5e9/work"
13             },
14 root@ubuntu:~/nginx#
15
16 Lower Dir:image 镜像层(镜像本身,只读)
17 Upper Dir:容器的上层(读写)
18 Merged Dir:容器的文件系统,使用 Union FS(联合文件系统)将 lowerdir 和 upper Dir:合并给容器使用。
19 Work Dir:容器在 宿主机的工作目录
数据卷的特点和使用场景:
- 数据卷是宿主机的目录或者文件,并且可以在多个容器之间共同使用。
- 在宿主机对数据卷更改数据后会在所有容器里面会立即更新。
- 数据卷的数据可以持久保存,即使删除使用使用该容器卷的容器也不影响。
- 在容器里面的写入数据不会影响到镜像本身。
- 日志输出
- 静态 web 页面
- 应用配置文件
- 多容器间目录或文件共
测试验证docker容器的-v参数使用:
 1 root@ubuntu:~# ls
 2 nginx  snap  test01  tomcat
 3 root@ubuntu:~# docker run -it --name centos --rm -v /root/:/root/ centos:7
 4 root@6b5850afb26b:/# ls
 5 anaconda-post.log  bin  dev  etc  home  lib  lib64  media  mnt  opt  proc  root  run  sbin  srv  sys  tmp  usr  var
 6 root@6b5850afb26b:/# cd /root/
 7 root@6b5850afb26b:~# ls
 8 nginx  snap  test01  tomcat
 9 root@6b5850afb26b:~# echo test > test.txt                              # 默认情况下是可读写的
10 root@6b5850afb26b:~# ls
11 nginx  snap  test.txt  test01  tomcat
12 root@6b5850afb26b:~# exit
13 exit
14 root@ubuntu:~# ls
15 nginx  snap  test01  test.txt  tomcat
16 root@ubuntu:~# cat test.txt
17 test
18 root@ubuntu:~#
19 root@ubuntu:~# docker run -it --name centos --rm -v /root/:/root/:ro centos:7        # 设置了只读权限
20 root@fbb0a160de5a:/# cd /root/
21 root@fbb0a160de5a:~# ls
22 nginx  snap  test.txt  test01  tomcat
23 root@fbb0a160de5a:~# echo abc > test.txt
24 bash: test.txt: Read-only file system
25 root@fbb0a160de5a:~# exit
26 exit
27 root@ubuntu:~#
下面参考一下博客写的比较好的小哥的文章的相关命令:镜像的磁盘管理
 1 root@ubuntu:~# docker system df -v    # 通过docker system df -v查看更详细的数据,包括每个镜像占用的空间,每个容器占用的空间等
 2 Images space usage:
 3
 4 REPOSITORY          TAG                 IMAGE ID            CREATED             SIZE                SHARED SIZE         UNIQUE SIZE         CONTAINERS
 5 tomcat              v1.0                0de0026ae082        3 hours ago         452.1MB             203.9MB             248.2MB             1
 6 nginx               v0.1                802f05f49216        4 hours ago         261.8MB             203.9MB             57.87MB             1
 7 test01              latest              6c44256cbe22        45 hours ago        1.236MB             1.236MB             0B                  0
 8 test01              v1.0                570d8d5676ad        46 hours ago        1.236MB             1.236MB             0B                  0
 9 nginx               latest              822b7ec2aaf2        6 days ago          133.2MB             0B                  133.2MB             0
10 alpine              latest              14119a10abf4        12 days ago         5.595MB             0B                  5.595MB             0
11 busybox             latest              42b97d3c2ae9        2 weeks ago         1.236MB             1.236MB             0B                  0
12 centos              7                   8652b9f0cb4c        9 months ago        203.9MB             203.9MB             0B                  0
13
14 Containers space usage:
15
16 CONTAINER ID        IMAGE               COMMAND                  LOCAL VOLUMES       SIZE                CREATED             STATUS              NAMES
17 72f3612333a0        tomcat:v1.0         "/usr/local/tomcat/b…"   0                   88.2kB              3 hours ago         Up 3 hours          tomcat
18 1456d8bd9383        nginx:v0.1          "/usr/sbin/nginx -g …"   0                   92B                 4 hours ago         Up 4 hours          nginx-test
19
20 Local Volumes space usage:
21
22 VOLUME NAME         LINKS               SIZE
23
24 Build cache usage: 0B
25
26 CACHE ID            CACHE TYPE          SIZE                CREATED             LAST USED           USAGE               SHARED
27 root@ubuntu:~#
28 root@ubuntu:~# docker ps --size        # 通过docker ps --size查看运行中的容器占用的空间
29 CONTAINER ID        IMAGE               COMMAND                  CREATED             STATUS              PORTS                                           NAMES               SIZE
30 72f3612333a0        tomcat:v1.0         "/usr/local/tomcat/b…"   3 hours ago         Up 3 hours          0.0.0.0:80->8080/tcp                            tomcat              88.2kB (virtual 452MB)
31 1456d8bd9383        nginx:v0.1          "/usr/sbin/nginx -g …"   4 hours ago         Up 4 hours          0.0.0.0:32769->80/tcp, 0.0.0.0:32768->443/tcp   nginx-test          92B (virtual 262MB)
32 root@ubuntu:~#
注:默认docker的根目录是/var/lib/docker,如果磁盘空间不够,可以修改/etc/docker/daemon.json添加或修改data-root到新的硬盘上,再重启docker服务,这样就完成了docker目录的迁移
五、Harbor 仓库及高可用设置
5.1、Harbor介绍:
Docker容器应用的开发和运行离不开可靠的镜像管理,虽然Docker官方也提供了公共的镜像仓库,但是从安全和效率等方面考虑,部署私有环境内的Registry也是非常必要的。Harbor是由VMware公司开源的企业级的Docker Registry管理项目,它包括权限管理(RBAC)、LDAP、日志审核、管理界面、自我注册、镜像复制和中文支持等功能
Harbor的架构:
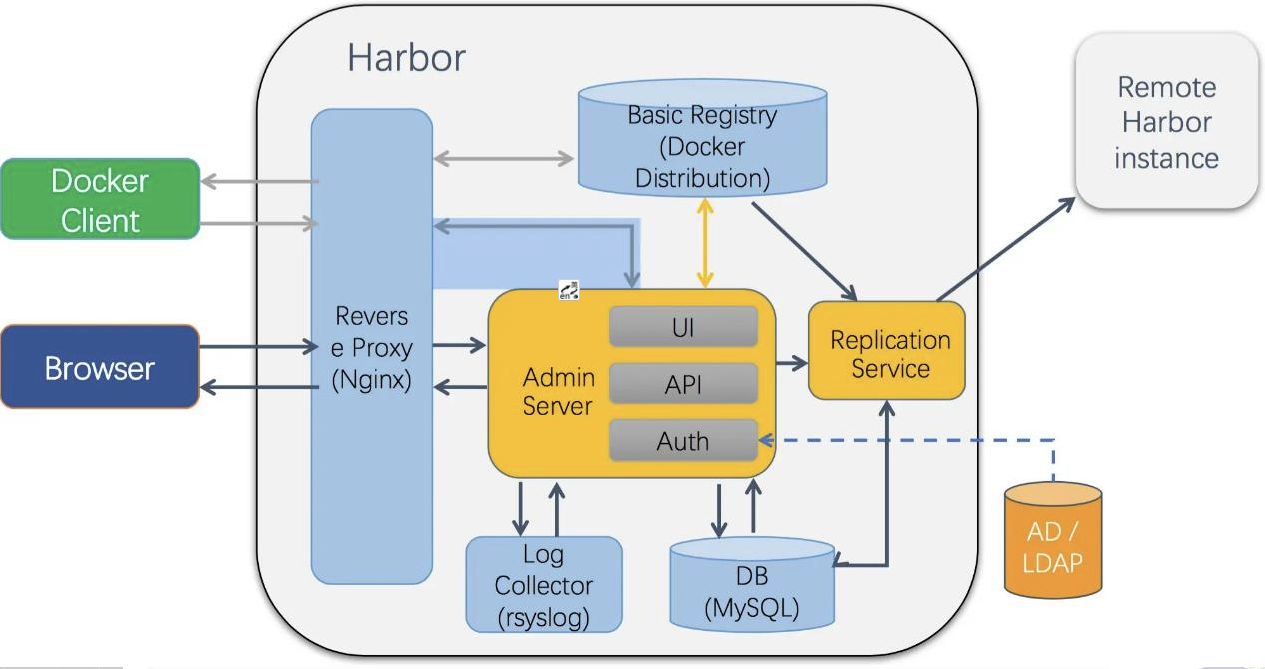
harbor组件:
- nginx:harbor 的一个反向代理组件,代理 registry、ui、token 等服务。这个代 理会转发 harbor web 和 docker client 的各种请求到后端服务上。
- harbor-adminserver:harbor 系统管理接口,可以修改系统配置以及获取系统信 息。 harbor-db:存储项目的元数据、用户、规则、复制策略等信息。
- harbor-jobservice:harbor 里面主要是为了镜像仓库之前同步使用的。
- harbor-log:收集其他 harbor 的日志信息。 harbor-ui:一个用户界面模块,用来管理 registry。
- registry:存储 docker images 的服务,并且提供 pull/push 服务。
- redis:存储缓存信息
- webhook:当 registry 中的 image 状态发生变化的时候去记录更新日志、复制等 操作。
- token service:在 docker client 进行 pull/push 的时候负责 token 的发放。
5.2、环境准备
本次实验使用两台Harbor进行搭建类似与MySQL双主的架构——需要docker环境(自己装)、docker-compose和harbor安装包,harbor的下载地址:https://github.com/goharbor/harbor/releases
上述地址的有在线和离线安装方式,这里提供一个离线下载地址(写文章的时候):https://github.com/goharbor/harbor/releases/download/v2.3.2/harbor-offline-installer-v2.3.2.tgz,至于docker-compose就用上课杰哥提供的docker安装包里的二进制文件即可,话不多说,下面开始进行两台服务器上的Harbor的安装,具体过程如下:
  1 root@ubuntu:~# tar -zxvf harbor-offline-installer-v2.3.2.tgz
  2 harbor/harbor.v2.3.2.tar.gz
  3 harbor/prepare
  4 harbor/LICENSE
  5 harbor/install.sh
  6 harbor/common.sh
  7 harbor/harbor.yml.tmpl
  8 root@ubuntu:~# ls
  9 harbor  harbor-offline-installer-v2.3.2.tgz  snap
 10 root@ubuntu:~# mv harbor /usr/local/
 11 root@ubuntu:~# cd /usr/local/
 12 root@ubuntu:/usr/local/harbor# ls
 13 common.sh  harbor.v2.3.2.tar.gz  harbor.yml.tmpl  install.sh  LICENSE  prepare
 14 root@ubuntu:/usr/local/harbor# cp harbor.yml.tmpl harbor.yml
 15 root@ubuntu:/usr/local/harbor# ls
 16 common.sh  harbor.v2.3.2.tar.gz  harbor.yml  harbor.yml.tmpl  install.sh  LICENSE  prepare
 17 root@ubuntu:/usr/local/harbor# vim harbor.yml
 18 root@ubuntu:/usr/local/harbor# ./install.sh
 19
 20 [Step 0]: checking if docker is installed ...
 21
 22 Note: docker version: 19.03.15
 23
 24 [Step 1]: checking docker-compose is installed ...
 25
 26 Note: docker-compose version: 1.24.1
 27
 28 [Step 2]: loading Harbor images ...
 29 f6e68d4c9b22: Loading layer [==================================================>]  37.21MB/37.21MB
 30 103076ba7411: Loading layer [==================================================>]  121.2MB/121.2MB
 31 fde3b64438e3: Loading layer [==================================================>]  3.072kB/3.072kB
 32 249a34ecfbe2: Loading layer [==================================================>]   59.9kB/59.9kB
 33 35783e12f32a: Loading layer [==================================================>]  61.95kB/61.95kB
 34 Loaded image: goharbor/redis-photon:v2.3.2
 35 7301dee185fe: Loading layer [==================================================>]  8.746MB/8.746MB
 36 Loaded image: goharbor/nginx-photon:v2.3.2
 37 4317ca489899: Loading layer [==================================================>]  8.746MB/8.746MB
 38 d2169f633d64: Loading layer [==================================================>]  11.64MB/11.64MB
 39 cacd32b266bf: Loading layer [==================================================>]  1.688MB/1.688MB
 40 Loaded image: goharbor/harbor-portal:v2.3.2
 41 c3ae7e069c68: Loading layer [==================================================>]  7.359MB/7.359MB
 42 0cfc20b693dd: Loading layer [==================================================>]  4.096kB/4.096kB
 43 4fca387754cd: Loading layer [==================================================>]  3.072kB/3.072kB
 44 3c4496c3ec80: Loading layer [==================================================>]  31.52MB/31.52MB
 45 1fc058950d0e: Loading layer [==================================================>]  11.39MB/11.39MB
 46 4ed942b905a4: Loading layer [==================================================>]   43.7MB/43.7MB
 47 Loaded image: goharbor/trivy-adapter-photon:v2.3.2
 48 a302c582e666: Loading layer [==================================================>]   6.82MB/6.82MB
 49 4dfdb1a3466a: Loading layer [==================================================>]  67.47MB/67.47MB
 50 678180162221: Loading layer [==================================================>]  3.072kB/3.072kB
 51 7241b7d6bd32: Loading layer [==================================================>]  4.096kB/4.096kB
 52 ee4b32ba01a0: Loading layer [==================================================>]  68.26MB/68.26MB
 53 Loaded image: goharbor/chartmuseum-photon:v2.3.2
 54 671f3386d963: Loading layer [==================================================>]  6.816MB/6.816MB
 55 a832248f5584: Loading layer [==================================================>]  6.219MB/6.219MB
 56 7a2ef1cebf21: Loading layer [==================================================>]  14.47MB/14.47MB
 57 51aa675bbc9d: Loading layer [==================================================>]  29.29MB/29.29MB
 58 7e6d06a2bb53: Loading layer [==================================================>]  22.02kB/22.02kB
 59 799b207a8043: Loading layer [==================================================>]  14.47MB/14.47MB
 60 Loaded image: goharbor/notary-signer-photon:v2.3.2
 61 c2660666d3b6: Loading layer [==================================================>]  9.914MB/9.914MB
 62 f64ad03ac62f: Loading layer [==================================================>]  3.584kB/3.584kB
 63 e0552b870e12: Loading layer [==================================================>]   2.56kB/2.56kB
 64 3c2ef908bb96: Loading layer [==================================================>]  73.35MB/73.35MB
 65 f22a7c57e296: Loading layer [==================================================>]  5.632kB/5.632kB
 66 6788f0f8bfd7: Loading layer [==================================================>]   93.7kB/93.7kB
 67 cb5eff88e3c0: Loading layer [==================================================>]  11.78kB/11.78kB
 68 9cf98131b83d: Loading layer [==================================================>]  74.25MB/74.25MB
 69 9ffcc54d3726: Loading layer [==================================================>]   2.56kB/2.56kB
 70 Loaded image: goharbor/harbor-core:v2.3.2
 71 c01617f475a3: Loading layer [==================================================>]  125.4MB/125.4MB
 72 a107f03b1efa: Loading layer [==================================================>]  3.584kB/3.584kB
 73 e224182b3157: Loading layer [==================================================>]  3.072kB/3.072kB
 74 caa213381dfb: Loading layer [==================================================>]   2.56kB/2.56kB
 75 dd7c9a10421f: Loading layer [==================================================>]  3.072kB/3.072kB
 76 e104b65b19d1: Loading layer [==================================================>]  3.584kB/3.584kB
 77 cca35c852e5b: Loading layer [==================================================>]  19.97kB/19.97kB
 78 Loaded image: goharbor/harbor-log:v2.3.2
 79 f85726ba84dc: Loading layer [==================================================>]  6.821MB/6.821MB
 80 a056039f5f6d: Loading layer [==================================================>]  4.096kB/4.096kB
 81 c90e384ee5a4: Loading layer [==================================================>]  19.02MB/19.02MB
 82 166cfc19ad5d: Loading layer [==================================================>]  3.072kB/3.072kB
 83 9b458167a646: Loading layer [==================================================>]  25.44MB/25.44MB
 84 2a481503dae1: Loading layer [==================================================>]  45.24MB/45.24MB
 85 Loaded image: goharbor/harbor-registryctl:v2.3.2
 86 6b9b715ecb6e: Loading layer [==================================================>]  9.914MB/9.914MB
 87 8ac2885dd0bc: Loading layer [==================================================>]  17.72MB/17.72MB
 88 3cd80dd3cb0c: Loading layer [==================================================>]  4.608kB/4.608kB
 89 7c944a564b1f: Loading layer [==================================================>]  18.51MB/18.51MB
 90 Loaded image: goharbor/harbor-exporter:v2.3.2
 91 b414ebcb4508: Loading layer [==================================================>]  6.816MB/6.816MB
 92 cd880de5aa45: Loading layer [==================================================>]  6.219MB/6.219MB
 93 1031af43c4d0: Loading layer [==================================================>]  15.88MB/15.88MB
 94 fcd9b76b6247: Loading layer [==================================================>]  29.29MB/29.29MB
 95 a32b5e8b89c2: Loading layer [==================================================>]  22.02kB/22.02kB
 96 af9265555a5b: Loading layer [==================================================>]  15.88MB/15.88MB
 97 Loaded image: goharbor/notary-server-photon:v2.3.2
 98 aa2711296b84: Loading layer [==================================================>]  164.9MB/164.9MB
 99 6779d37c68fb: Loading layer [==================================================>]  55.24MB/55.24MB
100 6bb091d5607a: Loading layer [==================================================>]   2.56kB/2.56kB
101 86bb5dbffc81: Loading layer [==================================================>]  1.536kB/1.536kB
102 b67384f7c271: Loading layer [==================================================>]  12.29kB/12.29kB
103 abcd93453033: Loading layer [==================================================>]  2.882MB/2.882MB
104 f5e6ae9af13d: Loading layer [==================================================>]    297kB/297kB
105 Loaded image: goharbor/prepare:v2.3.2
106 571889b5abe7: Loading layer [==================================================>]  1.096MB/1.096MB
107 b8a1c2a0e296: Loading layer [==================================================>]  5.888MB/5.888MB
108 99e396e6432d: Loading layer [==================================================>]  173.6MB/173.6MB
109 58ae8b6bde55: Loading layer [==================================================>]  15.34MB/15.34MB
110 c61cba7d6edf: Loading layer [==================================================>]  4.096kB/4.096kB
111 811ccbc829a3: Loading layer [==================================================>]  6.144kB/6.144kB
112 f35f22870f37: Loading layer [==================================================>]  3.072kB/3.072kB
113 2b725cdc2563: Loading layer [==================================================>]  2.048kB/2.048kB
114 f2ac0b4b02e3: Loading layer [==================================================>]   2.56kB/2.56kB
115 db59c776f906: Loading layer [==================================================>]   2.56kB/2.56kB
116 b0306a6e97d4: Loading layer [==================================================>]   2.56kB/2.56kB
117 46283a1471c9: Loading layer [==================================================>]  8.704kB/8.704kB
118 Loaded image: goharbor/harbor-db:v2.3.2
119 d7d543260996: Loading layer [==================================================>]  9.914MB/9.914MB
120 fb7ca2ddf03a: Loading layer [==================================================>]  3.584kB/3.584kB
121 23c842c0e703: Loading layer [==================================================>]   2.56kB/2.56kB
122 07d33224975b: Loading layer [==================================================>]  82.47MB/82.47MB
123 c1ab2a452194: Loading layer [==================================================>]  83.26MB/83.26MB
124 Loaded image: goharbor/harbor-jobservice:v2.3.2
125 242e29e7d4c6: Loading layer [==================================================>]  6.821MB/6.821MB
126 8fcdb8b505d0: Loading layer [==================================================>]  4.096kB/4.096kB
127 f5f2693cdb62: Loading layer [==================================================>]  3.072kB/3.072kB
128 09c19ab2448d: Loading layer [==================================================>]  19.02MB/19.02MB
129 3a12ffe8175d: Loading layer [==================================================>]  19.81MB/19.81MB
130 Loaded image: goharbor/registry-photon:v2.3.2
131
132
133 [Step 3]: preparing environment ...
134
135 [Step 4]: preparing harbor configs ...
136 prepare base dir is set to /usr/local/harbor
137 WARNING:root:WARNING: HTTP protocol is insecure. Harbor will deprecate http protocol in the future. Please make sure to upgrade to https
138 Generated configuration file: /config/portal/nginx.conf
139 Generated configuration file: /config/log/logrotate.conf
140 Generated configuration file: /config/log/rsyslog_docker.conf
141 Generated configuration file: /config/nginx/nginx.conf
142 Generated configuration file: /config/core/env
143 Generated configuration file: /config/core/app.conf
144 Generated configuration file: /config/registry/config.yml
145 Generated configuration file: /config/registryctl/env
146 Generated configuration file: /config/registryctl/config.yml
147 Generated configuration file: /config/db/env
148 Generated configuration file: /config/jobservice/env
149 Generated configuration file: /config/jobservice/config.yml
150 Generated and saved secret to file: /data/secret/keys/secretkey
151 Successfully called func: create_root_cert
152 Generated configuration file: /compose_location/docker-compose.yml
153 Clean up the input dir
154
155
156
157 [Step 5]: starting Harbor ...
158 Creating network "harbor_harbor" with the default driver
159 Creating harbor-log ... done
160 Creating registryctl   ... done
161 Creating harbor-portal ... done
162 Creating redis         ... done
163 Creating harbor-db     ... done
164 Creating registry      ... done
165 Creating harbor-core   ... done
166 Creating nginx             ... done
167 Creating harbor-jobservice ... done
168 ✔ ----Harbor has been installed and started successfully.----
169 root@ubuntu:/usr/local/harbor#
主要步骤分为:
docker-compose的安装:
1 # 上传docker-compose,修改名称和添加执行权限(至于哪里弄来的这个文件——自己解决):
2 cd /usr/local/bin/
3 mv docker-compose-Linux-x86_64_1.24.1 docker-compose
4 chmod +x docker-compose
harbor的安装:
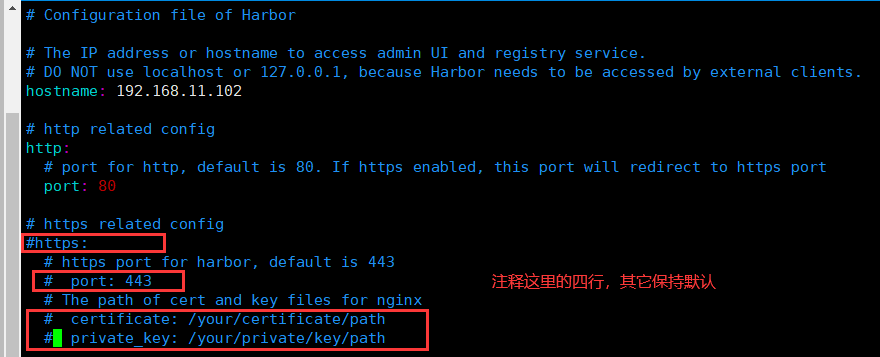
root@ubuntu:~# tar -zxvf harbor-offline-installer-v2.3.2.tgz
root@ubuntu:~# mv harbor /usr/local/
root@ubuntu:~# cd /usr/local/harbor
root@ubuntu:/usr/local/harbor# cp harbor.yml.tmpl harbor.yml
root@ubuntu:/usr/local/harbor# vim harbor.yml
root@ubuntu:/usr/local/harbor# ./install.sh

# 配置文件修改主要如下:
1、hostname: 192.168.11.101   # 修改为本地主机IP地址
2、注释htps服务及其相关端口和证书,分别是:13、15、17、18四行
其它保持默认,同样的方法安装另外一台
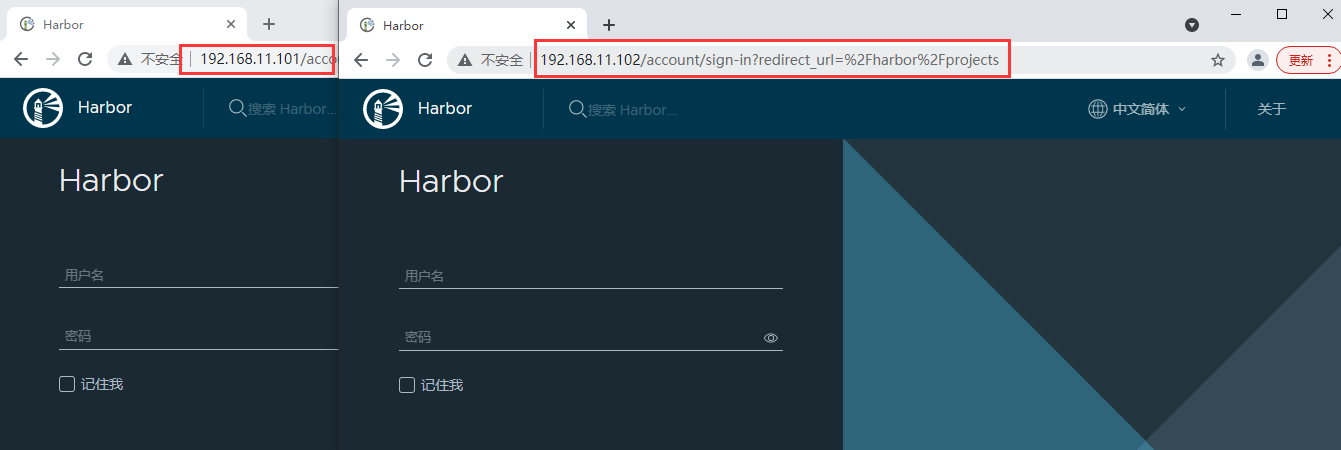
最终两台安装好后,登陆网页界面检查情况:
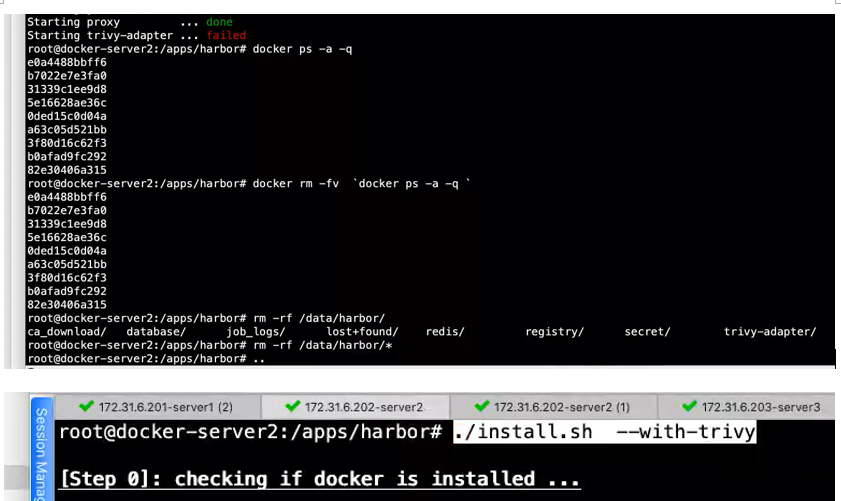
当然安装的时候,也可以加上镜像安全scan功能:./install.sh --with-trivy

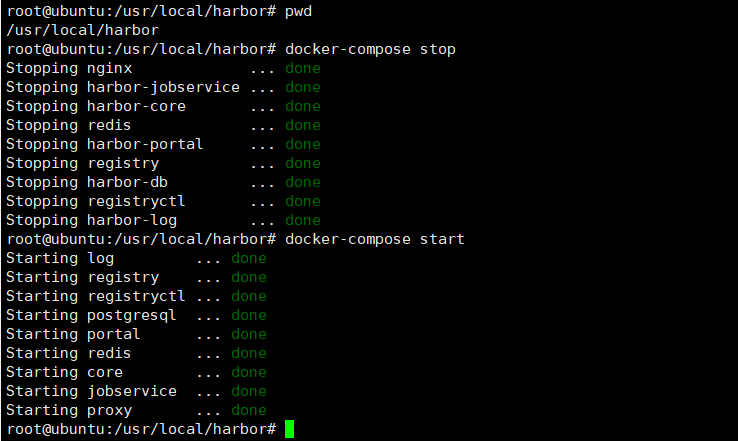
Harbor启动停在命令(进入harbor的安装目录):
如果安装失败,这删除所有相关容器和清理数据目录,下面用视频上截图(我也懒得去折腾了):
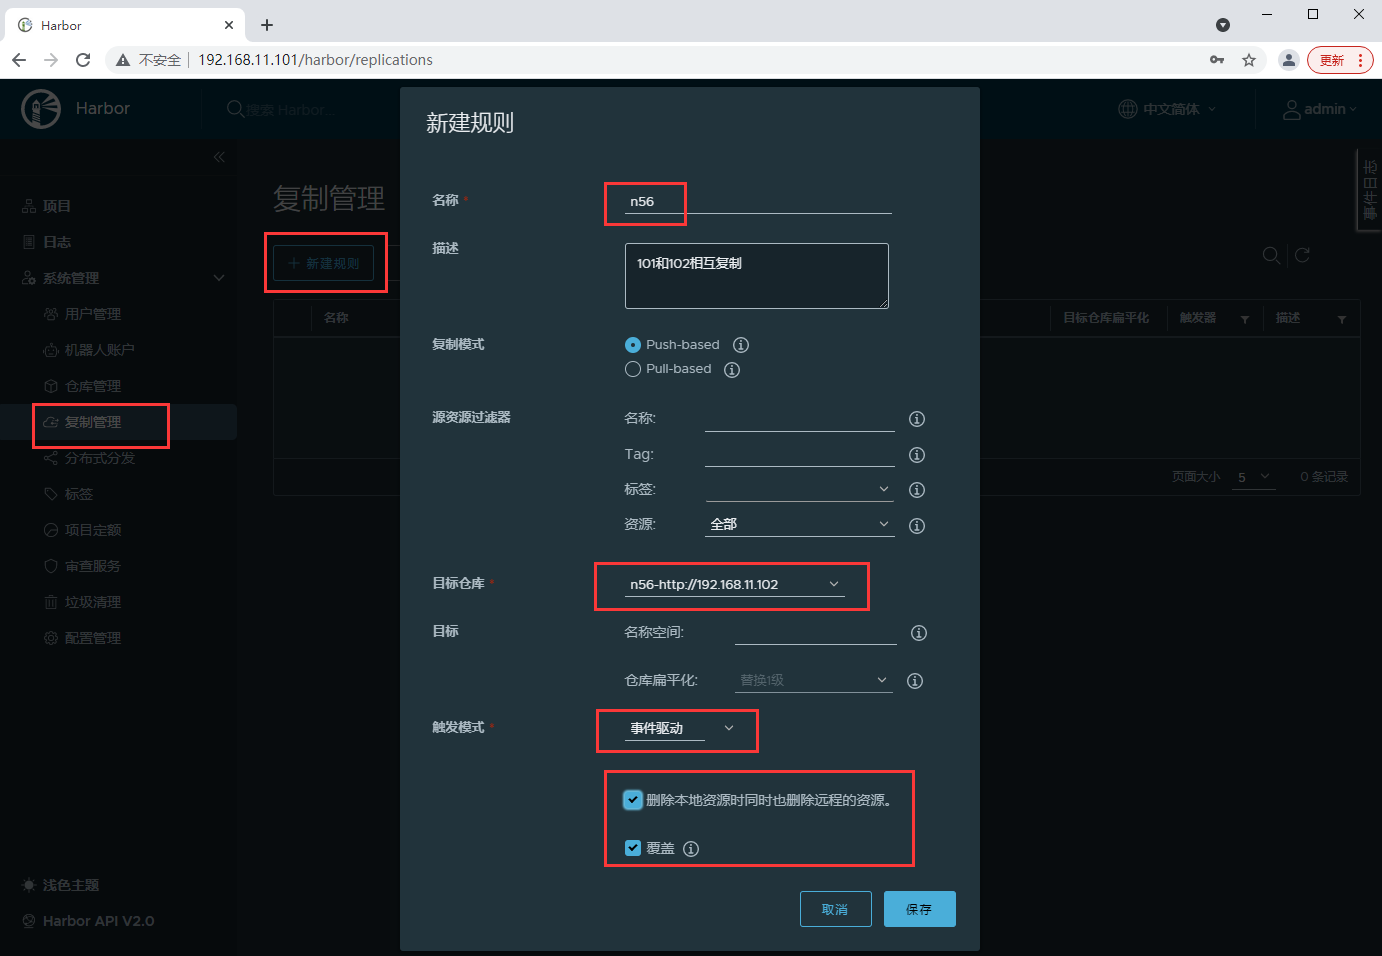
下面是配置相互复制步骤:

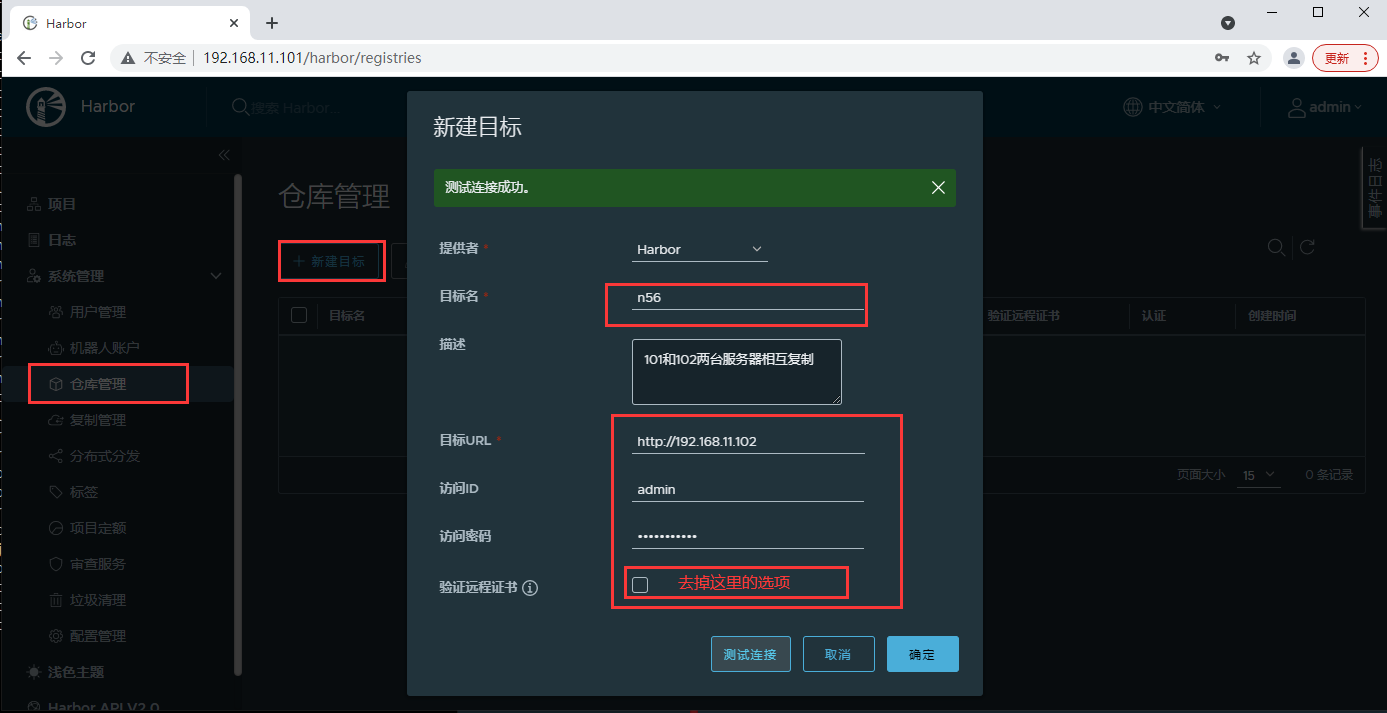
修改客户端的配置文件:添加上述两个harbor的地址并重启服务:
 1 root@ubuntu:~/nginx# vim /etc/docker/
 2 daemon.json  key.json
 3 root@ubuntu:~/nginx# vim /etc/docker/daemon.json
 4 root@ubuntu:~/nginx# cat /etc/docker/daemon.json
 5 {
 6   "registry-mirrors": ["https://xur01z5m.mirror.aliyuncs.com"],
 7   "insecure-registries": ["192.168.11.101","192.168.11.102"]
 8 }
 9 root@ubuntu:~/nginx# systemctl restart docker.service
10 root@ubuntu:~/nginx#
重新打tag、登陆harbor并上传镜像,以及登陆认证信息存放的地方:
 1 root@ubuntu:~/nginx# docker image ls
 2 REPOSITORY          TAG                 IMAGE ID            CREATED             SIZE
 3 tomcat              v1.0                0de0026ae082        4 hours ago         452MB
 4 nginx               v0.1                802f05f49216        5 hours ago         262MB
 5 nginx               v0.2                802f05f49216        5 hours ago         262MB
 6 test01              latest              6c44256cbe22        46 hours ago        1.24MB
 7 test01              v1.0                570d8d5676ad        46 hours ago        1.24MB
 8 nginx               latest              822b7ec2aaf2        6 days ago          133MB
 9 alpine              latest              14119a10abf4        12 days ago         5.6MB
10 busybox             latest              42b97d3c2ae9        2 weeks ago         1.24MB
11 centos              7                   8652b9f0cb4c        9 months ago        204MB
12 root@ubuntu:~/nginx# docker tag busybox:latest 192.168.11.101/n56/busybox:v1.0
13 root@ubuntu:~/nginx# docker login 192.168.11.101
14 Username: admin
15 Password:
16 WARNING! Your password will be stored unencrypted in /root/.docker/config.json.
17 Configure a credential helper to remove this warning. See
18 https://docs.docker.com/engine/reference/commandline/login/#credentials-store
19
20 Login Succeeded
21 root@ubuntu:~/nginx# docker push 192.168.11.101/n56/busybox:v1.0
22 The push refers to repository [192.168.11.101/n56/busybox]
23 0fd05bf2930d: Pushed
24 v1.0: digest: sha256:b862520da7361ea093806d292ce355188ae83f21e8e3b2a3ce4dbdba0a230f83 size: 527
25 root@ubuntu:~/nginx#
26 root@ubuntu:~/nginx# docker tag centos:7 192.168.11.102/n56/centos:7
27 root@ubuntu:~/nginx# docker login 192.168.11.102
28 Username: admin
29 Password:
30 WARNING! Your password will be stored unencrypted in /root/.docker/config.json.
31 Configure a credential helper to remove this warning. See
32 https://docs.docker.com/engine/reference/commandline/login/#credentials-store
33
34 Login Succeeded
35 root@ubuntu:~/nginx# docker push 192.168.11.102/n56/centos:7
36 The push refers to repository [192.168.11.102/n56/centos]
37 174f56854903: Pushed
38 7: digest: sha256:e4ca2ed0202e76be184e75fb26d14bf974193579039d5573fb2348664deef76e size: 529
39 root@ubuntu:~/nginx#
40 root@ubuntu:~/nginx# cat /root/.docker/config.json
41 {
42     "auths": {
43         "192.168.11.101": {
44             "auth": "YWRtaW46SGFyYm9yMTIzNDU="
45         },
46         "192.168.11.102": {
47             "auth": "YWRtaW46SGFyYm9yMTIzNDU="
48         }
49     },
50     "HttpHeaders": {
51         "User-Agent": "Docker-Client/19.03.15 (linux)"
52     }
53 }root@ubuntu:~/nginx#
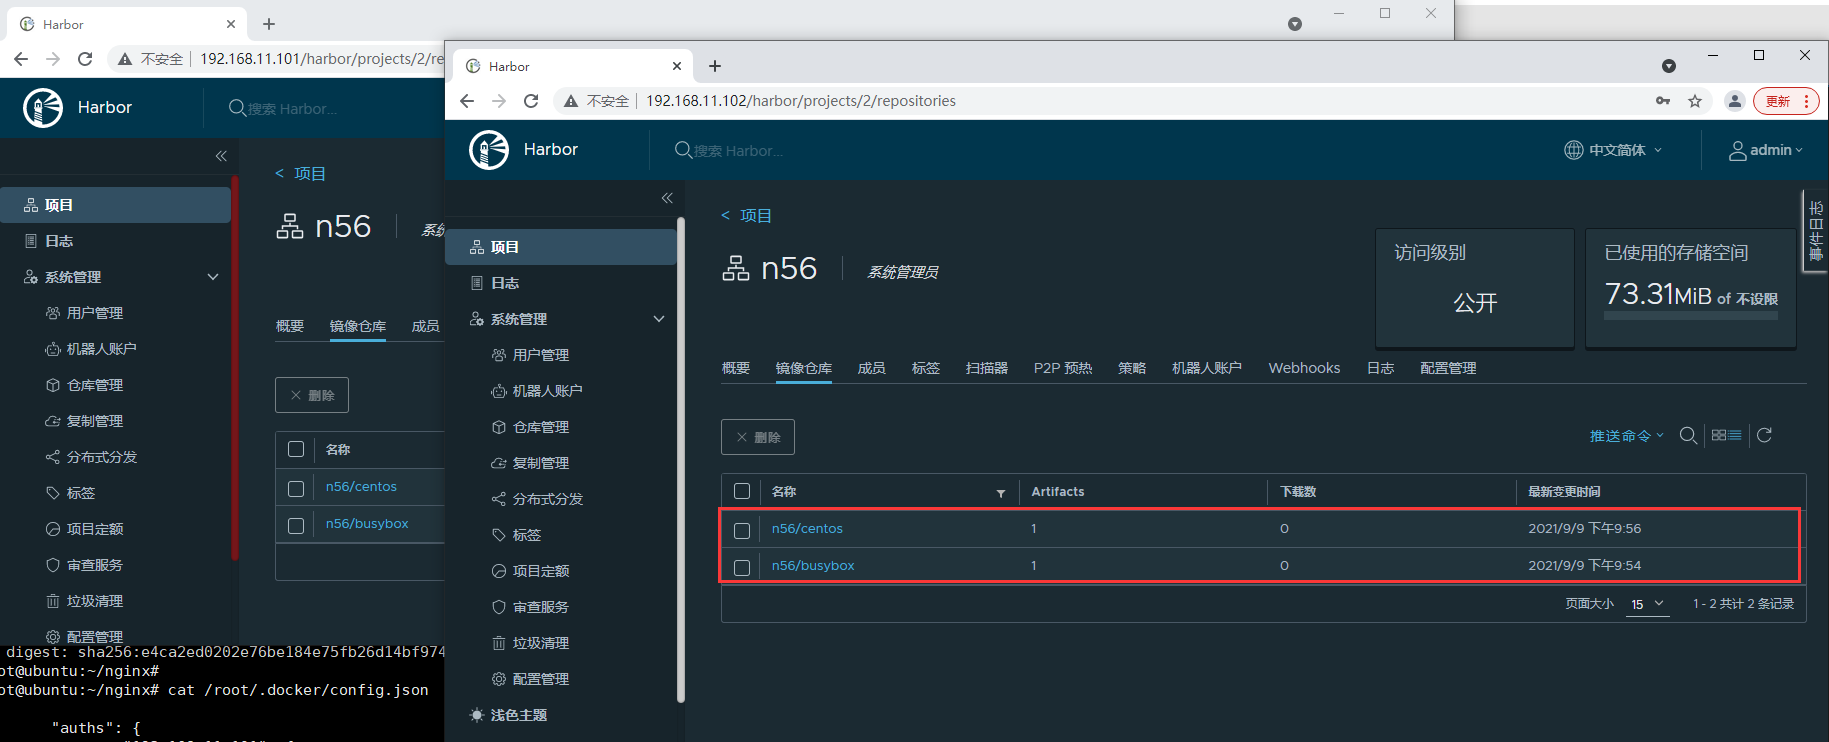
两台Harbor网页管理后台上面检验结果:
Harbor高可用相关配置,这里不一一详细描述了,只提供一下haproxy的主要配置文件,至于使用keepalived和haproxy搭配不说了(自己搞定):
1 root@ubuntu:~# vim /etc/haproxy/haproxy.cfg
2 listen harbor_80
3     bind 192.168.11.100:80            # VIP 地址端口,这里要特别注意一下:客户端也要加上这里的VIP地址
4     mode tcp
5     balance source
6     server harbor1 192.168.11.101:80 check inter 2000 fall 3 rise 5
7     server harbor2 192.168.11.102:80 check inter 2000 fall 3 rise 5
8 root@ubuntu:~# systemctl restart haproxy.service
还是写一下吧!!!
下面是我的具体过程——使用客户端155上安装haproxy:
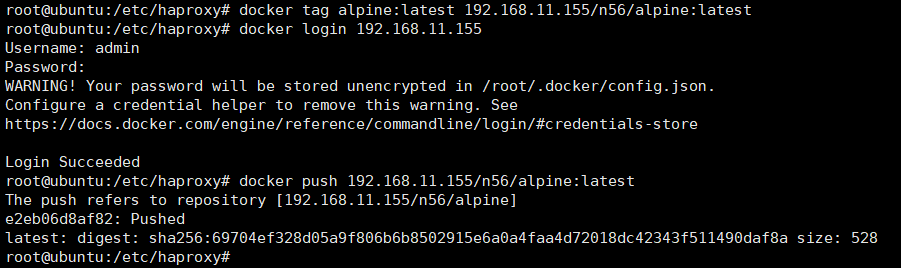
  1 root@ubuntu:~/nginx# apt install haproxy
  2 Reading package lists... Done
  3 Building dependency tree
  4 Reading state information... Done
  5 The following additional packages will be installed:
  6   liblua5.3-0
  7 Suggested packages:
  8   vim-haproxy haproxy-doc
  9 The following NEW packages will be installed:
 10   haproxy liblua5.3-0
 11 0 upgraded, 2 newly installed, 0 to remove and 72 not upgraded.
 12 Need to get 1,519 kB/1,635 kB of archives.
 13 After this operation, 3,777 kB of additional disk space will be used.
 14 Do you want to continue? [Y/n] y
 15 Get:1 https://mirrors.aliyun.com/ubuntu focal-updates/main amd64 haproxy amd64 2.0.13-2ubuntu0.3 [1,519 kB]
 16 Fetched 1,519 kB in 1s (1,534 kB/s)
 17 Selecting previously unselected package liblua5.3-0:amd64.
 18 (Reading database ... 71663 files and directories currently installed.)
 19 Preparing to unpack .../liblua5.3-0_5.3.3-1.1ubuntu2_amd64.deb ...
 20 Unpacking liblua5.3-0:amd64 (5.3.3-1.1ubuntu2) ...
 21 Selecting previously unselected package haproxy.
 22 Preparing to unpack .../haproxy_2.0.13-2ubuntu0.3_amd64.deb ...
 23 Unpacking haproxy (2.0.13-2ubuntu0.3) ...
 24 Setting up liblua5.3-0:amd64 (5.3.3-1.1ubuntu2) ...
 25 Setting up haproxy (2.0.13-2ubuntu0.3) ...
 26 Created symlink /etc/systemd/system/multi-user.target.wants/haproxy.service → /lib/systemd/system/haproxy.service.
 27 Processing triggers for man-db (2.9.1-1) ...
 28 Processing triggers for libc-bin (2.31-0ubuntu9.2) ...
 29 Processing triggers for rsyslog (8.2001.0-1ubuntu1.1) ...
 30 Processing triggers for systemd (245.4-4ubuntu3.11) ...
 31 root@ubuntu:~/nginx#
 32 root@ubuntu:~/nginx# cd /etc/haproxy/
 33 root@ubuntu:/etc/haproxy# ls
 34 errors  haproxy.cfg
 35 root@ubuntu:/etc/haproxy# cp haproxy.cfg haproxy.cfg_ori
 36 root@ubuntu:/etc/haproxy# vim haproxy.cfg
 37 root@ubuntu:/etc/haproxy# vim haproxy.cfg
 38 root@ubuntu:/etc/haproxy# systemctl status haproxy
 39 ● haproxy.service - HAProxy Load Balancer
 40      Loaded: loaded (/lib/systemd/system/haproxy.service; enabled; vendor preset: enabled)
 41      Active: active (running) since Thu 2021-09-09 14:13:39 UTC; 2min 1s ago
 42        Docs: man:haproxy(1)
 43              file:/usr/share/doc/haproxy/configuration.txt.gz
 44    Main PID: 16540 (haproxy)
 45       Tasks: 3 (limit: 2245)
 46      Memory: 2.3M
 47      CGroup: /system.slice/haproxy.service
 48              ├─16540 /usr/sbin/haproxy -Ws -f /etc/haproxy/haproxy.cfg -p /run/haproxy.pid -S /run/haproxy-master.sock
 49              └─16544 /usr/sbin/haproxy -Ws -f /etc/haproxy/haproxy.cfg -p /run/haproxy.pid -S /run/haproxy-master.sock
 50
 51 Sep 09 14:13:39 ubuntu systemd[1]: Starting HAProxy Load Balancer...
 52 Sep 09 14:13:39 ubuntu haproxy[16540]: [NOTICE] 251/141339 (16540) : New worker #1 (16544) forked
 53 Sep 09 14:13:39 ubuntu systemd[1]: Started HAProxy Load Balancer.
 54 root@ubuntu:/etc/haproxy# ss -ntlp
 55 State               Recv-Q               Send-Q                             Local Address:Port                             Peer Address:Port              Process
 56 LISTEN              0                    4096                               127.0.0.53%lo:53                                    0.0.0.0:*                  users:(("systemd-resolve",pid=803,fd=13))
 57 LISTEN              0                    128                                      0.0.0.0:22                                    0.0.0.0:*                  users:(("sshd",pid=877,fd=3))
 58 LISTEN              0                    128                                    127.0.0.1:6010                                  0.0.0.0:*                  users:(("sshd",pid=2436,fd=10))
 59 LISTEN              0                    128                                    127.0.0.1:6011                                  0.0.0.0:*                  users:(("sshd",pid=3591,fd=10))
 60 LISTEN              0                    128                                         [::]:22                                       [::]:*                  users:(("sshd",pid=877,fd=4))
 61 LISTEN              0                    128                                        [::1]:6010                                     [::]:*                  users:(("sshd",pid=2436,fd=9))
 62 LISTEN              0                    128                                        [::1]:6011                                     [::]:*                  users:(("sshd",pid=3591,fd=9))
 63 root@ubuntu:/etc/haproxy# vim haproxy.cfg
 64 root@ubuntu:/etc/haproxy# tail -n6 /etc/haproxy/haproxy.cfg
 65 listen harbor_80
 66         bind 192.168.11.155:80
 67         mode tcp
 68         balance source
 69         server harbor1 192.168.11.101:80 check inter 2000 fall 3 rise 5
 70         server harbor2 192.168.11.102:80 check inter 2000 fall 3 rise 5
 71 root@ubuntu:/etc/haproxy#
 72 root@ubuntu:/etc/haproxy# systemctl restart haproxy.service
 73 root@ubuntu:/etc/haproxy# ss -ntlp|grep 80
 74 LISTEN    0         491          192.168.11.155:80              0.0.0.0:*        users:(("haproxy",pid=17102,fd=7))
 75 LISTEN    0         4096          127.0.0.53%lo:53              0.0.0.0:*        users:(("systemd-resolve",pid=803,fd=13))
 76 root@ubuntu:/etc/haproxy#
 77 root@ubuntu:/etc/haproxy# vim /etc/docker/daemon.json
 78 root@ubuntu:/etc/haproxy# cat /etc/docker/daemon.json
 79 {
 80   "registry-mirrors": ["https://xur01z5m.mirror.aliyuncs.com"],
 81   "insecure-registries": ["192.168.11.101","192.168.11.102","192.168.11.155"]
 82 }
 83 root@ubuntu:/etc/haproxy#
 84 root@ubuntu:/etc/haproxy# systemctl restart haproxy.service
 85 root@ubuntu:/etc/haproxy# systemctl restart docker.service
 86 root@ubuntu:/etc/haproxy# docker images
 87 REPOSITORY                   TAG                 IMAGE ID            CREATED             SIZE
 88 tomcat                       v1.0                0de0026ae082        4 hours ago         452MB
 89 nginx                        v0.1                802f05f49216        5 hours ago         262MB
 90 nginx                        v0.2                802f05f49216        5 hours ago         262MB
 91 test01                       latest              6c44256cbe22        47 hours ago        1.24MB
 92 test01                       v1.0                570d8d5676ad        47 hours ago        1.24MB
 93 nginx                        latest              822b7ec2aaf2        6 days ago          133MB
 94 alpine                       latest              14119a10abf4        12 days ago         5.6MB
 95 192.168.11.101/n56/busybox   v1.0                42b97d3c2ae9        2 weeks ago         1.24MB
 96 busybox                      latest              42b97d3c2ae9        2 weeks ago         1.24MB
 97 192.168.11.102/n56/centos    7                   8652b9f0cb4c        9 months ago        204MB
 98 centos                       7                   8652b9f0cb4c        9 months ago        204MB
 99 root@ubuntu:/etc/haproxy# docker tag alpine:latest 192.168.11.155/n56/alpine:latest
100 root@ubuntu:/etc/haproxy# docker login 192.168.11.155
101 Username: admin
102 Password:
103 WARNING! Your password will be stored unencrypted in /root/.docker/config.json.
104 Configure a credential helper to remove this warning. See
105 https://docs.docker.com/engine/reference/commandline/login/#credentials-store
106
107 Login Succeeded
108 root@ubuntu:/etc/haproxy# docker push 192.168.11.155/n56/alpine:latest
109 The push refers to repository [192.168.11.155/n56/alpine]
110 e2eb06d8af82: Pushed
111 latest: digest: sha256:69704ef328d05a9f806b6b8502915e6a0a4faa4d72018dc42343f511490daf8a size: 528
112 root@ubuntu:/etc/haproxy#
主要步骤如下:
 1 root@ubuntu:~/nginx# apt install haproxy
 2 root@ubuntu:/etc/haproxy# vim haproxy.cfg
 3 root@ubuntu:/etc/haproxy# tail -n6 /etc/haproxy/haproxy.cfg
 4 listen harbor_80
 5         bind 192.168.11.155:80
 6         mode tcp
 7         balance source
 8         server harbor1 192.168.11.101:80 check inter 2000 fall 3 rise 5
 9         server harbor2 192.168.11.102:80 check inter 2000 fall 3 rise 5
10 root@ubuntu:/etc/haproxy#
11 root@ubuntu:/etc/haproxy# systemctl restart haproxy.service
12 root@ubuntu:/etc/haproxy# ss -ntlp|grep 80
13 LISTEN    0         491          192.168.11.155:80              0.0.0.0:*        users:(("haproxy",pid=17102,fd=7))
14 LISTEN    0         4096          127.0.0.53%lo:53              0.0.0.0:*        users:(("systemd-resolve",pid=803,fd=13))
15 root@ubuntu:/etc/haproxy#
16 root@ubuntu:/etc/haproxy# vim /etc/docker/daemon.json
17 root@ubuntu:/etc/haproxy# cat /etc/docker/daemon.json
18 {
19   "registry-mirrors": ["https://xur01z5m.mirror.aliyuncs.com"],
20   "insecure-registries": ["192.168.11.101","192.168.11.102","192.168.11.155"]
21 }
22 root@ubuntu:/etc/haproxy#
23 root@ubuntu:/etc/haproxy# systemctl restart haproxy.service
24 root@ubuntu:/etc/haproxy# systemctl restart docker.service
25 root@ubuntu:/etc/haproxy# docker images
26 REPOSITORY                   TAG                 IMAGE ID            CREATED             SIZE
27 tomcat                       v1.0                0de0026ae082        4 hours ago         452MB
28 nginx                        v0.1                802f05f49216        5 hours ago         262MB
29 nginx                        v0.2                802f05f49216        5 hours ago         262MB
30 test01                       latest              6c44256cbe22        47 hours ago        1.24MB
31 test01                       v1.0                570d8d5676ad        47 hours ago        1.24MB
32 nginx                        latest              822b7ec2aaf2        6 days ago          133MB
33 alpine                       latest              14119a10abf4        12 days ago         5.6MB
34 192.168.11.101/n56/busybox   v1.0                42b97d3c2ae9        2 weeks ago         1.24MB
35 busybox                      latest              42b97d3c2ae9        2 weeks ago         1.24MB
36 192.168.11.102/n56/centos    7                   8652b9f0cb4c        9 months ago        204MB
37 centos                       7                   8652b9f0cb4c        9 months ago        204MB
38 root@ubuntu:/etc/haproxy# docker tag alpine:latest 192.168.11.155/n56/alpine:latest
39 root@ubuntu:/etc/haproxy# docker login 192.168.11.155
40 Username: admin
41 Password:
42 WARNING! Your password will be stored unencrypted in /root/.docker/config.json.
43 Configure a credential helper to remove this warning. See
44 https://docs.docker.com/engine/reference/commandline/login/#credentials-store
45
46 Login Succeeded
47 root@ubuntu:/etc/haproxy# docker push 192.168.11.155/n56/alpine:latest
48 The push refers to repository [192.168.11.155/n56/alpine]
49 e2eb06d8af82: Pushed
50 latest: digest: sha256:69704ef328d05a9f806b6b8502915e6a0a4faa4d72018dc42343f511490daf8a size: 528
51 root@ubuntu:/etc/haproxy#
就这样吧,到此为止!!!