UITableView
我们都知道UITableView从iOS 8開始实现行高的自适应相对照较简单,首先必须设置estimatedRowHeight给出预估高度,设置rowHeight为UITableViewAutomaticDimension(注意:假设不改动rowHeight默认就是UITableViewAutomaticDimension)。对于这两个參数除了直接改动tableview相应的属性之外仍然支持使用相应的代理方法设置。
最后仅仅要在UITableViewCell中设置contentView的约束就可以。
因为UITableViewCell的宽度等同于UITableView因此约束的设置其实仅仅是为了自己主动计算高度。
通常的做法就是设置contentView的top和bottom约束。而后其内部子视图能够提供intrinsicContentSize(比如UIButtonUILabel默认就已经提供)或者已经有明白的height约束。这样一来就能够做到子控件确定了自身高度,而contentView子控件又设置了和contentView相关的bottom约束来反向计算出UITableViewCell的实际高度。
以下仍然曾经面UITableView文章的自己定义Cell举例。相比之前大量的运算而言Self-Sizing Cells能够说简化了非常多。除了设置estimatedRowHeight外最重要的就是加入相关Autolayout约束。
因为头像高度已经固定,内容高度能够通过固有高度自己主动计算。而二者的间隔和top、bottom约束已经固定,从而Self-Sizing Cells能够自己主动计算出Cell的高度。
高度计算约束关系:

Cell布局代码:
import UIKit
import SnapKit
class StatusTableViewCell: UITableViewCell {
// MARK: - 公共属性
var status:Status! {
didSet {
self.avatarImageView.image = UIImage(named: status.profileImageUrl)
self.userNameLabel.text = status.userName
self.mtypeImageView.image = UIImage(named: status.mbtype)
self.createdAtLabel.text = status.createdAt
self.sourceLabel.text = status.source
self.contentLabel.text = status.text
}
}
// MARK: - 生命周期及方法覆盖
override func awakeFromNib() {
super.awakeFromNib()
}
override init(style: UITableViewCellStyle, reuseIdentifier: String?) {
super.init(style: style, reuseIdentifier: reuseIdentifier)
self.setup()
}
required init?(coder aDecoder: NSCoder) {
super.init(coder: aDecoder)
}
override func setSelected(_ selected: Bool, animated: Bool) {
}
// MARK: - 私有方法
private func setup() {
self.contentView.addSubview(self.avatarImageView)
self.contentView.addSubview(self.userNameLabel)
self.contentView.addSubview(self.mtypeImageView)
self.contentView.addSubview(self.createdAtLabel)
self.contentView.addSubview(self.sourceLabel)
self.contentView.addSubview(self.contentLabel)
self.avatarImageView.snp.makeConstraints { (make) in
make.top.left.equalTo(10.0)
make.size.equalTo(CGSize( 40.0, height: 40.0))
}
self.userNameLabel.snp.makeConstraints { (make) in
make.top.equalTo(self.avatarImageView.snp.top)
make.left.equalTo(self.avatarImageView.snp.right).offset(8.0)
}
self.mtypeImageView.snp.makeConstraints { (make) in
make.top.equalTo(self.userNameLabel.snp.top)
make.left.equalTo(self.userNameLabel.snp.right).offset(8.0)
make.size.equalTo(CGSize( 14.0, height: 14.0))
}
self.createdAtLabel.snp.makeConstraints { (make) in
make.left.equalTo(self.userNameLabel.snp.left)
make.bottom.equalTo(self.avatarImageView.snp.bottom)
}
self.sourceLabel.snp.makeConstraints { (make) in
make.left.equalTo(self.createdAtLabel.snp.right).offset(10.0)
make.bottom.equalTo(self.createdAtLabel.snp.bottom)
make.right.lessThanOrEqualTo(-8.0)
}
self.contentLabel.snp.makeConstraints { (make) in
make.top.equalTo(self.avatarImageView.snp.bottom).offset(8.0)
make.left.equalTo(self.avatarImageView.snp.left)
make.right.equalTo(-8.0)
make.bottom.equalTo(-10.0) // 注意此处必须设置,否则contentView无法自适应高度
}
}
// MARK: - 私有属性
private lazy var avatarImageView:UIImageView = {
let temp = UIImageView()
return temp
}()
private lazy var mtypeImageView:UIImageView = {
let temp = UIImageView()
return temp
}()
private lazy var userNameLabel:UILabel = {
let temp = UILabel()
temp.textColor = UIColor(red: 50.0/255.0, green: 50.0/255.0, blue: 50.0/255.0, alpha: 1.0)
temp.font = UIFont.systemFont(ofSize: 14.0)
return temp
}()
private lazy var createdAtLabel:UILabel = {
let temp = UILabel()
temp.textColor = UIColor(red: 120.0/255.0, green: 120.0/255.0, blue: 120.0/255.0, alpha: 1.0)
temp.font = UIFont.systemFont(ofSize: 12.0)
return temp
}()
private lazy var sourceLabel:UILabel = {
let temp = UILabel()
temp.textColor = UIColor(red: 120.0/255.0, green: 120.0/255.0, blue: 120.0/255.0, alpha: 1.0)
temp.font = UIFont.systemFont(ofSize: 12.0)
return temp
}()
private lazy var contentLabel:UILabel = {
let temp = UILabel()
temp.textColor = UIColor(red: 50.0/255.0, green: 50.0/255.0, blue: 50.0/255.0, alpha: 1.0)
temp.font = UIFont.systemFont(ofSize: 14.0)
temp.numberOfLines = 0
return temp
}()
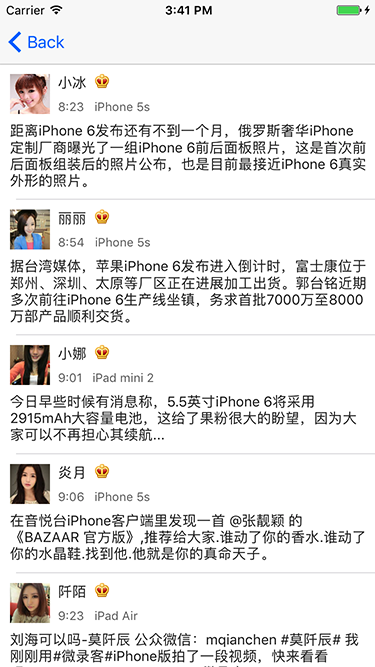
}终于效果:
不管是UITableView还是后面的UICollectionview,Self-Sizing Cells的概念均是从iOS 8開始提出的。假设是iOS 8之前的版本号则须要通过systemLayoutSizeFitting()进行计算或者通过frame直接设置。
UICollectionView
了解了UITableView的Cell行高自适应之后,要理解UICollectionviewCell的Size自适应并不难,因为UICollectionViewCell相比較于UITableViewCell除了要通过AutoLayout确定contentView的高度之外还要确定其宽度,其宽度确定原则和UITableViewCell的高度确定是相似的,仅仅是要通过UICollectionviewCell的contentView子控件自身确定其宽度,然后设置子控件和contentView相关的right约束就可以。当然对于UICollectionViewCell自适应尺寸相同必须设置UICollectionViewFlowLayout的estimatedItemSize属性(假设使用UICollectionViewFlowLayout)。
以下的的demo演示了类淘宝商品展示的UICollectionview布局,除了通过AutoLayout确定高度外,通过商品图片的left、right约束和width的设置能够反向判断出contentView的宽度,通过Self-Sizing Cells就能够终于确定UICollectionviewCell的size。
Cell布局代码:
import UIKit
class ProductCollectionViewCell: UICollectionViewCell {
// MARK: - 公共属性
var product:Product! {
didSet {
self.productImageView.image = UIImage(named: product.image)
self.contentLabel.text = product.text
self.priceLabel.text = "¥(product.price)"
self.salesLabel.text = "(product.sale)人购买"
}
}
// MARK: - 生命周期及方法覆盖
override init(frame: CGRect) {
super.init(frame: frame)
self.setup()
}
required init?(coder aDecoder: NSCoder) {
super.init(coder: aDecoder)
}
override func preferredLayoutAttributesFitting(_ layoutAttributes: UICollectionViewLayoutAttributes) -> UICollectionViewLayoutAttributes {
return super.preferredLayoutAttributesFitting(layoutAttributes)
}
// MARK: - 私有方法
private func setup() {
self.backgroundColor = UIColor.white
self.contentView.addSubview(self.productImageView)
self.contentView.addSubview(self.contentLabel)
self.contentView.addSubview(self.priceLabel)
self.contentView.addSubview(self.salesLabel)
let screenWidth = UIScreen.main.bounds.width
self.productImageView.snp.makeConstraints { (make) in
make.top.left.right.equalTo(0.0)
make.height.equalTo(screenWidth*0.5).priority(999)
make.width.equalTo((screenWidth-18)*0.5).priority(999) // 此设置能够确定cell宽度,注意虽然减少了默认的优先级仅仅是为了计算中间步骤不至于约束冲突,终于显示时此约束仍然会生效
}
self.contentLabel.snp.makeConstraints { (make) in
make.top.equalTo(self.productImageView.snp.bottom).offset(4.0)
make.left.equalTo(8.0)
make.right.equalTo(-8.0)
make.height.equalTo(28.0)
}
self.priceLabel.snp.makeConstraints { (make) in
make.top.equalTo(self.contentLabel.snp.bottom).offset(8.0)
make.left.equalTo(self.contentLabel.snp.left)
make.bottom.equalTo(-8.0) //此设置能够确定cell高度
}
self.salesLabel.snp.makeConstraints { (make) in
make.centerY.equalTo(self.priceLabel.snp.centerY)
make.right.equalTo(-8.0)
}
}
// MARK: - 私有属性
private lazy var productImageView:UIImageView = {
let temp = UIImageView()
temp.contentMode = .scaleAspectFit
temp.clipsToBounds = true
return temp
}()
private lazy var contentLabel:UILabel = {
let temp = UILabel()
temp.textColor = UIColor(red: 50.0/255.0, green: 50.0/255.0, blue: 50.0/255.0, alpha: 1.0)
temp.font = UIFont.systemFont(ofSize: 12.0)
temp.numberOfLines = 2
return temp
}()
private lazy var priceLabel:UILabel = {
let temp = UILabel()
temp.textColor = UIColor.orange
temp.font = UIFont.systemFont(ofSize: 14.0)
return temp
}()
private lazy var salesLabel:UILabel = {
let temp = UILabel()
temp.textColor = UIColor(red: 150.0/255.0, green: 150.0/255.0, blue: 150.0/255.0, alpha: 1.0)
temp.font = UIFont.systemFont(ofSize: 12.0)
return temp
}()
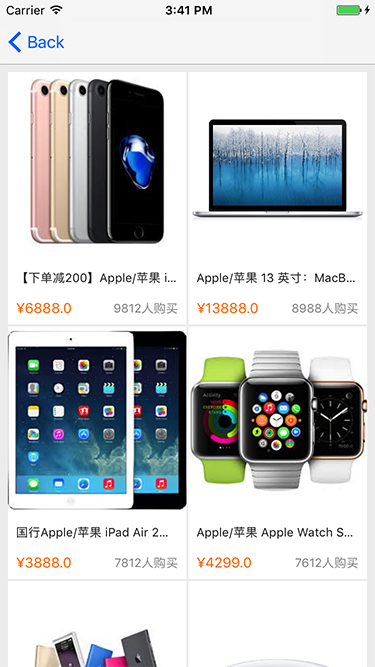
}终于效果:
除此之外从iOS 8開始,UICollectionViewCell提供了preferredLayoutAttributesFitting()方法用于提供一些cell属性改动,当然通过此方法能够又一次改动cell的size(包含Self-Sizing Cells自己主动计算后的size),对于手动计算高度的情况这也方法也提供了一种不用外部设置cell size的而能提供让UICollectionView确定cell尺寸的方式,可是这并不在Self-Sizing Cells讨论之列。因此本文不再深入讨论。