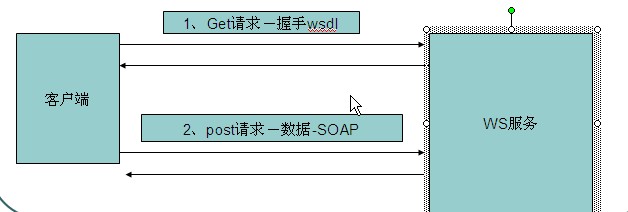
请求过程分析:
1.使用get方式获取wsdl文件,称为握手
2.使用post发出请求
3.服务器响应成功
几种监听工具:
http watch
Web Service explorer
eclipse 自带工具 TCP/IP Monitor
一.客户端调用(wximport自动生成代码 【推荐】)


 1 public class App {
 2     /**
 3      * 通过wsimport 解析wsdl生成客户端代码调用WebService服务
 4      * @param args
 5      */
 6     public static void main(String[] args) {
 7         /**
 8          * <service name="MyService">
 9          * 获得服务名称
10          */
11         MyService mywebService = new MyService();
12         /**
13          * <port name="HelloServicePort" binding="tns:HelloServicePortBinding">
14          */
15         HelloService hs = mywebService.getHelloServicePort();
16         /**
17          * 调用方法
18          */
19         System.out.println(hs.sayGoodbye("sjk"));
20         System.out.println(hs.aliassayHello("sjk"));
21     }
22 }
二.通过ajax+js+xml调用
 1 <html>
 2     <head>
 3         <title>通过ajax调用WebService服务</title>
 4         <script>
 5             var xhr = new ActiveXObject("Microsoft.XMLHTTP");
 6             function sendMsg(){
 7                 var name = document.getElementById('name').value;
 8                 //服务的地址
 9                 var wsUrl = 'http://192.168.1.100:6789/hello';
10                 //请求体
11                 var soap = '<soapenv:Envelope xmlns:soapenv="http://schemas.xmlsoap.org/soap/envelope/" xmlns:q0="http://ws.itcast.cn/" xmlns:xsd="http://www.w3.org/2001/XMLSchema" xmlns:xsi="http://www.w3.org/2001/XMLSchema-instance">' +
12                                      ' <soapenv:Body> <q0:sayHello><arg0>'+name+'</arg0>  </q0:sayHello> </soapenv:Body> </soapenv:Envelope>';
13                 //打开连接
14                 xhr.open('POST',wsUrl,true);
15                 //重新设置请求头
16                 xhr.setRequestHeader("Content-Type","text/xml;charset=UTF-8");
17                 //设置回调函数
18                 xhr.onreadystatechange = _back;
19                 //发送请求
20                 xhr.send(soap);
21             }
22
23             function _back(){
24                 if(xhr.readyState == 4){
25                     if(xhr.status == 200){
26                             //alert('调用Webservice成功了');
27                             var ret = xhr.responseXML;
28                             var msg = ret.getElementsByTagName('return')[0];
29                             document.getElementById('showInfo').innerHTML = msg.text;
30                             //alert(msg.text);
31                         }
32                 }
33             }
34         </script>
35     </head>
36     <body>
37             <input type="button" value="发送SOAP请求" onclick="sendMsg();">
38             <input type="text" id="name">
39             <div id="showInfo">
40             </div>
41     </body>
42 </html>
三.URL Connection方式
 1 import java.io.InputStream;
 2 import java.io.OutputStream;
 3 import java.net.HttpURLConnection;
 4 import java.net.URL;
 5 /**
 6  * 通过UrlConnection调用Webservice服务
 7  *
 8  */
 9 public class App {
10     public static String getDataByConnectUrl(String ssoUrl){
11         try {
12             URL url = new URL(ssoUrl);
13             HttpURLConnection con = (HttpURLConnection) url.openConnection();
14             con.setInstanceFollowRedirects(false);
15             con.setUseCaches(false);
16             con.setAllowUserInteraction(false);
17             con.connect();
18             StringBuffer sb = new StringBuffer();
19             String line = "";
20             BufferedReader URLinput = new BufferedReader(new InputStreamReader(con.getInputStream(),"UTF-8"));
21             while((line=URLinput.readLine()) != null){
22                 sb.append(line);
23             }
24             con.disconnect();
25         } catch (Exception e) {
26             e.printStackTrace();
27             return null;
28         }
29         return sb.toString();
30       }
31 }
四.单编程方式(和第一种方式一样)
 1 import javax.xml.namespace.QName;
 2 import org.apache.axis2.addressing.EndpointReference;
 3 import org.apache.axis2.client.Options;
 4 import org.apache.axis2.rpc.client.RPCServiceClient;
 5 class App{
 6     private void incomeService() {
 7       String xmlStr = "xmlData";//xml格式的参数数据拼成的字符串
 8       String url = "http://127.0.0.1:8080/webProject/services/systemDDLService";/wsdl地址
 9       String method="incomeJC";
10       String webObject = null;
11       try {
12         RPCServiceClient serviceClient = new RPCServiceClient();
13         Options options = serviceClient.getOptions();
14         EndpointReference targetEPR = new EndpointReference(url);
15         options.setTo(targetEPR);
16         QName opAddEntry = new QName("http://org.tempuri",method);
17         Object[] opAddEntryArgs = new Object[] {xmlStr};
18         Class[] classes = new Class[] { String.class };
19         webObject = (String)serviceClient.invokeBlocking(opAddEntry,opAddEntryArgs, classes)[0];
20         System.out.println(webObject);
21       }catch (Exception e) {
22         e.printStackTrace();
23         long end = System.currentTimeMillis();
24       }
25     }
26 }
原文:http://www.cnblogs.com/siqi/archive/2013/12/15/3475222.html