本文主要讲如何用Grunt打包AngularJS的模板HTML。
一 说明
AngularJS中使用单独HTML模板文件的地方非常多,例如:自定义指令、ng-include、templateUrl等。通常这些文件都是独立的html文件,AngularJS中使用这些文件都是通过文件路径地址引用的。
当用Grunt打包压缩整个项目时,如何处理这些html模板文件呢?本文讲的grunt-angular-templates插件可以解决该问题。
grunt-angular-templates插件的基本原理:
该插件实际使用的是AngularJS的$templateCache服务,将这些模板文件都缓存起来,当自定义指令、ng-include等需要对应的html文件时,AngularJS首先会去$templateCache中找对应的文件,如果找到了就不在发送XHR请求。
使用$templateCache缓存模板可以减少XHR请求数,并实现html文件打包。
同时,在AngularJS内部,第一次请求到模板HTML后,都会被缓存到 $templateCache 服务中,这样就确保一个文件只被请求一次。
下边是使用$templateCache缓存html模板的方法:
1 angular.module('app').run(["$templateCache", function($templateCache) {
2   $templateCache.put("home.html",
3     // contents for home.html ...
4   );
5   ...
6   $templateCache.put("src/app/templates/button.html",
7     // contents for button.html
8   );
9 }]);
二 安装
$ npm install grunt-angular-templates --save-dev
三 加载任务
grunt.loadNpmTasks('grunt-angular-templates');
四 配置
这里主要讲作者用到的几个常用配置:
4.1 src
要打包的模板文件路径。例如:'src/**/*.html'。
4.2 dest
输出打包好的文件地址。例如:'dist/tmp.js'。
4.3 options
各种设置都在options中,常用的有下边几个:
1)htmlmin
最小化html大小。设置了该项会去掉html的空格和换行等,可以减少压缩后文件大小。
官网推荐的设置如下:
 1 htmlmin :{
 2   collapseBooleanAttributes :true ,
 3   collapseWhitespace :是的,
 4   removeAttributeQuotes :true ,
 5   removeComments :true ,//  仅当您不使用comment指令时!
 6   removeEmptyAttributes :true ,
 7   removeRedundantAttributes :true ,
 8   removeScriptTypeAttributes :true ,
 9   removeStyleLinkTypeAttributes :true
10 }
2)standalone
设置是否创建新的AngularJS模块,还是使用一个现有的AngularJS模块。
设置为true时,将创建一个新的AngularJS模块,类似angular.module('app', []);
设置为false时,将使用已有的模块,类似angular.module('app')。
说明:该模块用于提供$templateCache进行模板缓存;模块名来自于下边的module属性。
3)module
设置创建的Angular模块名字,默认值为target,即Grunt配置项中ngtemplates的下一级属性名。
注意:
module和上边的standalone接口配合起来使用,如果是新创建的模块,必须在AngularJS启动模块中将该模块依赖进来,否则会导致找不到模板报错;如果是使用已有模块,就必须确保在加载打包后的html模板js之前已经定义了对应的模块,否则也会报错。
4)prefix
将模块存入到$templateCache时,对key添加的前缀。
注意1:如果设置了该属性,就要确保自定义指令、ng-include等中设置的模板地址也带有该前缀。
注意2:最终存入的存入到$templateCache的key是prefix+src后的结果,这里的src就是上边接口。
5)bootstrap(module, script)
该回调函数用于自定义模板缓存创建。
如果不定义该函数,插件会自己创建或者获取AngularJS模块,并通过run方法将所有html模板缓存到$templateCache中。
如果定义了该函数,则必须自己实现模板缓存到$templateCache,并将对应的js代码返回。最终会将返回的结果合并到输出文件中。
使用场景:将模板注册成AMD或者commonJS模块。例如:在requireJS构建的项目中。
参数说明:
module:AngularJS模块。
script:$templateCache.put()方法调用的js代码,如下:
1   $templateCache.put('/aa/src/button.html',
2     "<button type=button>{{text}}</button>"
3   );
五 实战
下边是一个实例项目:
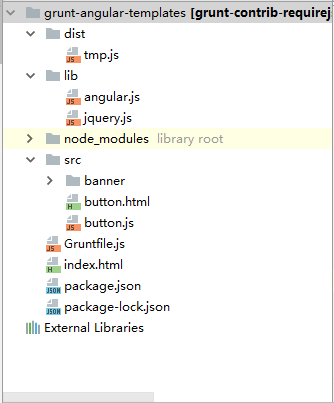
5.1 整体项目目录如下:
5.2 grunt配置文件如下:
 1 module.exports = function(grunt) {
 2     grunt.initConfig({
 3         // 清理空文件夹
 4         clean: {
 5             foo1: {
 6                 src: ['dist/*']
 7             }
 8         },
 9         ngtemplates: { // 将angular中html模板通过$templateCache进行合并
10             'angular-my-directives': {
11                 options: {
12                     htmlmin: {
13                         collapseBooleanAttributes: true,
14                         collapseWhitespace: true,
15                         removeAttributeQuotes: true,
16                         removeComments: true, // Only if you don't use comment directives!
17                         removeEmptyAttributes: true,
18                         removeRedundantAttributes: true,
19                         removeScriptTypeAttributes: true,
20                         removeStyleLinkTypeAttributes: true
21                     },
22                     standalone: true, // 是否创建新的Angular模块
23                     module: 'temp', // 设置创建的Angular模块名字,默认值为target,即'angular-my-directives'
24                     // bootstrap: function (module, script) {
25                     //     console.log(script);
26                     //     return script;
27                     // },
28                     prefix: '/aa/'
29                 },
30                 src: 'src/**/*.html', // where my view files are
31                 dest: 'dist/tmp.js' // single file of $templateCache
32             }
33         },
34     });
35
36     grunt.loadNpmTasks('grunt-angular-templates');
37     grunt.loadNpmTasks('grunt-contrib-clean');
38
39     // 默认被执行的任务列表。
40     grunt.registerTask('default', [
41         'clean',
42         'ngtemplates'
43     ]);
44
45 };
5.3 button.html和banner.html是两个html模板,其中button.html是button.js中定义的mybutton指令的模板:
button.html代码如下:
<button type="button">{{text}}</button>
button.js代码如下:
 1 var component = angular.module("component", []);
 2
 3 component.directive('myButton', myButton);
 4 myButton.$inject = [];
 5 function myButton() {
 6     return {
 7         restrict: 'E',
 8         priority: 999,
 9         scope: {
10             text: '=',
11         },
12         templateUrl: '/aa/src/button.html',
13         replace: true,
14         link: function (scope, $element) {
15
16         }
17     };
18 }
banner.html代码如下:
<div style=" 100%;background-color:blue;height: 70px">This is banner!</div>
5.4 执行grunt命令后,压缩好的tmp.js文件如下:
 1 angular.module('temp', []).run(['$templateCache', function($templateCache) {
 2   'use strict';
 3
 4   $templateCache.put('/aa/src/banner/banner.html',
 5     "<div style=" 100%;background-color:blue;height: 70px">This is banner!</div>"
 6   );
 7
 8   $templateCache.put('/aa/src/button.html',
 9     "<button type=button>{{text}}</button>"
10   );
11
12 }]);
5.5 测试用例index.html代码如下:
 1 <!doctype html>
 2 <html>
 3 <head>
 4     <meta charset="utf-8"/>
 5     <title>测试</title>
 6 </head>
 7 <body>
 8 <div  ng-controller="DemoCtrl">
 9     <div ng-include="bannerTemplate"></div>
10     <my-button text="buttonText"></my-button>
11 </div>
12 <!-- Load scripts. -->
13 <script type="text/javascript" src="./lib/jquery.js"></script>
14 <script type="text/javascript" src="./lib/angular.js"></script>
15 <script type="text/javascript" src="./dist/tmp.js"></script>
16 <script type="text/javascript" src="./src/button.js"></script>
17
18 <script type="text/javascript">
19     var app = angular.module("test", ["component", "temp"]);
20
21     app.controller('DemoCtrl', function ($scope) {
22         $scope.bannerTemplate = '/aa/src/banner/banner.html';
23         $scope.buttonText = '确认';
24
25     });
26
27     angular.bootstrap($("html"), ["test"]);
28 </script>
29 </body>
30 </html>
六 源码下载地址
https://gitee.com/bangbangwa/grunt/blob/master/grunt-angular-templates-test.rar
参考资料&内容来源
grunt官网:https://www.npmjs.com/package/grunt-angular-templates
博客园:https://www.cnblogs.com/ms-grf/p/6874256.html