scrapy简介
Scrapy 使用了 Twisted异步网络库来处理网络通讯。整体架构大致如下
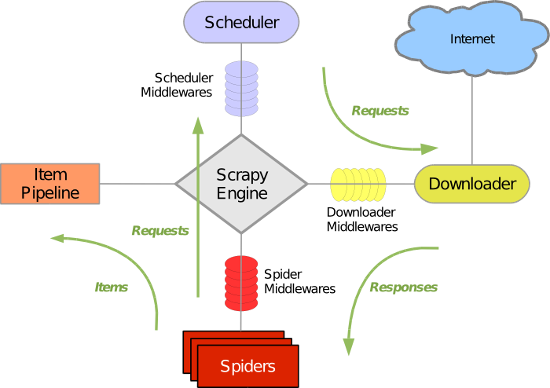
Scrapy主要包括了以下组件:
- 引擎(Scrapy)
用来处理整个系统的数据流处理, 触发事务(框架核心) - 调度器(Scheduler)
用来接受引擎发过来的请求, 压入队列中, 并在引擎再次请求的时候返回. 可以想像成一个URL(抓取网页的网址或者说是链接)的优先队列, 由它来决定下一个要抓取的网址是什么, 同时去除重复的网址 - 下载器(Downloader)
用于下载网页内容, 并将网页内容返回给蜘蛛(Scrapy下载器是建立在twisted这个高效的异步模型上的) - 爬虫(Spiders)
爬虫是主要干活的, 用于从特定的网页中提取自己需要的信息, 即所谓的实体(Item)。用户也可以从中提取出链接,让Scrapy继续抓取下一个页面 - 项目管道(Pipeline)
负责处理爬虫从网页中抽取的实体,主要的功能是持久化实体、验证实体的有效性、清除不需要的信息。当页面被爬虫解析后,将被发送到项目管道,并经过几个特定的次序处理数据。 - 下载器中间件(Downloader Middlewares)
位于Scrapy引擎和下载器之间的框架,主要是处理Scrapy引擎与下载器之间的请求及响应。 - 爬虫中间件(Spider Middlewares)
介于Scrapy引擎和爬虫之间的框架,主要工作是处理蜘蛛的响应输入和请求输出。 - 调度中间件(Scheduler Middewares)
介于Scrapy引擎和调度之间的中间件,从Scrapy引擎发送到调度的请求和响应。
Scrapy运行流程大概如下:
- 引擎从调度器中取出一个链接(URL)用于接下来的抓取
- 引擎把URL封装成一个请求(Request)传给下载器
- 下载器把资源下载下来,并封装成应答包(Response)
- 爬虫解析Response
- 解析出实体(Item),则交给实体管道进行进一步的处理
- 解析出的是链接(URL),则把URL交给调度器等待抓取
安装
Linux下的安装(包括mac)
pip install scrapy
Windows下的安装
http://www.lfd.uci.edu/~gohlke/pythonlibs/#twisted
b. 安装wheel
pip3 install wheel
c. 安装twisted
进入下载目录,执行 pip3 install Twisted‑18.7.0‑cp36‑cp36m‑win_amd64.whld. 安装pywin32
pip3 install pywin32
e. 安装scrapy
pip3 install scrapy
基本命令
1. scrapy startproject 项目名称 - 在当前目录中创建一个项目文件(类似于Django)2. scrapy genspider [-t template] <name> <domain> - 创建爬虫应用 如: scrapy gensipider -t basic oldboy oldboy.com scrapy gensipider -t xmlfeed autohome autohome.com.cn PS: 查看所有命令:scrapy gensipider -l 查看模板命令:scrapy gensipider -d 模板名称3. scrapy list - 展示爬虫应用列表4. scrapy crawl 爬虫应用名称 - 运行单独爬虫应用备注:scrapy crawl 应用名称 表示以日志的形式运行爬虫应用,可以在后面加 --nolog 取消日志 scrapy crawl 名称 --nolog
项目结构以及爬虫应用简介
|
1
2
3
4
5
6
7
8
9
10
11
12
|
project_name/ scrapy.cfg project_name/ __init__.py items.py middlewares.py
pipelines.py settings.py spiders/ __init__.py 爬虫1.py 爬虫2.py 爬虫3.py |
文件说明:
- scrapy.cfg 项目的主配置信息。(真正爬虫相关的配置信息在settings.py文件中)
- items.py 设置数据存储模板,用于结构化数据,如:Django的Model
- pipelines 数据处理行为,如:一般结构化的数据持久化
- settings.py 配置文件,如:递归的层数、并发数,延迟下载等
- spiders 爬虫目录,如:创建文件,编写爬虫规则
注意:一般创建爬虫文件时,以网站域名命名
import sys,io
sys.stdout=io.TextIOWrapper(sys.stdout.buffer,encoding='gb18030')


import scrapy

class ChoutiSpider(scrapy.Spider):
    name = 'chouti'
    allowed_domains = ['chouti.com']
    start_urls = ['https://dig.chouti.com/']

    def parse(self, response):
        pass

在爬取数据时,可以选择是否往.../robots.txt/发送验证,是否允许爬取,一般设置为False

使用scrapy解析文本内容时,可以使用每个应用中的response.xpath(xxx) 进行数据的解析。
Selector对象。selector对象可以继续xpath进行数据的解析。1.//+标签 表示从全局的子子孙孙中查找标签
response = HtmlResponse(url='http://example.com', body=html,encoding='utf-8')
hxs = HtmlXPathSelector(response)
print(hxs)   # selector对象
hxs = Selector(response=response).xpath('//a')
print(hxs)    #查找所有的a标签
hxs = Selector(response=response).xpath('//a[2]')
print(hxs)    #查找某一个具体的a标签    取第三个a标签
hxs = Selector(response=response).xpath('//a[@id]')
print(hxs)    #查找所有含有id属性的a标签
hxs = Selector(response=response).xpath('//a[@id="i1"]')
print(hxs)    # 查找含有id=“i1”的a标签
# hxs = Selector(response=response).xpath('//a[@href="link.html"][@id="i1"]')
# print(hxs)   # 查找含有href=‘xxx’并且id=‘xxx’的a标签
# hxs = Selector(response=response).xpath('//a[contains(@href, "link")]')
# print(hxs)   # 查找 href属性值中包含有‘link’的a标签
# hxs = Selector(response=response).xpath('//a[starts-with(@href, "link")]')
# print(hxs)   # 查找 href属性值以‘link’开始的a标签
# hxs = Selector(response=response).xpath('//a[re:test(@id, "id+")]')
# print(hxs)   # 正则匹配的用法   匹配id属性的值为数字的a标签
# hxs = Selector(response=response).xpath('//a[re:test(@id, "id+")]/text()').extract()
# print(hxs)    # 匹配id属性的值为数字的a标签的文本内容
# hxs = Selector(response=response).xpath('//a[re:test(@id, "id+")]/@href').extract()
# print(hxs)    #匹配id属性的值为数字的a标签的href属性值
# hxs = Selector(response=response).xpath('/html/body/ul/li/a/@href').extract()
# print(hxs)
# hxs = Selector(response=response).xpath('//body/ul/li/a/@href').extract_first()
# print(hxs)

# ul_list = Selector(response=response).xpath('//body/ul/li')
# for item in ul_list:
#     v = item.xpath('./a/span')
#     # 或
#     # v = item.xpath('a/span')
#     # 或
#     # v = item.xpath('*/a/span')
#     print(v)
scrapy的持久化
scrapy的持久化过程分为四个部分
首先,items定义传输的格式,其次,在爬虫应用中yield这个item对象,pipeline收到yield的item对象,进行持久化操作,这个过程中,settings中要进行相应的配置
items.py
# 规范持久化的格式
import scrapy


class MyspiderItem(scrapy.Item):
    # define the fields for your item here like:
    # name = scrapy.Field()
    url=scrapy.Field()
爬虫应用
import scrapy
from  myspider.items import MyspiderItem


class ChoutiSpider(scrapy.Spider):
    name = 'chouti'
    allowed_domains = ['chouti.com']
    start_urls = ['https://dig.chouti.com/']

    def parse(self, response):
        # print(response.text)
        a_list = response.xpath('//div[@id="content-list"]//div[@class="part1"]/a[@class="show-content color-chag"]/@href').extract()
        for url in a_list:
            yield MyspiderItem(url=url)
pipelines.py
class MyspiderPipeline(object):

    def __init__(self,file_path):
        self.f = None
        self.file_path = file_path

    @classmethod
    def from_crawler(cls,crawler):
        '''
        执行pipeline类时,会先去类中找from_crawler的方法,
        如果有,则先执行此方法,并且返回一个当前类的对象,
        如果没有,则直接执行初始化方法
        :param crawler:
        :return:
        '''
        # 可以进行一些初始化之前的处理,比如:文件的路径配置到settings文件中,方便后期的更改。
        file_path = crawler.settings.get('PACHONG_FILE_PATH')
        return cls(file_path)

    def open_spider(self,spider):
        '''
        爬虫开始时被调用
        :param spider:
        :return:
        '''
        self.f = open(self.file_path,'w',encoding='utf8')

    def process_item(self, item, spider):
        '''
        执行持久化的逻辑操作
        :param item: 爬虫yield过来的item对象  (一个字典)
        :param spider:  爬虫对象
        :return:
        '''
        self.f.write(item['url']+'
')
        self.f.flush()   #将写入到内存的文件强刷到文件中,防止夯住,不使用此方法会夯住
        return item

    def close_spider(self,spider):
        '''
        爬虫结束时调用
        :param spider:
        :return:
        '''
        self.f.close()
备注:执行pipeline时,会先找from_crawler方法,这个方法中,我们可以设置一些settings文件中的配置,通过crawler.settings得到一个settings对象(配置文件对象) <scrapy.settings.Settings object at 0x000002525581F908>
执行pipeline中的process_item() 方法进行数据的持久化处理时,如果有多个pipeline(比如:将数据分别写入文件和数据库)时,先执行的pipeline(按照配置文件中数值的大小顺序执行),必须返回一个item对象,否则,后续的pipeline执行时,接收的item为None,无法进行数据的持久化操作,如果只是单纯的对某些数据进行一个持久化的处理,可以通过抛出异常,来阻止当前item对象后续的pipeline执行。抛出异常为:from scrapy.exceptions import DropItem 直接 raise DropItem()
return不返回item对象与抛异常的区别:无返回值或者返回值为None时,后续的pipeline会执行,只是,此时的item为None,而抛出异常,会跳过当前对象后续的pipeline,执行下一个item对象。
settings.py
ITEM_PIPELINES = {
'myspider.pipelines.MyspiderPipeline': 300,
  'xxxxx.pipelines.FilePipeline': 400,
} # 每行后面的整型值,确定了他们运行的顺序,item按数字从低到高的顺序,通过pipeline,通常将这些数字定义在0-1000范围内。
备注:数值小的先执行。
获取所有页面
import scrapy
from  myspider.items import MyspiderItem
from scrapy.http import Request

class ChoutiSpider(scrapy.Spider):
    name = 'chouti'
    allowed_domains = ['chouti.com']
    start_urls = ['https://dig.chouti.com/']

    def parse(self, response):
        a_list = response.xpath('//div[@id="content-list"]//div[@class="part1"]/a[@class="show-content color-chag"]/@href').extract()
        for url in a_list:
            yield MyspiderItem(url=url)

        # 获取分页的url
        url_list = response.xpath('//div[@id="dig_lcpage"]//a/@href').extract()
        for url in url_list:
            url = 'https://dig.chouti.com%s'%url
            yield Request(url=url,callback=self.parse)
备注:通过yield 每一个request对象,将所有的页面url添加到调度器中。
scrapy框架会默认的将所有的结果进行去重操作。如果不去重,可以在request参数中,设置 dont_filter=True
class Spider(object_ref):

        def start_requests(self):
        cls = self.__class__
        if method_is_overridden(cls, Spider, 'make_requests_from_url'):
            warnings.warn(
                "Spider.make_requests_from_url method is deprecated; it "
                "won't be called in future Scrapy releases. Please "
                "override Spider.start_requests method instead (see %s.%s)." % (
                    cls.__module__, cls.__name__
                ),
            )
            for url in self.start_urls:
                yield self.make_requests_from_url(url)
        else:
            for url in self.start_urls:
                yield Request(url, dont_filter=True)
备注:在执行爬虫应用时,会先执行start_requests方法,所以我们可以重写此方法自定制。
获取响应数据中的cookie
返回的response中,无法通过 .cookies 获取cookie,只能通过从响应头中获取,但是获取的结果还得需要解析。
{b'Server': [b'Tengine'], b'Content-Type': [b'text/html; charset=UTF-8'], b'Date': [
b'Fri, 20 Jul 2018 13:43:42 GMT'], b'Cache-Control': [b'private'], b'Content-Language': [b'en'],
b'Set-Cookie': [b'gpsd=5b05bcae8c6f4a273a53addfc8bbff22; domain=chouti.com; path=/; expires=Sun,
19-Aug-2018 13:43:42 GMT', b'JSESSIONID=aaadbrXmU-Jh2_kvbaysw; path=/'], b'Vary': [b'Accept-Encoding'],
 b'Via': [b'cache15.l2nu29-1[69,0], kunlun9.cn125[73,0]'], b'Timing-Allow-Origin': [b'*'],
 b'Eagleid': [b'6a78b50915320942226762320e']}
所以,要通过scrapy封装的方法,将cookie解析出来
import scrapy
from scrapy.http.cookies import CookieJar

class ChoutiSpider(scrapy.Spider):
    name = 'chouti'
    allowed_domains = ['chouti.com']
    start_urls = ['https://dig.chouti.com/']
    cookie_dict = {}
    def parse(self, response):

        cookie_jar = CookieJar()
        cookie_jar.extract_cookies(response,response.request)
        for k, v in cookie_jar._cookies.items():
            for i, j in v.items():
                for m, n in j.items():
                    self.cookie_dict[m] = n.value
        print(self.cookie_dict)
备注:CookieJar中封装的内容特别丰富,print(cookie_jar._cookies) 包含很多
{'.chouti.com': {'/': {'gpsd': Cookie(version=0, name='gpsd', value='fcb9b9da7aaede0176d2a88cde8b6adb',
 port=None, port_specified=False, domain='.chouti.com', domain_specified=True, domain_initial_dot=False,
path='/', path_specified=True, secure=False, expires=1534688487, discard=False, comment=None,
comment_url=None, rest={}, rfc2109=False)}}, 'dig.chouti.com': {'/': {'JSESSIONID':
Cookie(version=0, name='JSESSIONID', value='aaa4GWMivXwJf6ygMaysw', port=None, port_specified=False,
domain='dig.chouti.com', domain_specified=False, domain_initial_dot=False, path='/',
 path_specified=True, secure=False, expires=None, discard=True, comment=None, comment_url=None, rest={},
rfc2109=False)}}}
自动登录抽屉并点赞和取消赞代码示例
import scrapy
from scrapy.http.response.html import HtmlResponse
# import sys,os,io
# sys.stdout=io.TextIOWrapper(sys.stdout.buffer,encoding='gb18030')
from ..items import XzxItem
from scrapy.http import Request
from scrapy.http.cookies import CookieJar

class ChoutiSpider(scrapy.Spider):
    name = 'chouti'
    allowed_domains = ['chouti.com']
    start_urls = ['https://dig.chouti.com/r/ask/hot/1']
    cookie_dict = {}
    def start_requests(self):
        for url in self.start_urls:
            yield Request(url=url,callback=self.parse)

    def parse(self, response):
        # 1. 去第一次访问页面中获取cookie
        # print(response.headers['Set-Cookie'],type(response.headers['Set-Cookie']))
        cookie_jar = CookieJar() # 空
        cookie_jar.extract_cookies(response, response.request) # cookie_jar中包含了cookie


        for k, v in cookie_jar._cookies.items():
            for i, j in v.items():
                for m, n in j.items():
                    self.cookie_dict[m] = n.value
        # 2. 向https://dig.chouti.com/login发送POST请求
        yield Request(
            url='https://dig.chouti.com/login',
            method='POST',
            body="phone=8615901492719&password=qwer1234&oneMonth=1",
            cookies=self.cookie_dict,
            headers={
                'user-agent':'Mozilla/5.0 (Windows NT 6.1; WOW64) AppleWebKit/537.36 (KHTML, like Gecko) Chrome/67.0.3396.99 Safari/537.36',
                'content-type':'application/x-www-form-urlencoded; charset=UTF-8',
            },
            callback=self.check_login
        )

    def check_login(self,response):
        print(response.text)
        yield Request(url='https://dig.chouti.com/',callback=self.index)

    def index(self,response):

        news_id_list = response.xpath('//div[@id="content-list"]//div[@class="part2"]/@share-linkid').extract()
        for news_id in news_id_list:
            # 赞
            """
            news_url = "https://dig.chouti.com/link/vote?linksId=%s" %(news_id,)
            yield Request(
                url=news_url,
                method='POST',
                cookies=self.cookie_dict,
                callback=self.output
            )
            """
            # 取消赞
            news_url = "https://dig.chouti.com/vote/cancel/vote.do"
            yield Request(
                url=news_url,
                method='POST',
                body="linksId=%s" %(news_id,),
                cookies=self.cookie_dict,
                headers={
                    'content-type': 'application/x-www-form-urlencoded; charset=UTF-8',
                },
                callback=self.output
            )

        # 2.1 获取页面
        page_list = response.xpath('//*[@id="dig_lcpage"]//a/@href').extract()
        for url in page_list:
            url = "https://dig.chouti.com" + url
            yield Request(url=url,callback=self.index)

    def output(self,response):
        print(response.text)
备注:爬取过程中的坑:请求头中,一定要携带content-type参数。请求过程中的url不能重复,尤其是和起始url。
from urllib.parse import urlencode

ret = {'name':'xxx','age':18}

print(urlencode(ret))