SpringBoot项目中访问Redis主要有两种方式:JedisPool和RedisTemplate,本文使用JedisPool
1、pom.xml添加dependency
<dependency>
    <groupId>redis.clients</groupId>
    <artifactId>jedis</artifactId>
    <version>2.9.0</version>
    <scope>compile</scope>
</dependency>
2、下面封装一个工具类,utils新建JedisPoolUtil,先只封装读写字符串
package com.jgui.utils;

import com.jgui.config.RedisConfig;
import lombok.Data;
import org.springframework.beans.factory.annotation.Autowired;
import org.springframework.boot.context.properties.ConfigurationProperties;
import org.springframework.boot.context.properties.EnableConfigurationProperties;
import org.springframework.context.annotation.Bean;
import org.springframework.stereotype.Component;
import redis.clients.jedis.Jedis;
import redis.clients.jedis.JedisPool;
import redis.clients.jedis.JedisPoolConfig;

/**
 * @Author: zhaogaojian
 * @Description:
 * @Date: Created in 2020/1/821:54
 */
@Component
public class JedisPoolUtil {
    private  JedisPool jedisPool=null;
    @Autowired
    private  RedisConfig redisConfig;
    private  JedisPool getJedisPool() {
        if(jedisPool==null)
        {
            JedisPoolConfig jedisPoolConfig = new JedisPoolConfig();
            jedisPoolConfig.setMaxTotal(redisConfig.getPoolMaxTotal());
            jedisPoolConfig.setMaxIdle(redisConfig.getPoolMaxIdle());
            jedisPoolConfig.setMaxWaitMillis(redisConfig.getPoolMaxWait());
            jedisPool=new JedisPool(jedisPoolConfig, redisConfig.getHost(),redisConfig.getPort(),redisConfig.getTimeout()*1000,redisConfig.getPassword(),0);
        }
        return jedisPool;
    }
    public  String set(String key,String value, int cacheSeconds)
    {
        String strRet = null;
        Jedis jedis =null;
        try {
            jedis = getJedisPool().getResource();
            strRet=jedis.set(key,value);
            if (cacheSeconds != 0) {
                jedis.expire(key, cacheSeconds);
            }
        } catch (Exception e) {
            //logger.error(e.getMessage(), e);
        } finally {
            if (jedis != null)
                jedis.close(); //注意这里不是关闭连接,在JedisPool模式下,Jedis会被归还给资源池。
        }
        return strRet;
    }
    public  String get(String key)
    {
        String strRet=null;
        Jedis jedis =null;
        try {
            jedis = getJedisPool().getResource();
            strRet=jedis.get(key);
        } catch (Exception e) {
            //logger.error(e.getMessage(), e);
        } finally {
            if (jedis != null)
                jedis.close(); //注意这里不是关闭连接,在JedisPool模式下,Jedis会被归还给资源池。
        }
        return strRet;
    }
}
3、Config文件新建RedisConfig
package com.jgui.config;

import lombok.Data;
import org.springframework.beans.factory.annotation.Value;
import org.springframework.boot.context.properties.ConfigurationProperties;
import org.springframework.boot.context.properties.EnableConfigurationProperties;
import org.springframework.stereotype.Component;

/**
 * @Author: zhaogaojian
 * @Description:
 * @Date: Created in 2020/1/822:51
 */
@Data
@Component
@ConfigurationProperties(prefix = "redis") //把同类的配置信息自动封装成实体类
public class RedisConfig {
    private String host="127.0.0.1";
    private Integer port=6379;
    private Integer timeout=3;  //秒
    private String password="123456";

    private Integer poolMaxTotal=10;
    private Integer poolMaxIdle=10;
    private Integer poolMaxWait=3;//秒
}
4、application.properties增加配置节
#--------------------Jedis配置-------------------
redis.host=127.0.0.1
redis.port=6379
#秒
redis.timeout=5
redis.password=123456
redis.poolMaxTotal=10
redis.poolMaxIdle=10
#秒
redis.poolMaxWait=3
5、修改hello进行测试
    @Autowired
    private JedisPoolUtil jedisPoolUtil;
    @RequestMapping("/hello")
    public String hello() {

        String ret=jedisPoolUtil.set("111","123",60);
        String ret1=jedisPoolUtil.get("111");
        return ret1;
        //return userDao.selectByPrimaryKey(1).getRealname();
        //return "Hello World11";
    }
6、拦截器增加hello排除
public void addInterceptors(InterceptorRegistry registry){
        List<String> excludePath = new ArrayList<>();
        excludePath.add("/login"); //登录
        excludePath.add("/hello"); //测试
        registry.addInterceptor(tokenInterceptor)
                .addPathPatterns("/**")
                .excludePathPatterns(excludePath);
        WebMvcConfigurer.super.addInterceptors(registry);

    }
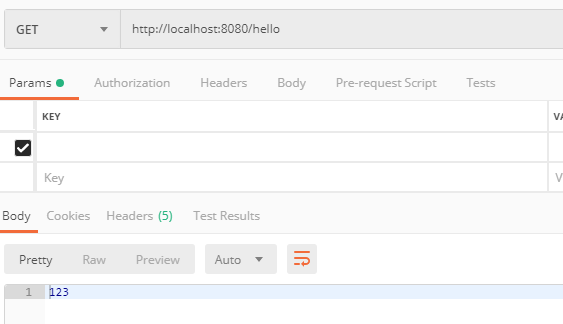
7、运行测试,返回123,工作正常

以上参考
https://www.jianshu.com/p/df57fefe0ab7
https://www.jdon.com/51938
https://blog.csdn.net/MRA__S__/article/details/82051538
https://blog.csdn.net/damanchen/article/details/103770222
等