

[root@linux-node1 ~]# yum -y install mariadb mariadb-server php php-mysql httpd
已安装:
  httpd.x86_64 0:2.4.6-67.el7.centos.5     mariadb.x86_64 1:5.5.56-2.el7        mariadb-server.x86_64 1:5.5.56-2.el7
  php.x86_64 0:5.4.16-42.el7               php-mysql.x86_64 0:5.4.16-42.el7

作为依赖被安装:
  httpd-tools.x86_64 0:2.4.6-67.el7.centos.5                 libzip.x86_64 0:0.10.1-8.el7
  mailcap.noarch 0:2.1.41-2.el7                              perl-Compress-Raw-Bzip2.x86_64 0:2.061-3.el7
  perl-Compress-Raw-Zlib.x86_64 1:2.061-4.el7                perl-DBD-MySQL.x86_64 0:4.023-5.el7
  perl-DBI.x86_64 0:1.627-4.el7                              perl-IO-Compress.noarch 0:2.061-2.el7
  perl-Net-Daemon.noarch 0:0.48-5.el7                        perl-PlRPC.noarch 0:0.2020-14.el7
  php-cli.x86_64 0:5.4.16-42.el7                             php-common.x86_64 0:5.4.16-42.el7
  php-pdo.x86_64 0:5.4.16-42.el7

作为依赖被升级:
  mariadb-libs.x86_64 1:5.5.56-2.el7

完毕!
[root@linux-node1 ~]# systemctl enable mariadb
Created symlink from /etc/systemd/system/multi-user.target.wants/mariadb.service to /usr/lib/systemd/system/mariadb.service.
[root@linux-node1 ~]# systemctl start mariadb
[root@linux-node1 ~]# mysql_secure_installation

NOTE: RUNNING ALL PARTS OF THIS SCRIPT IS RECOMMENDED FOR ALL MariaDB
      SERVERS IN PRODUCTION USE!  PLEASE READ EACH STEP CAREFULLY!

In order to log into MariaDB to secure it, we'll need the current
password for the root user.  If you've just installed MariaDB, and
you haven't set the root password yet, the password will be blank,
so you should just press enter here.

Enter current password for root (enter for none): #输入root密码(第一次按回车设置root密码)
Set root password? [Y/n] y    #是否设置root密码
New password:
Re-enter new password:
Password updated successfully!
Reloading privilege tables..
 ... Success!

Remove anonymous users? [Y/n] y    #是否删除匿名用户

Disallow root login remotely? [Y/n] n    #是否禁用root远程登录

Remove test database and access to it? [Y/n] y    #是否删除测试库并访问它

Reload privilege tables now? [Y/n] y    #是否现在加载权限表

#创建zabbix数据库及其用户
[root@linux-node1 ~]# mysql -uroot -p'******' -e "create database zabbix default character set utf8 collate utf8_bin;"
[root@linux-node1 ~]# mysql -uroot -p'******' -e "grant all on zabbix.* to 'zabbix'@'%' identified by 'zabbix';"

[root@linux-node1 ~]# mysql -uzabbix -pzabbix
Welcome to the MariaDB monitor.  Commands end with ; or g.
Your MariaDB connection id is 16
Server version: 5.5.56-MariaDB MariaDB Server

Copyright (c) 2000, 2017, Oracle, MariaDB Corporation Ab and others.

Type 'help;' or 'h' for help. Type 'c' to clear the current input statement.

MariaDB [(none)]> show databases;
+--------------------+
| Database           |
+--------------------+
| information_schema |
| zabbix             |
+--------------------+
2 rows in set (0.00 sec)

MariaDB [(none)]>
[root@linux-node1 ~]# systemctl start httpd
[root@linux-node1 ~]# netstat -lntup
Active Internet connections (only servers)
Proto Recv-Q Send-Q Local Address           Foreign Address         State       PID/Program name
tcp        0      0 0.0.0.0:3306            0.0.0.0:*               LISTEN      3010/mysqld
tcp        0      0 0.0.0.0:22              0.0.0.0:*               LISTEN      1486/sshd
tcp        0      0 127.0.0.1:25            0.0.0.0:*               LISTEN      2631/master
tcp6       0      0 :::80                   :::*                    LISTEN      8152/httpd
tcp6       0      0 :::22                   :::*                    LISTEN      1486/sshd
tcp6       0      0 ::1:25                  :::*                    LISTEN      2631/master
[root@linux-node1 ~]# rpm -ivh http://repo.zabbix.com/zabbix/3.4/rhel/7/x86_64/zabbix-release-3.4-2.el7.noarch.rpm
获取http://repo.zabbix.com/zabbix/3.4/rhel/7/x86_64/zabbix-release-3.4-2.el7.noarch.rpm
警告:/var/tmp/rpm-tmp.vEGLOj: 头V4 RSA/SHA512 Signature, 密钥 ID a14fe591: NOKEY
准备中...                          ################################# [100%]
正在升级/安装...
   1:zabbix-release-3.4-2.el7         ################################# [100%]
[root@linux-node1 ~]# yum -y install zabbix-server-mysql zabbix-web-mysql zabbix-get
已安装:
  zabbix-get.x86_64 0:3.4.3-1.el7    zabbix-server-mysql.x86_64 0:3.4.3-1.el7    zabbix-web-mysql.noarch 0:3.4.3-1.el7

作为依赖被安装:
  OpenIPMI-libs.x86_64 0:2.0.19-15.el7                         OpenIPMI-modalias.x86_64 0:2.0.19-15.el7
  dejavu-fonts-common.noarch 0:2.33-6.el7                      dejavu-sans-fonts.noarch 0:2.33-6.el7
  fontpackages-filesystem.noarch 0:1.44-8.el7                  fping.x86_64 0:3.10-4.el7
  iksemel.x86_64 0:1.4-6.el7                                   libX11.x86_64 0:1.6.5-1.el7
  libX11-common.noarch 0:1.6.5-1.el7                           libXau.x86_64 0:1.0.8-2.1.el7
  libXpm.x86_64 0:3.5.12-1.el7                                 libevent.x86_64 0:2.0.21-4.el7
  libpng.x86_64 2:1.5.13-7.el7_2                               libtool-ltdl.x86_64 0:2.4.2-22.el7_3
  libxcb.x86_64 0:1.12-1.el7                                   libxslt.x86_64 0:1.1.28-5.el7
  net-snmp-libs.x86_64 1:5.7.2-28.el7                          php-bcmath.x86_64 0:5.4.16-42.el7
  php-gd.x86_64 0:5.4.16-42.el7                                php-ldap.x86_64 0:5.4.16-42.el7
  php-mbstring.x86_64 0:5.4.16-42.el7                          php-xml.x86_64 0:5.4.16-42.el7
  t1lib.x86_64 0:5.1.2-14.el7                                  unixODBC.x86_64 0:2.3.1-11.el7
  zabbix-web.noarch 0:3.4.3-1.el7

完毕!
#导入zabbix数据库结构
[root@linux-node1 ~]# cd /usr/share/doc/zabbix-server-mysql-3.4.3/
[root@linux-node1 zabbix-server-mysql-3.4.3]# zcat create.sql.gz | mysql -uroot -p'******' zabbix
#修改zabbix sever的配置文件
[root@linux-node1 ~]# vim /etc/zabbix/zabbix_server.conf
DBHost=localhost
DBName=zabbix
DBUser=zabbix
DBPassword=zabbix
#定义php的时区
[root@linux-node1 ~]# vim /etc/httpd/conf.d/zabbix.conf
        php_value date.timezone Asia/Chongqing
#zabbix-server加入开机启动,并启动zabbix-server
[root@linux-node1 ~]# systemctl enable zabbix-server
Created symlink from /etc/systemd/system/multi-user.target.wants/zabbix-server.service to /usr/lib/systemd/system/zabbix-server.service.
[root@linux-node1 ~]# systemctl start zabbix-server
#重启apache
[root@linux-node1 ~]# systemctl restart httpd
访问http://192.168.56.11/zabbix/setup.php这个地址
[root@linux-node1 ~]# vim /etc/httpd/conf.d/zabbix.conf
Alias /zabbix /usr/share/zabbix    #/zabbix可自定义位置,修改完毕后需重启apache
数据采集
本地 远程
agent-->>server 2种方式,1种是server轮训方式,2是客户端主动发给server
######SNMP#######
[root@node1]#yum install -y net-snmp net-snmp-libs net-snmp-utils -y
[root@node1]#vim /etc/snmp/snmpd.conf
com2sec admin default admin
group admin v2c admin
view admin included .1 80
access admin "" any noauth exact admin admin none
[root@node1]# netstat -nulp |grep 161
[root@node1]# snmpget -v2c -c admin 10.240.17.100 .1.3.6.1.4.1.2021.10.1.3.1
在监控页面上----configuration---host---create host----

然后添加模版---Templates--选择模版Template OS LINUX SNMP-V2 ---Add ----Add------点Macros---输入{$SNMP_COMMUNITY}=admin----Add
https://yq.aliyun.com/articles/293215?spm=5176.100239.blogcont38837.25.2b8b6e57comiq9 邮件发送报警设置
配置nginx--监控存活状态
[root@node2]#yum install nginx -y
[root@node2]#vim /etc/zabbix/zabbix_agentd.conf
243 Include=/etc/zabbix_agentd.conf.d/
255 UnsafeUserParameters=1
[root@node2]#/etc/init.d/zabbix_agentd restart
[root@node2]#vim /etc/zabbix_agentd.conf.d/zabbix-nginx.conf
UserParameter=nginx-alive,curl --head -s http://10.240.17.103/ |grep '200 ok' |wc -l
[root@node1]#yum install zabbix-get -y
[root@node1]#zabbix_get 10.240.17.103 -k nginx-alive
在页面----configuration---hosts---node2----items----create items----


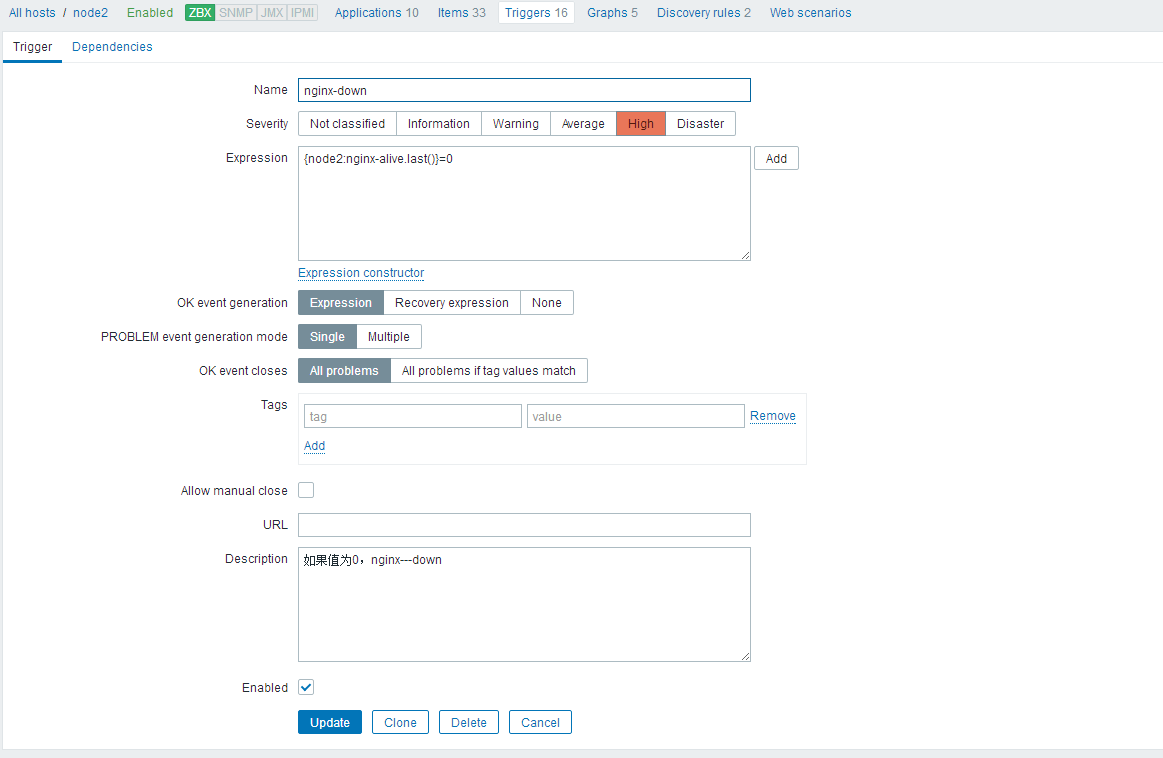
--创建触发器--configuration----node2Triggers----create triggers---
[root@node2]#vim nginx.conf
server{
           server_name 127.0.0.1;
                location /nginx_status {
                           stub_status on;
                           access_log off;
                           allow 127.0.0.1;
                           deny all;
                          }
}

/data/ops/app/nginx -s reload
[root@node2]#curl http://127.0.0.1/nginx_status
[root@node2]# vim /etc/zabbix/zabbix_nginx_plugin.sh
#!/bin/bash
NGINX_PORT=$1
nginx_active(){
         /usr/bin/curl "http://127.0.0.1:"$NGINX_PORT"/nginx_status/" 2>/dev/null|grep 'Active'|awk '{print $3}'
        }
nginx_reading(){
         /usr/bin/curl "http://127.0.0.1:"$NGINX_PORT"/nginx_status/" 2>/dev/null|grep 'Reading'|awk '{print $2}'
}
nginx_writing(){
         /usr/bin/curl "http://127.0.0.1:"$NGINX_PORT"/nginx_status/" 2>/dev/null|grep 'Writing'|awk '{print $4}'
}
nginx_waiting(){
         /usr/bin/curl "http://127.0.0.1:"$NGINX_PORT"/nginx_status/" 2>/dev/null|grep 'Waiting'|awk '{print $2}'
}
nginx_accepts(){
         /usr/bin/curl "http://127.0.0.1:"$NGINX_PORT"/nginx_status/" 2>/dev/null|awk NR==3|awk '{print $1}'
}
nginx_handled(){
         /usr/bin/curl "http://127.0.0.1:"$NGINX_PORT"/nginx_status/" 2>/dev/null|awk NR==3|awk '{print $2}'
}

nginx_requests(){
         /usr/bin/curl "http://127.0.0.1:"$NGINX_PORT"/nginx_status/" 2>/dev/null|awk NR==3|awk '{print $3}'
}

mail() {
        case $2 in
                active)
                         nginx_active;
                          ;;
                reading)
                        nginx_reading;
                          ;;
                writing)
                        nginx_writing;
                          ;;
                  waiting)
                         nginx_waiting;
                          ;;
                  accepts)
                         nginx_accepts;
                          ;;
                   handled)
                         nginx_handled;
                          ;;
                   requests)
                         nginx_requests;
                   esac
}
mail $1 $2
vim zabbix-nginx.conf
UserParameter=nginx-status[*],/etc/zabbix/zabbix_nginx_plugin.sh "$1" "$2"
[root@node1]#zabbix_get -s 10.240.17.103 -k nginx-status[80,accepts]
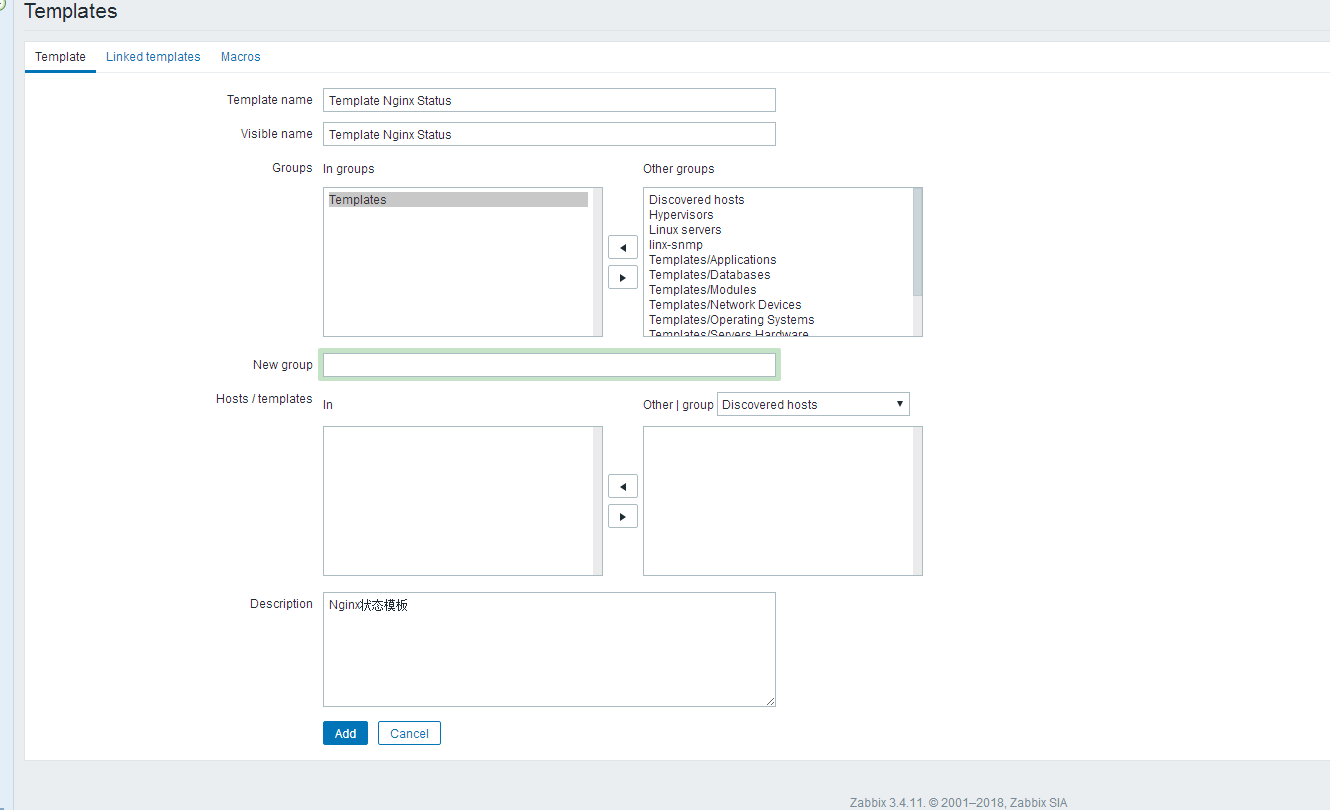
创建自定义模板----configuration--Templates---create templates----add
然后点进模板---APPlic ations---create 添加Nginx Status---点items--create item------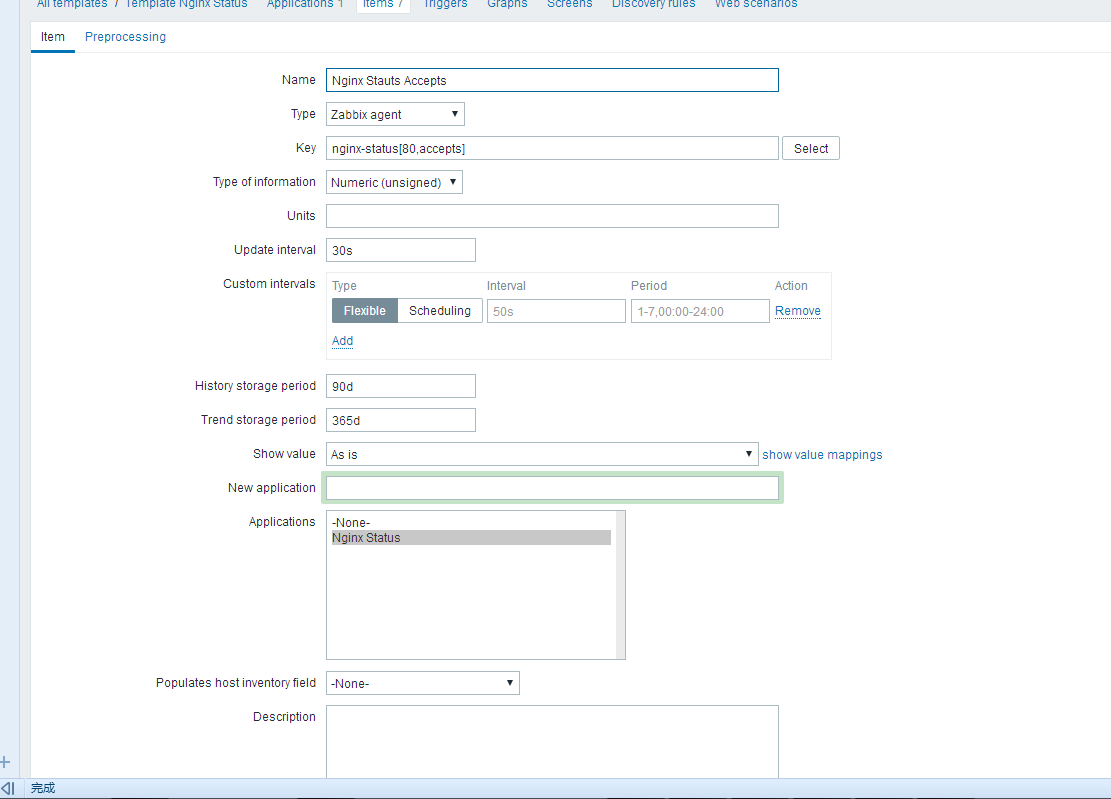
---克隆添加7次----configuration--hosts----
---add----update 至此 模板创建添加成功。
创建图形--- configuration---Template找到nginx模板-----Graphs---create graphs --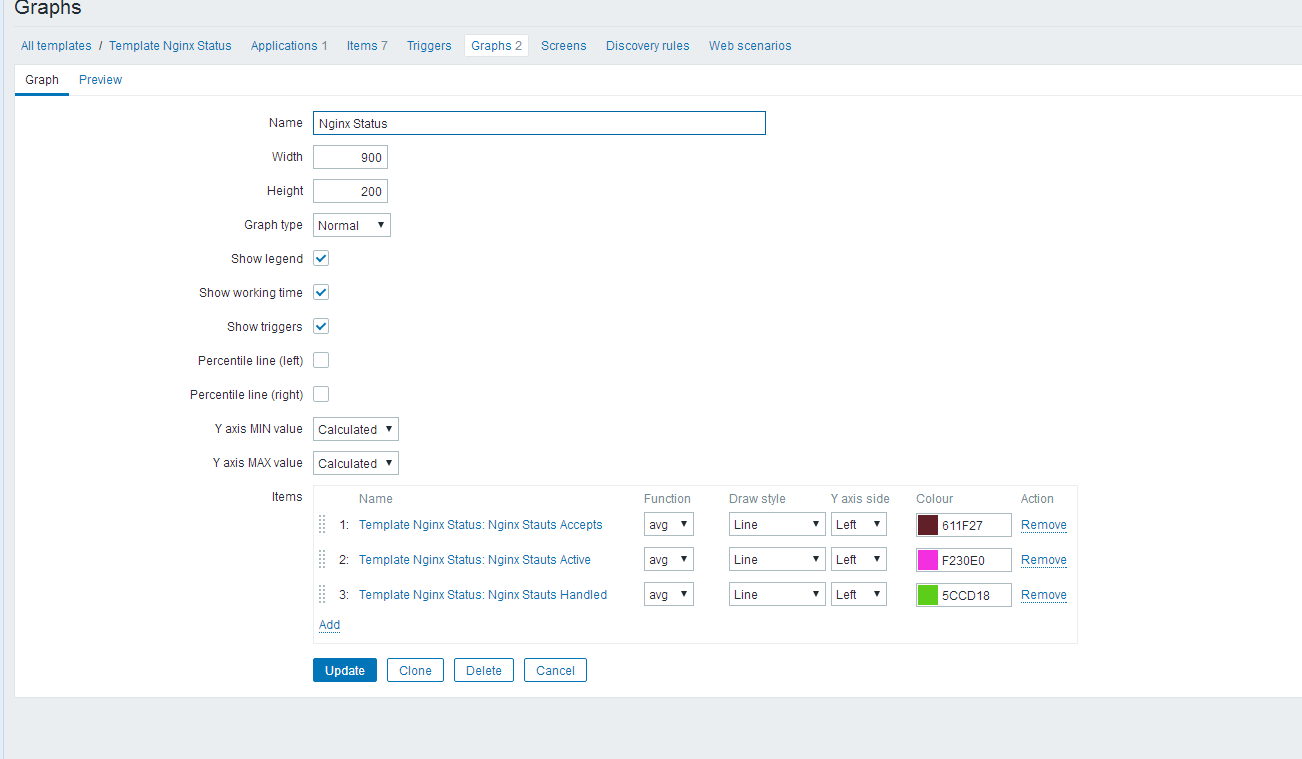
----Screens----All screens-----create screens---
Constructor--- 添加change--add 最终添加完成
#!/bin/bash
############################################################
# $Name:         zabbix_linux_plugins.sh
# $Version:      v1.0
# $Function:     zabbix plugins
# $Author:       Jason Zhao
# $organization: www.unixhot.com
# $Create Date:  2014-08-10
# $Description:  Monitor Linux Service Status
############################################################
tcp_status_fun(){
    TCP_STAT=$1
    #netstat -n | awk '/^tcp/ {++state[$NF]} END {for(key in state) print key,state[key]}' > /tmp/netstat.tmp
    ss -ant | awk 'NR>1 {++s[$1]} END {for(k in s) print k,s[k]}' > /tmp/netstat.tmp
    TCP_STAT_VALUE=$(grep "$TCP_STAT" /tmp/netstat.tmp | cut -d ' ' -f2)
    if [ -z $TCP_STAT_VALUE ];then
        TCP_STAT_VALUE=0
    fi
    echo $TCP_STAT_VALUE
}

nginx_status_fun(){
    NGINX_PORT=$1
    NGINX_COMMAND=$2
    nginx_active(){
        /usr/bin/curl "http://127.0.0.1:"$NGINX_PORT"/nginx_status/" 2>/dev/null| grep 'Active' | awk '{print $NF}'
        }
    nginx_reading(){
        /usr/bin/curl "http://127.0.0.1:"$NGINX_PORT"/nginx_status/" 2>/dev/null| grep 'Reading' | awk '{print $2}'
       }
    nginx_writing(){
        /usr/bin/curl "http://127.0.0.1:"$NGINX_PORT"/nginx_status/" 2>/dev/null| grep 'Writing' | awk '{print $4}'
       }
    nginx_waiting(){
        /usr/bin/curl "http://127.0.0.1:"$NGINX_PORT"/nginx_status/" 2>/dev/null| grep 'Waiting' | awk '{print $6}'
       }
    nginx_accepts(){
        /usr/bin/curl "http://127.0.0.1:"$NGINX_PORT"/nginx_status/" 2>/dev/null| awk NR==3 | awk '{print $1}'
       }
    nginx_handled(){
        /usr/bin/curl "http://127.0.0.1:"$NGINX_PORT"/nginx_status/" 2>/dev/null| awk NR==3 | awk '{print $2}'
       }
    nginx_requests(){
        /usr/bin/curl "http://127.0.0.1:"$NGINX_PORT"/nginx_status/" 2>/dev/null| awk NR==3 | awk '{print $3}'
       }
      case $NGINX_COMMAND in
        active)
            nginx_active;
            ;;
        reading)
            nginx_reading;
            ;;
        writing)
            nginx_writing;
            ;;
        waiting)
            nginx_waiting;
            ;;
        accepts)
            nginx_accepts;
            ;;
        handled)
            nginx_handled;
            ;;
        requests)
            nginx_requests;
        esac
}

memcached_status_fun(){
    M_PORT=$1
    M_COMMAND=$2
    echo -e "stats
quit" | nc 127.0.0.1 "$M_PORT" | grep "STAT $M_COMMAND " | awk '{print $3}'
}

redis_status_fun(){
    R_PORT=$1
    R_COMMAND=$2
    (echo -en "INFO
";sleep 1;) | nc 127.0.0.1 "$R_PORT" > /tmp/redis_"$R_PORT".tmp
    REDIS_STAT_VALUE=$(grep ""$R_COMMAND":" /tmp/redis_"$R_PORT".tmp | cut -d ':' -f2)
     echo $REDIS_STAT_VALUE
}

main(){
    case $1 in
        tcp_status)
            tcp_status_fun $2;
            ;;
        nginx_status)
            nginx_status_fun $2 $3;
            ;;
        memcached_status)
            memcached_status_fun $2 $3;
            ;;
        redis_status)
            redis_status_fun $2 $3;
            ;;
        *)
            echo $"Usage: $0 {tcp_status key|memcached_status key|redis_status key|nginx_status key}"
    esac
}

main $1 $2 $3