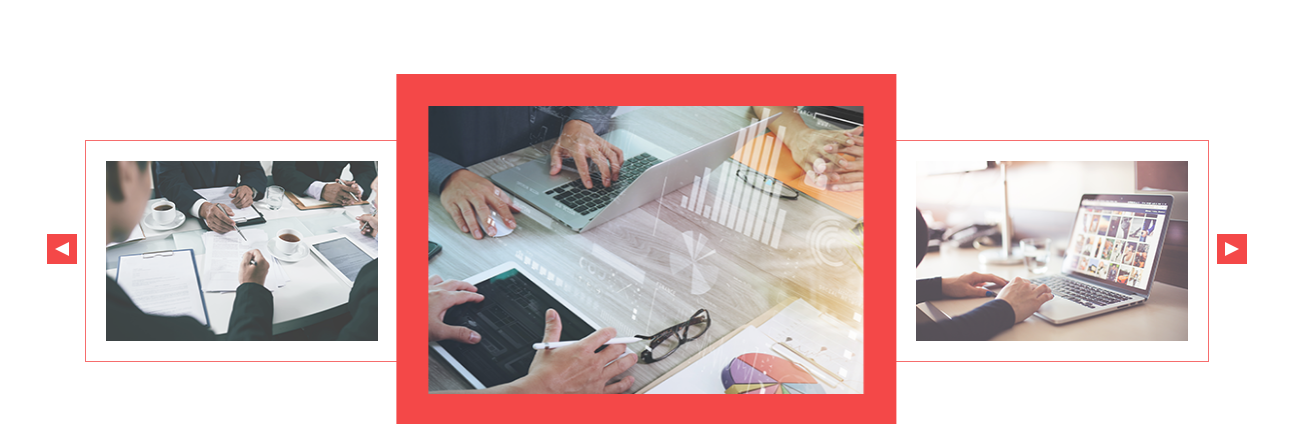
html 图片最少4张
 1 <!--轮播图 start-->
 2         <div class="showList">
 3            <div class="sl-con">
 4                <ul>
 5                    <li class="p4">
 6                        <img src="./img/sl2.png">
 7                    </li>
 8                    <li class="p3">
 9                        <img src="./img/sl1.png">
10                    </li>
11                    <li class="p2">
12                        <img src="./img/sl2.png">
13                    </li>
14                    <li class="p1">
15                        <img src="./img/sl3.png">
16                    </li>
17                </ul>
18            </div>
19             <a href="javascript:;" class="prev btn"><i></i></a>
20             <a href="javascript:;" class="next btn"><i></i></a>
21         </div>
22         <!--轮播图 end-->z
每个li要设置不同的class为p,样式就是通过p来设置的
js代码
 1 //最少要四张图
 2 //保存图片列表的className,通过className来给图片赋值相应的css
 3
 4 var cArr=[]
 5 var liList=$(".sl-con ul li") //图片列表
 6 liList.each(function () {
 7     cArr.push($(this).attr("class"))
 8 })
 9 var listLastIndex=cArr.length-1  //获取列表的最大index值
10 var index=0;
11 $(".next").click(
12     function(){
13         nextimg();
14     }
15 )
16 $(".prev").click(
17     function(){
18         previmg();
19     }
20 )
21 //上一张
22 function previmg(){
23     cArr.unshift(cArr[listLastIndex]);
24     cArr.pop();
25     //i是元素的索引,从0开始
26     //e为当前处理的元素
27     //each循环,当前处理的元素移除所有的class,然后添加数组索引i的class
28     $(".sl-con ul li").each(function(i,e){
29         $(e).removeClass().addClass(cArr[i]);
30     })
31     index--;
32     if (index<0) {
33         index=listLastIndex;
34     }
35 }
36
37 //下一张
38 function nextimg(){
39     cArr.push(cArr[0]);
40     cArr.shift();
41     $(".sl-con ul li").each(function(i,e){
42         $(e).removeClass().addClass(cArr[i]);
43     })
44     index++;
45     if (index>listLastIndex) {
46         index=0;
47     }
48 }
49
50 //点击class为p1的元素触发上一张照片的函数
51 $(document).on("click",".p1",function(){
52     previmg();
53 });
54
55 //点击class为p3的元素触发下一张照片的函数
56 $(document).on("click",".p3",function(){
57     nextimg();
58 });
59
60
61  //            进入页面自动开始定时器
62  var timer=setInterval(nextimg,4000);
63  //            鼠标移入showList时清除定时器
64  $(".showList").mouseover(function(){
65      clearInterval(timer);
66 })
67
68 //            鼠标移出showList时开始定时器
69  $(".showList").mouseleave(function(){
70     timer=setInterval(nextimg,4000);
71  })
css代码
 1 /*轮播图 start*/
 2 .showList{
 3      1200px;
 4     height: 550px;
 5     margin: 0 auto;
 6     position: relative;
 7 }
 8 .sl-con{
 9      1124px;
10     height: 350px;
11     overflow: hidden;
12     position: absolute;
13     margin-left: 38px;
14     margin-top: 100px;
15 }
16
17 .sl-con ul li{
18     position: absolute;
19     top: 66px;
20     left: 0;
21     list-style: none;
22     opacity: 0;
23     transition: all 0.3s ease-out;
24     border: 1px solid #f44848;
25 }
26 .sl-con ul li img{
27      272px;
28     height: 180px;
29     border:none;
30     float: left;
31     padding: 20px;
32 }
33
34 .p1{
35     transform:translate3d(0px,0,0) scale(1);
36     transform-origin:0 50%;
37     opacity: 0.8 !important;
38     z-index: 2;
39 }
40 /*translate3d X值为li图片的宽(312)*1.3((1.6-1)/2+1)  405*/
41 .p2{
42     transform:translate3d(405px,0,0) scale(1.6);
43     z-index: 3;
44     opacity: 1 !important;
45     background-color: #f44848;
46     border: none !important;
47 }
48 /*translate3d X值为li图片的宽(312)*2.6((1.6+1)  810*/
49 /*有1px的误差,自己调整*/
50 .p3{
51     transform:translate3d(810px,0,0) scale(1);
52     transform-origin:100% 50%;
53     opacity: 0.8 !important;
54     z-index: 2;
55 }
56 .btn{
57      30px;
58     height: 30px;
59     display: block;
60     background-color: #f44848;
61     position: absolute;
62     top: 260px;
63     cursor: pointer;
64 }
65 .prev i{
66     display: block;
67      0;
68     height: 0;
69     border-top: 7px solid transparent;
70     border-right: 14px solid #ffffff;
71     border-bottom: 7px solid transparent;
72     margin: 8px 8px;
73 }
74 .next{
75     right: 0;
76 }
77 .next i{
78     display: block;
79      0;
80     height: 0;
81     border-top: 7px solid transparent;
82     border-left: 14px solid #ffffff;
83     border-bottom: 7px solid transparent;
84     margin: 8px 8px;
85 }
86
87
88 /*轮播图  end*/
注意一定要设置 p1 p2 p3的样式