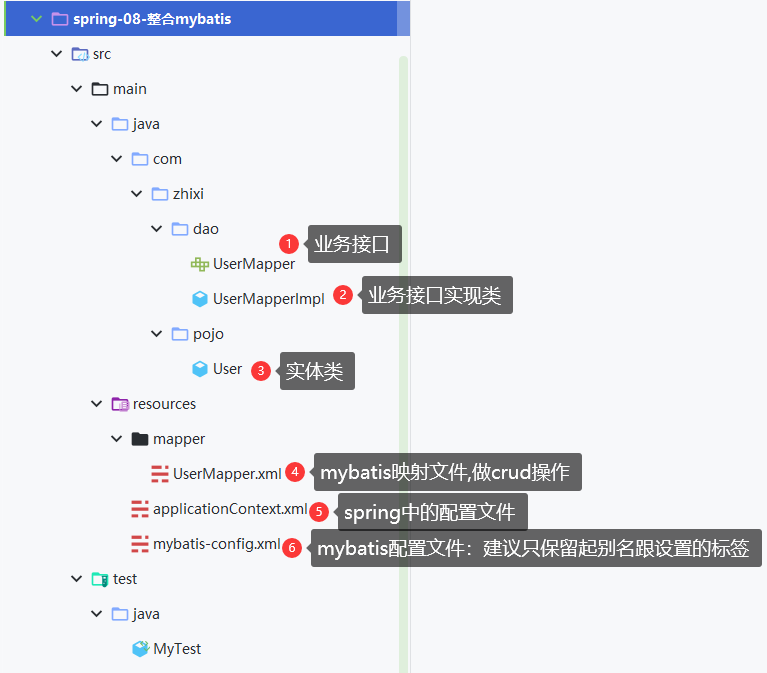
1、mybatis整合需要导入的jar包
    <dependencies>
        <dependency>
            <groupId>junit</groupId>
            <artifactId>junit</artifactId>
            <version>4.11</version>
            <scope>test</scope>
        </dependency>
        <!--mysql-jdbc依赖-->
        <dependency>
            <groupId>mysql</groupId>
            <artifactId>mysql-connector-java</artifactId>
            <version>5.1.48</version>
        </dependency>
        <!--mybatis依赖-->
        <dependency>
            <groupId>org.mybatis</groupId>
            <artifactId>mybatis</artifactId>
            <version>3.4.6</version>
        </dependency>
        <!--spring依赖-->
        <dependency>
            <groupId>org.springframework</groupId>
            <artifactId>spring-webmvc</artifactId>
            <version>5.2.12.RELEASE</version>
        </dependency>
        <!--springAOP的包-->
        <dependency>
            <groupId>org.aspectj</groupId>
            <artifactId>aspectjweaver</artifactId>
            <version>1.9.4</version>
        </dependency>
        <!--ssm整合jdbc依赖-->
        <dependency>
            <groupId>org.springframework</groupId>
            <artifactId>spring-jdbc</artifactId>
            <version>5.2.12.RELEASE</version>
        </dependency>
        <!--mybatis整合依赖-->
        <dependency>
            <groupId>org.mybatis</groupId>
            <artifactId>mybatis-spring</artifactId>
            <version>2.0.5</version>
        </dependency>
    </dependencies>
2、自己搭建mybatis环境,能够跑起来
参考我的mybatis博客进行搭建环境!
3、整合Mybatis的方式一:
3.1、什么是 MyBatis-Spring?
MyBatis-Spring 会帮助你将 MyBatis 代码无缝地整合到 Spring 中。

它将允许 MyBatis 参与到 Spring 的事务管理之中,创建映射器 mapper 和 SqlSession 并注入到 bean 中,以及将 Mybatis 的异常转换为 Spring 的 DataAccessException。

最终,可以做到应用代码不依赖于 MyBatis,Spring 或 MyBatis-Spring。
3.2、创建applicationContext.xml 也就是Spring的配置文件,名字随意
<?xml version="1.0" encoding="UTF-8"?>
<beans xmlns="http://www.springframework.org/schema/beans"
       xmlns:xsi="http://www.w3.org/2001/XMLSchema-instance"
       xmlns:context="http://www.springframework.org/schema/context"
       xmlns:aop="http://www.springframework.org/schema/aop"

       xsi:schemaLocation="http://www.springframework.org/schema/beans
        https://www.springframework.org/schema/beans/spring-beans.xsd
        http://www.springframework.org/schema/context
        https://www.springframework.org/schema/context/spring-context.xsd

        http://www.springframework.org/schema/aop
        https://www.springframework.org/schema/aop/spring-aop.xsd

">

</beans>
3.3、剥离mybatis连接mysql的信息,让spring管理:
<!-- DataSource:使用Spring的数据源替换Mybatis的配置c3pθ dbcp druid 我们这里使用Spring提供的JDBC:org.springframework.jdbc.datasource --> <bean id="datasource" class="org.springframework.jdbc.datasource.DriverManagerDataSource"> <property name="driverClassName" value="com.mysql.jdbc.Driver"/> <property name="url" value="jdbc:mysql://localhost:3306/mybatis?useSSL=true&useUnicode=true&characterEncoding=UTF-8"/> <property name="username" value="root"/> <property name="password" value="zhixi158"/> </bean>
3.4、剥离mybatis创建SqlSessionFactory,就是写在工具类中的那三行工厂代码:
    <!--sqlSessionFactory的创建-->
    <bean id="sqlSessionFactory" class="org.mybatis.spring.SqlSessionFactoryBean">
        <property name="dataSource" ref="datasource" />
        <!--绑定mybatis的设置,说明和spring连通了-->
        <property name="confLocation" value="mybatis-config.xml"/>
        <!--mapper映射器-->
        <property name="mapperLocations" value="mapper/*.xml"/>
    </bean>
- 黄色背景的这行代码就相当于剥离了mybatis配置文件中的:
<mappers>
    <mapper resource="mapper/UserMapper.xml"></mapper>
</mappers>
3.5、创建SQLSession对象
    <!--SqlSessionTemplate:就是我们在测试类使用的SQLSession对象-->
    <bean id="selSession" class="org.mybatis.spring.SqlSessionTemplate">
        <!--因为在SqlSessionTemplate中没有set方法,所以只能通过构造器注入-->
        <constructor-arg index="0" ref="sqlSessionFactory"/>
    </bean>
3.6、创建CRUD的类,其实就是在mybatis测试类中写的那些
import com.zhixi.pojo.User;
import org.mybatis.spring.SqlSessionTemplate;

import java.util.List;

public class UserMapperImpl implements UserMapper {

    // 在原来我们所有的操作都是SQLSession来,现在使用SQLSessionTemplate
    private SqlSessionTemplate sqlSession;

    public void setSqlSession(SqlSessionTemplate sqlSession) {
        this.sqlSession = sqlSession;
    }

    public List<User> getUserAll() {
        UserMapper mapper = sqlSession.getMapper(UserMapper.class);
        return mapper.getUserAll();
    }
}
xml文件中对应的创建UserMapperImpl 这个bean:
    <bean id="userMapperImpl" class="com.zhixi.dao.UserMapperImpl">
        <!--给类中的属性赋值-->
        <property name="sqlSession" ref="selSession"/>
    </bean>
3.7、测试类
@Test
    public void test1() {
        ApplicationContext context = new ClassPathXmlApplicationContext("applicationContext.xml");
        UserMapper userMapper = (UserMapper) context.getBean("userMapperImpl");
        List<User> userAll = userMapper.getUserAll();
        for (User user : userAll) {
            System.out.println(user);
        }
    }
结果:测试成功
User(id=1, name=zhangsan, pwd=123)
User(id=2, name=lisi, pwd=1234)
User(id=3, name=wangwu, pwd=12345)
User(id=4, name=zhangzhixi, pwd=zhixi158)
3.8、完整的代码:

1、pojo实体类:
import lombok.Data;

/**
 * @author zhangzhixi
 */
@Data
public class User {
    private int id;
    private String name;
    private String pwd;
}
2、业务接口
public interface UserMapper {
    List<User> getUserAll();
}
3、Spring配置文件

<?xml version="1.0" encoding="UTF-8"?> <beans xmlns="http://www.springframework.org/schema/beans" xmlns:xsi="http://www.w3.org/2001/XMLSchema-instance" xmlns:context="http://www.springframework.org/schema/context" xmlns:aop="http://www.springframework.org/schema/aop" xsi:schemaLocation="http://www.springframework.org/schema/beans https://www.springframework.org/schema/beans/spring-beans.xsd http://www.springframework.org/schema/context https://www.springframework.org/schema/context/spring-context.xsd http://www.springframework.org/schema/aop https://www.springframework.org/schema/aop/spring-aop.xsd "> <!-- DataSource:使用Spring的数据源替换Mybatis的配置c3pθ dbcp druid 我们这里使用Spring提供的JDBC:org.springframework.jdbc.datasource --> <bean id="datasource" class="org.springframework.jdbc.datasource.DriverManagerDataSource"> <property name="driverClassName" value="com.mysql.jdbc.Driver"/> <property name="url" value="jdbc:mysql://localhost:3306/mybatis?useSSL=true&useUnicode=true&characterEncoding=UTF-8"/> <property name="username" value="root"/> <property name="password" value="zhixi158"/> </bean> <!--sqlSessionFactory的创建--> <bean id="sqlSessionFactory" class="org.mybatis.spring.SqlSessionFactoryBean"> <property name="dataSource" ref="datasource" /> <!--绑定mybatis的设置,说明和spring连通了--> <property name="configLocation" value="mybatis-config.xml"/> <!--mapper映射器--> <property name="mapperLocations" value="mapper/UserMapper.xml"/> </bean> <!--SqlSessionTemplate:就是我们在测试类使用的SQLSession对象--> <bean id="selSession" class="org.mybatis.spring.SqlSessionTemplate"> <!--因为在SqlSessionTemplate中没有set方法,所以只能通过构造器注入--> <constructor-arg index="0" ref="sqlSessionFactory"/> </bean> <bean id="userMapperImpl" class="com.zhixi.dao.UserMapperImpl"> <!--给类中的属性赋值--> <property name="sqlSession" ref="selSession"/> </bean> </beans>
4、mybatis配置文件
<?xml version="1.0" encoding="UTF-8" ?>
<!DOCTYPE configuration
        PUBLIC "-//mybatis.org//DTD Config 3.0//EN"
        "http://mybatis.org/dtd/mybatis-3-config.dtd">

<configuration>
    <typeAliases>
        <package name="com.zhixi.pojo"/>
    </typeAliases>
</configuration>
5、mybatis映射文件,执行crud
<?xml version="1.0" encoding="UTF-8" ?>
<!DOCTYPE mapper
        PUBLIC "-//mybatis.org//DTD Config 3.0//EN"
        "http://mybatis.org/dtd/mybatis-3-mapper.dtd">
<mapper namespace="com.zhixi.dao.UserMapper">
    <select id="getUserAll" resultType="user">
        select * from user;
    </select>
</mapper>
6、业务接口的实现类
import com.zhixi.pojo.User;
import org.mybatis.spring.SqlSessionTemplate;

import java.util.List;

public class UserMapperImpl implements UserMapper {

    // 在原来我们所有的操作都是SQLSession来,现在使用SQLSessionTemplate
    private SqlSessionTemplate sqlSession;

    public void setSqlSession(SqlSessionTemplate sqlSession) {
        this.sqlSession = sqlSession;
    }

    public List<User> getUserAll() {
        UserMapper mapper = sqlSession.getMapper(UserMapper.class);
        return mapper.getUserAll();
    }
}
7、测试文件
import com.zhixi.dao.UserMapper;
import com.zhixi.pojo.User;
import org.junit.Test;
import org.springframework.context.ApplicationContext;
import org.springframework.context.support.ClassPathXmlApplicationContext;
import java.util.List;
public class MyTest {
    @Test
    public void test1() {
        ApplicationContext context = new ClassPathXmlApplicationContext("applicationContext.xml");
        UserMapper userMapper = (UserMapper) context.getBean("userMapperImpl");
        List<User> userAll = userMapper.getUserAll();
        for (User user : userAll) {
            System.out.println(user);
        }
    }
}
=========================================================
3.9、合并spring的文件:
因为我们写在applicationContext中的配置,几乎是不用动的,所以我们可以创建一个新的spring.xml文件,将我们刚刚的applicationContext导入进来:

<?xml version="1.0" encoding="UTF-8"?>
<beans xmlns="http://www.springframework.org/schema/beans"
       xmlns:xsi="http://www.w3.org/2001/XMLSchema-instance"
       xmlns:context="http://www.springframework.org/schema/context"
       xmlns:aop="http://www.springframework.org/schema/aop"

       xsi:schemaLocation="http://www.springframework.org/schema/beans
        https://www.springframework.org/schema/beans/spring-beans.xsd
        http://www.springframework.org/schema/context
        https://www.springframework.org/schema/context/spring-context.xsd

        http://www.springframework.org/schema/aop
        https://www.springframework.org/schema/aop/spring-aop.xsd
">

    <import resource="applicationContext.xml"/>


    <bean id="userMapperImpl" class="com.zhixi.dao.UserMapperImpl">
        <!--给类中的属性赋值-->
        <property name="sqlSession" ref="selSession"/>
    </bean>
</beans>
然后直接在测试文件中:new ClassPathXmlApplicationContext("spring.xml");即可~
4、整合Mybatis的方式二:
SqlSessionDaoSupport 是一个抽象的支持类,用来为你提供 SqlSession。调用 getSqlSession() 方法你会得到一个 SqlSessionTemplate,之后可以用于执行 SQL 方法:
就是说官方提供了一个抽象类SQLSessionSupport,我们用Mapper的实现类去继承他,然后调用getSqlSession方法可以得到SqlSessionTemplate(也就相当于SqSession):
1、UserMapperImpl2:
import com.zhixi.pojo.User;
import org.mybatis.spring.support.SqlSessionDaoSupport;

import java.util.List;

public class UserMapperImpl2 extends SqlSessionDaoSupport implements UserMapper {

    public List<User> getUserAll() {
        // 简化成一行
        return getSqlSession().getMapper(UserMapper.class).getUserAll();
    }
}
2、配置bean
    <bean id="userMapperImpl2" class="com.zhixi.dao.UserMapperImpl2">
        <property name="sqlSessionFactory" ref="sqlSessionFactory"/>
    </bean>
在配置bean的时候,必须要给SqlSessionDaoSupport中的 setSqlSessionFactory 或者 setSqlSessionTemplate赋值、
3、简化spring配置

至此,这是第二种方法,相对于第一种方式,是简化了一些、但是还是推荐使用第一种!
