Ansible:
Configuration、Command and Control
是什么 ? SSH-based configuration management, deployment, and task execution system
运维工具的分类:
agent:基于专用的agent程序完成管理功能,puppet, func, zabbix, ...需要有代理程序的工具
降低了系统级账号和密码泄露的风险
agentless:基于ssh或telnet服务完成管理,ansible, fabric, ...无需代理程序的工具
架构:
Ansible Core
Modules:
Core Modules
Customed Modules自定义模块
Host Iventory 主机清单,定义要管理的主机
Files
CMDB
PlayBooks剧本,定义哪个主机扮演什么角色
Hosts
roles时我们定义好的调用模块完成的任务功能
Connection Plugins:连接插件
特性:
模块化:调用特定的模块,完成特定的任务;
基于Python语言研发,由Paramiko, PyYAML和Jinja2三个核心库实现;
部署简单:agentless;
支持自定义模块,使用任意编程语言;
强大的playbook机制;
幂等性;
Eg: 主机67
Yum install ansible -y
配置主机清单
Vim /etc/ansible/hosts
[websrvs]组名
10.1.0.68 ansible_ssh_user=root ansible_ssh_pass=123.com
10.1.0.69 ansible_ssh_user=root ansible_ssh_pass=123.com
[dbsrvs]
10.1.0.8 ansible_ssh_user=root ansible_ssh_pass=123.com
10.1.0.68 ansible_ssh_user=root ansible_ssh_pass=123.com
ssh免密钥登录
1、在ansible server上生成公钥/私钥
ssh-keygen -t rsa -P ''
- 写入信任文件
将在ansible server生成的公钥/私钥分发到slave服务器
scp /root/.ssh/id_rsa.pub 192.168.100.6:/root/.ssh/authorized_keys
..................................................
在slave服务器上执行如下指令:(可选项,可以不做)
cat /root/.ssh/id_rsa.pub >> /root/.ssh/authorized_keys
Chmod 600 /root/.ssh/authorized_keys
当ssh免秘钥登录设置完成后,就可以在主机清单中的各主机ip或域名后面无需跟用
户名和密码了;
Ansible-doc -l 可以获取到可以使用的管理模块
Ansible websrvs -m ping 来探测连接的主机是否ok
Ansible all -m ping 所有主机是否都在线
安装及程序环境:
程序:
ansible
ansible-playbook
ansible-doc
配置文件:
/etc/ansible/ansible.cfg
主机清单:
/etc/ansible/hosts
插件目录:
/usr/share/ansible_plugins/
基本使用入门:
ansible命令:
Usage: ansible <host-pattern> [options]
此处的hsot-pattern一定是在/etc/ansible/hosts下定义的主机
常用选项:
-m MOD_NAME -a MOD_ARGS
-m 指明模块名称
-a 指明模块参数
调用哪个模块,传递什么参数,来完成什么样的任务。
配置Host Inventory:
/etc/ansible/hosts
[group_id]
HOST_PATTERN1
HOST_PATTERN2
模块:
获取模块列表:ansible-doc -l
获取指定模块的使用帮助:ansible-doc -s MOD_NAME
常用模块:
ping:探测目标主机是否存活;
command:在远程主机执行命令;
Ansible all -m command -a "ifconfig"
Eg: ansible all -m command -a "useradd centos"
Ansible all -m command -a "echo '123.com' | passwd --stdin centos"该命令执行有问题
shell:在远程主机上调用shell解释器运行命令,支持shell的各种功能,例如管道等 ;
Ansibele all -m shell -a "echo '123.com' | passwd --stdin centos"
注意:command和shell模块的核心参数直接为命令本身;而其它模块的参数通常为"key=value"格式;
copy: C o p i e s f i l e s t o r e m o t e l o c a t i o n s .
复制文件到远程主机
用法:
(1) 复制文件
-a "src=源 dest=目标 "
Ansible all -m copy -a "src=/etc/fstab dest=/tmp/fstab.ansible mode=640(指明授权)"
(2) 给定内容生成文件
-a "content= dest= "
Ansible all -m copy -a "content='hello word' dest=/tmp/test.ansible mode=640"
其它参数:mode(权限), owner(属主), group(属组), ...
file:Sets attributes of files 设置文件属性
Ansible all -m file -a "path=/tmp/fstab.ansible owner(修改属主)=centos"
state定义文件目标状态
用法:
(1) 创建目录:
-a "path= state=directory"
Ansible all -m file -a "path=/tmp/dir.ansible state=directory"
(2) 创建链接文件:
-a "path= src= state=link"
Ansible all -m file -a "path=/tmp/test.ansible.link src=/tmp/test.ansable state=link"
(3) 删除文件:
-a "path= state=absent"
Ansible all -m file -a "path=/tmp/fstab.ansible state=absent(缺席)"
fetch: fetches a file from remote nodes
从远程主机拉取文件到本地
Eg:ansible 192.168.100.5 -m fetch -a "src=/testdir/1.txt dest=/testdir"
cron:Manage cron.d and crontab entries.
管理crontab中的周期任务的
-a " "
minute=
hour=
day=
month=
weekday=
job=真正要执行的命令
name=
user=为哪个用户来创建crontab
Eg:ansible all -m cron -a "minute='*/5' job='/usr/sbin/ntpdate 10.1.0.1 & > /dev/null' name='sync time' " 每隔5分钟执行一次时间同步,无论成功失败,返回的结果都去/dev/null。这次任务的名称叫sync time;
去客户机执行crontab -l查看计划任务
若删除此计划任务:
Ansible all -m cron -a "name='sync time' state=absent"
state={present(创建)|absent}
hostname:Manage hostname设置主机名
name=
yum: Manages packages with the i(yum) package manager
-a ""
(1) name= state={present|latest}
state=install(prestent、 latest) remove(absent)
(2) name= state=absent
Eg:ansible all -m yum -a "name=httpd state=present"
Et: ansible all -m yum -a "name=httpd state=absent"
service:M a n a g e s e r v i c e s .控制守护进程的启动停止
-a ""
name=包名
state=
started
stopped
restarted
enabled=表示是否开机自动启动
runlevel=在哪些级别下开机自启动
Eg:ansible all -m service -a "name=httpd state=started enabled=true"
group: A d d o r r e m o v e g r o u p s用来添加或删除组
-a ""
name=
state=
system=
gid=
user:M a n a g e u s e r a c c o u n t s
-a ""
name=
group=基本组
groups=附加组
comment=注释信息
uid=
system=
shell=默认shell
expires=过期时间
Home=指定家目录
setup:G a t h e r s f a c t s a b o u t r e m o t e h o s t s
用于收集远程主机的facts
Facts:用于实现在每一个主机上收集当前主机的各种属性信息的集合。
Eg:ansible 10.1.0.68 -m setup
YAML:
Yum info PyYAML
YAML is a data serialization format designed for human readability and interaction with scripting languages.YAML是一种数据序列化格式为人类可读性和交互设计与脚本语言
数据结构:
Key : value键值对
列表:
- item1
- item2
- item3
字典:{name:jerry, age:21}
PlayBook:剧本
核心元素:
Tasks:任务,由模块定义的操作的列表;
Variables:变量
Templates:模板,即使用了模板语法的文本文件;
Handlers:由特定条件触发的Tasks;
Roles:角色;
playbook的基础组件:
Hosts:运行指定任务的目标主机;
remote_user:在远程主机以哪个用户身份执行;
sudo_user:非管理员需要拥有sudo权限;
tasks:任务列表
模块,模块参数:
格式:
(1) action: module arguments
(2) module: arguments
示例1:
Vim group.yaml

运行playbook,使用ansible-playbook命令
(1) 检测语法
ansible-playbook /path/to/playbook.yaml 运行playbook.yaml
-C或--syntax-check 语法检查
Eg:ansible-playbook --check group.yaml
(2) 测试运行:
ansible-playbook -C /path/to/playbook.yaml
--list-hosts某些任务只影响哪些主机
--list-tasks 列出要执行的任务
--list-tags tags标签
(3) 运行
ansible-playbook /path/to/playbook.yaml
-t TAGS, --tags=TAGS只运行这里tags所标记的任务
--skip-tags=SKIP_TAGS跳过指定的标签所标记的任务
--start-at-task=START_AT从某个任务开始向后运行
Eg:ansible-playbook --check --list-hosts group.yaml
Ansible-playbook --check --list-hosts --list-tasks group.yaml 还能显示所执行的任务
Ansible websrvs -m yum -a "name=httpd state=absent"
在服务端安装httpd,只是为了生成httpd.conf文件作为模板文件
修改监听的端口为8080
条件:
远程主机安装程序包
提供配置文件
启动服务
Vim web.yaml
- hosts: websrvs
remote_user: root
tasks:
- name: install httpd package
yum: name=httpd state=latest
- name: install conf file
copy: src=/root/httpd.conf dest=/etc/httpd/conf/httpd.conf
- name: start httpd service
service: name=httpd state=started

Ansible-playbook --syntax-check web.yaml
Ansible-playbook --check web.yaml
Ansible-playbook web.yaml
在客户端检测8080端口是否启动
再次把端口改为80.启动playbook,80端口不会被启动
handlers:由特定条件触发的Tasks;
调用及定义方式:
tasks:
- name: TASK_NAME
module: arguments
notify: HANDLER_NAME 表示通知
handlers:
- name: HANDLER_NAME
module: arguments
示例:
- hosts: websrvs
remote_user: root
tasks:
- name: install httpd package
yum: name=httpd state=latest
- name: install conf file
copy: src=/root/httpd.conf dest=/etc/httpd/conf/httpd.conf
notify: restart httpd service 在handlers中定义的名称跟notify中定义的名称一致,表示通知触发参数,所以其配置文件不改,restart就不会被触发。
- name: start httpd service
service: name=httpd state=started
handlers:处理器
- name: restart httpd service
service: name=httpd state=restarted
注意:notify和handlers的name要保持一致;其copy的源文件不发生改变,handlers也不会被触发生效;

再次启动服务,80端口启动
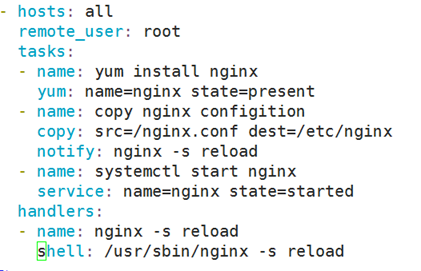
注意:若是nginx的配置文件发生修改,则不需要重启,一重启,就会发生问题,一重启意味着有些服务就会出问题。
将state定义为reload
。。。。。。。。。。。。。。。。。。。。。。。。。。
notify: reload nginx service
。。。。。。。。。。。。。。。。。。。。。。。。
handlers:
- name: reload nginx service
Shell: nginx -s reload(此处最好写全路径,可以用which命令查)
 或
或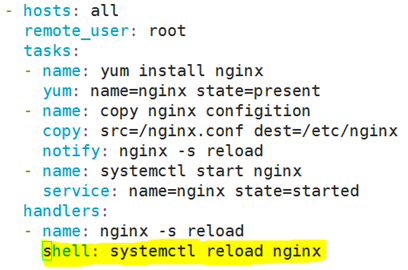
tags:给指定的任务定义一个调用标识;只调用打了标签的任务
多个任务可以使用同一个tag,也可以在一次任务中指定多个tag。
- name: NAME
module: arguments
tags: TAG_ID
Eg:
Vim web.yaml
- hosts: websrvs
remote_user: root
tasks:
- name: install httpd package
yum: name=httpd state=latest
- name: install conf file
copy: src=/root/httpd.conf dest=/etc/httpd/conf/httpd.conf
tags:instconf
- name: start httpd service
service: name=httpd state=started

Ansible-playbook --check -t instconf web.yaml
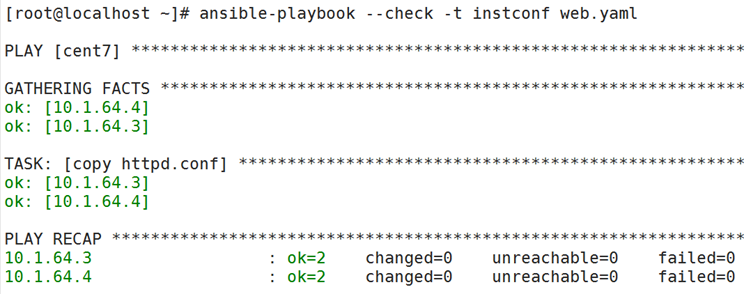
Ansible-playbook --check -t instconf --list-tags web.yaml 显示你的标签
Ansible-playbook -t instconf web.yaml
Variables:变量
类型:
内建:可直接调用
(1) facts
自定义:
(1) 命令行传递;
-e VAR=VALUE
Eg:
vim pkg.yaml- hosts:websrvs
remote_user:root
tasks:
- name:install a package
yum:name={{ pkgname }} state=present

Ansible-playbook --syntax-check pkg.yaml
Ansible-playbook --check -e pkgname=ftp pkg.yaml
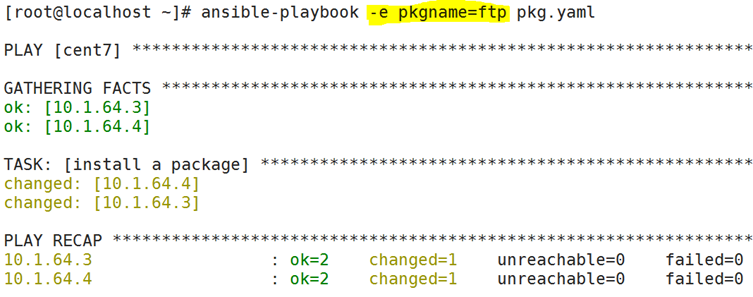
Ansible-playbook --check -e pkgname=vsftpd pkg.yaml
(2) 在hosts Inventory中为每个主机定义专用变量值;
(a) 向不同的主机传递不同的变量 ;
IP/HOSTNAME variable_name=value
Vim hosts
[websrvs]
10.1.0.68 pkgname=nginx
10.1.0.69 pkgname=httpd
传递给主机的单独的变量

Ansible-playbook --check pkg.yaml

(b) 向组内的所有主机传递相同的变量 ;
[groupname:vars]
variable_name=value
Vim hosts
[websrvs]
10.1.0.68
10.1.0.69
[websrvs:vars]
Pkgname=memcached
在websrvs组内有一组变量,其中有一个变量是Pkgname=memcached
意味着websrvs组中的成员都可以使用pkgname这个便量名
(3) 在playbook中定义
vars:
- var_name: value
- var_name: value
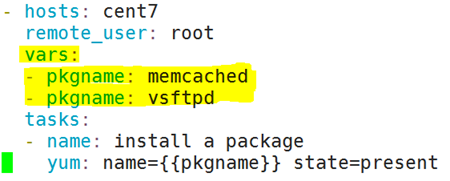
vim pkg.yaml
- hosts:websrvs
remote_user:root
vars:
- pkgname:memcached
- pkgname:vsftpd
tasks:
- name:install a package
yum:name={{ pkgname }} state=present
Ansible-playbook --check pkg.yaml
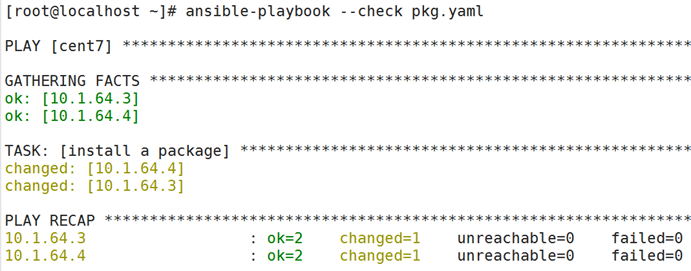
Ansible-playbook --check pkgname=vsftpd pkg.yaml
(4) Inventory还可以使用参数:
用于定义ansible远程连接目标主机时使用的属性,而非传递给playbook的变量;较危险不常用。
使用该功能时要安装:yum install sshpass -y
ansible_ssh_host
ansible_ssh_port
ansible_ssh_user连接此主机使用的用户名
ansible_ssh_pass连接此主机使用的密码
ansible_sudo_pass
...
[websrvs]
10.1.0.68 ansible_ssh_user=root ansible_ssh_pass=123.com
10.1.0.69

(5) 在角色调用时传递
roles:
- { role: ROLE_NAME, var: value, ...}
变量调用:
{{ var_name }}
Templates:模板
文本文件,内部嵌套有模板语言脚本(使用模板语言编写)
Yum info python-jinja2
Jinja2 is a template engine written in pure Python. It provides a Django inspired non-XML syntax but supports inline expressions and an optional sandboxed environment.
语法:
字面量:
字符串:使用单引号或双引号;
数字:整数、浮点数;
列表:[item1, item2, ...]
元组:(item1, item2, ...)
字典:{key1:value1, key2:value2, ...}
布尔型:true/false
算术运算:
+, -, *, /, //, %, **
比较操作:
==, !=, >, <, >=, <=
逻辑运算:and, or, not
执行模板文件中的脚本,并生成结果数据流,需要使用template模块;
Ansible-doc -s template
template:
-a ""
src=
dest=
mode=
onwer=
group=
注意:此模板不能在命令行使用,而只能用于playbook;
示例:假如每个主机所使用的nginx所使用的配置文件对应的值是其虚拟的cpu
个数
Ansible websrvs -m steup | grep vcpus
该play-book能够基于模板复制配置文件
在服务端安装nginx,主要使用其配置文件
Vim /etc/nginx/nginx.conf
Worker_press {{ ansible_processor_vcpus}};
Ansible websrvs -m copy -a "src=/root/nginx.conf dest=/tmp/nginx.conf"
此时查看客户机中的nginx.conf,copy命令将nginx.conf中的{{ ansible_processor_vcpus}}
当成了普通字符串。
所以在基于模板方式定义时,要将其解析为一个结果放在配置文件中。
Vim test.yaml
- hosts: websrvs
Remote_user: root
Tasks:
- name: generate conf file
Template: src=/root/nginx.conf.j2 dest=/tmp/nginx.conf
Ansible-playbook --check test.yaml
Ansible-playbook test.yaml
在客户机上验证:less /tmp/nginx.conf
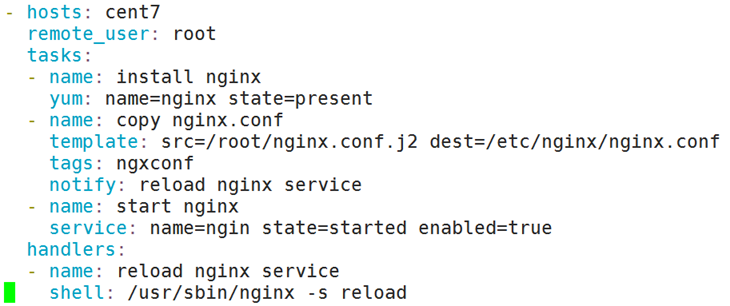
Vim nginx.yaml
- hosts: ngxsrvs
remote_user: root
tasks:
- name: download nginx package
Shell: "wget -o /tmp/ http://nginx.org/"
- name: install nginx package
yum: name=nginx state=latest
- name: install conf file
template: src=/root/nginx.conf.j2 dest=/etc/nginx/nginx.conf
tags: ngxconf
notify: reload nginx service
- name: start nginx service
service: name=nginx state=started enabled=true
handlers:
- name: reload nginx service
shell: /usr/sbin/nginx -s reload或service: name=nginx state=restarted
条件测试:
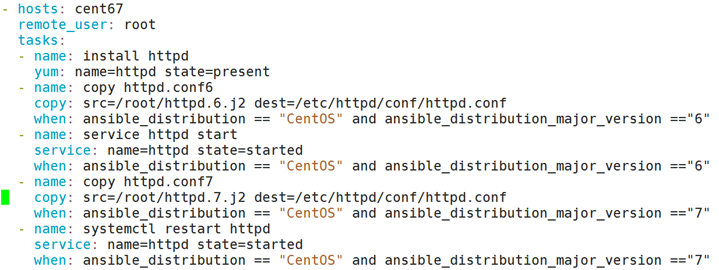
when语句:在tasks中使用,Jinja2的语法格式;
- hosts: all
remote_user: root
tasks:
- name: install nginx package
yum: name=nginx state=latest
- name: start nginx service on CentOS6
shell: service nginx start
when: ansible_distribution == "CentOS" and ansible_distribution_major_version == "6"
- name: start nginx service
shell: systemctl start nginx.service
when: ansible_distribution == "CentOS" and ansible_distribution_major_version == "7"

实验环境:
给两台客户机分别安装CentOS6和CentOS7

循环:迭代,需要重复执行的任务;
对迭代项的引用,固定变量名为"item",使用with_item属性给定要迭代的元素;
元素:列表
字符串
字典
基于字符串列表给出元素示例:
Vim websrvs.yaml
- hosts: websrvs
remote_user: root
tasks:
- name: install packages
yum: name={{ item(只能使用item) }} state=latest
with_items:
- httpd
- php
- php-mysql
- php-mbstring
- php-gd

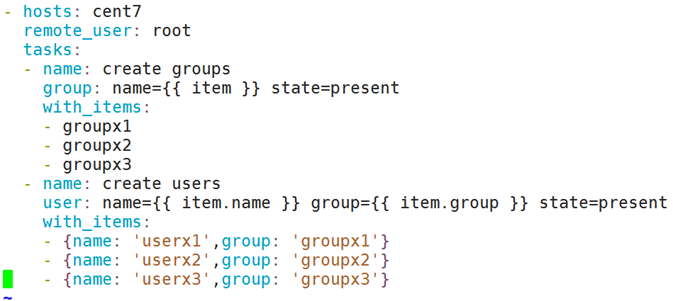
基于字典列表给元素示例:创建3个用户,三个用户分别属于不同的组
- hosts: all
remote_user: root
tasks:
- name: create groups
group: name={{ item }} state=present
with_items:
- groupx1
- groupx2
- groupx3
- name: create users
user: name={{ item.name }} group={{ item.group }} state=present
with_items:
- {name: 'userx1', group: 'groupx1'}
- {name: 'userx2', group: 'groupx2'}
- {name: 'userx3', group: 'groupx3'}
角色:roles
以特定的层级目录结构进行组织的tasks、variables、handlers、templates、files等;
role_name/
files/:存储由copy或script等模块调用的文件;
tasks/:此目录中至少应该有一个名为main.yml的文件,用于定义各task;其它的文件
需要由main.yml进行"包含"调用;
handlers/:此目录中至少应该有一个名为main.yml的文件,用于定义各handler;其它
的文件需要由main.yml进行"包含"调用;
vars/:此目录中至少应该有一个名为main.yml的文件,用于定义各variable;其它的文
件需要由main.yml进行"包含"调用;
templates/:存储由template模块调用的模板文本;
meta/:此目录中至少应该有一个名为main.yml的文件,定义当前角色的特殊设定及其
依赖关系;其它的文件需要由main.yml进行"包含"调用;
default/:此目录中至少应该有一个名为main.yml的文件,用于设定默认变量;
Eg:
Cd /etc/ansible/roles/ Mkdir ./{nginx,memcached,httpd,mysql}/{files,templates,vars,handlers,meta,default,tasks} -pv
Vim nginx/tesks/main.yml (将下载的nginx包放在该目录)
- name: copy nginx package to remote host
Copy:src=nginx-1.10.0-1.el7.ngx.x86_64.rpm
dest=/tmp/nginx-1.10.0-1.el7.ngx.x86_64.rpm
- name: install nginx package
Yum: name=/tmp/nginx-1.10.0-1.el7.ngx.x86_64.rpm state=present
- name: install conf file nginx.conf
Template: src=nginx.conf.j2 dest=/etc/nginx/nginx.conf(不用写全路径,只要将文件放入template目录中,系统自己会去找,所以只需要去写文件名)
Tags:ngxconf
Notify: reload nginx service
- name: install conf file default.conf
Template: src=default.conf.j2 dest=/etc/nginx/conf.d/default.conf
Tags: ngxconf
Notify: reload nginx service
- name: art nginx service
Service: name=nginx enabled=true state=started

##################################################################
Vim nginx/handlers/main.yml
- name: reload nginx service
Service: name=nginx state=restarted

########################################################
Vim nginx/templates/nginx.conf.j2
......................................................................
Worker_proesses {{ ansible_processor_vcpus }};
.......................................................................

##########################################################################
Cp /etc/nginx/conf.d/default.conf templates/default.conf.j2
Vim default.conf.f2
......................................................
Server {
Listen {{ ngxport }};
....................................................
}

############################################################################
Vim vars/main.yml 定义变量
ngxport: "8090"

调用方式:
Vim nginx.yml
- hosts: ngxsrvs
Remote_user: root
Roles:
- nginx(该名称要跟roles目录下的名称一致)

或当我们想让服务监听到其他端口,而又不需要让所有服务都跑一遍,
就可以用定义变量的方式来修改监听端口。
Vim nginx.yml
- hosts: ngxsrvs
Remote_user: root
Roles:
- { role: nginx, ngxport: 8080 }

Ansible-playbook --check --list-tags nginx.yml
Ansible-playbook --check -t ngxconf nginx.yml
Ansible-playbook -t ngxconf nginx.yml
Vim ansible.cfg
Roles_path = /etc/ansible/roles 取消注释
Ansible-playbook --syntax-check nginx.yml
Ansible-playbook --check nginx.yml (该处报错install nginx package,正常,
因为是测试,第一步没有真正把文件复制过去)
######################################################################
Vim ansible.cfg
............................
Forks = 5 默认一次只影响5个主机,例如当有100个主机时,ansible
一次只处理5个,如果机器性能还行,可以调大一点。
###########################################################
##############################################################################
Yum install memcached
Vim roles/memcached/tasks/main.yml
- name: install memcached
Yum : name=memcached state=latest
- name: install conf file
Template: src=memcached.j2 dest=/etc/sysconfig/memcached
Tags: mcconf
Notify: reload memcached
- name: start memcached service
Service: name=memcached state=started enabled=true
Cp /etc/sysconfig/memcached roles/memcached/templates/memecached.j2
Vim memcached.j2
........................................................
CACHESIZE="{{ ansible_memtotal_mb // 4 }}"
..................................................
################################################################################
Vim roles/memcached/handlers/main.yml
- name: reload memcached
Service: name=memcached state=restarted
###############################################
Vim nginx.yml
- hosts: ngxsrvs
Remote_user: root
Roles:
- nginx
- memcached
Ansible-playbook --check nginx.yml
在客户机上进行测试:
Ss -ntl 11211
Cat /etc/sysconfig/memcached
######################################################################################################################################################################################################################################################
Mysql 演示
Vim /roles/mysql/tasks/main.yml
- name: install myaql-server
Yum: name=myaql-server state=latest
When: ansible_distribution == "CentOS" and ansible_distribution_major_version == "6"
- name: install mariadb-server
Yum: name=mariadb-server state=latest
When: ansible_distribution == "CentOS" and ansible_distribution_major_version == "7"
- name: start myaql service
Service: name=mysqld state=started
When: ansible_distribution == "CentOS" and ansible_distribution_major_version == "6"
- name: start mariadb service
Service: name=mariadb state=started
When: ansible_distribution == "CentOS" and ansible_distribution_major_version == "7"
Vim db.yaml
- hosts: dbsrvs
Remote_user: root
Roles:
- myaql
Ansible-playbook --check db.yaml
在客户机上分别测试 ss -ntl
在playbook中调用角色的方法:
- hosts: HOSTS
remote_user: USERNAME
roles:
- ROLE1
- ROLE2
- { role: ROLE3, VARIABLE: VALUE, ...}
- { role: ROLE4, when: CONDITION }