在学习javascript中,如果在事件的使用上出现一些反差效果,不良效果,如鼠标的移入移出时,显示你所需要的内容,
但就是没有出现,然而你不断的检查代码,逐个代码查错,还在浏览器的调试工具中调试都没有发现错误,没有看到你所
想要的错误,那么这个时候你要判断一下是不是冒泡事件带来的不良效果了,不过在判断之前,你是不是要知道什么是冒泡事件呢?
接下来冒泡的解释:
冒泡就是从里的事件源一级一级向上触发直到window:
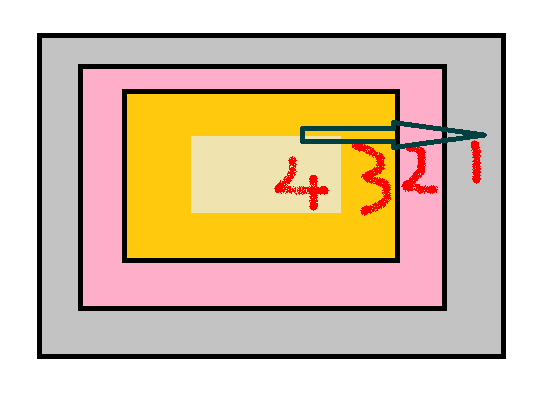
图:

事件源就是你所触发事件在位置的元素,而在这个元素触发了事件,如图你所触发的元素是编号为4的物块,而它就是事件源,
还有事件其实在你没有编写前就给每个元素对象自动添加上,就差你给它添加事件函数了,有个事件函数,它的事件才会有东西
执行,不是只是个空有事件,没有事件函数的事件,这点要搞懂,不是会走进误区!!!!
上面假设的那个冒泡就是从这个编号4的物块一层一层向上冒泡,直到window,而它顺序:
事件来源对象编号4->上级对象编号3->上上级对象编号2->上上上级对象编号1->body->document->window
注意:这个冒泡只和你的HTML结构有关,不能直观的看表现出效果,判断它的某些子元素不会触发冒泡给上层,只要是在
HTML结构里元素就会向上冒泡给上级。
图:

代码:
<!DOCTYPE html>
<html lang="en">
<head>
    <meta charset="UTF-8">
    <title>Document</title>
    <style>
        div{
            width: 100px;
            height: 100px;
        }
        #div1{
            background: red;
            position: relative;
        }
        #div2{
            position: absolute;
            top: 150px;
            background: green;
        }
    </style>
</head>
<body>
    <div id="div1">
        <div id="div2"></div>
    </div>
</body>
</html>
从图可以直观看一定不知道它们的HTML结构是父子关系,所以会走进误区,以为这两个是独立的块,不会冒泡到其中一个为父级元素,但从代码看,这个就是父子关系,所以触发子级,会冒泡给父级再向上冒泡。
所以这个一定要搞懂。
这就是冒泡;
接下来就是冒泡事件的不良反应,比如你只想触发某个元素的事件,但它的父级或上上级也被你触发了,那么你就要阻止了,
还有就是你的事件加了定时器了,这时你就要注意冒泡的不良反应了,如你想当前元素触发事件但到后代元素后当前元素又再一次触发它的事件,然后又调用到定时器,
然后你的效果就向不理想的现象触发,这是一种不良情况,还有很多,等以后一一自己去体验,而这些的不良效果,都主要阻止冒泡就可以了。
而阻止冒泡前,你要找到你所要阻止的元素,他不一定是你所需效果的元素的位置,可能是它子级的元素,所以你要先找到这个阻止源,然后才是在这个元素放阻止的
方法,一般阻止使用event.cancelBubble=true;即可,现在的主流浏览器都支持,但之前版本的火狐是不支持的,所以如果出现不支持那么请做兼容,event.stopPropagation();
这个是火狐之前版本支持的,当然的现在的版本也支持。
错误代码:
<!DOCTYPE html>
<html lang="en">
<head>
    <meta charset="UTF-8">
    <title>冒泡</title>
    <style>
    #div1{
        width: 500px;
        height: 500px;
        margin: 0 auto;
        background: red;
    }
    #div2{
        width: 300px;
        height: 300px;
        margin: 0 auto;
        background: green;
    }
    #div3{
        width: 100px;
        height: 100px;
        margin: 0 auto;
        background: #eeeeee;
    }


    </style>
<script>
window.onload=function(){
            var oDiv=document.getElementById("div1");
                oDiv.onmouseover=function(ev){
                  ev=ev||event;
                  this.style.background="#000";
            }
            oDiv.onmouseout=function(ev){
                timer=setTimeout(function(){
                oDiv.style.background="red";
                },1000);

            }
}
</script>
</head>
<body>
    <div id="div1">
        <div id="div2">
            <div id="div3"></div>
        </div>
    </div>
</body>
</html>
执行这些代码一定发现问题;
阻止冒泡后修改的代码:
<!DOCTYPE html>
<html lang="en">
<head>
    <meta charset="UTF-8">
    <title>阻止冒泡</title>
    <style>
    #div1{
        width: 500px;
        height: 500px;
        margin: 0 auto;
        background: red;
    }
    #div2{
        width: 300px;
        height: 300px;
        margin: 0 auto;
        background: green;
    }
    #div3{
        width: 100px;
        height: 100px;
        margin: 0 auto;
        background: #eeeeee;
    }


    </style>
    <script>
        window.onload=function(){
            var oDiv=document.getElementById("div1");
            var oDiv1=document.getElementById("div2");
            var oDiv2=document.getElementById("div3");
            var timer=null;
            oDiv1.onmouseover=function(){
                clearInterval(timer);
            }
            oDiv1.onmouseout=function(ev){
                ev=ev||event;
                ev.cancelBubble=true;
            }
            oDiv2.onmouseout=function(ev){
                ev=ev||event;
                ev.cancelBubble=true;
            }

            oDiv.onmouseover=function(ev){
                ev=ev||event;
                this.style.background="#000";
            }
            oDiv.onmouseout=function(ev){
                timer=setTimeout(function(){
                oDiv.style.background="red";
                },1000);

            }
        }

    </script>
</head>
<body>
    <div id="div1">
        <div id="div2">
            <div id="div3"></div>
        </div>
    </div>
</body>
</html>
之于定时器的是什么,自己去普及。
OK~大体的说了说。
冒泡有不少好处,事件委托就是其一;
事件委托:
事件委托就是使用父级为子级干事,它的核心是利用冒泡,还有事件源属性使用event.srcElement,它需要去兼容,还有个属性是event.target,
兼容例子:
var obj=event.srcElement||event.target;
它有个好处是如果你动态的为父级添加子标签,那些添加的子标签都可以使用这些事件方法,也能触发这些事件,就像动态的添加函数一样,使它们都有自己的事件。
代码:
<!DOCTYPE html>
<html lang="en">
<head>
<meta charset="UTF-8">
<title>无标题文档</title>
<style>
    #m1{
        width:200px;
        background:#0F6;
        overflow:hidden;
        margin:60px auto;
        }
    li{
        width:100px;
        height:50px;
        margin:50px auto 50px;
        text-align:center;
        line-height:50px;
        border:2px solid #999;
        cursor:pointer;
    }
</style>
</head>
<ul id="m1">
    <li>111</li>
    <li>222</li>
    <li>333</li>
    <li>444</li>
    <li>555</li>
    <li>666</li>
</ul>
<input type="button" id="btn" value="添加" />
<script>
    var num=6;
    var btn=document.getElementById("btn");
    var m1=document.getElementById("m1");
    m1.onmouseover=function(){
    var e=event||window.event;
    var obj=e.srcElement||e.target;
    if(obj.nodeName.toLowerCase()=="li"){
        obj.style.background="#ff0";
        }
        };
    m1.onmouseout=function(){
    var e=event||window.event;
    var obj=e.srcElement||e.target;
        obj.style.background="";
        };
    btn.onclick=function(){
                num++;
        var li=document.createElement("li");
        li.innerHTML=111*num;
        m1.appendChild(li);
        };
</script>
<body>
</body>
</html>
到此为止了。
还有事件捕获在待定中。。。