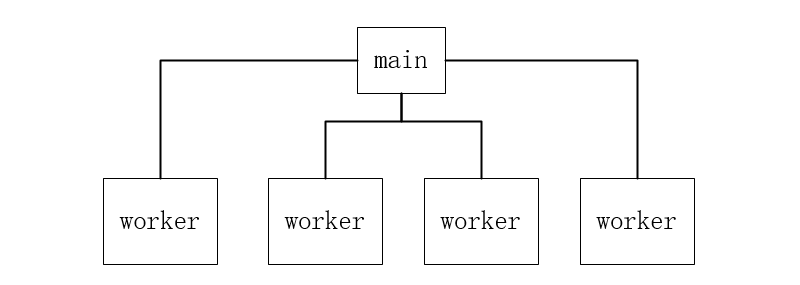
Nginx启动流程概览
一、Init Cycle
1 ngx_cycle结构:
-
- ngx_cycle是nginx全局配置,类型为ngx_cycle_t,其结构如下(已精简):
struct ngx_cycle_s {
    void                  ****conf_ctx;   //全局配置项
    ngx_pool_t               *pool;
    ngx_log_t                *log;

    ngx_connection_t        **files;
    ngx_connection_t         *free_connections;

    ngx_module_t            **modules;    //module数组
    ngx_queue_t               reusable_connections_queue;  //重复使用的socket存放队列
    ngx_uint_t                reusable_connections_n;
    ngx_array_t               listening;

    ngx_rbtree_t              config_dump_rbtree;
    ngx_rbtree_node_t         config_dump_sentinel;

    ngx_connection_t         *connections;
    ngx_event_t              *read_events;
    ngx_event_t              *write_events;
    ... ...
};
1.1 看到ngx_cycle的conf_ctx的指针的层次可知,这个结构将会很复杂,不过复杂性都体现在HTTP类型module中,以下用HTTP类型模块说明:

- 第一层,指针类型为ngx_http_conf_ctx_t*,包含main、Svr、Loc三种作用域的conf;
typedef struct {
    void        **main_conf;
    void        **srv_conf;
    void        **loc_conf;
} ngx_http_conf_ctx_t;
- 第二层,因http_module有多个,所以为三种作用域的conf数组;
- 第三层指针指向具体某个http_module不同作用域的配置,类型分别为:
-
- 1 ngx_http_core_main_conf_t,Main作用域的配置是全局的,包含监听的sever以及http阶段解析相关配置;
typedef struct {
    ngx_array_t                servers;         /* ngx_http_core_srv_conf_t */
    ngx_http_phase_engine_t    phase_engine;
    ... ...
    ngx_array_t               *ports;
    ngx_http_phase_t           phases[NGX_HTTP_LOG_PHASE + 1];
} ngx_http_core_main_conf_t;
-
- 2 ngx_http_core_srv_conf_t,Svr作用域的配置对应于conf文件的sever块,server可能有多个,每个server下location也可以有多个,所以看到当前结构内部有指向Location的两级指针;
typedef struct {
    /* array of the ngx_http_server_name_t, "server_name" directive */
    ngx_array_t                 server_names;

    /* server ctx */
    ngx_http_conf_ctx_t        *ctx;
    ... ...
    ngx_http_core_loc_conf_t  **named_locations;
} ngx_http_core_srv_conf_t;
-
- 3 ngx_http_core_loc_conf_t location配置结构太过复杂,以下只列举几项;
struct ngx_http_core_loc_conf_s {
    ngx_str_t     name;          /* location name */
    ... ...
    /* pointer to the modules' loc_conf */
    void        **loc_conf;
    ngx_http_handler_pt  handler;
    ... ...
};
- 最后一层指针便能访问具体的特定Http_module模块指定作用域下的特定配置项。
1.2 不过实际使用中没那么麻烦,有专门的宏,只需指定模块指针便能取得需要的各种配置:
```c
#define ngx_http_conf_get_module_main_conf(cf, module)
    ((ngx_http_conf_ctx_t *) cf->ctx)->main_conf[module.ctx_index]
#define ngx_http_conf_get_module_srv_conf(cf, module)
    ((ngx_http_conf_ctx_t *) cf->ctx)->srv_conf[module.ctx_index]
#define ngx_http_conf_get_module_loc_conf(cf, module)
    ((ngx_http_conf_ctx_t *) cf->ctx)->loc_conf[module.ctx_index]
```
2 ngx_cycle Initial
2.1 配置解析
- 由于ngx_cycle结构很复杂,其初始化过程也很冗长,其复杂性主要体现在配置解析阶段,在该阶段从ngx_conf_parse函数进入,但在解析配置文件过程中会多次递归调用该函数;举例说明:
worker_processes  1;
events {
    worker_connections  1024;
}

http {
    include       mime.types;
    default_type  application/octet-stream;
    ... ...
- 1 文件解析到worker_processes时对各模块的commands扫描一遍,找到该命令,调用对应的set函数,当前配置项,只需设置一项全局数值;
- 2 当解析到events 遇到“{”符号,会触发对events对应set函数的调用;调用ngx_events_block函数,因为该命令为event core module的,所以其起到所有event module的代理作用,将会触发所有event module的create_conf函数和init_conf函数,大致流程如下:
for (i = 0; cf->cycle->modules[i]; i++) {
    if (cf->cycle->modules[i]->type != NGX_EVENT_MODULE) {
        continue;
    }
    (*ctx)[cf->cycle->modules[i]->ctx_index] = m->create_conf(cf->cycle);
}

rv = ngx_conf_parse(cf, NULL);

for (i = 0; cf->cycle->modules[i]; i++) {
    if (cf->cycle->modules[i]->type != NGX_EVENT_MODULE) {
        continue;
    }
    rv = m->init_conf(cf->cycle, (*ctx)[cf->cycle->modules[i]->ctx_index]);
}
- 3 由上流程中也可以看出,ngx_conf_parse将会被调用数次。因epollselectpoll等模块也是event module,所以epoll的创建等参数设置也会在这一阶段完成
- 4 解析到http块时,先找到http命令对应的set,即调用ngx_http_block,在该函数中会完成所有模块各个作用域的http配置;大致流程如下:
for (m = 0; cf->cycle->modules[m]; m++) {
    // 为各个模块创建配置
    ctx->main_conf[mi] = module->create_main_conf(cf); //create_main_conf
    ctx->srv_conf[mi] = module->create_srv_conf(cf); //create_srv_conf
    ctx->loc_conf[mi] = module->create_loc_conf(cf); //create_loc_conf
    module->preconfiguration(cf)

    rv = module->init_main_conf(cf, ctx->main_conf[mi]) //init_main_conf
    // 关联 或作用域冲突的配置项合并
    rv = ngx_http_merge_servers(cf, cmcf, module, mi); //merge_servers
}
/* create location trees */
ngx_http_init_locations(cf, cscfp[s], clcf)
ngx_http_init_static_location_trees(cf, clcf)

//初始化http解析过程中的11阶段,每个阶段都有个handler数组,为其分配空间
ngx_http_init_phases(cf, cmcf)

for (module:modules) {
    // 遍历所有http模块向各个phase的handlers中添加handler
    module->postconfiguration(cf)
}
// 为各phase设置公共checker,设置handler调用链
ngx_http_init_phase_handlers(cf, cmcf)

// 优化服务器端口对,初始化监听队列即配置,设置ngx_listening_t的handler
// handler = ngx_http_init_connection 此handler将会在accept后被调用,用来初始化已接受的tcp链接
ngx_http_optimize_servers(cf, cmcf, cmcf->ports)
}
- 5 其余配置项都要经历类似的解析设置经历,最终nginx.conf个文件将会变成极其复杂的cycle结构体。
2.2 全局配置初始化
- *在init_cycle流程中篇幅被众多的数组、链表、树等配置结构的初始化流程充斥着,还有配置继承等内容,看起来很直接,很好懂,此处不再花篇幅。
2.3 ngx_init_modules
- 各模块静态配置初始化之后,依次调用其init module函数完成配置阶段最后的初始化,该阶段大多数模块都相关函数,少数模块做了设置回调等操作。
二、Init Process
1 进程初始化
if (ngx_process == NGX_PROCESS_SINGLE) {
    ngx_single_process_cycle(cycle);
} else {
    ngx_master_process_cycle(cycle);
}
- 进程的初始化流程会因配置不同,一般情况下都需要Main + N Worker的模式,所以以下内容以ngx_master_process_cycle展开。

- 1 main 进程流程,处理控制台及操作系统的信号,管理worker进程的生命周期;
ngx_start_worker_processes(cycle, ccf->worker_processes, NGX_PROCESS_RESPAWN);
for ( ;; ) {
    if (ngx_reap) {}
    if (ngx_terminate) {} //结束进程
    if (ngx_quit) {} //退出
    if (ngx_reconfigure) {} //刷新配置
    if (ngx_restart) {} //重启
    ...
}
- 2 fork子进程,完成每个子进程的初始化,调用各module的process init;设置与主进程的通信管道;
for (i = 0; i < n; i++) {
    ngx_spawn_process(cycle, ngx_worker_process_cycle, (void *) (intptr_t) i, "worker process", type);
    ch.pid = ngx_processes[ngx_process_slot].pid;
    ch.slot = ngx_process_slot;
    ch.fd = ngx_processes[ngx_process_slot].channel[0];
    ngx_pass_open_channel(cycle, &ch);
}
-
- ngx_spawn_process完成对各子进程的fork操作,设置好与父进程(即Main)的全双工通信管道后调用fork,再调用ngx_worker_process_cycle启动各子进程的主流程;
ngx_pid_t ngx_spawn_process(ngx_cycle_t *cycle, ngx_spawn_proc_pt proc, void *data,
    char *name, ngx_int_t respawn)
{
    // 用socketPair 充当父子进程间通信的,可以使用各种socket io选项
    socketpair(AF_UNIX, SOCK_STREAM, 0, ngx_processes[s].channel)
    ngx_nonblocking(ngx_processes[s].channel[0]) == -1)
    ngx_nonblocking(ngx_processes[s].channel[1]) == -1)
    ioctl(ngx_processes[s].channel[0], FIOASYNC, &on)
    fcntl(ngx_processes[s].channel[0], F_SETOWN, ngx_pid)
    fcntl(ngx_processes[s].channel[0], F_SETFD, FD_CLOEXEC)
    fcntl(ngx_processes[s].channel[1], F_SETFD, FD_CLOEXEC)
    // 创建子进程
    ret = fork()
    if ret==0 {
        proc(cycle, data); //ngx_worker_process_cycle
    }
}
三、Start Worker 和 Event Handle
- 子进程由于都是fork而来,继承了主进程在配置阶段配置完的cycle结构,所以每个子进程都是一个单独的server;在这一阶段需要调用各子模块的init_process来完成众多模块的进程级别初始化,之后进入自己的循环,处理各种事件。
static void ngx_worker_process_cycle(ngx_cycle_t *cycle, void *data)
{
    ngx_worker_process_init(cycle, worker);
    for ( ;; ) {
        // 处理信号
        if (ngx_exiting)

        // 检查事件驱动模块和定时器
        ngx_process_events_and_timers(cycle);

        if (ngx_terminate)
        if (ngx_quit)
        if (ngx_reopen)
}
- 1 ngx_worker_process_init
- 在这一阶段遍历module执行init_process;大多数模块的init_process都是NULL,重点关注event_core_module,其init_process为ngx_event_process_init
for (m = 0; cycle->modules[m]; m++) {
        if (cycle->modules[m]->type != NGX_EVENT_MODULE) {
            continue;
        }
        module->actions.init(cycle, ngx_timer_resolution) != NGX_OK) //ngx_epoll_init
}
//设置读事件的handler
rev->handler = (c->type == SOCK_STREAM) ? ngx_event_accept : ngx_event_recvmsg;
-
- 该函数中将会遍历event类型的模块,执行其actions.init函数,实际上,linux环境默认事件模块是epoll,event模块的非核心模块只有ngx_epoll_module,所以此次会完成epoll的读写事件初始化函数ngx_epoll_init,以下为函数体:
static ngx_int_t ngx_epoll_init(ngx_cycle_t *cycle, ngx_msec_t timer)
{
    ep = epoll_create(cycle->connection_n / 2); //事件创建
    event_list = ngx_alloc(sizeof(struct epoll_event) * epcf->events,
    nevents = epcf->events;
    ngx_event_actions = ngx_epoll_module_ctx.actions;
}
- 2 worker进程主逻辑 ngx_process_events_and_timers
void ngx_process_events_and_timers(ngx_cycle_t *cycle)
{
    (void) ngx_process_events(cycle, timer, flags); //事件处理
    ngx_event_process_posted(cycle, &ngx_posted_accept_events); 请求响应
}
-
- 事件模块使用epoll时,此处的ngx_process_events实际上是ngx_epoll_process_events;完成epoll_wait和事件检测,调用可读或可写事件的handler;
static ngx_int_t ngx_epoll_process_events(ngx_cycle_t *cycle, ngx_msec_t timer, ngx_uint_t flags)
{
    events = epoll_wait(ep, event_list, (int) nevents, timer);
    rev->handler(rev); // ngx_event_accept
}
-
- 来新的请求后,事件变成可读,将会调用ngx_event_accept,会调用操作系统提供的accept,之后创建ngx_connection结构,设置socket属性后调用ngx_http_init_connection初始化新创建的链接,准备接受数据;
void ngx_event_accept(ngx_event_t *ev)
{
    s = accept(lc->fd, &sa.sockaddr, &socklen);
    c = ngx_get_connection(s, ev->log);
    ls->handler(c); // ngx_http_init_connection
}

