源码下载:http://www.bacula.org
bacula适合数据业务量巨大,每天都在迅速增长,还需要以tar打包方式进行低级备份而且没有异地容灾策略。Bacula是一个完美的增量备份功能,同时还支持远程容灾备份,可以通过bacula,可以将数据备份到任意一个远程的主机上
1. 安装
# yum -y install mysql-devel.x86_64 //依赖头文件,可以看configure# ./configure \
--sbindir=/opt/bacula/bin \
--sysconfdir=/opt/bacula/etc \
--enable-smartalloc \
--with-mysql \
--with-working-dir=/opt/bacula/working \
--with-pid-dir=/opt/bacula/working \
--with-subsys-dir=/opt/bacula/working \
--with-plugindir=/usr/lib64
出现错误:configure: error: Unable to find a working C++ compiler
# yum install gcc-c++.x86_64 //redhat
# apt-get install g++ //ubuntusbindir:bin文件
sysconfdir:脚本和配置文件
libdir:libraries文件
mysql:检查mysql头文件
plugindir:Bacula plugins directory
2. 配置文件
/opt/bacula/etc目录
3. 初始化Mysql数据库
在baculaServer上安装完bacula后,还需要创建bacula对应的Mysql数据库以及访问数据库的授权,好在bacula已经为用户准备好了这样的脚本,接下来只要在bacula服务器端上执行如下脚本即可
# cd /bacula/etc
# ./grant_mysql_privileges
# ./create_mysql_database
# ./make_mysql_tables
这些脚本需要mysql这个命令,默认在/usr/bin目录下
脚本中是这样写的:
bindir=/var/lib/mysql/bin接下来可以登录Mysql数据库,查看bacula的数据库和数据表是否已经建立。在执行上面三行Mysql初始代码时,默认由空密码的root用户执行,因此要请确保Mysql数据库root密码为空
4. 配置bacula备份系统
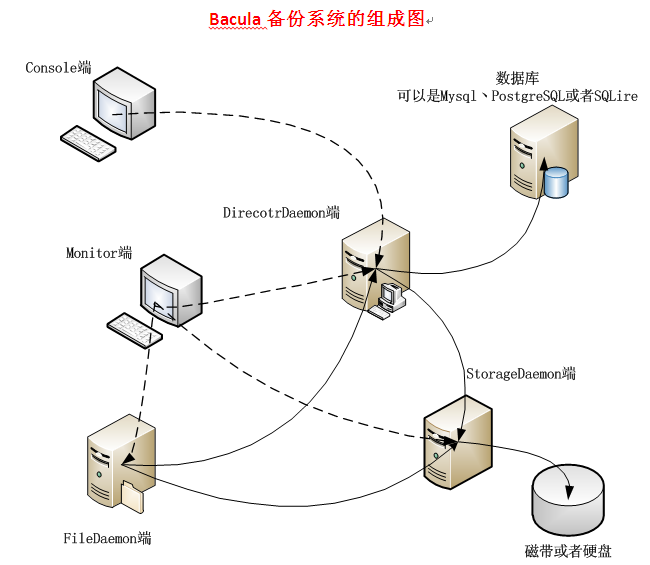
Director Daemon:负责监听所有的备份、恢复、验证、存档事务,以及定制备份和恢复文件计划等,并将整个系统运行状况记录在一个数据库文件中。其配置文件为bacula-dir.conf
Storage Daemon(SD):主要负责将数据备份到存储介质上,而在数据恢复时,负责将数据从存储介质中传送出去。其配置文件为bacula-sd.conf
File Daemon(FD):安装在需要备份数据的机器上的守护进程,在备份数据时,它负责把文件传出,在恢复数据时负责接收数据并执行恢复操作。配置文件为bacula-fd.conf
Console:管理控制台。可以通过这个控制台连接到Director Daemon进行管理备份与恢复操作
Monitor:进程监控端
1. 配置bacula的Console端
Console端的配置文件是bconsole.conf
Director {
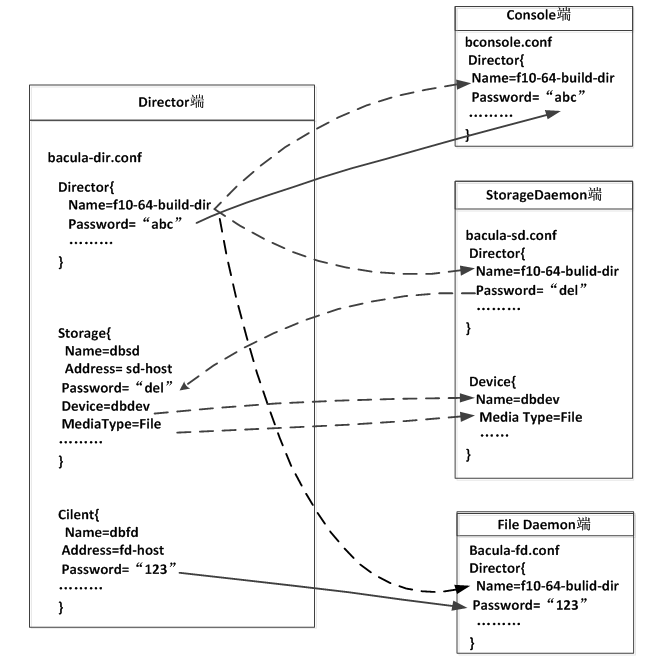
Name = f10-64-build-dir     #控制端名称,在下面的bacula-dir.conf和bacula-sd.conf文件中会陆续的被引用
DIRport = 9101              #控制端服务端口
address = 192.168.12.188    #控制端服务器IP地址
Password = "ouDao0SGXx/F+Tx4YygkK4so0l/ieqGJIkQ5DMsTQh6t"   #控制端密码文件
}
2. 配置bacula的Director端
bacula-dir.conf是Director端的配置文件,也是bacula的核心配置文件,这个文件非常复杂,共分为10个逻辑段,分别是:
- Director,定义全局设置
- Catalog,定义后台数据库
- Jobdefs,定义默认执行任务
- Job,自定义一个备份或者恢复任务
- Fileset,定义备份哪些数据,不备份哪些数据
- Schedule,定义备份时间策略
- Pool,定义供Job使用的池属性
- Client,定义要备份的主机地址
- Storage,定义数据的存储方式
- Messages,定义发送日志报告和记录日志的位置
Director { #定义bacula的全局配置
Name = f10-64-build-dir
DIRport = 9101 #定义Director的监听端口
QueryFile = "/opt/bacula/etc/query.sql"
WorkingDirectory = "/opt/bacula/var/bacula/working"
PidDirectory = "/var/run"
Maximum Concurrent jobs = 1 #定义一次能处理的最大并发数

#验证密码,这个密码必须与bconsole.conf文件中对应的Director逻辑段密码相同
Password = "ouDao0SGXx/F+Tx4YygkK4so0l/ieqGJIkQ5DMsTQh6t"

#定义日志输出方式,"Daemon"在下面的Messages逻辑段中进行了定义
Messages = Daemon
}

Job { #自定义一个备份任务
Name = "Client1" #备份任务名称。如果有空格,字符串需要用双引号
Client = dbfd #指定要备份的客户端主机,"dbfd"在后面Client逻辑段中进行定义
Level = Incremental #定义备份的级别,Incremental为增量备份。Level的取值#可为Full(完全备份)、Incremental(增量备份)
                    #和Differential(差异备份),如果第一次没做完全备份,则先进行完全备份后再执行Incremental
type = Backup #定义Job的类型,"backup"为备份任务,可选的类型还有restore和verify等
FileSet = dbfs #指定要备份的客户端数据,"dbfs"在后面FileSet逻辑段中进行定义
Schedule = dbscd #指定这个备份任务的执行时间策略,"dbscd"在后面的Schedule逻辑段中进行了定义
Storage = dbsd #指定备份数据的存储路径与介质,"dbsd" 在后面的Storage逻辑段中进行定义
Messages = Standard
Pool = dbpool #指定备份使用的pool属性,"dbpool"在后面的Pool逻辑段中进行定义。
write Bootstrap = "/opt/bacula/var/bacula/working/Client2.bsr" #指定备份的引导信息路径
}


Job { #定义一个名为Client的差异备份的任务
Name = "Client"
Type = Backup
FileSet = dbfs
Schedule = dbscd
Storage = dbsd
Messages = Standard
Pool = dbpool
Client = dbfd
Level = Differential #指定备份级别为差异备份
Write Bootstrap = "/opt/bacula/var/bacula/working/Client1.bsr"
}


Job { #定义一个名为BackupCatalog的完全备份任务
Name = "BackupCatalog"
Type = Backup
Level = Full #指定备份级别为完全备份
Client = dbfd
FileSet="dbfs"
Schedule = "dbscd"
Pool = dbpool
Storage = dbsd
Messages = Standard
RunBeforeJob = "/opt/bacula/etc/make_catalog_backup bacula bacula"
RunAfterJob = "/opt/bacula/etc/delete_catalog_backup"
Write Bootstrap = "/opt/var/bacula/working/BackupCatalog.bsr"
}


Job { #定义一个还原任务
Name = "RestoreFiles"
Type = Restore #定义Job的类型为"Restore ",即恢复数据
Client=dbfd
FileSet=dbfs
Storage = dbsd
Pool = dbpool
Messages = Standard
Where = /tmp/bacula-restores #指定默认恢复数据到这个路径
}


FileSet { #定义一个名为dbfs的备份资源,也就是指定需要备份哪些数据,需要排除哪些数据等,可以指定多个FileSet
Name = dbfs
Include {
Options {
signature = MD5; Compression=gzip; } #表示使用MD5签名并压缩
file = /cws3 #指定客户端FD需要备份的文件目录
}

Exclude { #通过Exclude排除不需要备份的文件或者目录,可根据具体情况修改
File = /opt/bacula/var/bacula/working
File = /tmp
File = /proc
File = /tmp
File = /.journal
File = /.fsck
}
}

Schedule { #定义一个名为dbscd的备份任务调度策略
Name = dbscd
Run = Full 1st sun at 23:05 #第一周的周日晚23:05分进行完全备份
Run = Differential 2nd-5th sun at 23:05 #第2~5周的周日晚23:05进行差异备份
Run = Incremental mon-sat at 23:05 #所有周一至周六晚23:05分进行增量备份
}


FileSet {
Name = "Catalog"
Include {
Options {
signature = MD5
}
File = /opt/bacula/var/bacula/working/bacula.sql
}
}


Client { #Client用来定义备份哪个客户端FD的数据
Name = dbfd #Clinet的名称,可以在前面的Job中调用
Address = 192.168.12.189 #要备份的客户端FD主机的IP地址
FDPort = 9102 #与客户端FD通信的端口
Catalog = MyCatalog #使用哪个数据库存储信息,"MyCatalog"在后面的MyCatalog逻辑段中进行定义
Password = "ouDao0SGXx/F+Tx4YygkK4so0l/ieqGJIkQ5DMsTQh6t"   #Director端与客户端FD的验证密码,
            #这个值必须与客户端FD配置文件bacula-fd.conf中密码相同
File Retention = 30 days #指定保存在数据库中的记录多久循环一次,这里是30天,只影响数据库中的记录不影响备份的文件
Job Retention = 6 months #指定Job的保持周期,应该大于File Retention指定的值
AutoPrune = yes #当达到指定的保持周期时,是否自动删除数据库中的记录,yes表示自动清除过期的Job
}

Client {
Name = dbfd1
Address = 192.168.12.188
FDPort = 9102
Catalog = MyCatalog
Password = "Wr8lj3q51PgZ21U2FSaTXICYhLmQkT1XhHbm8a6/j8Bz"
File Retention = 30 days
Job Retention = 6 months
AutoPrune = yes
}


Storage { # Storage用来定义将客户端的数据备份到哪个存储设备上
Name = dbsd
Address = 192.168.12.188 #指定存储端SD的IP地址,不要用localhost,不然异机会连接不上
SDPort = 9103 #指定存储端SD通信的端口
Password = "ouDao0SGXx/F+Tx4YygkK4so0l/ieqGJIkQ5DMsTQh6t" #Director端与存储端SD的验证密码,
            #这个值必须与存储端SD配置文件bacula-sd.conf中Director逻辑段密码相同
Device = dbdev  #指定数据备份的存储介质,必须与存储端(这里是192.168.12.188)的bacula-sd.conf配置文件中的
                #"Device" 逻辑段的"Name"项名称相同
Media Type = File   #指定存储介质的类别,必须与存储端SD(这里是192.168.12.188)的bacula-sd.conf配置文件中的
                    #"Device" 逻辑段的"Media Type"项名称相同
}

Catalog { # Catalog逻辑段用来定义关于日志和数据库设定
Name = MyCatalog
dbname = "bacula"; dbuser = "bacula"; dbpassword = "" #指定库名、用户名和密码
}

Messages {  # Messages逻辑段用来设定Director端如何保存日志,以及日志的保存格式,可以将日志信息发送到管理员邮箱,
            # 前提是必须开启sendmail服务
Name = Standard
mailcommand = "/usr/sbin/bsmtp -h localhost -f \"\(Bacula\) \<%r\>\" -s \"Bacula: %t %e of %c %l\" %r"
operatorcommand = "/usr/sbin/bsmtp -h localhost -f \"\(Bacula\) \<%r\>\" -s \"Bacula: Intervention needed for %j\" %r"
mail = dba.gao@gmail.com = all, !skipped
operator = exitgogo@126.com = mount
console = all, !skipped, !saved
append = "/opt/bacula/log/bacula.log" = all, !skipped #定义bacula的运行日志
append ="/opt/bacula/log/bacula.err.log" = error,warning, fatal #定义bacula的错误日志
catalog = all
}

Messages { #定义了一个名为Daemon的Messages逻辑段,"Daemon"已经在前面进行了引用
Name = Daemon
mailcommand = "/usr/sbin/bsmtp -h localhost -f \"\(Bacula\) \<%r\>\" -s \"Bacula daemon message\" %r"
mail = exitgogo@126.com = all, !skipped
console = all, !skipped, !saved
append = "/opt/bacula/log/bacula_demo.log" = all, !skipped
}


Pool { #定义供Job任务使用的池属性信息,例如,设定备份文件过期时间、是否覆盖过期的备份数据、是否自动清除过期备份等
Name = dbpool
Pool Type = Backup
Recycle = yes #重复使用
AutoPrune = yes #表示自动清除过期备份文件
Volume Retention = 7 days #指定备份文件保留的时间
Label Format ="db-${Year}-${Month:p/2/0/r}-${Day:p/2/0/r}-id${JobId}" #设定备份文件的命名格式,
                #这个设定格式会产生的命名文件为:db-2010-04-18-id139
Maximum Volumes = 7 #设置最多保存多少个备份文件
Recycle Current Volume = yes #表示可以使用最近过期的备份文件来存储新备份
Maximum Volume Jobs = 1 #表示每次执行备份任务创建一个备份文件
}

Console { #限定Console利用tray-monitor获得Director的状态信息
Name = f10-64-build-mon
Password = "RSQy3sRjak3ktZ8Hr07gc728VkZHBr0QCjOC5x3pXEap"
CommandACL = status, .status
}
3. 配置bacula的SD(备份目的)
SD的配置文件是bacula-sd.conf
Storage { #定义存储,本例中是f10-64-build-sd
Name = f10-64-build-sd #定义存储名称
SDPort = 9103 #监听端口
WorkingDirectory = "/opt/bacula/var/bacula/working"
Pid Directory = "/var/run"
Maximum Concurrent Jobs = 20
}

Director { #定义一个控制StorageDaemon的Director
Name = f10-64-build-dir #这里的"Name"值必须和Director端配置文件bacula-dir.conf中Director逻辑段名称相同
Password = "ouDao0SGXx/F+Tx4YygkK4so0l/ieqGJIkQ5DMsTQh6t" #这里的"Password"值必须和Director端配置文件
            #bacula-dir.conf中Storage逻辑段密码相同
}

Director { #定义一个监控端的Director
Name = f10-64-build-mon #这里的"Name"值必须和Director端配置文件bacula-dir.conf中Console逻辑段名称相同
Password = "RSQy3sRjak3ktZ8Hr07gc728VkZHBr0QCjOC5x3pXEap" #这里的"Password"值必须和Director端配置文件
            #bacula-dir.conf中Console逻辑段密码相同
Monitor = yes
}

Device { #定义Device
Name = dbdev #定义Device的名称,这个名称在Director端配置文件bacula-dir.conf中的Storage逻辑段Device项中被引用
Media Type = File #只要和Storage -> Media type名字一致即可
Archive Device = /webdata   #Archive Device用来指定备份存储的介质,可以是cd、dvd、tap等,
                            #这里是将备份的文件保存的/webdata目录下
LabelMedia = yes; #通过Label命令来建立卷文件
Random Access = yes; #设置是否采用随机访问存储介质,这里选择yes
AutomaticMount = yes; #表示当存储设备打开时,是否自动使用它,这选择yes
RemovableMedia = no; #是否支持可移动的设备,如tap或cd,这里选择no
AlwaysOpen = no; #是否确保tap设备总是可用,这里没有使用tap设备,因此设置为no
}

Messages { #为存储端SD定义一个日志或消息处理机制
Name = Standard
director = f10-64-build-dir = all
}
4. 配置bacula的FD端(备份源)
客户端FD运行在一台独立的服务器上,它的配置文件是bacula-fd.conf
Director { #定义一个允许连接FD的控制端
Name = f10-64-build-dir #这里的"Name"值必须和Director端配置文件bacula-dir.conf中Director逻辑段名称相同
Password = "ouDao0SGXx/F+Tx4YygkK4so0l/ieqGJIkQ5DMsTQh6t" #这里的"Password"值必须和Director端配置文件
            #bacula-dir.conf中Client逻辑段密码相同
}

Director { #定义一个允许连接FD的监控端
Name = f10-64-build-mon
Password = "RSQy3sRjak3ktZ8Hr07gc728VkZHBr0QCjOC5x3pXEap"
Monitor = yes
}

FileDaemon { #定义一个FD端
Name = localhost.localdomain-fd
FDport = 9102 #监控端口
WorkingDirectory = /opt/bacula/var/bacula/working
Pid Directory = /var/run
Maximum Concurrent Jobs = 20 #定义一次能处理的并发作业数
}

Messages { #定义一个用于FD端的Messages
Name = Standard
director = localhost.localdomain-dir = all, !skipped, !restored
}
借用一个图:
5. 启动bacula的Director daemon与Storage daemon
第一种方式:
# /opt/bacula/sbin/bacula {start|stop|restart|status}第二种方式:
# /bacula/etc/bacula-ctl-dir {start|stop|restart|status}
# /bacula/etc/bacula-ctl-sd {start|stop|restart|status}
# /bacula/etc/bacula-ctl-fd {start|stop|restart|status}
观察启动端口情况:
# netstat -antl | grep 91
tcp 0 0 0.0.0.0:9101 0.0.0.0:* LISTEN
tcp 0 0 0.0.0.0:9102 0.0.0.0:* LISTEN
tcp 0 0 0.0.0.0:9103 0.0.0.0:* LISTEN
注:启动bacula的dir服务前,必须启动MySQL数据库
6. 在客户端FD启动File daemon
# /bacula/sbin/bacula {start|stop|restart|status}# /bacula/etc/bacula-ctl-fd {start|stop|restart|status}7. 工作流程
- 通过console连接到Director端,备份恢复操作开始
- Director端从自己的数据库中调出记录信息,对存储端SD与客户端FD的任务进行协调
- 客户端FD负责验证Director的操作许可,如果验证通过,则允许连接到存储端SD
- 客户端FD根据Director发出的请求去连接SD,将FD端的数据备份到存SD指定的存储介质上,或者将SD端存储介质中的数据传回到客户端FD指定的位置上,完成备份恢复过程
8.console控制
*help

Command       Description
=======       ===========
add           Add media to a pool
autodisplay   Autodisplay console messages
automount     Automount after label
cancel        Cancel a job
create        Create DB Pool from resource
delete        Delete volume, pool or job
disable       Disable a job, attributes batch process
enable        Enable a job, attributes batch process
estimate      Performs FileSet estimate, listing gives full listing
exit          Terminate Bconsole session
gui           Non-interactive gui mode
help          Print help on specific command
label         Label a tape
list          List objects from catalog
llist         Full or long list like list command
messages      Display pending messages      //可以让作业信息立即显示
memory        Print current memory usage
mount         Mount storage
prune         Prune expired records from catalog
purge         Purge records from catalog
quit          Terminate Bconsole session
query         Query catalog
restore       Restore files                 //还原
relabel       Relabel a tape
release       Release storage
reload        Reload conf file              //修改配置文件生效
run           Run a job                     //备份
status        Report status
stop          Stop a job
setdebug      Sets debug level
setbandwidth  Sets bandwidth
setip         Sets new client address -- if authorized
show          Show resource records
sqlquery      Use SQL to query catalog
time          Print current time
trace         Turn on/off trace to file
truncate      Truncate one or more Volumes
unmount       Unmount storage
umount        Umount - for old-time Unix guys, see unmount
update        Update volume, pool or stats
use           Use catalog xxx
var           Does variable expansion
version       Print Director version
wait          Wait until no jobs are running

When at a prompt, entering a period cancels the command.
1. 添加存储介质
# ./bconsole
Connecting to Director localhost:9101
1000 OK: 1 localhost-dir Version: 7.0.5 (28 July 2014)
Enter a period to cancel a command.
*label                              #run/restore
Automatically selected Catalog: MyCatalog
Using Catalog "MyCatalog"
The defined Storage resources are:
     1: File1
     2: File2
Select Storage resource (1-2): 1
Enter new Volume name: abc          #/tmp下的备份名
Defined Pools:
     1: Default
     2: File
     3: Scratch
Select the Pool (1-3): 2
Connecting to Storage daemon File at localhost:9103 ...
Sending label command for Volume "abc" Slot 0 ...
3000 OK label. VolBytes=192 DVD=0 Volume="abc" Device="FileChgr1-Dev1" (/tmp)
Catalog record for Volume "abc", Slot 0  successfully created.
Requesting to mount FileChgr1 ...
3906 File device ""FileChgr1-Dev1" (/tmp)" is always mounted.
*quit
2. 备份
*run
Automatically selected Catalog: MyCatalog
Using Catalog "MyCatalog"
A job name must be specified.
The defined Job resources are:
     1: BackupClient1
     2: BackupCatalog
     3: RestoreFiles
Select Job resource (1-3): 1
Run Backup job
JobName:  BackupClient1
Level:    Incremental
Client:   localhost-fd
FileSet:  Full Set
Pool:     File (From Job resource)
Storage:  File (From Job resource)
When:     2015-05-19 20:35:49
Priority: 10
OK to run? (yes/mod/no): yes
Job queued. JobId=1
You have messages.
3. 还原
*restore

First you select one or more JobIds that contain files
to be restored. You will be presented several methods
of specifying the JobIds. Then you will be allowed to
select which files from those JobIds are to be restored.

To select the JobIds, you have the following choices:
     1: List last 20 Jobs run
     2: List Jobs where a given File is saved
     3: Enter list of comma separated JobIds to select
     4: Enter SQL list command
     5: Select the most recent backup for a client
     6: Select backup for a client before a specified time
     7: Enter a list of files to restore
     8: Enter a list of files to restore before a specified time
     9: Find the JobIds of the most recent backup for a client
    10: Find the JobIds for a backup for a client before a specified time
    11: Enter a list of directories to restore for found JobIds
    12: Select full restore to a specified Job date
    13: Cancel
Select item:  (1-13): 5
Automatically selected Client: localhost-fd
Automatically selected FileSet: Full Set
+-------+-------+----------+------------+---------------------+------------+
| JobId | Level | JobFiles | JobBytes   | StartTime           | VolumeName |
+-------+-------+----------+------------+---------------------+------------+
|     1 | F     |       17 | 12,840,619 | 2015-05-19 20:37:14 | Vol-0003   |
+-------+-------+----------+------------+---------------------+------------+
You have selected the following JobId: 1

Building directory tree for JobId(s) 1 ...
16 files inserted into the tree.

You are now entering file selection mode where you add (mark) and
remove (unmark) files to be restored. No files are initially added, unless
you used the "all" keyword on the command line.
Enter "done" to leave this mode.

cwd is: /
$ ls
opt/
$ mark opt
17 files marked.
$ done
