ring Boot的启动分析:
1)直接调用静态的run方法(实质上内部是直接转换成2)方法)
ConfigurableApplicationContext context = SpringApplication.run(App.class,args);
2)实例化SpringApplication对象,然后调用run方法
SpringApplication app =new SpringApplication(App.class);
ConfigurableApplicationContext context =app.run(args);
二:
spring boot 的运行流程:
1.判断是否是webEnvironment
2.加载所有classpath下面的META-INF/spring.factories ApplicationContextInitializer
3.加载所有classpath下面的META-INF/spring.factories ApplicationContextListener
4.推断main方法所在的类
5.执行run方法
6.设置了一个系统变量:java.awt.headless
7.加载所有classpath下面的META-INF/spring.factories SpringApplicationRunListener
8.执行所有SpringApplicationRunListener的started方法
9.实例化了ApplicationArguments对象
10.创建environment
11.配置environment,主要是把run方法的参数配置进environment中
12.执行所有SpringApplicationRunListener的environmentPrepared方法,执行方法其实就是发送了一个事件
13.如果不是web环境,但是是webEnvironment,则把这个web的environment转换成标准的environment
14.打印banner
15.初始化applicationContext,如果是web环境,则实例化AnnotationConfigEmbeddedWebApplicationContext,否则实例化AnnotationConfigApplicationContext
16.如果beanNameGenerator不为空,则把beanNameGenerator对象注入到context里面去
17.回调所有的ApplicationContextInitializer 初始化方法
18.执行所有SpringApplicationRunListener的contextPrepared方法,执行方法其实就是发送了一个事件
19.依次向spring容器中注入ApplicationArguments对象和Banner对象
20.加载所有的源到context中去
21.执行所有SpringApplicationRunListener的contextLoaded方法,执行方法其实就是发送了一个事件
22.执行context的refresh方法,并调用context的registerShutdownHook方法
23.回调获取容器中所有的ApplicationRunner,CommandLineRunner接口,然后排序,依次调用
24.执行所有SpringApplicationRunListener的finished方法,执行方法其实就是发送了一个事件
三 spring boot web学习
1.静态获取变量
@ResponseBody
@PostMapping("/user/create")
public String create(@RequestParam(value="username",defaultValue="admin") String username, @RequestParam(value="password",required=false) String password) {
return "username is :" + username +"password is : " + password;
}
2.动态获取变量:
@ResponseBody
@GetMapping("/user/{id}")
public String createDynamic(@PathVariable("id") String id)
return "id is + " id;
3.@RestController :表示当前controller方法中的返回值可以直接用于body的输出
在1,2 中所有的返回方法上面都加了一个@ResponseBody,如果在controller类上把@Controller换成 @RestController ,那么所有的方法就不用加@ResponseBody了
4.spring boot中使用jsp
pom.xml文件中 需要另外加入依赖 tomcat-embed-jasper;(如果使用jsp就不要用下面的freemarker)
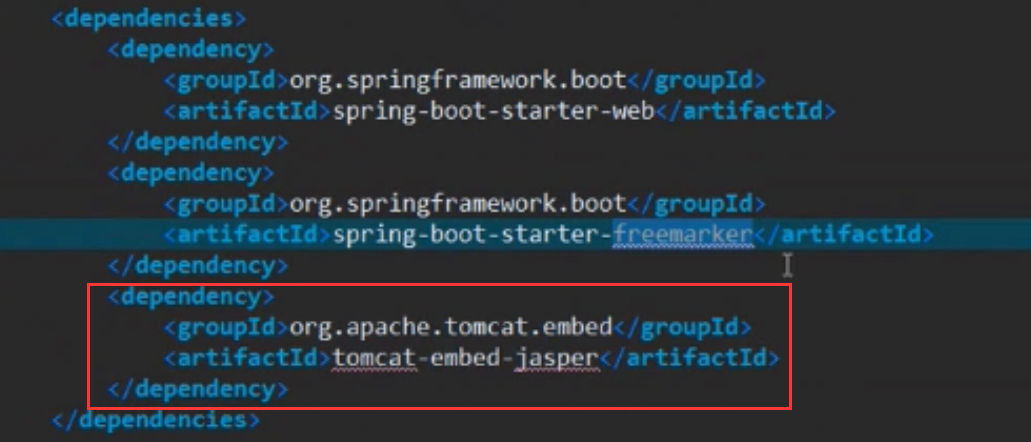
然后在application.properties文件中加入两个配置项:
spring.mvc.view.prefix=/WEB-INF/jsp/ //这个文件夹名自己定义
spring.mvc.view.suffix=.jsp
注意:当前端页面使用jsp文件时,不能用@RestController,方法上也不能加@ResponseBody
5.spring boot中使用模板
5.1 在pom.xml文件中引入freemarker的依赖:
<dependency>
<groupId>org.springframework.boot</groupId>
<artifactId>spring-boot-starter-freemarker</artifactId>
</dependency>
5.2 在resources文件夹下新建templates文件夹,在文件夹中新建XXX.ftl文件
5.3 模板文件路径可以修改,修改方法为:在application.properties文件夹中添加(修改)spring.freemarker.templateLoaderPath=classpath:/ftl
5.4注意如果使用freemarker,那么对应的controller类上的注解不能用@RestController,只能用@Controller
那后台服务端代码如何向前端ftl模板文件传送数据呢?
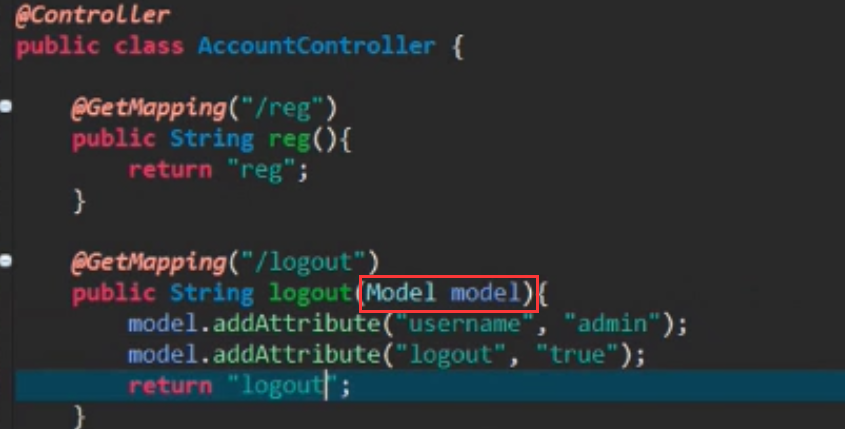
前端页面logout.ftl文件内容如下:
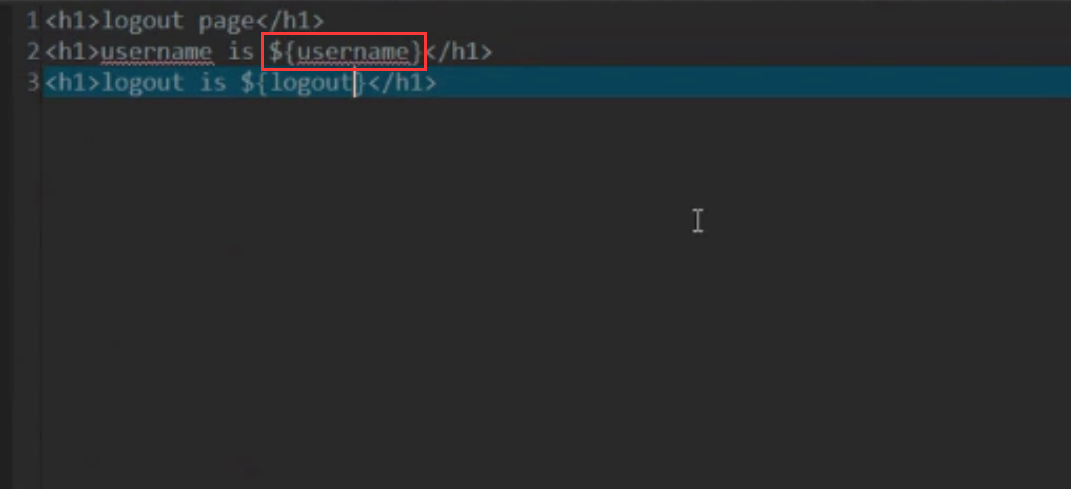
注意:在同一个文件中,jsp和模板ftl(或者velocity)二者最好只使用一个,不要都用
6. spring boot web中获取静态资源:
6.1 放在webapp文件夹下的资源是可以直接访问的
6.2 可以在classpath下新建(一般是在resources文件夹下)static或者public文件夹,为啥是这两个文件夹?可以通过源码知道:源码位置是 spring-boot-autoconfigure-1.5.7.RELEASE.jar 包下的org.springframework.boot.autoconfigure.web 下的ResourceProperties类,根据源码文件,那么我们就可以设置自己的静态文件夹的位置和名字:
在application.properties 文件中spring.resources.staticLocations=classpath:/html/
创建完或者不创建,浏览器访问的页面地址都是:localhost:8080/页面名字.html 注意路径中不用加static或者public或者新创建的文件夹html
7.如何在spring boot中使用servlet
7.1 编写XXXServlet 继承(extends)HttpServlet,类上使用注解@WebServlet("/xxx.do")

7.2 在App.class上添加包扫描@ServletComponentScan

7.3 除了上述方法之外,还可以在spring boot 中配置servlet使用其他方法:
7.3.1依然编写 XXXServlet类,这个时候在类上不再使用@WebServlet("/xxx.do")注解了,在App.class上也不用写@ServletComponentScan注解
7.3.2 编写一个配置类 例如 ServletRegister 在其上加注解@SpringBootConfiguration

以上两种Servlet的用法分析:
第一种方法,servlet其实依赖的是Servlet3.0,如果项目中使用的是Servlet3.0以下(Servlet2.0)那么第一种方法(使用注解@WebServlet("/xxx.do"))就行不通啦,因为Servlet2.0是不支持@WebServlet("/xxx.do")这个注解的
那么第二种方法,可以看出Servlet是注入到了Spring容器中,使用的是Spring的注入的一些Bean,所有能够适用Servlet2.0等
以上就是二者的区别
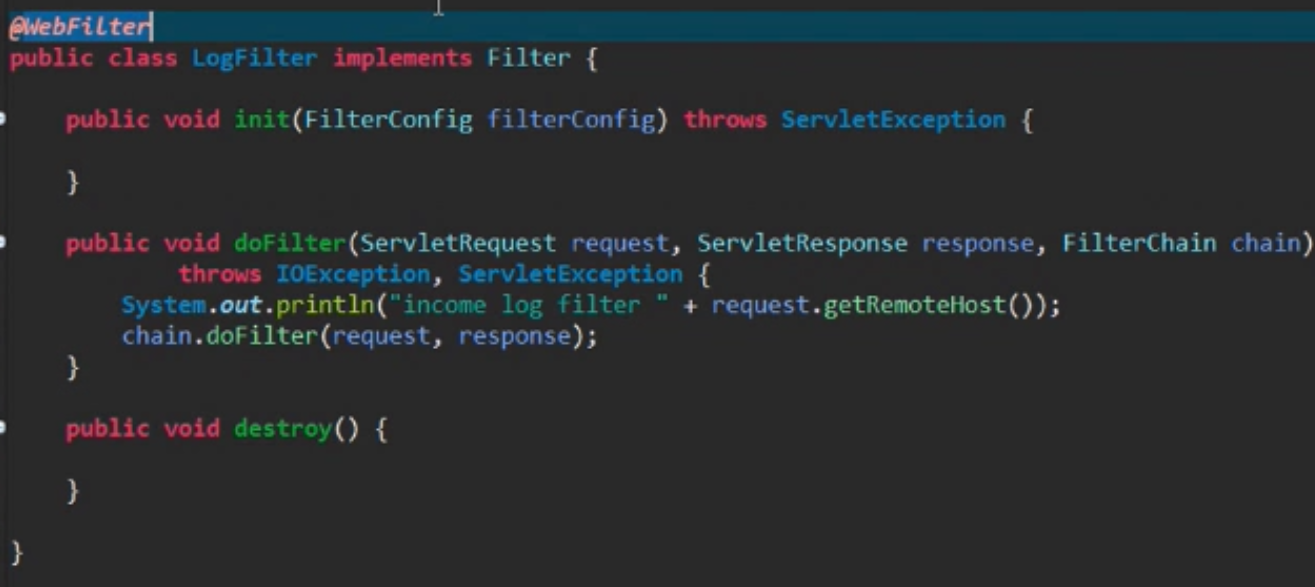
8.Spring boot 使用Filter: @WebFilter()括号中添加拦截的内容
9.spring boot 使用ServletContextListener

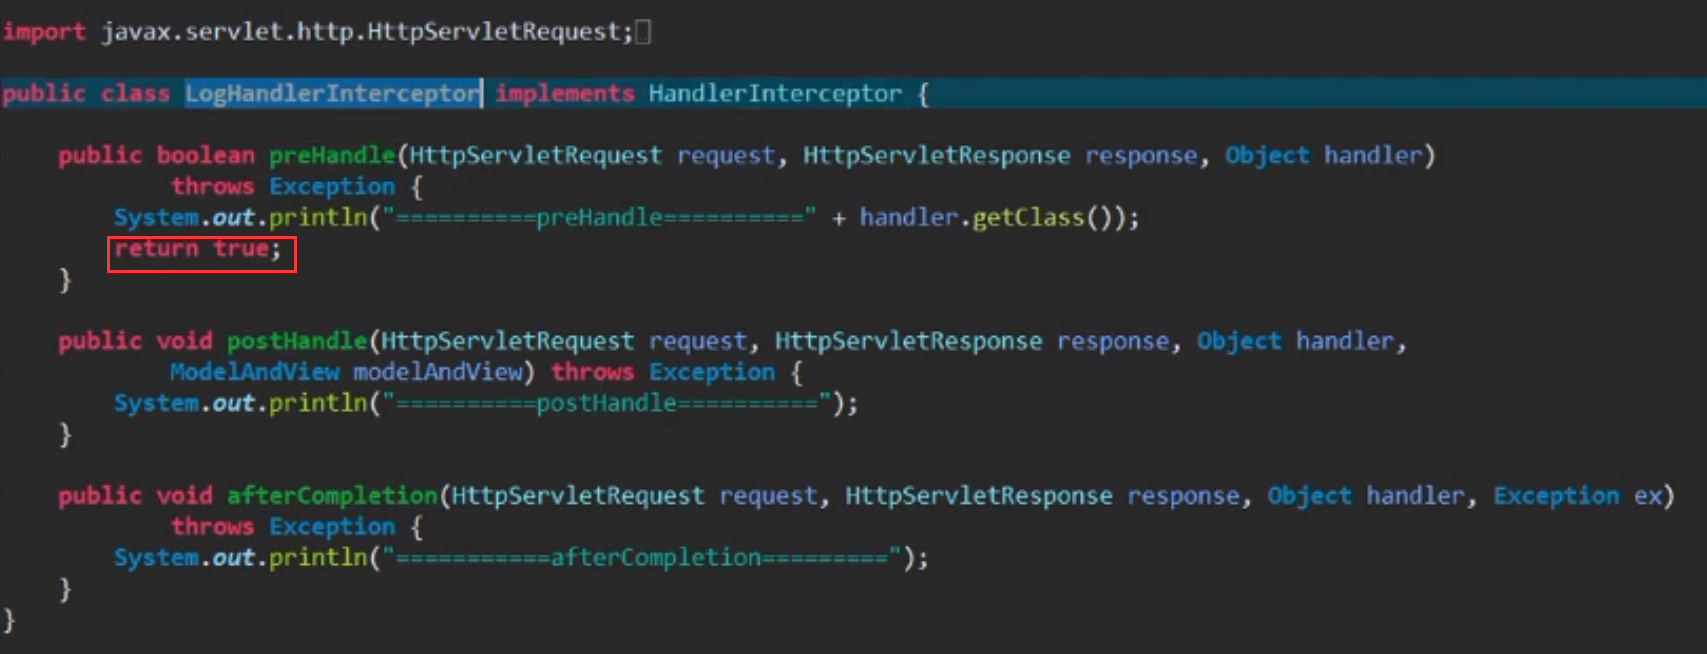
9.Spring boot中使用拦截器 : (HandlerInterceptor)
9.1编写拦截器类:
9.2 将编写的拦截器纳入到Spring容器中

总结:

10.spring boot 的异常处理
10.1 如何去掉spring boot自带的异常处理逻辑界面:
@SpringBootApplication(exclude=ErrorMvcAutoConfiguration.class)
10.2 如何在spring boot中出现错误(404,500错误)时,能够跳转到自己项目中指定的界面呢?
10.2.1 首先在resources下新建static或者public文件夹,建完文件夹后,新建404.html 和500.html
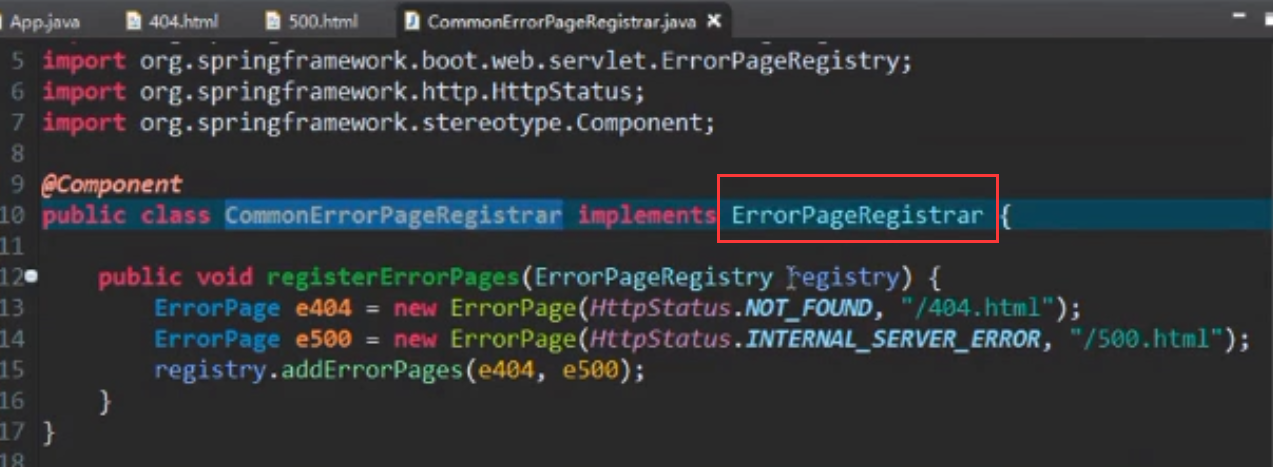
10.2.2 然后在编写java类:
这个类实现ErrorPageRegistrar接口,然后实现registerErrorPages方法,在该方法里面,添加具体的错误处理逻辑
10.3 处理当前类里面的异常:
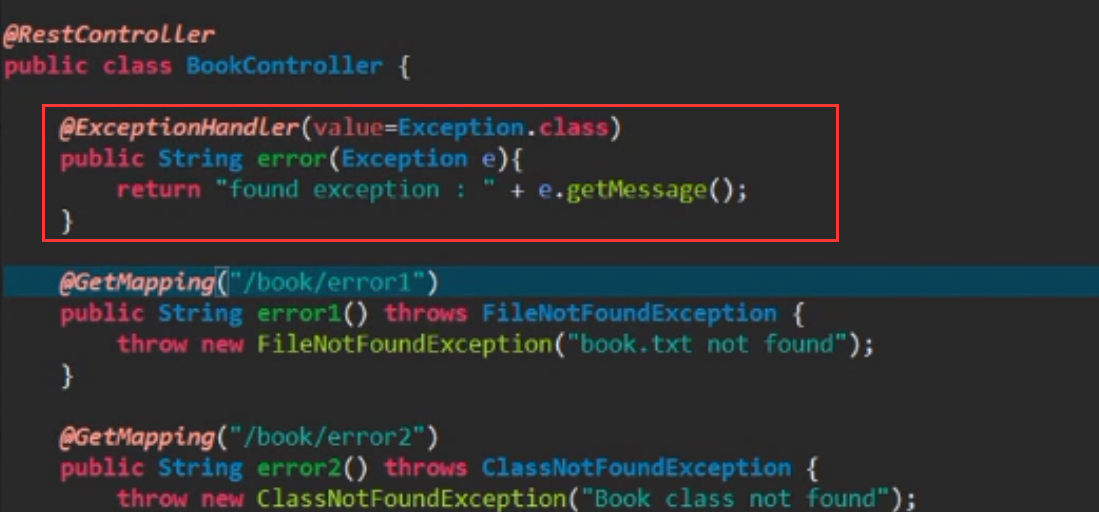
使用@ExceptionHandler(value=Exception.class) 当然value的值可以指定所需要的异常,比如ClassNotFoundException等等
10.4 处理全局异常:这时候需要编写一个异常类:
类的上面加注解@ControllerAdvice 类里面的方法上加@ExceptionHandler
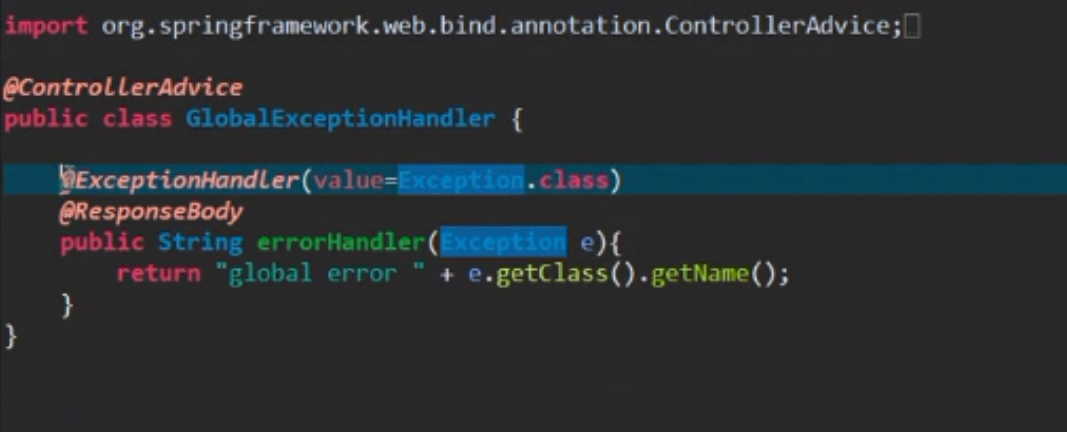
同样的,我们也可以在@ExceptionHandler(value="FileNotFoundException")中的value指定特定的异常类
当然这个类中可以写多个方法,每个方法负责处理不同的异常
11.spring boot中使用默认的Jdbctemplate DataSource(这个datasource默认使用的是tomcat的)
首先在pom.xml文件中加入
<dependency> <groupId>mysql</groupId> <artifactId>mysql-connector-java</artifactId> <version>6.0.3</version></dependency>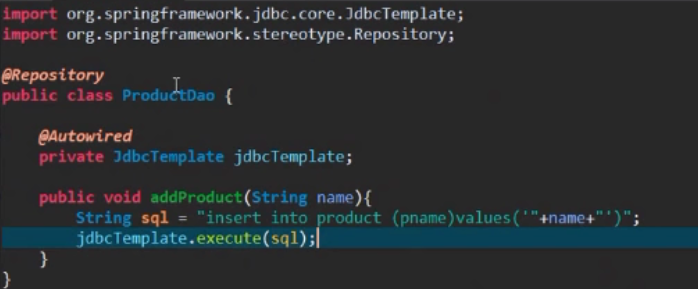
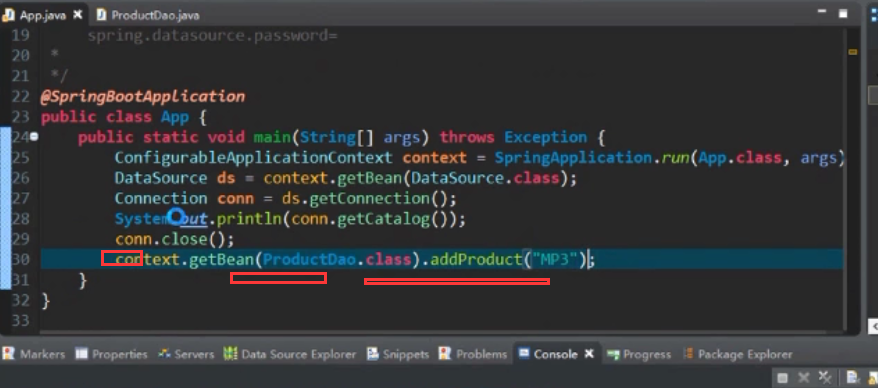
12.spring boot使用 自己配置的数据源如:druid
在pom.xml文件中加入依赖:
<dependency> <groupId>com.alibaba</groupId> <artifactId>druid</artifactId> <version>1.1.4</version></dependency> |

13.spring boot 中启用事物:
首先在使用的场合中(通常是Service类)启用注解@EnableTransactionManagement,然后在需要加事物的方法上面加注解@Transactional
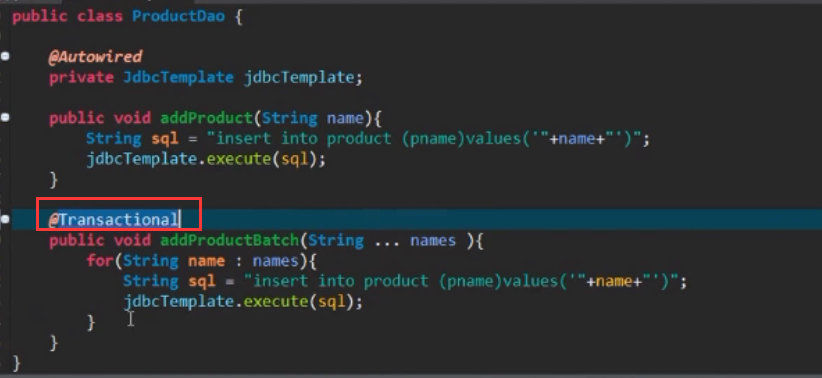
注意Spring boot的事物默认只对运行时异常进行事物生效(回滚),非运行时异常,比如FileNotFound异常,不会对事物进行回滚。RuntimeException 包括,比如空指针异常等
NullPointerException - 空指针引用异常
ClassCastException - 类型强制转换异常。
IllegalArgumentException - 传递非法参数异常。
ArithmeticException - 算术运算异常
ArrayStoreException - 向数组中存放与声明类型不兼容对象异常
IndexOutOfBoundsException - 下标越界异常
NegativeArraySizeException - 创建一个大小为负数的数组错误异常
NumberFormatException - 数字格式异常
SecurityException - 安全异常
UnsupportedOperationException - 不支持的操作异常
如果想对所有的异常都进行回滚,或者想指定特定的异常进行回滚,那么需要这样配置:
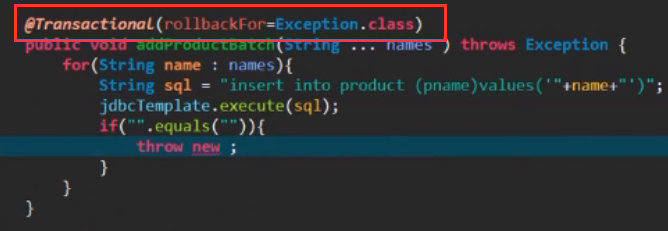
具体可点开@Transactional这个注解,注解里面的参数进行设置,比如,可以设置哪些异常不回滚,通过设置类的名字进行回顾等等
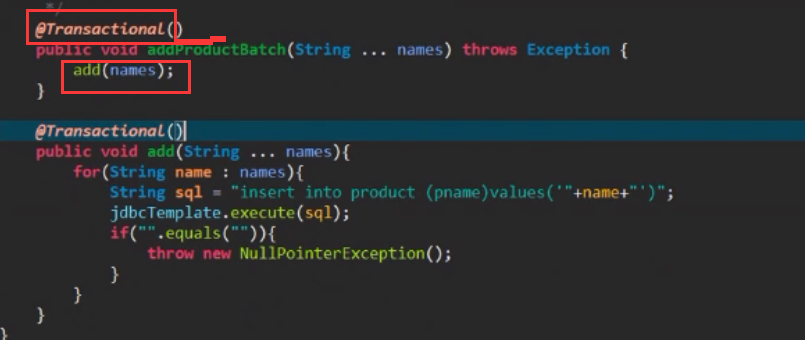
使用事物的注意事项:图中的addProductBatch()方法又调用了add()方法,那么若要使用事物的完整性,就必须在addProductBatch()方法上面加事物注解@Transactional
add方法上面可以不加注解
