前言
其实对于Nop的多语言,最主要的元素有下面两个:
-
WebWorkContext(IWorkContext的实现类)
-
LocalizationService(ILocalizationService的实现类)
其他相关的元素可以说都是在这两个的基础上体现价值的。
下面先来介绍一下WebWorkContext的WorkingLanguage属性,这个是贯穿整个应用的,所以必须要先从这个讲起。
WorkingLanguage
WebWorkContext中对多语言来说最为重要的一个属性就是WorkingLanguage,它决定了我们当前浏览页面所采用的是那种语言。
每次打开一个页面,包括切换语言时,都是读取这个WorkingLanguage的值。当然在读的时候,也做了不少操作:
-
从当前上下文中的_cachedLanguage变量是否有值,有就直接读取了这个值。
-
从GenericAttribute表中查询当前用户的语言ID,这张表中的字段Key对应的值是LanguageId时,就表明是某个用户当前正在使用的语言ID。
-
从Language表中查询出语言信息(当前店铺->当前店铺默认->当前店铺的第一个->所有语言的第一个)
查询语言表时,首先查出店铺支持的所有语言,然后找到当前用户正在使用的语言ID,根据这两个条件组合得到的Language实体就是当前的WorkingLanguage。
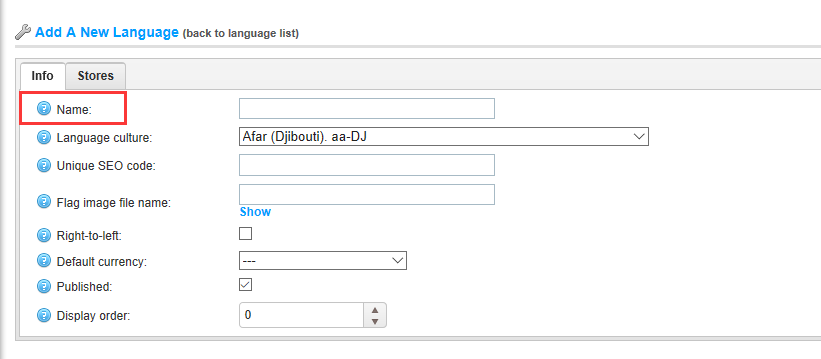
如果说这两个条件的组合拿不到相应的语言实体,就会根据当前Store的默认语言ID(如下图所示)去找。

如果根据Store的默认语言还是不能找到,就会取这个Store语言列表的第一个。
如果还是没有查找到相应的语言,那就不会根据Store去找语言,而是直接取所有发布语言中的第一个,这就要确保在数据库中必须存在一个初始化的语言。
初始化对任何一个系统都是必不可少的!!
下面是这个属性get具体的实现片段:
if (_cachedLanguage != null)
    return _cachedLanguage;

Language detectedLanguage = null;
if (_localizationSettings.SeoFriendlyUrlsForLanguagesEnabled)
{
    //get language from URL
    detectedLanguage = GetLanguageFromUrl();
}
if (detectedLanguage == null && _localizationSettings.AutomaticallyDetectLanguage)
{
    //get language from browser settings
    //but we do it only once
    if (!this.CurrentCustomer.GetAttribute<bool>(SystemCustomerAttributeNames.LanguageAutomaticallyDetected,
        _genericAttributeService, _storeContext.CurrentStore.Id))
    {
        detectedLanguage = GetLanguageFromBrowserSettings();
        if (detectedLanguage != null)
        {
            _genericAttributeService.SaveAttribute(this.CurrentCustomer, SystemCustomerAttributeNames.LanguageAutomaticallyDetected,
                 true, _storeContext.CurrentStore.Id);
        }
    }
}
if (detectedLanguage != null)
{
    //the language is detected. now we need to save it
    if (this.CurrentCustomer.GetAttribute<int>(SystemCustomerAttributeNames.LanguageId,
        _genericAttributeService, _storeContext.CurrentStore.Id) != detectedLanguage.Id)
    {
        _genericAttributeService.SaveAttribute(this.CurrentCustomer, SystemCustomerAttributeNames.LanguageId,
            detectedLanguage.Id, _storeContext.CurrentStore.Id);
    }
}

var allLanguages = _languageService.GetAllLanguages(storeId: _storeContext.CurrentStore.Id);
//find current customer language
var languageId = this.CurrentCustomer.GetAttribute<int>(SystemCustomerAttributeNames.LanguageId,
    _genericAttributeService, _storeContext.CurrentStore.Id);
var language = allLanguages.FirstOrDefault(x => x.Id == languageId);
if (language == null)
{
    //it not found, then let's load the default currency for the current language (if specified)
    languageId = _storeContext.CurrentStore.DefaultLanguageId;
    language = allLanguages.FirstOrDefault(x => x.Id == languageId);
}
if (language == null)
{
    //it not specified, then return the first (filtered by current store) found one
    language = allLanguages.FirstOrDefault();
}
if (language == null)
{
    //it not specified, then return the first found one
    language = _languageService.GetAllLanguages().FirstOrDefault();
}

//cache
_cachedLanguage = language;
return _cachedLanguage;
因为这里目前不涉及对这个属性的set操作,只有在切换语言的时候会涉及,所以set的内容会放到切换语言的小节说明。并且在大部分情况下,用到的都是get操作。
视图中常规的用法
来看看Nop中比较常规的用法:
我拿了BlogMonths.cshtml中的一小段代码做演示:

在视图中,可以看到很多这样的写法,几乎每个cshtml文件都会有!
这里的T其实是一个delegate。这个delegate有2个输入参数,并最终返回一个LocalizedString对象。
比较经常的都是只用到了第一个参数。第一个参数就是对应 LocaleStringResource表中的ResourceName字段
可以把这个对应关系理解为一个key-value,就像用网上不少资料用资源文件处理多语言那样。
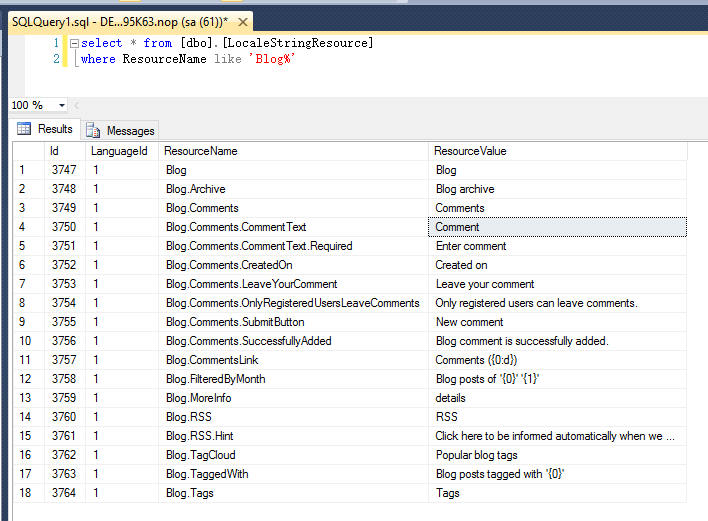
下图是在LocaleStringResource表中用Blog做模糊查询的示例结果:
至于第二个参数怎么用,想想我们string.Format的用法就知道个所以然了。只要在ResourcesValue中存储一个带有占位符的字符串即可!
上图中也有部分ResourcesValue用到了这个占位符的写法。
其实我们看了它的实现会更加清晰的理解:
public Localizer T
{
    get
    {
        if (_localizer == null)
        {
            //null localizer
            //_localizer = (format, args) => new LocalizedString((args == null || args.Length == 0) ? format : string.Format(format, args));

            //default localizer
            _localizer = (format, args) =>
                             {
                                 var resFormat = _localizationService.GetResource(format);
                                 if (string.IsNullOrEmpty(resFormat))
                                 {
                                     return new LocalizedString(format);
                                 }
                                 return
                                     new LocalizedString((args == null || args.Length == 0)
                                                             ? resFormat
                                                             : string.Format(resFormat, args));
                             };
        }
        return _localizer;
    }
}
此时可能大家会有个疑问,这里返回的是一个LocalizedString对象,并不是一个字符串,那么,它是怎么输出到页面并呈现到我们面前的呢??
最开始的时候我也迟疑了一下,因为源码在手,所以查看了一下类的定义:
public class LocalizedString : MarshalByRefObject, IHtmlString
{}看到这个类继承了IHtmlString接口,应该就知道个七七八八了!这个接口的ToHtmlString方法就是问题的本质所在!
当断点在LocalizedString实现的ToHtmlString方法时会发现,大部分都是走的这个方法,返回的内容也就是所谓键值对中的值。
其中还有部分是显式调用Text等其他属性的。
有兴趣深入了解这个接口的内容,可以去看看msdn上面相关的内容。
视图中强类型的使用
说起强类型,大家应该也不会陌生,毕竟大部分的MVC教程都会涉及。
在System.Web.Mvc.Html这个命名空间下,有不少静态类(如InputExtensions,SelectExtensions等)和静态方法(如TextBoxFor,PasswordFor等)。
其中这些静态方法中,以For结尾的都是归属于强类型。
看看它们的方法签名就知道了为什么叫强类型了。
public static MvcHtmlString TextBoxFor<TModel, TProperty>(this HtmlHelper<TModel> htmlHelper, Expression<Func<TModel, TProperty>> expression);下面就来看看,Nop在多语言这一块是怎么个强类型法。
Nop在强类型这一块的就一个扩展:NopLabelFor
Nop只在Nop.Admin这个项目中用到这个扩展的,在Nop.Web是没有用到的。
在我个人看来,这一块的实现可以说是挺妙的!下面来看看它是怎么个妙法:
先来看看它的用法,既然是强类型的,就必然有两个方面,一个是View,一个是Model
View中的用法
@Html.NopLabelFor(model => model.Name)Model的定义
[NopResourceDisplayName("Admin.Configuration.Languages.Fields.Name")]
public string Name { get; set; }
在View中的用法和其他强类型的写法并没有什么太大的区别!只是在Model定义的时候要加上一个Attribute做为标识
下面来看看它的实现,其实这个的实现主要涉及的相关类就只有两个:
-
一个是视图的扩展-HtmlExtensions
-
一个是模型相关的Attribute-NopResourceDisplayName
先来看一下NopResourceDisplayName的实现
public class NopResourceDisplayName : System.ComponentModel.DisplayNameAttribute, IModelAttribute
{
    private string _resourceValue = string.Empty;
    //private bool _resourceValueRetrived;

    public NopResourceDisplayName(string resourceKey)
        : base(resourceKey)
    {
        ResourceKey = resourceKey;
    }

    public string ResourceKey { get; set; }

    public override string DisplayName
    {
        get
        {
            //do not cache resources because it causes issues when you have multiple languages
            //if (!_resourceValueRetrived)
            //{
            var langId = EngineContext.Current.Resolve<IWorkContext>().WorkingLanguage.Id;
                _resourceValue = EngineContext.Current
                    .Resolve<ILocalizationService>()
                    .GetResource(ResourceKey, langId, true, ResourceKey);
            //    _resourceValueRetrived = true;
            //}
            return _resourceValue;
        }
    }

    public string Name
    {
        get { return "NopResourceDisplayName"; }
    }
}
重写了DisplayNameAttribute的DisplayName ,这样在界面中展示的时候就会显示这个值 , 实现了IModelAttribute的Name。
其中DisplayName中是根据ResourcesKey去数据库中找到要显示的文字。Name是在HtmlExtensions中用于拿到对应的NopResourceDisplayName对象。
然后是扩展的具体写法:
public static MvcHtmlString NopLabelFor<TModel, TValue>(this HtmlHelper<TModel> helper, Expression<Func<TModel, TValue>> expression, bool displayHint = true)
{
    var result = new StringBuilder();
    var metadata = ModelMetadata.FromLambdaExpression(expression, helper.ViewData);
    var hintResource = string.Empty;
    object value;
    if (metadata.AdditionalValues.TryGetValue("NopResourceDisplayName", out value))
    {
        var resourceDisplayName = value as NopResourceDisplayName;
        if (resourceDisplayName != null && displayHint)
        {
            var langId = EngineContext.Current.Resolve<IWorkContext>().WorkingLanguage.Id;
            hintResource = EngineContext.Current.Resolve<ILocalizationService>()
                .GetResource(resourceDisplayName.ResourceKey + ".Hint", langId);

            result.Append(helper.Hint(hintResource).ToHtmlString());
        }
    }
    result.Append(helper.LabelFor(expression, new { title = hintResource }));
    return MvcHtmlString.Create(result.ToString());
}
这个扩展做的事其实也很简单,根据模型的NopResourceDisplayName这个Attribute去显示对应的信息。
不过要注意的是在这里还做了一个额外的操作:在文字的前面添加了一个小图标!
可以看到这句代码helper.Hint(hintResource).ToHtmlString(),它调用了另一个Html的扩展,这个扩展就只是创建了一个img标签。
最后的效果如下:
这里还有一个关于验证相关的实现,这里的多语言实现与强类型的实现相类似,就不重复了,它的实现依赖于FluentValidation。
模型Property的用法
上面提到的基本都是在页面上的操作的多语言,Nop中还有不少是直接在controller等地方将多语言的结果查出来赋值给对应的视图模型再呈现到界面上的!这一点十分感谢 Spraus 前辈的评论提醒!
下面以首页的Featured products为例补充说明一下这种用法。
foreach (var product in products)
{
    var model = new ProductOverviewModel
    {
        Id = product.Id,
        Name = product.GetLocalized(x => x.Name),
        ShortDescription = product.GetLocalized(x => x.ShortDescription),
        FullDescription = product.GetLocalized(x => x.FullDescription),
        //...
    };
    //other code
}通过上面的代码片段,可以看出,它也是用了一个泛型的扩展方法来实现的。这个扩展方法就是GetLocalized。
大家应该已经发现这里的写法与我们前面提到的强类型写法有那么一点类似~~都是我们熟悉的lambda表达式。
有那么一点不同的是,这里的实现是借助了Linq的Expression。
var member = keySelector.Body as MemberExpression;
var propInfo = member.Member as PropertyInfo;

TPropType result = default(TPropType);
string resultStr = string.Empty;

string localeKeyGroup = typeof(T).Name;
string localeKey = propInfo.Name;

if (languageId > 0)
{
    //localized value
    if (loadLocalizedValue)
    {
        var leService = EngineContext.Current.Resolve<ILocalizedEntityService>();
        resultStr = leService.GetLocalizedValue(languageId, entity.Id, localeKeyGroup, localeKey);
        if (!String.IsNullOrEmpty(resultStr))
            result = CommonHelper.To<TPropType>(resultStr);
    }
}

//set default value if required
if (String.IsNullOrEmpty(resultStr) && returnDefaultValue)
{
    var localizer = keySelector.Compile();
    result = localizer(entity);
}
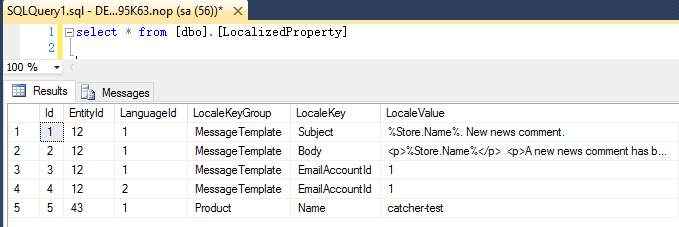
return result;上面是这种方式的核心代码片段。这里还涉及到了另外的一张数据表LocalizedProperty
对商品这一块来说,这样做的意义就是维护多套不同语言的商品资料。有专人来维护这一块可以做到更好的分工!
- EntityId -> 实体id(例:商品的id)
- LanguageId -> 语言id
- LocaleKeyGroup -> 所在分组(例:商品组,这里以类名或表名作为定义)
- LocaleKey -> 键(例:商品名称,这里是类的属性名或表的字段名)
- LocalValue ->值(例:Lumia 950XL,这里是类的属性值或表的字段值)
当然这样子的做法会导致这个表的数据量飙升!尤其是商品基数太大的时候。这个时候就可以采用分库分为表的方式来处理这个问题。
切换语言
Nop中的切换语言是通过在一个下拉框中选中后通过js跳转来完成。
window.location.href=/Common/SetLanguage/{langid}?returnUrl=xxx可以看到,它是由CommonController下面的SetLanguage这个Action来处理的。
在setlanguage处理的时候,主要有4大步(第三步是Nop.Web这个项目用的),大致的流程如下:

其中还给当前上下文(workcontext)的WorkingLanguage属性为找到的那个Language实体。
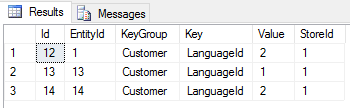
同时会向GenericAttribute这个表中添加或者更新记录,这个表就像是一个配置表那样,存着许多的配置信息。这里添加或更新的依据是KeyGroup为Customer,Key为LanguageId。
具体设置的片段代码如下:
var languageId = value != null ? value.Id : 0;
_genericAttributeService.SaveAttribute(this.CurrentCustomer,
    SystemCustomerAttributeNames.LanguageId,
    languageId, _storeContext.CurrentStore.Id);

//reset cache
_cachedLanguage = null;
总结
多语言的解决方案有很多,但是不乎下面这几种情况居多:
- 资源文件、XML文件等外部文件
- 基于数据库(字段级别、表级别等)
- 为每种语言单独生成一个页面
- 为每种语言单独做一个站点
- 第三方的翻译API
Nop的多语言是基于数据库实现的,我个人也是比较偏向于这种实现!
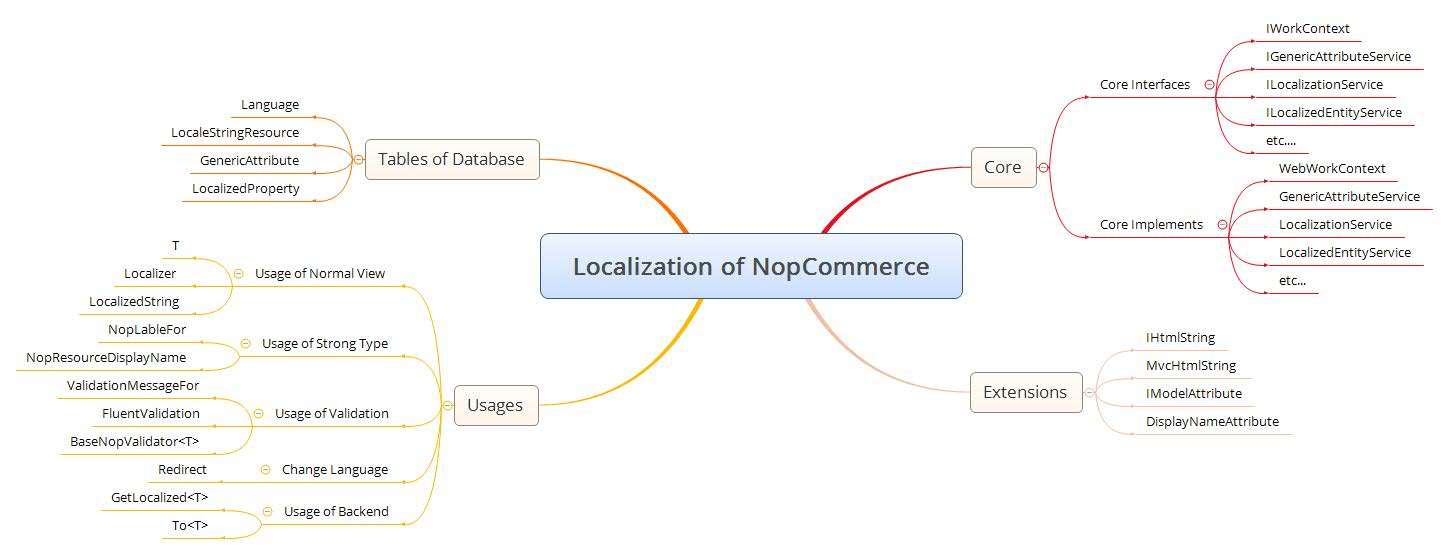
最后用一张思维导图来概括本文的内容