JavaScript进阶和JQuery入门
一、BOM模型
BOM(Brower Object Model)浏览器对象模型。在HTML页面加载时,浏览器在内存中生成一个全局对象window,通过这个window来访问浏览器相关的信息。把这个对象成为浏览器对象模型。
BOM的组成:
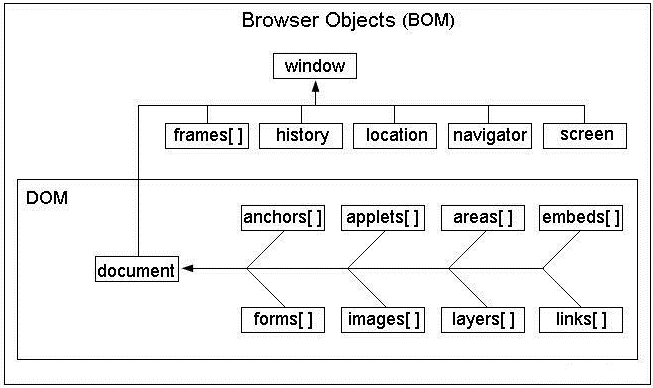
BOM的window对象包含6大核心,分别是:
- document:对象,即文档对象
- frames :HTML自带框架
- history:历史访问记录(页面)
- location:当前访问的页面
- navigator:包含浏览器的相关信息
- screen:用户显示屏幕相关信息
BOM的顶级对象就是window,由于所有浏览器都支持window对象,所以在调用函数的时候,window可以省略。
用户自定义的全局变量和全局函数都是window的成员。
二、window之定时器
1、什么是定时器
所谓定时器,就是在指定的事件,执行我们指定好的一件事。
生活中的定时器:闹钟、定时炸弹、上课铃声等。。
程序中的定时器:轮播图、定时弹出广告等。
2、JS中的定时器
JS中的定时函有两种:
2.1、周期定时器
按照指定的周期来调用函数或者代码串,执行多次
语法:
var timeid = window.setInteval(code,ms);
参数解析:
code:每隔一段事件执行的具体js代码或者函数
ms:间隔时间,单位是毫秒,1秒 = 1000毫秒
案例:每隔一秒打印一条语句
<!DOCTYPE html>
<html>
	<head>
		<meta charset="utf-8">
		<title>周期定时器</title>
	</head>
	<body>
	</body>
	<script type="text/javascript">
		//每隔一秒打印一条语句
		var timeid = window.setInterval(function(){
			console.log("123");
		},1000);
	</script>
</html>
案例:轮播图
<!DOCTYPE html>
<html>
	<head>
		<meta charset="utf-8">
		<title>轮播图</title>
	</head>
	<body>
		<img src="img/1.png" id="img" >
	</body>
	<script type="text/javascript">
		//定义索引
		var index = 1;
		//创建定时器
		var timeid = window.setInterval(function(){
			//获取img标签
			var img = document.getElementById('img');
			//给img设置新的图片
			img.src = 'img/' + (++index) + '.png';
			if(index == 5){
				index = 0;
			}
		},1000);
	</script>
</html>
2.2、延时定时器
在指定的毫秒后调用函数或者代码串,只执行一次
语法:
var timeid = window.setTimeout(code,ms);
参数说明:
code:延迟执行的代码或者函数
ms:延迟时间,单位毫秒
案例:打开页面五秒后,打印一条输出语句
<!DOCTYPE html>
<html>
	<head>
		<meta charset="utf-8">
		<title>延时定时器</title>
	</head>
	<body>

	</body>
	<script type="text/javascript">
		//创建延时定时器
		var timeid = window.setTimeout(function(){
			console.log('耗子尾汁');
		},5000);
	</script>
</html>
案例:页面打开三秒后,隐藏图片
<!DOCTYPE html>
<html>
	<head>
		<meta charset="utf-8">
		<title></title>
	</head>
	<body>
		<img src="img/1.png" id="img">
	</body>
	<script type="text/javascript">
		//创建定时器
		var timeid = setTimeout(function(){
			//获取图片元素
			var img = document.getElementById('img');
			//隐藏元素
			img.style.display = 'none';
		},3000);
	</script>
</html>
2.3、清除定时器
可以阻止定时器的执行
语法:
windos.clearInterval(timeid);
window.clearTimeout(timeid);
参数说明:
timeid:具体的定时器id
案例:停止倒计时
<!DOCTYPE html>
<html>
	<head>
		<meta charset="utf-8">
		<title>清空定时器案例-倒计时停止</title>
	</head>
	<body>
		<button type="button" onclick="startInterval()">开始倒计时</button>
		<button type="button" onclick="stopInterval()">停止倒计时</button>
	</body>
	<script type="text/javascript">

		var timeid = null;

		//开启定时器
		function startInterval(){
			//防止多次点击
			if(timeid != null){
				window.clearInterval(timeid);
			}
			//创建倒计时变量
			var count = 100;
			//开启定时器
			timeid = window.setInterval(function(){
				//如果不为0
				if(--count > 0){
					console.log(count);
				}
			},1000);
		}

		//清空定时器
		function stopInterval(){
			window.clearInterval(timeid);
		}
	</script>
</html>
三、window弹框
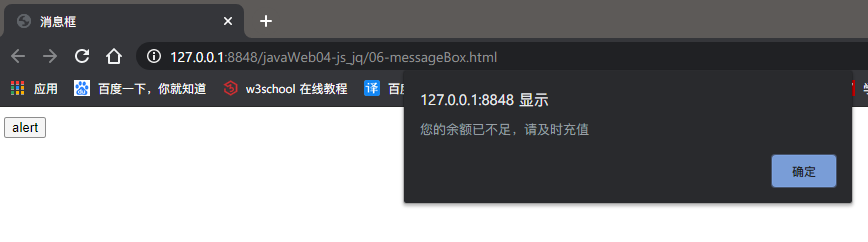
1、消息框
windows.alert('内容');
案例:
<!DOCTYPE html>
<html>
	<head>
		<meta charset="utf-8">
		<title>消息框</title>
	</head>
	<body>
		<input type="button" value="alert" onclick="alertBox()">
	</body>
	<script type="text/javascript">

		//1、消息框
		function alertBox(){
			window.alert("您的余额已不足,请及时充值");
		}
	</script>
</html>
效果:
2、确认框
window.confirm("提示内容");
案例:
<!DOCTYPE html>
<html>
	<head>
		<meta charset="utf-8">
		<title>消息框</title>
	</head>
	<body>
		<input type="button" value="confirm" onclick="confirmBox()">
	</body>
	<script type="text/javascript">

		//2、确认框
		function confirmBox(){
			if(window.confirm("您确定要关闭吗?")){
				alert('已关闭');
			}else{
				alert('你点了取消');
			}
		}
	</script>
</html>
3、接收框
window.prompt('默认内容',"默认值");
案例:
<!DOCTYPE html>
<html>
	<head>
		<meta charset="utf-8">
		<title>消息框</title>
	</head>
	<body>
		<input type="button" value="prompt" onclick="promptBox()">
	</body>
	<script type="text/javascript">

		//3、输入框
		function promptBox(){
			var inputVal = window.prompt("请输入你的姓名:","");
			window.alert("你输入的是:" + inputVal);
		}
	</script>
</html>
四、其他window对象
1、location
location:当前页的url地址,可通过设置一个新路径跳转到指定页面。
案例:跳转到百度页面
<!DOCTYPE html>
<html>
	<head>
		<meta charset="utf-8">
		<title>location属性</title>
	</head>
	<body>
		<input id="btn" type="button" value="跳转页面">
	</body>
	<script type="text/javascript">

		//打印location的属性
		console.log(location.href);
		console.log(location.hostname);
		console.log(location.protocol);
		console.log(location.pathname);
		console.log(location.port);

		//跳转页面的单击事件
		document.getElementById("btn").onclick = function(){
			location.href = "https://www.baidu.com";
		}
	</script>
</html>
属性介绍:
href:设置或获取当前链接
hostname:当前链接的主机号
protocol:当前链接的协议
pathname:当前链接的地址
port:当前链接的端口号
2、history
history:浏览器的访问记录。
windows.history
案例代码:
<!DOCTYPE html>
<html>
	<head>
		<meta charset="utf-8">
		<title>history属性</title>
	</head>
	<body>
		<a href="https://www.baidu.com">baidu</a>
		<button type="button" onclick="back()">上一页</button>
		<button type="button" onclick="forward()">下一页</button>
	</body>
	<script type="text/javascript">

		//返回上一个页面
		function back(){
			//back:后退,相等于浏览器的后退箭头
			history.back();
		}

		//继续下一个页面
		function forward(){
			//forward:前进,相当于浏览器的前进箭头
			history.forward();
		}

	</script>
</html>
方法介绍:
history.back():回到上一个页面
history.forward():下一个页面
3、screen
用于获取和屏幕有关的属性
<!DOCTYPE html>
<html>
	<head>
		<meta charset="utf-8">
		<title></title>
	</head>
	<body>
	</body>
	<script type="text/javascript">
		//打印屏幕属性
		console.log(window.screen);
		//打印屏幕的宽度(包含任务栏)
		console.log(window.screen.width);
		//打印屏幕的高度(包含任务栏)
		console.log(window.screen.height);
		//打印屏幕的宽度(不包含任务栏)
		console.log(window.screen.availWidth);
		//打印屏幕的高度(不包含任务栏)
		console.log(window.screen.availHeight);
	</script>
</html>
属性介绍:
window.screen.width:屏幕的宽度
window.screen.height:屏幕的高度
window.screen.avaiWidth:不包含任务栏的宽度
windows.screen.avaiHeight:不包含任务栏的高度
4、document
获取dom元素,获取body的可见区域
<!DOCTYPE html>
<html>
	<head>
		<meta charset="utf-8">
		<title></title>
	</head>
	<body>
		<p>hello world</p>
	</body>
	<script type="text/javascript">

		//打印body的宽高
		console.log(document.body.offsetWidth);
		console.log(document.body.offsetHeight);


	</script>
</html>
属性介绍:
document.body.offsetWidth:获取body的宽度
document.body.offsetHeight:获取body的高度
5、拓展案例:桌面弹球
需求如图:

案例代码:
<!DOCTYPE html>
<html>
	<head>
		<meta charset="UTF-8">
		<title>桌面弹球</title>
		<style type="text/css">
			* {
				padding: 0;
				margin: 0;
			}

			.ball {
				 100px;
				height: 100px;
				/*修改为圆形*/
				border-radius: 50%;
				background-color: red;
			}
		</style>
	</head>
	<body>
		<div id="ball" class="ball"></div>
	</body>
	<script type="text/javascript">
		//获取球体元素
		var ball = document.getElementById("ball");

		//初始增量
		var incr = 0;
		//移动方向,默认为左
		var left = true;

		//将小球移动方法
		function toRight(incr) {
			ball.style.marginLeft = incr + 'px';
		}
		//启动定时器
		window.setInterval(function() {
			if (incr + 100 == document.body.offsetWidth) {
				left = false;
			}
			if (incr == 0) {
				left = true;
			}
			toRight(left ? ++incr : --incr);
		}, 5);
	</script>
</html>
五、JQuery基本介绍
1、jQuery简介
JQuery是一个快速、简洁的JavaScript框架。JQuery设计的宗旨是“Write Less,Do More”,即提倡用更少的代码,做更多的事。它封装JavaScript常用的功能代码,提供一种简洁的JavaScript设计模式,优化HTML文档操作、事件处理、动画设计和AJAX交互。
2、jQuery的使用步骤
2.1、下载jQuery库文件
登录jquery官网,https://jquery.com/download/进入下载页面

下载后,我们会得到:
- jquery-3.5.1.min.js:压缩版本
- jquery-3.5.1.js:未压缩版本
区别:
1、压缩版本比为压缩版本的体积更小,去除了注释,并且进行了压缩和混淆。加载速度更快。
2、未压缩版本的编码更加规范,可以用来学习使用。而压缩版本的阅读性很低。
2.2、使用jQuery库文件
jquery库文件就是使用JavaScript编写的代码,可以直接使用外部引入js的方式引入。
<!-- 引入JQuery库文件 -->
<script type="text/javascript" src="js/jquery-3.5.1.min.js"></script>
2.3、jQuery的基本语法
jQuey中需要频繁使用jQuery关键字进行API调用。由于jQuery是严格区分大小写的,所以书写这个单词非常繁琐。jQuery中定义了$符,替代jQuery关键字。
$()或者jQuery()称之为工厂函数
$(选择器) 或者 jQuery(选择器) 可以查找页面元素
2.4、jQuery加载就绪函数
如果想在页面加载的时候就执行一段代码,可以使用window.onload来指定加载时执行的函数。
	<script type="text/javascript">

		//页面加载时执行
		window.onload = function(){
			//具体代码
		}
	</script>
在jQuery中提供了就绪函数,可以实现上述功能:
<!DOCTYPE html>
<html>
	<head>
		<meta charset="utf-8">
		<title></title>
		<!-- 引入JQuery库文件 -->
		<script type="text/javascript" src="js/jquery-3.5.1.min.js"></script>
	</head>
	<body>
	</body>
	<script type="text/javascript">

		//页面加载时执行
		window.onload = function(){
			//具体代码
			alert(0);
		}

		//第一种就绪函数写法
		jQuery(document).ready(function(){
			//具体代码
			alert(1);
		});

		//第二种就绪函数写法
		$(document).ready(function(){
			//具体代码
			alert(2);
		})

		//第三种就绪函数写法
		$(function(){
			//具体代码
			alert(3);
		})
	</script>
</html>
二者区别:
1、window.onload一个页面只能写一个,多个时,只执行最后一个;而jQuery中的加载就绪函数就可以写多个,而且都可以执行。
注意:使用jQuery时,一定要先导入库文件,再写脚本代码。
3、DOM对象和jQuery对象
DOM对象:通过原生js代码获取到的对象就是DOM对象
jQuery对象:通过工厂函数jQury()或者$()对DOM对象进行包装后得到的对象就是jQuery对象。
二者可以相互转换但是DOM对象和jQuery对象所拥有的属性和函数不能混合调用。
转换方式:
DOM to jQuery:$(dom对象)或者jQuery(dom对象)
jQuery to DOM:jQury对象[index] 或者 jQuery对象,get(index)
案例:
<!DOCTYPE html>
<html>
	<head>
		<meta charset="utf-8">
		<title></title>
		<script type="text/javascript" src="js/jquery-3.5.1.min.js"></script>
	</head>
	<body>
		<div id="box"></div>
	</body>
	<script type="text/javascript">
		//通过原生js获取DOM对象
		var box = document.getElementById("box");
		//将js对象转换为jq对象
		var $box = $(box);
		//打印jq对象和js对象
		console.log(box);
		console.log($box);


		//将jQuery对象转换为js对象
		var jsBox = $box[0];
		console.log(jsBox);
		console.log($box.get(0));
	</script>
</html>
注意:jQuery对象建议使用(开头,便与区分(不是必须以)开头)
案例:通过DOM和jQuery对象获取标签中的文本信息和文本框中的值
<!DOCTYPE html>
<html>
	<head>
		<meta charset="utf-8">
		<title>DOM和jQuery函数调用问题</title>
		<script type="text/javascript" src="js/jquery-3.5.1.min.js"></script>
	</head>
	<body>
		<p id="content"><span>中公教育</span></p>
		<input type="text" id="name" value="hello world">
	</body>
	<script type="text/javascript">

		//获取DOM元素
		var content = document.getElementById("content");
		//获取DOM元素的内容
		console.log(content.innerText);
		console.log(content.innerHTML)

		//转换为jQuery对象
		var $content = $(content);
		console.log($content.text());
		console.log($content.html());

		//获取文本框的值
		var text = document.getElementById("name");
		console.log(text.value);
		var $text = $(text);
		console.log($text.val());
	</script>
</html>
总结:
jQuery对象中的text()方法等价于js中的innerText
jQuery对象中的html()方法等价于js中的innerHTML
jQuery对象中的val()方法等价于js中的value
六、jQuery选择器
选择器作用:精确定位查询页面中的元素。
选择器分为:
- 基本选择器
- 层级选择器
- 过滤选择器
- 属性选择器
- 表单选择器
- this
1、基本选择器
标签 类 id 全局 这类选择器属于基本选择器
案例:
<!DOCTYPE html>
<html>
	<head>
		<meta charset="utf-8">
		<title></title>
		<script type="text/javascript" src="js/jquery-3.5.1.min.js"></script>
	</head>
	<body>
		<p id="title">p1</p>
		<p class="group1">p2</p>
		<p class="group1">p3</p>
	</body>
	<script type="text/javascript">

		//标签选择器:HTML页面中所有的标签
		var el1 = $("p");
		console.log(el1.length)

		//类选择器
		var el2 = $(".group1");
		console.log(el2.length);

		//id选择器
		var el3 = $("#title");
		console.log(el3.length);

		//全局选择器
		var el4 = $("*");
		console.log(el4.length);
		console.log(el4);
	</script>
</html>
总结:
标签选择器:$("标签名");
类选择器:$("类名");
id选择器:$("id");
全局选择器:$("*");
2、层级选择器
层级选择器是根据节点树上的层级关系获取元素。
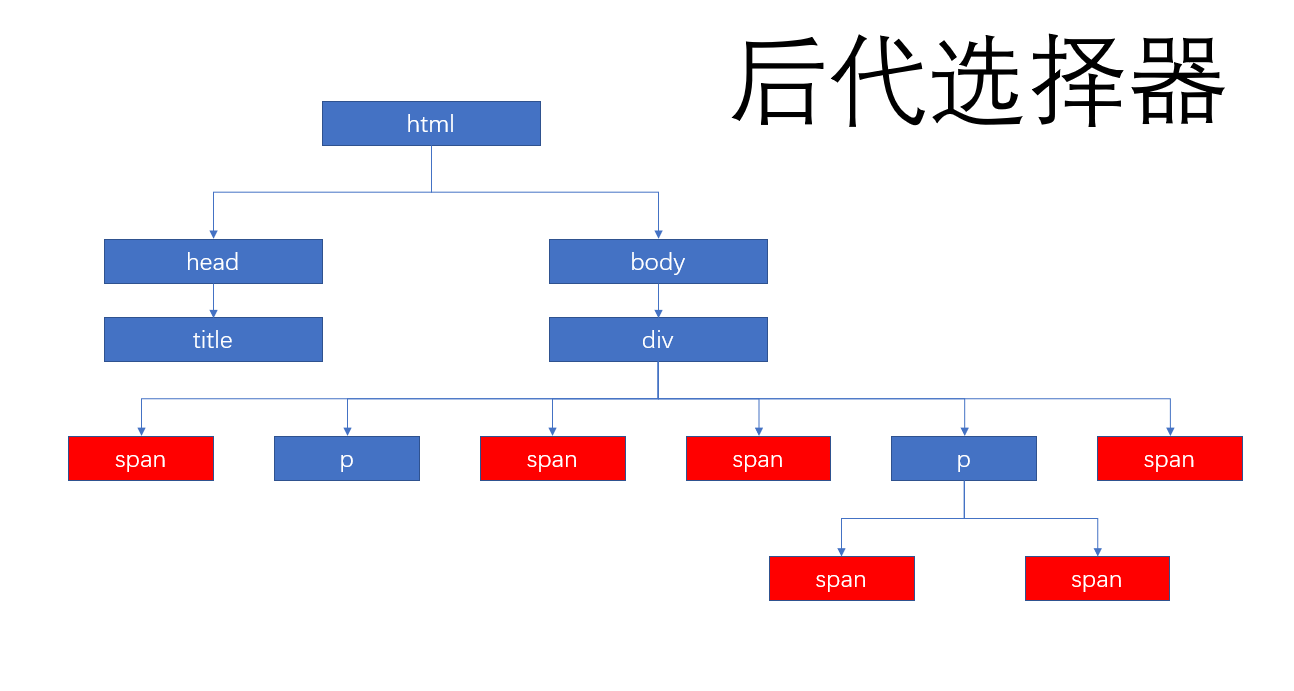
2.1、后代选择器
parent child 使用空格隔开 , 表示parent节点内的所有child节点(子、孙、重孙。。)
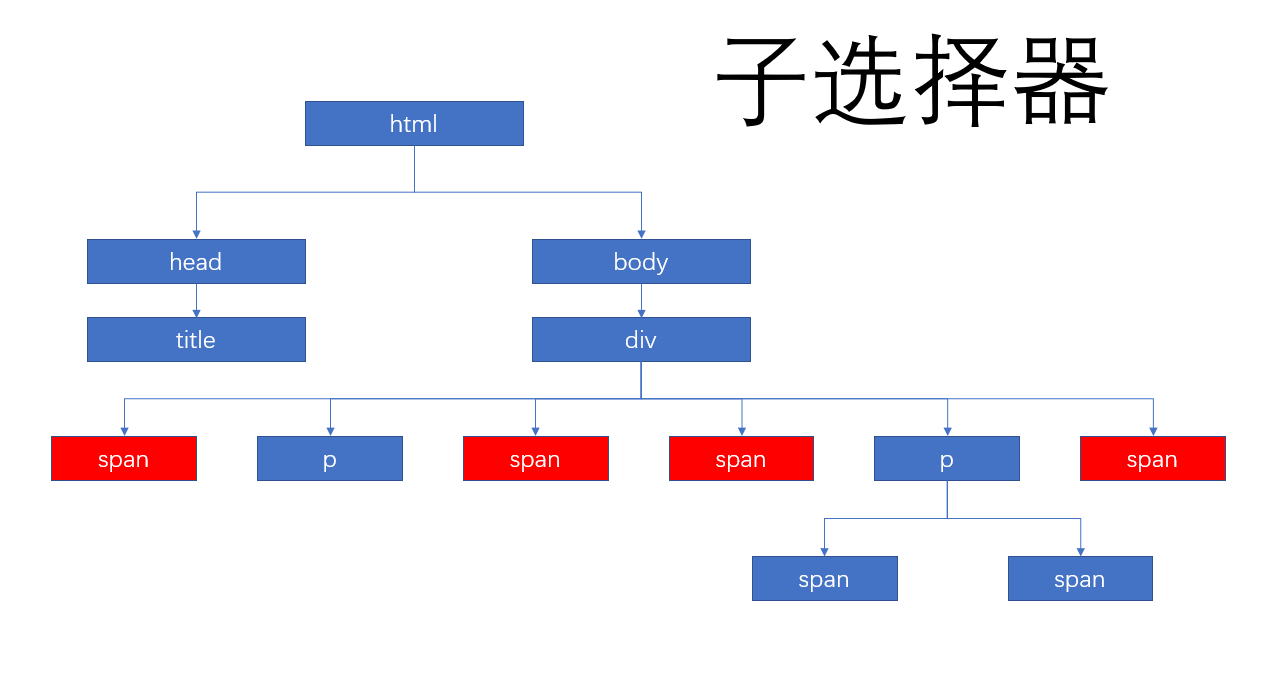
2.2、子选择器
parent > child 中间使用>隔开,表示parent的直接子节点child(一定要是子节点)
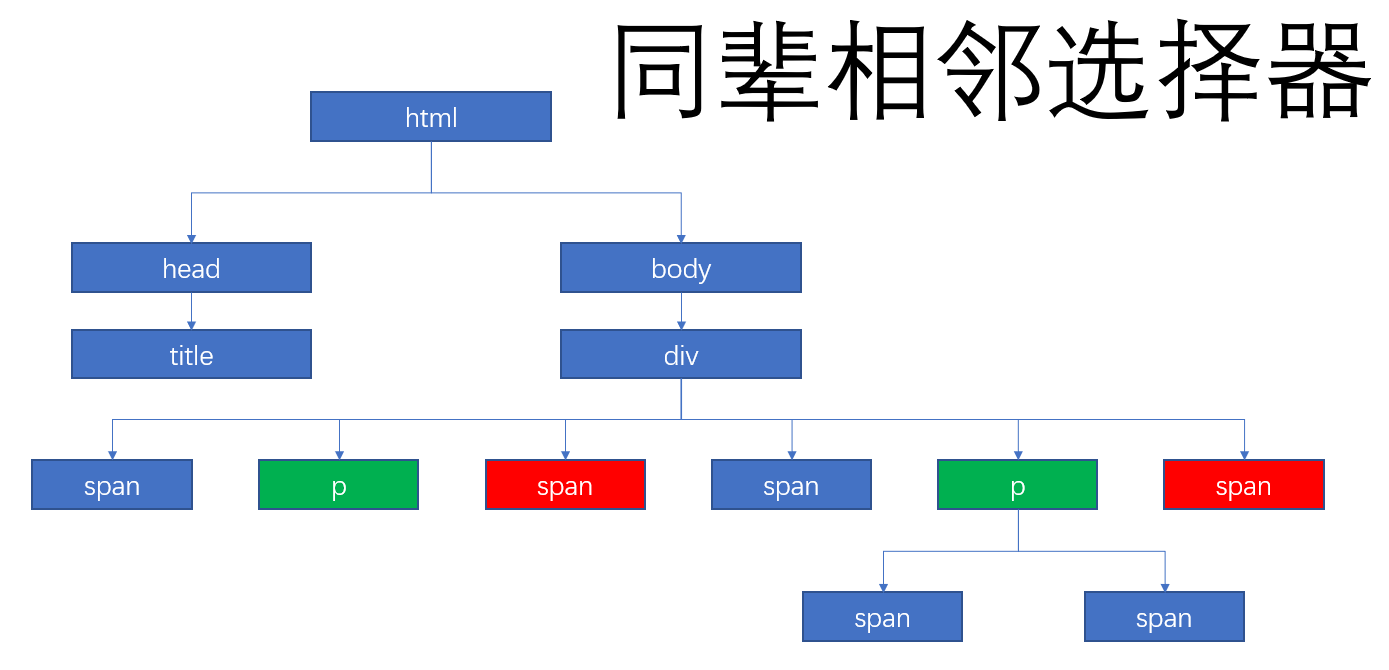
2.3、同辈相邻选择器
brother1 + brother2 中间用+间隔,表示相邻的元素获取brother1后面的brother2(兄弟节点,只能读取一个)
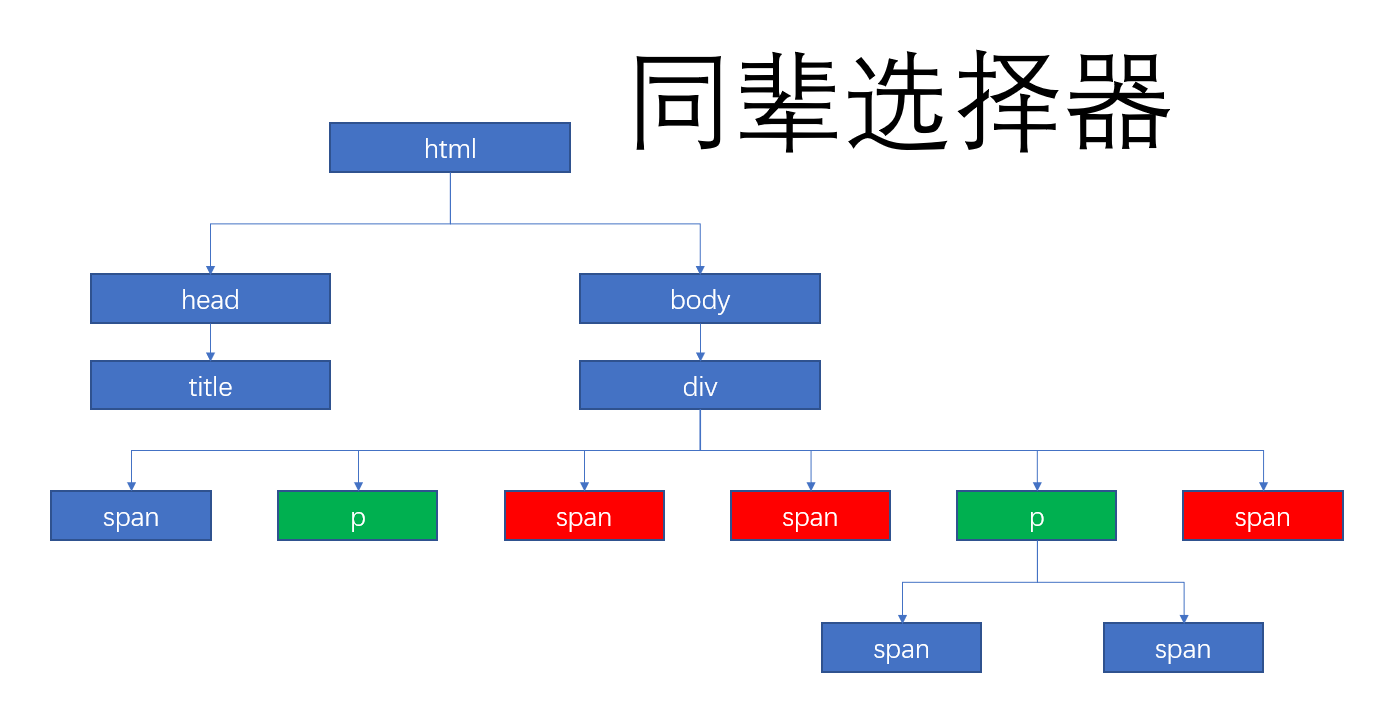
2.4、同辈选择器
brother1 ~ brother2 中间使用~符号隔开 表示brother1后面所有的brother2(包含后面所有的)
2.5、案例:
<!DOCTYPE html>
<html>
	<head>
		<meta charset="UTF-8">
		<title>层级选择器</title>
		<script type="text/javascript" src="js/jquery-3.5.1.min.js"></script>
	</head>
	<body>
		<div>
			<span>span6</span>
			<p>P1</p>
			<span>span1</span>
			<span>span4</span>
			<p>
				<span>span2</span>
				<span>span3</span>
			</p>
			<span>span5</span>
		</div>
	</body>
	<script type="text/javascript">
		//后代选择器
		var el1 = $("div span");
		console.log(el1.length);

		//子选择器
		var el2 = $("div>span");
		console.log(el2.length);

		//同辈相邻元素选择器
		var el3 = $("p+span");
		console.log(el3.length);
		console.log(el3);

		//同辈元素选择器
		var el4 = $("p~span");
		console.log(el4.length);
	</script>
</html>
3、过滤选择器
过滤选择器是指一获取到的对象列表中,再进行筛选。语法:
:xx
| 选择器 | 说明 |
|---|---|
| :first | 筛选列中的第一项 |
| :last | 筛选列中的最后一项 |
| :odd | 奇数元素,按照下标找出奇数元素,下标从0开始 |
| :even | 偶数元素,按照下标找出偶数元素,下标从0开始 |
| :eq(index) | 等于某个索引值的元素,下标从0开始 |
| :gt(index) | 大于index下标的元素,下标从0开始 |
| :lt(index) | 小于index下标的元素,下标从0开始 |
| not(selector) | 除了selector元素以外的所有 |
案例代码:
<!DOCTYPE html>
<html>
	<head>
		<meta charset="utf-8">
		<title>过滤选择器</title>
		<script src="js/jquery-3.5.1.min.js" type="text/javascript" charset="utf-8"></script>
	</head>
	<body>
		<ul>
			<li>列表1</li>
			<li>列表2</li>
			<li>列表3</li>
			<li>列表4</li>
			<li>列表5</li>
		</ul>
	</body>
	<script type="text/javascript">

		//筛选第一项
		var first = $("li:first");
		console.log(first.text());

		//筛选最后一项
		var last = $("li:last");
		console.log(last.text());

		//获取奇数元素
		var odd = $("li:odd");
		console.log(odd.text());

		//获取偶数元素
		var even = $("li:even");
		console.log(even.text());

		//获取某个下标的元素
		var eq = $("li:eq(2)");
		console.log(eq.text());

		//获取大于某个下标的所有元素
		var gt = $("li:gt(2)");
		console.log(gt.text());

		//获取小于某个下标的所有元素
		var lt = $("li:lt(2)");
		console.log(lt.text());

		//获取除了2以外的所有元素
		var not = $("li:not(li:eq(2))");
		console.log(not.text());

	</script>
</html>
4、属性选择器
通过标签的属性或属性值来获取元素。特殊语法:[]
| 选择器 | 说明 |
|---|---|
| [attribute] | 获取包含attribute属性的元素 |
| [attribute='value'] | 获取某个属性等于value时的元素 |
| [attribute!='value'] | 获取不等于value的元素 |
| [attribute^='value'] | 获取属性值以value开头的元素 |
| [attribute$='value'] | 获取属性以value结尾的元素 |
| [attribute*='value'] | 获取属性包含value的元素 |
案例代码:
<!DOCTYPE html>
<html>
	<head>
		<meta charset="utf-8">
		<title></title>
		<script src="js/jquery-3.5.1.min.js" type="text/javascript" charset="utf-8"></script>
	</head>
	<body>
		<a href="#">链接1</a>
		<a href="index1.html">链接2</a>
		<a href="index2.html">链接3</a>
		<a href="hello.jpg">链接4</a>
		<a href="obj.html">链接5</a>
	</body>
	<script type="text/javascript">

		//获取页面中拥有href的元素
		var haveHref = $("[href]");
		console.log(haveHref.text());

		//获取href属性等于#的元素
		var sharp = $("[href = '#']");
		console.log(sharp.text());

		//获取href元素不为#的元素
		var notSharp = $("a[href != '#']");
		console.log(notSharp.text());

		//获取href属性以index开头的元素
		var headEqindex = $("[href ^= 'index']");
		console.log(headEqindex.text());

		//获取href属性以html结尾的元素
		var lastEqHtml = $("[href $= 'html']");
		console.log(lastEqHtml.text());

		//获取href中包含o的元素
		var hasO = $("[href *= 'o']");
		console.log(hasO.text());

	</script>
</html>
5、表单选择器
表单选择器是用于判定表单类型和状态的选择器
5.1、基本表单选择器
| 选择器 | 说明 |
|---|---|
| :input | 获取所有表单元素(包含select/textarea/input) |
| :text | 获取所有的文本框 |
| :password | 获取所有的密码框 |
| :checkbox | 获取所有多选框 |
| :radio | 获取所有的单选框 |
| :image | 获取所有图片标签 |
| :button | 获取所有按钮 |
| :file | 获取所有文件上传组件 |
| :hidden | 获取所有hidden元素 |
案例代码:
<!DOCTYPE html>
<html>
	<head>
		<meta charset="utf-8">
		<title>表单选择器</title>
		<script src="js/jquery-3.5.1.min.js" type="text/javascript" charset="utf-8"></script>
	</head>
	<body>
		<form action="" method="">
			<input type="text">
			<input type="password">
			<input type="radio" value="男">
			<select name="city">
				<option value="0">北京</option>
				<option value="1">上海</option>
				<option value="2">天津</option>
			</select>
			<textarea rows="" cols="">

			</textarea>
			<input type="submit">
		</form>
	</body>
	<script type="text/javascript">

		//获取所有表单元素
		var arr = $(":input");
		arr.each(function(index){
			console.log(arr[index]);
		});

		//获取所有单选按钮
		console.log($(":radio").val());
	</script>
</html>
作业:自行测试其他类型的表单选择器;
5.2、表单过滤器
| 过滤器 | 说明 |
|---|---|
| :enabled | 获取所有启用状态的元素 |
| :disabled | 获取所有禁用状态的元素 |
| :checked | 获取所有checked为true的的元素 |
| :selected | 获取所有selected为true的元素 |
案例代码:获取所有禁用的标签
<!DOCTYPE html>
<html>
	<head>
		<meta charset="utf-8">
		<title>获取所有禁用的元素</title>
		<script src="js/jquery-3.5.1.min.js" type="text/javascript" charset="utf-8"></script>
	</head>
	<body>
		<input type="text">
		<input type="text" disabled="disabled">
		<input type="text" disabled="disabled">
		<input type="" name="" id="" value="" />
	</body>
	<script type="text/javascript">

		//获取所有禁用的表单元素
		var arr = $(":disabled");
		arr.each(function(i){
			console.log(arr[i]);
		})

		//获取所有可用的表单元素
		var brr = $(":enabled");
		for(var i=0;i<brr.length;i++){
			console.log(brr[i]);
		}
	</script>
</html>
案例:获取所有选中状态的表单元素
<!DOCTYPE html>
<html>
	<head>
		<meta charset="UTF-8">
		<title>复选框过滤选择器</title>
		<script type="text/javascript" src="js/jquery-3.5.1.min.js"></script>
	</head>
	<body>
		<input type="checkbox" checked="checked" value="a"/>
		<input type="checkbox" checked="checked" value="b"/>
		<input type="checkbox" />
		<input type="checkbox" />

		<select name="city">
			<option value="0">北京</option>
			<option value="10" selected="selected">上海</option>
			<option value="2">天津</option>
		</select>
	</body>
	<script type="text/javascript">
		//获取所有被选中的复选框
		/*console.log($(":checked").length);
		var arr = $(":checked");
		arr.each(function(i){
			console.log(arr[i].value);
		})*/

		//获取被选择中的下拉列表框
		console.log($(":selected").val());
	</script>
</html>
6、jQuery事件
jQuery对JS的事件操作进行了简化,下面我们通过一个案例介绍一下jQuery的事件
案例:
<!DOCTYPE html>
<html>
	<head>
		<meta charset="UTF-8">
		<title>JQuery事件</title>
		<style type="text/css">
			#box{
				 200px;
				height: 200px;
				background: red;
			}
		</style>
		<script type="text/javascript" src="js/jquery-3.5.1.min.js"></script>
	</head>
	<body>
		<input type="text" id="name" />
		<input type="button" name="btn" id="btn" value="获取值" />
		<p>
			<img src="img/1.png" width="200px" height="200px" />
		</p>

		<div id="box"></div>
	</body>
	<script type="text/javascript">
		$("#btn").click(function(){
			alert($("#name").val());
		})

		$("img").mouseover(function(){
			alert("悬浮事件");
		}).mouseleave(function(){
			alert("离开事件");
		})
		/*this:代表的是当前对象,也就当前被绑定事件的操作对象*/
		$("#box").mouseover(function(){
			//$(this).css("background","blue");
			this.style.backgroundColor = "green";
		})
	</script>
</html>
7、this
this选择器
<!DOCTYPE html>
<html>
	<head>
		<meta charset="UTF-8">
		<title>this选择器</title>
		<script type="text/javascript" src="js/jquery-3.5.1.min.js"></script>
	</head>
	<body>
		<ul>
			<li>列表1</li>
			<li>列表2</li>
			<li>列表3</li>
			<li>列表4</li>
		</ul>
	</body>
	<script type="text/javascript">
		$("li").click(function(){
			alert($(this).text());;
		})
	</script>
</html>