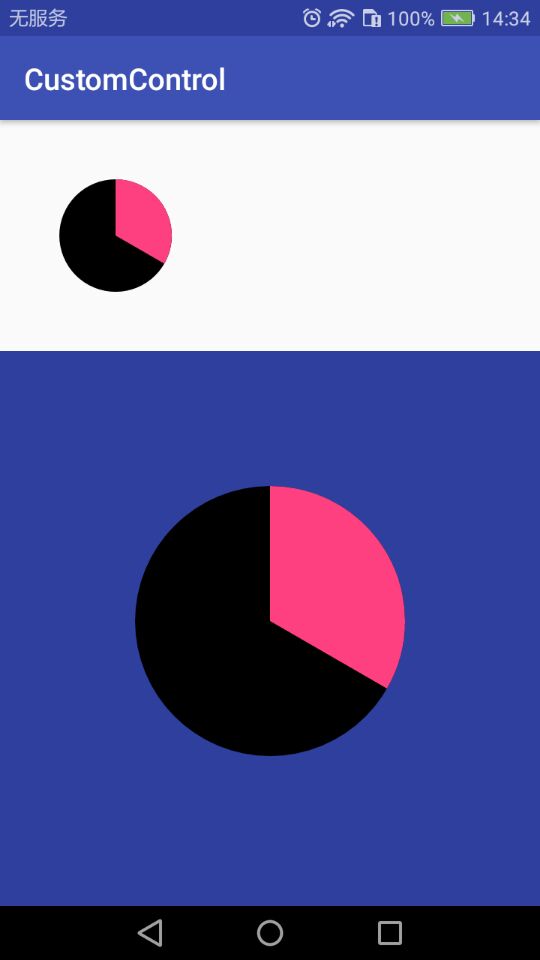
前面简单的讲述了Android中自定义控件中的几个方法,今天通过代码来实现一个简单的案例
自定义一个扇形图
自定义控件示例:
这里先介绍继承View的方式为例
public class CircularView extends View {


    /****
     * 有三个参数的构造函数中第三个参数是默认的Style,
     * 这里的默认的Style是指它在当前Application或Activity所用的Theme中的默认Style,且只有在明确调用的时候才会生效,
     */

    private final static String TAG = CircularView.class.getName();

    private Paint mPaint;

    private RectF oval;

    public CircularView(Context context) {
        super(context);
        init();
    }

    public CircularView(Context context, AttributeSet attrs) {
        super(context, attrs);
        init();
    }

    public CircularView(Context context, AttributeSet attrs, int defStyleAttr) {
        super(context, attrs, defStyleAttr);
        init();
    }

    public CircularView(Context context, AttributeSet attrs, int defStyleAttr, int defStyleRes) {
        super(context, attrs, defStyleAttr, defStyleRes);
        init();
    }

    private void init(){
        mPaint = new Paint();
        mPaint.setAntiAlias(true);
        oval = new RectF();
    }

    /****
     * 测量-Measure过程是计算视图大小
     *
     * @param widthMeasureSpec
     * @param heightMeasureSpec
     */
    @Override
    protected void onMeasure(int widthMeasureSpec, int heightMeasureSpec) {
        super.onMeasure(widthMeasureSpec, heightMeasureSpec);

        //根据提供的测量值(格式)提取模式(三个模式之一)
        //MeasureSpec有3种模式分别是UNSPECIFIED, EXACTLY和AT_MOST,
        int widthMode = MeasureSpec.getMode(widthMeasureSpec);  //取出宽度的测量模式
        int widthSize = MeasureSpec.getSize(widthMeasureSpec);//获取View的大小(宽度的确切数值)

        int heightMode = MeasureSpec.getMode(heightMeasureSpec);
        int heightSize = MeasureSpec.getSize(heightMeasureSpec);

        Log.i(TAG,"onMeasure---widthMode--->"+widthMode);
        switch (widthMode){
            case MeasureSpec.EXACTLY:

                break;
            case MeasureSpec.AT_MOST:

                break;
            case MeasureSpec.UNSPECIFIED:

              break;
        }
        Log.i(TAG,"onMeasure--widthSize--->"+ widthSize);
        Log.i(TAG,"onMeasure--heightMode-->"+ heightMode);
        Log.i(TAG,"onMeasure--heightSize-->"+heightSize);

    }


    /***
     * 确定View的大小(这个函数在视图大小发生改变时调用。)
     *
     * 宽度,高度,上一次宽度,上一次高度。
     * 只需关注 宽度(w), 高度(h) 即可,这两个参数就是View最终的大小。
     * @param w
     * @param h
     * @param oldw
     * @param oldh
     */
    @Override
    protected void onSizeChanged(int w, int h, int oldw, int oldh) {
        super.onSizeChanged(w, h, oldw, oldh);
        Log.i(TAG,"onSizeChanged");
    }

    /****
     * 布局-Layout过程用于设置视图在屏幕中显示的位置,onLayout一般只会在自定义ViewGroup中才会使用
     *
     * 确定布局的函数是onLayout,它用于确定子View的位置,在自定义ViewGroup中会用到,他调用的是子View的layout函数。
     *
     * @param changed
     * @param left
     * @param top
     * @param right
     * @param bottom
     */
    @Override
    protected void onLayout(boolean changed, int left, int top, int right, int bottom) {
        super.onLayout(changed, left, top, right, bottom);
        Log.i(TAG,"onLayout");
    }


    /***
     * 绘制-draw过程主要用于利用前两步得到的参数,将视图显示在屏幕上,到这里也就完成了整个的视图绘制工作
     * @param canvas
     */
    @Override
    protected void onDraw(Canvas canvas) {
        super.onDraw(canvas);
        mPaint.setColor(Color.BLACK);
        // FILL填充, STROKE描边,FILL_AND_STROKE填充和描边
        mPaint.setStyle(Paint.Style.FILL_AND_STROKE);
        int width = getWidth();//布局中自定义控件的宽度
        int height = getHeight();
        Log.i(TAG,"onDraw--->" + width + "--" + height);
        float radius = width /4;
        canvas.drawCircle(width/2,width/2,radius,mPaint);//画圆
        mPaint.setColor(getResources().getColor(R.color.colorAccent));
        //用于定义的圆弧的形状和大小的界限
        oval.set(width/2 - radius,width/2 - radius, width/2 + radius, width/2 + radius);
        //根据进度画圆弧
        canvas.drawArc(oval,270,120,true,mPaint);
    }
}
在布局中如何使用
<?xml version="1.0" encoding="utf-8"?>
<LinearLayout xmlns:android="http://schemas.android.com/apk/res/android"
    android:orientation="vertical" android:layout_width="match_parent"
    android:layout_height="match_parent">

    <com.zhangqie.customcontrol.demo1.CircularView
        android:layout_width="150dp"
        android:layout_height="150dp"
        android:layout_margin="2dp"
        />


    <com.zhangqie.customcontrol.demo1.CircularView
        android:layout_width="wrap_content"
        android:layout_height="wrap_content"
        android:background="@color/colorPrimaryDark"
        />
</LinearLayout>
我用了两种模式,固定大小和自适应
效果如图:(自适应的默认居中了)

本篇主要介绍Android自定义控件的基本用法,后续中介绍如何自定义属性。