1. input-file收集日志信息
 1 [yun@mini04 config]$ pwd
 2 /app/logstash/config
 3 [yun@mini04 config]$ cat file.conf
 4 input{
 5   file{
 6     path => ["/var/log/messages", "/var/log/secure"]
 7     type => "system-log"
 8     start_position => "beginning"
 9   }
10 }
11
12
13 filter{
14 }
15
16 output{
17   # es有3台,随便指定一台即可  也可以是多台如 ["127.0.0.1:9200","127.0.0.2:9200"]
18   elasticsearch {
19      hosts => ["mini01:9200", "mini02:9200", "mini03:9200"]
20      index => "system-log-%{+YYYY.MM}"
21   }
22 }
23
24 ##################################################
25 [root@mini04 ~]# /app/logstash/bin/logstash -f /app/logstash/config/file.conf   # 启动  此处需要root用户启动才行,否则没有权限
26 …………
1.1. 浏览器访问


2. input-if判断【日志多点收集】
为了方便,我把logstatsh部署到了mini03上
本节作用:收集java日志【日志收集得有些缺陷,不方便查看,需要改进配置】
 1 [yun@mini03 config]$ pwd
 2 /app/logstash/config
 3 [yun@mini03 config]$ cat file2.conf
 4 input{
 5   file{
 6     path => ["/var/log/messages", "/var/log/secure"]
 7     type => "system-log"
 8     start_position => "beginning"
 9   }
10
11   file{
12     path => ["/app/es-data/logs/zhang-es.log"]
13     type => "es-log"
14     start_position => "beginning"
15   }
16 }
17
18
19 filter{
20 }
21
22 output{
23   # es有3台,随便指定一台即可  也可以是多台如 ["127.0.0.1:9200","127.0.0.2:9200"]
24   if [type=] == "system-log" {
25     elasticsearch {
26        hosts => ["mini01:9200", "mini02:9200", "mini03:9200"]
27        index => "system-log-%{+YYYY.MM}"
28     }
29   }
30
31   if [type] == "es-log" {
32     elasticsearch {
33        hosts => ["mini01:9200", "mini02:9200", "mini03:9200"]
34        index => "es-log-%{+YYYY.MM}"
35     }
36   }
37 }
38
39 ##################################
40 [root@mini04 ~]# /app/logstash/bin/logstash -f /app/logstash/config/file2.conf   # 启动  此处需要root用户启动才行,否则没有权限
41 …………
浏览器访问
1 http://mini01:9100/ # head访问
1 http://mini01:5601 # kibana 访问

缺点:
java应用的日志有报错等,这样直接收集那么不方便查看看
3. codec-multiline——多行合并收集【可用于java程序日志收集】
3.1. 命令行输入输出测试
多行合并,以 [ 开头作为匹配
 1 # 配置文件
 2 [yun@mini03 config]$ pwd
 3 /app/logstash/config
 4 [yun@mini03 config]$ cat codec_test.conf
 5 # 输入配置说明:
 6 # pattern => "^["   匹配 [ 开头的行;
 7 # negate => "true" 表示如果不能匹配则放在一起;
 8 # what => "previous"  如果是"previous"表示,任何不以 [ 开头的行都应该与前面的行合并。
 9 #      如果为"next" 表示, 任何以 [ 结尾的行都应该与以下行合并。
10 input{
11   stdin{
12     codec => multiline {
13       pattern => "^["
14       negate => "true"
15       what => "previous"
16     }
17   }
18 }
19
20 filter{
21 }
22
23 output{
24   stdout{
25     codec => rubydebug
26   }
27 }
28 # 执行
29 [yun@mini03 config]$ /app/logstash/bin/logstash -f /app/logstash/config/codec_test.conf   # 执行
30 ………………
31 1111
32 222
33 333
34 [444
35 {
36           "host" => "mini03",
37        "message" => "1111
222
333",
38       "@version" => "1",
39           "tags" => [
40         [0] "multiline"
41     ],
42     "@timestamp" => 2018-08-25T06:04:42.486Z
43 }
44 555
45 666
46 8888
47 [999
48 {
49           "host" => "mini03",
50        "message" => "[444
555
666
8888",
51       "@version" => "1",
52           "tags" => [
53         [0] "multiline"
54     ],
55     "@timestamp" => 2018-08-25T06:04:58.319Z
56 }
3.2. 重新收集ES日志
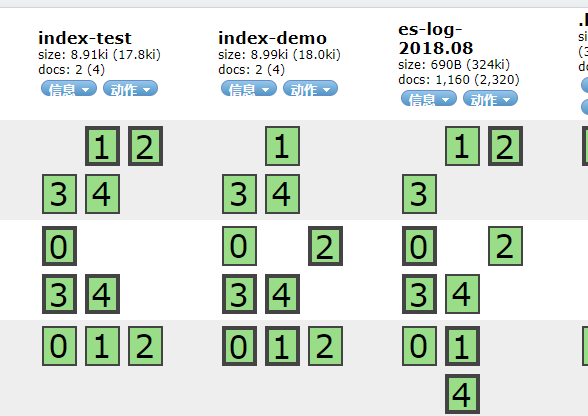
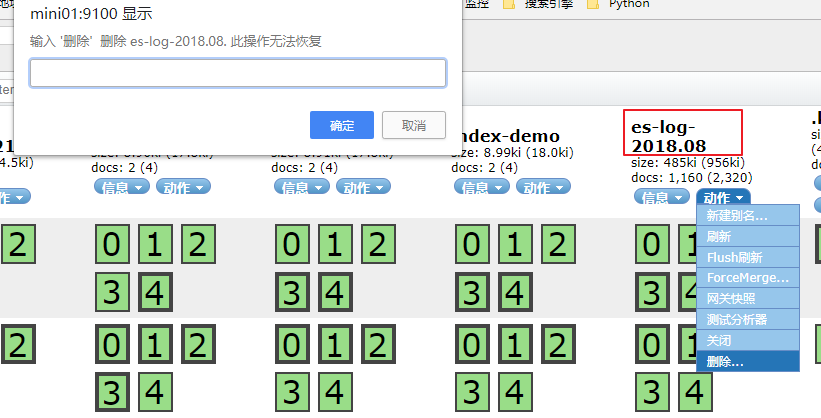
3.2.1. 在ES上删除之前收集的mini03 ES日志
停止mini03上的logstash程序
3.2.2. 删除logstash的标记
插件通过在一个名为sincedb的单独文件并记录每个文件中当前的位置来跟踪当前位置。这样就可以停止并重新启动Logstash,并让它在结束的地方继续运行,而不会遗漏在log出来时添加到文件中的行。
 1 # 查找标记文件
 2 [yun@mini03 logstash]$ pwd
 3 /app/logstash
 4 [yun@mini03 logstash]$ find . -type f | grep 'sincedb'
 5 ./data/plugins/inputs/file/.sincedb_1fb922e15ccea4ac0d028d33639ba3ea
 6 ./data/plugins/inputs/file/.sincedb_56a0ba191c6aa2202fcdc058933e33b0
 7 ##### mini03 es的日志信息
 8 [yun@mini03 logs]$ pwd
 9 /app/es-data/logs
10 [yun@mini03 logs]$ ll -i zhang-es.log
11 33588216 -rw-rw-r-- 1 yun yun 19888 Aug 25 14:24 zhang-es.log  # 第一列为es的inode信息
12 ##### logstash sincedb 的文件信息
13 [yun@mini03 file]$ pwd
14 /app/logstash/data/plugins/inputs/file
15 [yun@mini03 file]$ ll -a
16 total 8
17 drwxr-xr-x 2 yun yun 104 Aug 24 00:02 .
18 drwxr-xr-x 3 yun yun  18 Aug 23 23:37 ..
19 -rw-r--r-- 1 yun yun  45 Aug 24 00:02 .sincedb_1fb922e15ccea4ac0d028d33639ba3ea
20 -rw-r--r-- 1 yun yun  23 Aug 24 00:02 .sincedb_56a0ba191c6aa2202fcdc058933e33b0
21 [yun@mini03 file]$ cat .sincedb_56a0ba191c6aa2202fcdc058933e33b0
22 33588216 0 2051 153392
23 [yun@mini03 file]$ rm -f .sincedb_56a0ba191c6aa2202fcdc058933e33b0  # 删除es的sincedb文件
说明:其中 33588216为对应es日志的inode信息,所以删除 .sincedb_56a0ba191c6aa2202fcdc058933e33b0 文件,那么再次采集es日志时,就会从新开始采集
3.2.3. logstash配置并启动
 1 [yun@mini03 config]$ pwd
 2 /app/logstash/config
 3 [yun@mini03 config]$ cat codec.conf
 4 input{
 5   file{
 6     path => ["/var/log/messages", "/var/log/secure"]
 7     type => "system-log"
 8     start_position => "beginning"
 9   }
10
11   file{
12     path => ["/app/es-data/logs/zhang-es.log"]
13     type => "es-log"
14     start_position => "beginning"
15     codec => multiline {
16       pattern => "^["
17       negate => "true"
18       what => "previous"
19     }
20   }
21 }
22
23 filter{
24 }
25
26 output{
27   # es有3台,随便指定一台即可  也可以是多台如 ["127.0.0.1:9200","127.0.0.2:9200"]
28   if [type=] == "system-log" {
29     elasticsearch {
30        hosts => ["mini01:9200", "mini02:9200", "mini03:9200"]
31        index => "system-log-%{+YYYY.MM}"
32     }
33   }
34
35   if [type] == "es-log" {
36     elasticsearch {
37        hosts => ["mini01:9200", "mini02:9200", "mini03:9200"]
38        index => "es-log-%{+YYYY.MM}"
39     }
40   }
41 }
42
43 #### 使用root权限启动,因为该配置中有 "/var/log/messages", "/var/log/secure" 日志收集
44 [root@mini03 ~]# /app/logstash/bin/logstash -f /app/logstash/config/codec.conf &
3.2.4. 浏览器通过kibana查看
通过kibana查询,得知此次收集的日志确实符合我们的浏览习惯。

4. codec-json【收集Nginx访问日志】
需要将Nginx的访问日志改为json格式
4.1. nginx 部分日志配置
在mini03 yum安装Nginx
[root@mini03 ~]# vim /etc/nginx/nginx.conf
# For more information on configuration, see:
#   * Official English Documentation: http://nginx.org/en/docs/
#   * Official Russian Documentation: http://nginx.org/ru/docs/

user nginx;
worker_processes auto;
error_log /var/log/nginx/error.log;
pid /run/nginx.pid;

# Load dynamic modules. See /usr/share/nginx/README.dynamic.
include /usr/share/nginx/modules/*.conf;

events {
    worker_connections 1024;
}

http {
    log_format  main  '$remote_addr - $remote_user [$time_local] "$request" '
                      '$status $body_bytes_sent "$http_referer" '
                      '"$http_user_agent" "$http_x_forwarded_for"';
    # 新增配置,上面的配置没有被引用,所以可以不管
    # 切记:不要换行★★★★★
    log_format  access_log_json  '{"user_ip":"$http_x_real_ip","lan_ip":"$remote_addr","log_time":"$time_iso8601","user_req":"$request","http_code":"$status","body_bytes_sent":"$body_bytes_sent","req_time":"$request_time","user_ua":"$http_user_agent"}';

    # access_log  /var/log/nginx/access.log  main;  # 注释
    access_log  /var/log/nginx/access_log_json.log  access_log_json;  # 新增
4.2. logstash配置并启动
 1 [yun@mini03 config]$ pwd
 2 /app/logstash/config
 3 [yun@mini03 config]$ cat codec_json.conf
 4 input{
 5
 6   file{
 7     path => ["/var/log/nginx/access_log_json.log"]
 8     type => "nginx-access-log"
 9     codec => json
10   }
11 }
12
13 filter{
14 }
15
16 output{
17   # es有3台,随便指定一台即可  也可以是多台如 ["127.0.0.1:9200","127.0.0.2:9200"]
18   elasticsearch {
19     hosts => ["mini01:9200", "mini02:9200", "mini03:9200"]
20     index => "nginx-access-log-%{+YYYY.MM.dd}"
21   }
22
23 }
24
25 ##### 需要root权限,因为Nginx是yum安装的  访问日志在/var/log/nginx/access_log_json.log中
26 [root@mini03 ~]# /app/logstash/bin/logstash -f /app/logstash/config/codec_json.conf &
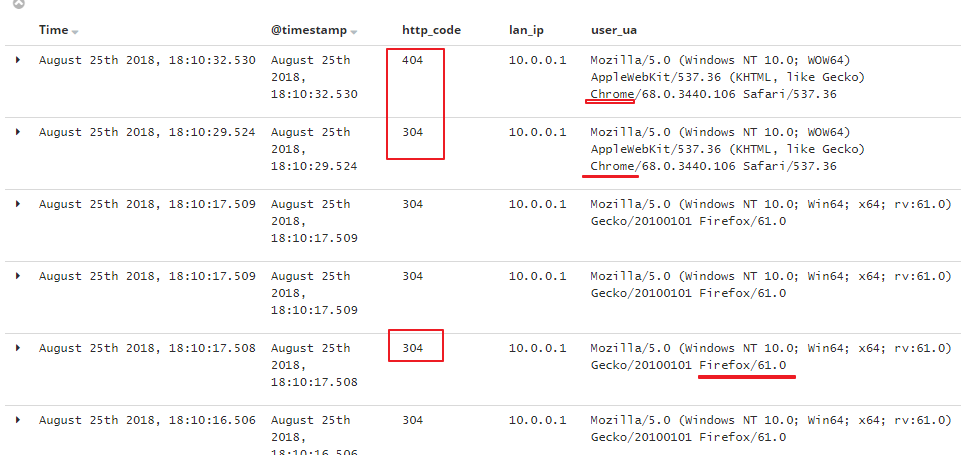
4.3. 浏览器访问Nginx
访问方式如下:
- 通过浏览器访问 http://mini03/
1 http://mini03/32t23t23t/ee # 可以得到404状态码
- 在mini01、mini02、mini03 通过如下命令访问
1 # 需要安装软件
2 yum -y install httpd-tools
3 # 访问命令如下
4 ab -n10 -c 1 http://mini03/
5 ab -n10 -c 1 http://mini03/aa/bbb/ccc    # 为了得到404 状态码
4.4. 信息查看
通过head查看

通过kibana查看
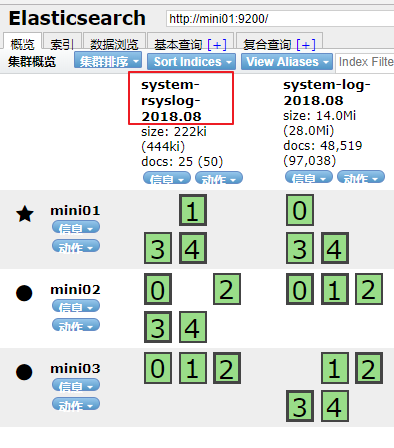
5. input-rsyslog日志收集
要求:收集mini01、mini02、mini03的rsyslog日志
5.1. rsyslog日志收集测试
logstash配置
 1 [yun@mini03 config]$ pwd
 2 /app/logstash/config
 3 [yun@mini03 config]$ cat rsyslog_test.conf
 4 input{
 5   syslog{
 6     type => "system-rsyslog"
 7     port => 514
 8   }
 9 }
10
11 filter{
12 }
13
14 output{
15   stdout{
16     codec => rubydebug
17   }
18 }
19
20 ##### 使用root用户,不然有权限限制
21 [root@mini03 ~]# /app/logstash/bin/logstash -f /app/logstash/config/rsyslog_test.conf
mini01、mini02、mini03配置修改
1 [root@mini01 ~]# tail -n5 /etc/rsyslog.conf   # mini01、mini02、mini03
2 # remote host is: name/ip:port, e.g. 192.168.0.1:514, port optional
3 #*.* @@remote-host:514
4 # 下面要添加的配置
5 *.* @@172.16.1.13:514
6
7 # ### end of the forwarding rule ###
8 [root@mini01 ~]# systemctl restart rsyslog.service  # 重启rsyslog
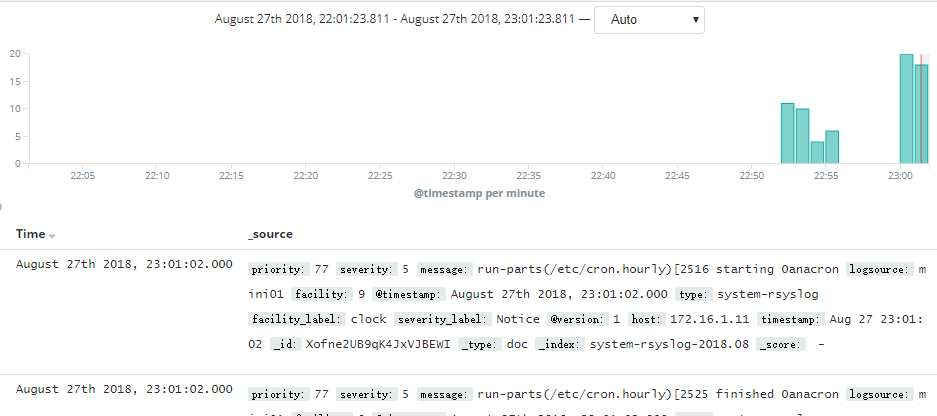
在mini03的logstash上,可见有rsyslog刷过来。
5.2. rsyslog收集到ES配置
其中mini01、mini02、mini03上的配置已经按上面修改,因此不用改变。
logstash配置
 1 [yun@mini03 config]$ pwd
 2 /app/logstash/config
 3 [yun@mini03 config]$ cat rsyslog.conf
 4 input{
 5   syslog{
 6     type => "system-rsyslog"
 7     port => 514
 8   }
 9 }
10
11 filter{
12 }
13
14 output{
15   # es有3台,随便指定一台即可  也可以是多台如 ["127.0.0.1:9200","127.0.0.2:9200"]
16   elasticsearch {
17     hosts => ["mini01:9200", "mini02:9200", "mini03:9200"]
18     index => "system-rsyslog-%{+YYYY.MM}"
19   }
20
21 }
22
23 ##### 使用root用户,不然有权限限制
24 [root@mini03 ~]# /app/logstash/bin/logstash -f /app/logstash/config/rsyslog.conf &
5.3. 浏览器查看
通过head查看
通过kibana查看
6. input-tcp收集
这次只做测试,就不收集到ES了。
6.1. logstash配置
 1 [yun@mini03 config]$ pwd
 2 /app/logstash/config
 3 [yun@mini03 config]$ cat tcp_test.conf
 4 input{
 5   tcp {
 6     port => 12345
 7     mode => "server"
 8     type => "tcp_test"
 9   }
10 }
11
12 filter{
13 }
14
15 output{
16   stdout{
17     codec => rubydebug
18   }
19 }
20
21 ##########################
22 [yun@mini03 ~]$ /app/logstash/bin/logstash -f /app/logstash/config/tcp_test.conf  # 可以使用普通用户
6.2. 在mini02测试
1 [yun@mini02 ~]$ echo "11111" | nc mini03 12345
2 [yun@mini02 ~]$ echo "testinfo" | nc mini03 12345
3 [yun@mini02 ~]$ nc mini03 12345 < /etc/resolv.conf
4 [yun@mini02 ~]$ echo "myinfo" > /dev/tcp/mini03/12345
在mini03上可见,命令行有logstash的信息输出
7. filter-Grok
生产环境几乎不用
原因:
1、grok是非常影响性能的
2、不灵活
最佳实践:做到分离,各司其职
1 logstash => redis/kafka => logstash/python => ES
7.1. 查看grok位置和文件
 1 [yun@mini03 patterns]$ pwd
 2 /app/logstash/vendor/bundle/jruby/2.3.0/gems/logstash-patterns-core-4.1.2/patterns
 3 [yun@mini03 patterns]$ ll
 4 total 112
 5 -rw-r--r-- 1 yun yun  1831 Jul 20 14:21 aws
 6 -rw-r--r-- 1 yun yun  4831 Jul 20 14:21 bacula
 7 -rw-r--r-- 1 yun yun   260 Jul 20 14:21 bind
 8 -rw-r--r-- 1 yun yun  2154 Jul 20 14:21 bro
 9 -rw-r--r-- 1 yun yun   879 Jul 20 14:21 exim
10 -rw-r--r-- 1 yun yun 10095 Jul 20 14:21 firewalls
11 -rw-r--r-- 1 yun yun  5338 Jul 20 14:21 grok-patterns
12 -rw-r--r-- 1 yun yun  3251 Jul 20 14:21 haproxy
13 -rw-r--r-- 1 yun yun   987 Jul 20 14:21 httpd
14 -rw-r--r-- 1 yun yun  1265 Jul 20 14:21 java
15 -rw-r--r-- 1 yun yun  1087 Jul 20 14:21 junos
16 -rw-r--r-- 1 yun yun  1037 Jul 20 14:21 linux-syslog
17 -rw-r--r-- 1 yun yun    74 Jul 20 14:21 maven
18 -rw-r--r-- 1 yun yun    49 Jul 20 14:21 mcollective
19 -rw-r--r-- 1 yun yun   190 Jul 20 14:21 mcollective-patterns
20 -rw-r--r-- 1 yun yun   614 Jul 20 14:21 mongodb
21 -rw-r--r-- 1 yun yun  9597 Jul 20 14:21 nagios
22 -rw-r--r-- 1 yun yun   142 Jul 20 14:21 postgresql
23 -rw-r--r-- 1 yun yun   845 Jul 20 14:21 rails
24 -rw-r--r-- 1 yun yun   224 Jul 20 14:21 redis
25 -rw-r--r-- 1 yun yun   188 Jul 20 14:21 ruby
26 -rw-r--r-- 1 yun yun   404 Jul 20 14:21 squid
7.2. 命令行测试
 1 [yun@mini03 config]$ pwd
 2 /app/logstash/config
 3 [yun@mini03 config]$
 4 [yun@mini03 config]$ cat filter-grok_test.conf
 5 input{
 6   stdin{}
 7 }
 8
 9 filter{
10   grok {
11     match => { "message" => "%{IP:client} %{WORD:method} %{URIPATHPARAM:request} %{NUMBER:bytes} %{NUMBER:duration}" }
12   }
13 }
14
15 output{
16   stdout{
17     codec => rubydebug
18   }
19 }
20
21 #######################################
22 [yun@mini03 ~]$ /app/logstash/bin/logstash -f /app/logstash/config/filter-grok_test.conf  # 使用普通用户
23 ……………………
24 # 输入如下一行字符串
25 55.3.244.1 GET /index.html 15824 0.043
26 {
27       "@version" => "1",
28           "host" => "mini03",
29          "bytes" => "15824",
30        "message" => "55.3.244.1 GET /index.html 15824 0.043",
31         "client" => "55.3.244.1",
32       "duration" => "0.043",
33        "request" => "/index.html",
34     "@timestamp" => 2018-08-28T13:53:40.910Z,
35         "method" => "GET"
36 }
7.3. httpd日志收集命令行测试
[yun@mini03 config]$ pwd
/app/logstash/config
[yun@mini03 config]$ cat filter-grok_httpd-test.conf
input{
  file{
    path => ["/var/log/httpd/access_log"]
    type => "httpd-access-log"
    start_position => "beginning"
  }
}

filter{
  grok {
    match => { "message" => "%{HTTPD_COMBINEDLOG}" }
  }
}

output{
  stdout{
    codec => rubydebug
  }
}

################# 使用root用户,涉及权限问题
[root@mini03 ~]# /app/logstash/bin/logstash -f /app/logstash/config/filter-grok_httpd-test.conf
……………………
# 可见httpd的日志被收集,并且被解析
{
           "path" => "/var/log/httpd/access_log",
       "referrer" => ""http://mini03/"",
           "host" => "mini03",
       "response" => "200",
        "message" => "10.0.0.1 - - [28/Aug/2018:22:35:31 +0800] "GET /images/poweredby.png HTTP/1.1" 200 3956 "http://mini03/" "Mozilla/5.0 (Windows NT 10.0; WOW64) AppleWebKit/537.36 (KHTML, like Gecko) Chrome/68.0.3440.106 Safari/537.36"",
           "auth" => "-",
      "timestamp" => "28/Aug/2018:22:35:31 +0800",
          "bytes" => "3956",
       "clientip" => "10.0.0.1",
          "agent" => ""Mozilla/5.0 (Windows NT 10.0; WOW64) AppleWebKit/537.36 (KHTML, like Gecko) Chrome/68.0.3440.106 Safari/537.36"",
       "@version" => "1",
     "@timestamp" => 2018-08-28T14:44:12.477Z,
    "httpversion" => "1.1",
           "type" => "httpd-access-log",
          "ident" => "-",
        "request" => "/images/poweredby.png",
           "verb" => "GET"
}
………………
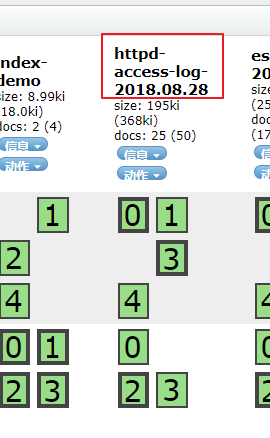
7.4. httpd收集日志到ES
 1 [yun@mini03 config]$ pwd
 2 /app/logstash/config
 3 [yun@mini03 config]$ cat filter-grok_httpd.conf
 4 input{
 5   file{
 6     path => ["/var/log/httpd/access_log"]
 7     type => "httpd-access-log"
 8     start_position => "beginning"
 9   }
10 }
11
12 filter{
13   grok {
14     match => { "message" => "%{HTTPD_COMBINEDLOG}" }
15   }
16 }
17
18 output{
19   # es有3台,随便指定一台即可  也可以是多台如 ["127.0.0.1:9200","127.0.0.2:9200"]
20   elasticsearch {
21     hosts => ["mini01:9200", "mini02:9200", "mini03:9200"]
22     index => "httpd-access-log-%{+YYYY.MM.dd}"
23   }
24 }
25
26 ########## 使用root用户,涉及权限
27 [root@mini03 ~]# /app/logstash/bin/logstash -f /app/logstash/config/filter-grok_httpd.conf
28 ………………
7.5. 浏览器访问httpd
浏览器
1 # 可以通过谷歌、火狐、IE访问
2 http://mini03/
3 http://mini03/indweg.html
Linux命令行访问
1 [yun@mini02 ~]$ ab -n40 -c 1 http://mini03/
2 [yun@mini02 ~]$ ab -n40 -c 1 http://mini03/wet/bdhw/
7.6. 信息查看
head访问
kibana查看
