RHCSA_PDF版传送门:https://files.cnblogs.com/files/zhangjianghua/RHCSA%E8%AF%95%E9%A2%98.pdf
RHCE_PDF版传送门:https://files.cnblogs.com/files/zhangjianghua/RHCE%E8%AF%95%E9%A2%98.pdf
RHCE 考试题目:
第一题:配置 SELinux
描述:SELinux 必须在两个系统system1和system2中运行于 Enforcing 模式
system1和system2:
[root@server0 ~]# vim /etc/selinux/config
SELINUX=enforcing
SELINUXTYPE=targeted
[root@server0 ~]# getenforce
Enforcing
第二题:配置SSH访问
描述:按以下要求配置SSH访问:
用户能够从域 domain1.example.com 内的客户端通过SSH远程访问您的两个虚拟机系统
在域 my133t.org 内的客户端不能访问您的两个虚拟机系统
system1和system2:
[root@server0 ~]# vim /etc/hosts.allow
sshd : 172.25.0.0/255.255.255.0
[root@server0 ~]# vim /etc/hosts.deny
sshd : 172.24.3.0/255.255.255.0
第三题:自定义用户环境
描述:在系统 system1 和 system2上创建自定义命令名为 qstat 此自定义命令将执行以下命令: /bin/ps -Ao pid,tt,user,fname,rsz此命令对系统中所有用户有效。
system1 和system2:
[root@server0 ~]# vim /etc/profile
alias qstat='/bin/ps -Ao pid,tt,user,fname,rsz'
[root@server0 ~]# source /etc/profile
[root@server0 ~]# qstat
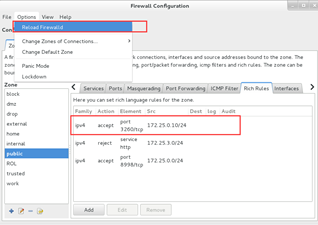
第四题:配置端口转发
描述:在系统system1配置端口转发,要求如下:在 172.24.1.0/24 网络中的系统,访问 system1 的本地端口 5423 将被转发到80 此设置必须永久有效
system1:
[root@server0~]#firewall-cmd --permanent - -add-forward-port=
port=5423:proto=tcp:toport=80:toaddr=
success
[root@server0~]#firewall-cmd --permanent - -add-forward-port=
port=5423:proto=udp:toport=80:toaddr=
success
[root@server0 ~]# firewall-cmd --reload
success
[root@server0 ~]# firewall-cmd --list-all
public (default, active)
interfaces: eth0
sources:
services: dhcpv6-client ssh
ports:
masquerade: no
forward-ports: port=5423:proto=udp:toport=80:toaddr=
port=5423:proto=tcp:toport=80:toaddr=
icmp-blocks:
rich rules:
第五题:配置链路聚合
描述:在 system1.domain1.example.com 和 system2.domain1.example.com 之间按以下要求配置一个链路:
此链路使用接口 eth1 和
eth2
此链路在一个接口失效时仍然能工作
此链路在 system1 使用下面的地址
172.16.1.25/255.255.255.0
此链路在 system2 使用下面的地址
172.16.1.35/255.255.255.0
此链路在系统重启之后依然保持正常状态
system1和system2:
[root@server0 ~]# nmcli connection add con-name team0 type team ifname team0 config '{"runner":{"name":"activebackup"}}'
Connection 'team0' (3074d5bf-1a12-437b-a0ad-2d81c083d842) successfully added.
[root@server0 ~]# nmcli connection modify team0 ipv4.addresses '172.16.0.11/24'
[root@server0 ~]# nmcli connection modify team0 ipv4.method manual
[root@server0 ~]# nmcli connection add con-name eth1 type team-slave ifname eth1 master team0
Connection 'eth1' (6baf4c43-9118-4151-b28f-be3498de4458) successfully added.
[root@server0 ~]# nmcli connection add con-name eth2 type team-slave ifname eth2 master team0
Connection 'eth2' (612ddb83-0389-423a-86d9-8abd77a61492) successfully added.
[root@server0 ~]# systemctl restart network
[root@server0 ~]# teamdctl team0 state
setup:
runner: activebackup
ports:
eth1
link watches:
link summary: up
instance[link_watch_0]:
name: ethtool
link: up
eth2
link watches:
link summary: up
instance[link_watch_0]:
name: ethtool
link: up
runner:
active port: eth1
[root@desktop0 ~]# ping 172.16.0.11
PING 172.16.0.11 (172.16.0.11) 56(84) bytes of data.
64 bytes from 172.16.0.11: icmp_seq=1 ttl=64 time=53.9 ms
64 bytes from 172.16.0.11: icmp_seq=2 ttl=64 time=1.64 ms
64 bytes from 172.16.0.11: icmp_seq=3 ttl=64 time=16.1 ms
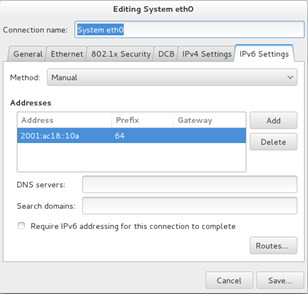
第六题:配置IPv6地址
描述:在您的考试系统上配置接口 eth0 使用下列IPv6地址:
system1 上的地址应该是 2001:ac18::10a/64
system2 上的地址应该是 2001:ac18::114/64
两个系统必须能与网络 2001:ac18/64 内的系统通信。
地址必须在重启后依旧生效。
两个系统必须保持当前的IPv4地址并能通信。
system1和system2:
[root@server0 ~]# nm-connection-editor
[root@server0 ~]# systemctl restart network
[root@server0 ~]# ping6 2001:ac18::114
PING 2001:ac18::114(2001:ac18::114) 56 data bytes
64 bytes from 2001:ac18::114: icmp_seq=1 ttl=64 time=12.3 ms
64 bytes from 2001:ac18::114: icmp_seq=2 ttl=64 time=1.95 ms
64 bytes from 2001:ac18::114: icmp_seq=3 ttl=64 time=1.28 ms
第七题:配置本地邮件服务
描述:在系统system1 和 system2 上配置邮件服务,满足以下要求:
这些系统不接收外部发送来的邮件
在这些系统上本地发送的任何邮件都会自动路由到 rhgls.domain1.example.com
从这些系统上发送的邮件显示来自于 domain1.example.com
您可以通过发送邮件到本地用户 'dave' 来测试您的配置,系统 rhgls.domain1.example.com 已经配置把此用户的邮件转到下列URL http://rhgls.domain1.example.com/received_mail/1
system1和system2:
[root@server0 ~]# vim /etc/postfix/main.cf
myorigin = domain1.example.com
local_transport = error:local
relayhost = rhgls.domain1.example.com
[root@server0 ~]# systemctl restart postfix.service
[root@server0 ~]# systemctl enable postfix.service
[root@server0 ~]# firewall-cmd --permanent --add-service=smtp
success
[root@server0 ~]# firewall-cmd --reload
success
[root@server0 ~]# mail -s "for test" dave@domain1.example.com
第八题:通过 SMB 共享目录
描述:在system1上配置SMB服务
您的 SMB 服务器必须是 STAFF 工作组的一个成员
共享 /common 目录共享名必须为 common
只有 domain1.example.com 域内的客户端可以访问 common 共享
common
必须是可以浏览的
用户 andy 必须能够读取共享中的内容,如果需要的话,验证的密码是 flectrag
system1:
[root@server0 ~]# yum install samba samba-client.x86_64 -y
[root@server0 ~]# mkdir /common
[root@server0 ~]# chcon -R -t samba_share_t /common/
[root@server0 ~]# vim /etc/samba/smb.conf
workgroup = STAFF #修改89行
[common]
path = /common
hosts allow = 172.25.0.0/24
browseable = yes
[root@server0 ~]# smbpasswd -a andy
New SMB password:
Retype new SMB password:
Added user andy.
[root@server0 ~]# firewall-cmd --permanent --add-service=samba
success
[root@server0 ~]# firewall-cmd --permanent --add-service=mountd
success
[root@server0 ~]# firewall-cmd --reload
success
[root@server0 ~]# systemctl restart smb nmb
[root@server0 ~]# systemctl enable smb nmb
system2验证:
[root@desktop0 ~]# yum install samba-client cifs-utils –y
[root@desktop0 ~]# smbclient -L //172.25.0.11 -U andy
Enter andy's password:
Domain=[STAFF] OS=[Unix] Server=[Samba 4.1.1]
Sharename Type Comment
--------- ---- -------
common Disk
IPC$ IPC IPC Service (Samba Server Version 4.1.1)
andy Disk Home Directories
Domain=[STAFF] OS=[Unix] Server=[Samba 4.1.1]
Server Comment
--------- -------
SERVER0 Samba Server Version 4.1.1
Workgroup Master
--------- -------
STAFF SERVER0
第九题:配置多用户SMB 挂载
描述:在system1 共享通过SMB目录 /miscellaneous 满足以下要求:
共享名为 miscellaneous
共享目录 miscellaneous 只能被
domain1.example.com 域中的客户端使用
共享目录 miscellaneous 必须可以被浏览
用户 silene 必须能以读的方式访问此共享, 访问密码是
flectrag
用户 akira 必须能以读写的方式访问此共享, 访问密码是
flectrag
此共享永久挂载在 system2.domain1.example.com 上的 /mnt/multi 目录, 并使用用户 silene 作为认证
任何用户可以通过用户 akira 来临时获取写的权限
system1:
[root@server0 ~]# mkdir /miscellaneous
[root@server0 ~]# chmod o+w /miscellaneous/
[root@server0 ~]# chcon -R -t samba_share_t /miscellaneous/
[root@server0 ~]# smbpasswd -a silene
New SMB password:
Retype new SMB password:
Added user silene.
[root@server0 ~]# smbpasswd -a akira
New SMB password:
Retype new SMB password:
Added user akira.
[root@server0 ~]# vim /etc/samba/smb.conf
[miscellaneous]
path = /miscellaneous
hosts allow = 172.25.0.0/24
browseable = yes
writable = no
write list = akira
[root@server0 ~]# systemctl restart smb nmb
system2:
[root@desktop0 ~]# smbclient -L //172.25.0.11 -U silene
Enter silene's password:
Domain=[STAFF] OS=[Unix] Server=[Samba 4.1.1]
Sharename Type Comment
--------- ---- -------
common Disk
miscellaneous Disk
IPC$ IPC IPC Service (Samba Server Version 4.1.1)
silene Disk Home Directories
Domain=[STAFF] OS=[Unix] Server=[Samba 4.1.1]
Server Comment
--------- -------
SERVER0 Samba Server Version 4.1.1
Workgroup Master
--------- -------
STAFF SERVER0
[root@desktop0 ~]# mkdir /mnt/multi
[root@desktop0 ~]# vim /etc/fstab
//172.25.0.11/miscellaneous /mnt/multi cifs
defaults,multiuser,username=silene,password=flectrag,sec=ntlmssp 0 0
[root@desktop0 ~]# mount -a
[root@desktop0 ~]# df -h
Filesystem Size Used Avail Use% Mounted on
/dev/vda1 10G 3.1G 7.0G 31% /
devtmpfs 906M 0 906M 0% /dev
tmpfs 921M 140K 921M 1% /dev/shm
tmpfs 921M 17M 904M 2% /run
tmpfs 921M 0 921M 0% /sys/fs/cgroup
//172.25.0.11/miscellaneous 10G 3.1G 7.0G 31% /mnt/multi
[root@desktop0 ~]# useradd silene #创建测试用户silene
[root@desktop0 ~]# yum install cifs* -y
[root@desktop0 ~]# su - silene
Last login: Tue Jul 17 14:16:54 CST 2018 on pts/1
[silene@desktop0 ~]$ cifscreds add server0 -u akira
Password:
[silene@desktop0 ~]$ touch /mnt/multi/test1
[silene@desktop0 ~]$ ls /mnt/multi/
test1
第十题:配置NFS服务
描述:在 system1 配置NFS服务,要求如下:
以只读的方式共享目录 /public 同时只能被 domain1.example.com 域中的系统访问
以读写的方式共享目录 /protected 能被
domain1.example.com 域中的系统访问
访问 /protected 需要通过Kerberos安全加密,
您可以使用下面URL提供的密钥
http://host.domain1.example.com/materials/nfs_server.keytab
目录 /protected 应该包含名为 confidential
拥有人 为deepak 的子目录
用户 deepak 能以读写方式访问
/protected/confidential
system1:
[root@server0 ~]# mkdir /public
[root@server0 ~]# mkdir -p /protected/confidential
[root@server0 ~]# chcon -R -t public_content_t /public
[root@server0 ~]# chcon -R -t public_content_t /protected/
[root@server0 ~]# chown deepak /protected/confidential/
[root@server0 ~]# vim /etc/exports
/public 172.25.0.0/24(ro,sync)
/protected 172.25.0.0/24(rw,sync,sec=krb5p)
[root@server0~]#wget -O /etc/krb5.keytab
http://classroom.example.com/pub/keytabs/server0.keytab
[root@server0 ~]# vim /etc/sysconfig/nfs
RPCNFSDARGS="-V 4.2"
[root@server0 ~]# setfacl -m u:deepak:rwx /protected/
[root@server0 ~]# firewall-cmd --permanent --add-service=nfs
success
[root@server0 ~]# firewall-cmd --permanent --add-service=mountd
success
[root@server0 ~]# firewall-cmd --permanent --add-service=rpc-bind
success
[root@server0 ~]# firewall-cmd --reload
success
[root@server0 ~]# systemctl restart nfs-server nfs-secure-server
[root@server0 ~]# systemctl enable nfs-server nfs-secure-server
[root@server0 ~]# exportfs -ra
[root@server0 ~]# showmount -e
Export list for server0.example.com:
/protected 172.25.0.0/24
/public 172.25.0.0/24
第十一题:挂载一个NFS共享
描述:在 system2 上挂载一个来自 system1.domain1.example.com 的NFS共享,并符合下列要求:
/public
挂载在下面的目录上 /mnt/nfsmount
/protected 挂载在下面的目录上 /mnt/nfssecure 并使用安全的方式,密钥下载URL如下:
http://host.domain1.example.com/materials/nfs_client.keytab
用户 deepak 能够在
/mnt/nfssecure/confidential 上创建文件
这些文件系统在系统启动时自动挂载
system2:
[root@desktop0 ~]# mkdir /mnt/nfsmount
[root@desktop0 ~]# mkdir /mnt/nfssecure
[root@desktop0 ~]# showmount -e 172.25.0.11
Export list for 172.25.0.11:
/protected 172.25.0.0/24
/public 172.25.0.0/24
[root@desktop0 ~]# wget -O /etc/krb5.keytab
http://classroom.example.com/pub/keytabs/desktop0.keytab
[root@desktop0 ~]# systemctl restart nfs-secure
[root@desktop0 ~]# systemctl enable nfs-secure
[root@desktop0 ~]# vim /etc/fstab
172.25.0.11:/public /mnt/nfsmount nfs defaults 0 0
172.25.0.11:/protected /mnt/nfssecure nfs defaults,sec=krb5p,v4.2 0 0
[root@desktop0 ~]# mount –a
[root@desktop0 ~]# df -h
Filesystem Size Used Avail Use% Mounted on
/dev/vda1 10G 3.1G 7.0G 31% /
devtmpfs 906M 0 906M 0% /dev
tmpfs 921M 80K 921M 1% /dev/shm
tmpfs 921M 17M 904M 2% /run
tmpfs 921M 0 921M 0% /sys/fs/cgroup
172.25.0.11:/public 10G 3.1G 7.0G 31% /mnt/nfsmount
//172.25.0.11/miscellaneous 10G 3.1G 7.0G 31% /mnt/multi
172.25.0.11:/protected 10G 3.1G 7.0G 31% /mnt/nfssecure
第十二题:完成实现一个 web 服务器
描述:在 system1 上配置一个站点 http://system1.domain1.example.com 然后执行下述步骤:
从 http://rhgls.domain1.example.com/materials/station.html 下载文件,并且将文件重命名为 index.html 不要修改此文件的内容
将文件 index.html 拷贝到您的 web 服务器的 DocumentRoot 目录下
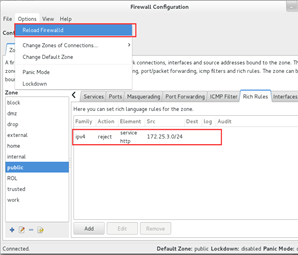
来自于 domain1.example.com 域的客户端可以访问此Web服务
来自于 my133t.org 域的客户端拒绝访问此Web服务
system1:
[root@server0 ~]# yum install -y httpd
[root@server0 ~]# cp /usr/share/doc/httpd-2.4.6/httpd-vhosts.conf /etc/httpd/conf.d/
[root@server0 ~]# vim /etc/httpd/conf.d/httpd-vhosts.conf
<VirtualHost *:80>
DocumentRoot /var/www/html
ServerName server0.example.com
</VirtualHost>
[root@server0 ~]# cd /var/www/html/
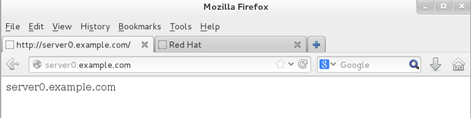
[root@server0 html]# wget -O index.html
http://rhgls.domain1.example.com/materials/station.html
[root@server0 html]# cat index.html
server0.example.com
[root@server0 ~]# systemctl restart httpd
[root@server0 ~]# systemctl enable httpd
[root@server0 ~]# firewall-cmd --permanent --add-service=http
success
[root@server0 ~]# firewall-cmd --permanent --add-service=https
success
[root@server0 ~]# firewall-cmd --reload
success
[root@server0 ~]# firewall-config

system2验证:
[root@desktop0 ~]# firefox
第十三题:配置安全web服务
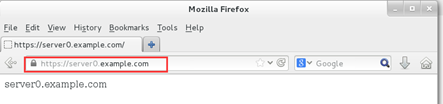
描述:为站点 http://system1.domain1.example.com 配置TLS加密
一个已签名证书从 http://host.domain1.example.com/materials/system1.crt 获取
此证书的密钥从 http://host.domain1.example.com/materials/system1.key 获取
此证书的签名授权信息从 http://host.domain1.example.com/materials/domain1.crt 获取
system1:
[root@server0 ~]# yum install mod_ssl –y
[root@server0 ~]# cd /etc/pki/tls/certs/
[root@server0 certs]# wget -O localhost.crt http://classroom/pub/tls/certs/www0.crt
[root@server0 certs]# wget -O server-chain.crt http://classroom/pub/example-ca.crt
[root@server0 ~]# cd /etc/pki/tls/private/
[root@server0 private]# wget -O localhost.key http://classroom/pub/tls/private/www0.key
[root@server0 ~]# vim /etc/httpd/conf.d/ssl.conf
<VirtualHost _default_:443>
DocumentRoot "/var/www/html"
ServerName server0.example.com:443
SSLEngine on
SSLProtocol all -SSLv2
SSLCipherSuite HIGH:MEDIUM:!aNULL:!MD5
SSLHonorCipherOrder on
SSLCertificateFile /etc/pki/tls/certs/localhost.crt
SSLCertificateKeyFile /etc/pki/tls/private/localhost.key
SSLCertificateChainFile /etc/pki/tls/certs/server-chain.crt
[root@server0 ~]# systemctl restart httpd
[root@server0 ~]# systemctl enable httpd
system2验证:
[root@desktop0 ~]# firefox
第十四题:配置虚拟主机
描述:在 system1 上扩展您的 web 服务器,为站点 http://www.domain1.example.com创建一个虚拟主机,然后执行下述步骤:
设置 DocumentRoot 为 /var/www/virtual
从 http://rhgls.domain1.example.com/materials/www.html
下载文件并重命名为 index.html 不要对文件
index.html 的内容做任何修改
将文件 index.html 放到虚拟主机的
DocumentRoot 目录下
确保 andy 用户能够在 /var/www/virtual 目录下创建文件
system1:
[root@server0 ~]# mkdir -p /var/www/virtual
[root@server0 ~]# ls -Zd /var/www/html/
drwxr-xr-x. root root system_u:object_r:httpd_sys_content_t:s0 /var/www/html/
[root@server0 ~]# chcon -R -t httpd_sys_content_t /var/www/virtual/
[root@server0 ~]# setfacl -m u:andy:rwx /var/www/virtual/
[root@server0 ~]# cd /var/www/virtual/
[root@server0 virtual]# wget -O index.html
http://rhgls.domain1.example.com/materials/www.html
[root@server0 virtual]# cat index.html
www0.example.com
[root@server0 ~]# vim /etc/httpd/conf.d/httpd-vhosts.conf
<VirtualHost *:80>
DocumentRoot "/var/www/virtual"
ServerName www0.example.com
</VirtualHost>
system2验证:
[root@desktop0 ~]# firefox
第十五题:配置 web 内容的访问
描述:在您的system1 上的 web 服务器的 DocumentRoot 目录下创建一个名为 secret 的目录,要求如下:
从 http://rhgls.domain1.example.com/materials/private.html 下载一个文件副本到这个目录,并且重命名为 index.html。
不要对这个文件的内容做任何修改。
从 system1 上,任何人都可以浏览 secret 的内容,
但是从其它系统不能访问这个目录的内容
system1:
[root@server0 ~]# mkdir -p /var/www/html/secret
[root@server0 ~]# chcon -R -t httpd_sys_content_t /var/www/html/secret/
[root@server0 ~]# cd /var/www/html/secret/
[root@server0 secret]# wget -O index.html
http://rhgls.domain1.example.com/materials/private.html
[root@server0 secret]# cat index.html
private test.secret
[root@server0 secret]# vim /etc/httpd/conf.d/httpd-vhosts.conf
<Directory "/var/www/html/secret">
AllowOverride None
Require all denied
Require local
</Directory>
[root@server0 secret]# systemctl restart httpd
[root@server0 secret]# firefox

第十六题:实现动态Web内容
描述:在 system1 上配置提供动态Web内容,要求如下:
动态内容由名为dynamic.domain1.example.com的虚拟主机提供
虚拟主机侦听在端口 8998
从 http://rhgls.domain1.example.com/materials/webapp.wsgi
下载一个脚本,然后放在适当的位置, 无论如何不要求修改此文件的内容
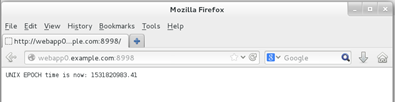
客户端访问 http://dynamic.domain1.example.com:8998/ 时
应该接收到动态生成的web页面
此 http://dynamic.domain1.example.com:8998/ 必须能被 domain1.example.com 域内的所有系统访问
system1:
[root@server0 ~]# yum install mod_wsgi –y
[root@server0 ~]# mkdir -p /var/www/webapp
[root@server0 ~]# chcon -R -t httpd_sys_content_t /var/www/webapp/
[root@server0 ~]# cd /var/www/webapp/
[root@server0 webapp]# wget -O webapp.wsgi
http://rhgls.domain1.example.com/materials/webapp.wsgi
[root@server0 webapp]# vim /etc/httpd/conf.d/httpd-vhosts.conf
listen 8998
<VirtualHost *:8998>
ServerName webapp0.example.com
WSGIScriptAlias / /var/www/webapp/webapp.wsgi
</VirtualHost>
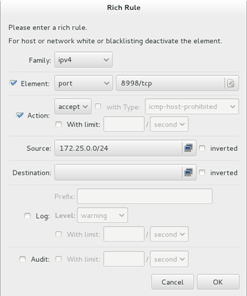
[root@server0 webapp]# firewall-cmd --permanent --add-port=8998/tcp
success
[root@server0 webapp]# firewall-cmd --reload
success
[root@server0 webapp]# firewall-config

[root@server0 webapp]# semanage port -a -t http_port_t -p tcp 8998
[root@server0 webapp]# systemctl restart httpd
system2验证:
第十七题:创建一个脚本
描述:在system1上创建一个名为 /root/script 的脚本,让其提供下列特性:
当运行 /root/script foo,输出为 bar
当运行 /root/script bar,输出为 foo
当没有任何参数或者参数不是 foo 或者 bar时,
其错误输出产生以下的信息:
/root/script foo|bar
system1:
[root@server0 ~]# vim /root/script
#!/bin/bash
case $1 in
foo)
echo "bar"
;;
bar)
echo "foo"
;;
*)
echo "/root/script foo|bar"
;;
esac
[root@server0 ~]# chmod +x /root/script
[root@server0 ~]# sh /root/script foo
bar
[root@server0 ~]# sh /root/script bar
foo
[root@server0 ~]# sh /root/script
/root/script foo|bar
第十八题:创建一个添加用户的脚本
描述:在 system1 上创建一个脚本,名为 /root/mkusers , 此脚本能实现为系统 system1 创建本地用户, 并且这些用户的用户名来自一个包含用户名列表的文件。同时满足下列要求:
此脚本要求提供一个参数,此参数就是包含用户名列表的文件
如果没有提供参数,此脚本应该给出下面的提示信息 Usage: /root/mkusers userfile 然后退出并返回相应的值
如果提供一个不存在的文件名,此脚本应该给出下面的提示信息 Input file not found 然后退出并返回相应的值
创建的用户登录shell为 /bin/false
此脚本不需要为用户设置密码
您可以从下面的URL获取用户名列表作为测试用
http://rhgls.domain1.example.com/materials/userlist
system1:
[root@server0 ~]# wget http://rhgls.domain1.example.com/materials/userlist
[root@server0 ~]# cat userlist
clearlove
Uzi
jack
Faker
[root@server0 ~]# vim /root/mksuers
#!/bin/bash
if [ $# -eq 0 ];then
echo "Usage:/root/mkusers userfile"
exit 1
fi
if [ ! -f $1 ];then
echo "Input file not found"
exit 1
fi
while read line
do
useradd -s /bin/false $line
done < $1
[root@server0 ~]# chmod +x /root/mksuers
[root@server0 ~]# sh /root/mksuers
Usage:/root/mkusers userfile
[root@server0 ~]# sh /root/mksuers mmm
Input file not found
[root@server0 ~]# sh /root/mksuers userlist
[root@server0 ~]# id Uzi
uid=1007(Uzi) gid=1007(Uzi) groups=1007(Uzi)
[root@server0 ~]# id Faker
uid=1009(Faker) gid=1009(Faker) groups=1009(Faker)
[root@server0 ~]# id clearlove
uid=1006(clearlove) gid=1006(clearlove) groups=1006(clearlove)
第十九题:配置 iSCSI 服务端
描述:配置 system1 提供一个 iSCSI 服务磁盘名为 iqn.2014-12.com.example.domain1:system1 ,并符合下列要求:
服务端口为 3260
使用 iscsi_vol 作其后端卷 其大小为 3G
此服务只能被 system2.domain1.example.com 访问
system1:
[root@server0 ~]# yum install -y target*
[root@server0 ~]# fdisk /dev/vdb #创建逻辑分区5,大小等于3G
[root@server0 ~]# targetcli
Warning: Could not load preferences file /root/.targetcli/prefs.bin.
targetcli shell version 2.1.fb34
Copyright 2011-2013 by Datera, Inc and others.
For help on commands, type 'help'.
/> ls
o- / ......................................................................................................................... [...]
o- backstores .............................................................................................................. [...]
| o- block .................................................................................................. [Storage Objects: 0]
| o- fileio ................................................................................................. [Storage Objects: 0]
| o- pscsi .................................................................................................. [Storage Objects: 0]
| o- ramdisk ................................................................................................ [Storage Objects: 0]
o- iscsi ............................................................................................................ [Targets: 0]
o- loopback ......................................................................................................... [Targets: 0]
/> /backstores/block create iscsi_vol /dev/vdb5
Created block storage object iscsi_vol using /dev/vdb5.
/> /iscsi create iqn.2014-12.com.example.domain1:server0
Created target iqn.2014-12.com.example.domain1:server0.
Created TPG 1.
/> ls
o- / ......................................................................................................................... [...]
o- backstores .............................................................................................................. [...]
| o- block .................................................................................................. [Storage Objects: 1]
| | o- iscsi_vol ..................................................................... [/dev/vdb5 (3.0GiB) write-thru deactivated]
| o- fileio ................................................................................................. [Storage Objects: 0]
| o- pscsi .................................................................................................. [Storage Objects: 0]
| o- ramdisk ................................................................................................ [Storage Objects: 0]
o- iscsi ............................................................................................................ [Targets: 1]
| o- iqn.2014-12.com.example.domain1:server0 ........................................................................... [TPGs: 1]
| o- tpg1 ............................................................................................... [no-gen-acls, no-auth]
| o- acls .......................................................................................................... [ACLs: 0]
| o- luns .......................................................................................................... [LUNs: 0]
| o- portals .................................................................................................... [Portals: 0]
o- loopback ......................................................................................................... [Targets: 0]
/> /iscsi/iqn.2014-12.com.example.domain1:server0/tpg1/acls create
iqn.2014-12.com.example.domain1:desktop0
Created Node ACL for iqn.2014-12.com.example.domain1:desktop0
/> /iscsi/iqn.2014-12.com.example.domain1:server0/tpg1/luns create /backstores/block/iscsi_vol
Created LUN 0.
Created LUN 0->0 mapping in node ACL iqn.2014-12.com.example.domain1:desktop0
/> iscsi/iqn.2014-12.com.example.domain1:server0/tpg1/portals create 172.25.0.11
Using default IP port 3260
Created network portal 172.25.0.11:3260.
/> exit
Global pref auto_save_on_exit=true
Last 10 configs saved in /etc/target/backup.
Configuration saved to /etc/target/saveconfig.json
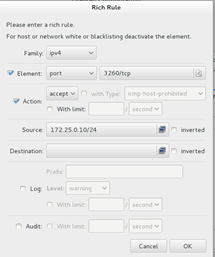
[root@server0 ~]# firewall-cmd --permanent --add-port=3260/tcp
success
[root@server0 ~]# firewall-cmd --reload
success
[root@server0 ~]# firewall-config
[root@server0 ~]# systemctl restart iscsid
[root@server0 ~]# systemctl restart targetd
[root@server0 ~]# systemctl enable iscsid
[root@server0 ~]# systemctl enable targetd
第二十题:配置 iSCSI 的客户端
描述:配置 system2 使其能连接在 system1 的上提供的 iqn.2014-12.com.example.domain1:system1 并符合以下要求:
iSCSI
设备在系统启动的期间自动加载
块设备 iSCSI 上包含一个大小为 1700 MiB 的分区,并格式化为 xfs
此分区挂载在 /mnt/data 上 同时在系统启动的期间自动挂载
system2:
[root@desktop0 ~]# yum install -y iscsi*
[root@desktop0 ~]# vim /etc/iscsi/initiatorname.iscsi
InitiatorName=iqn.2014-12.com.example.domain1:desktop0
[root@desktop0 ~]# systemctl restart iscsi
[root@desktop0 ~]# systemctl enable iscsi
[root@desktop0 ~]# iscsiadm -m discovery -t st -p 172.25.0.11
172.25.0.11:3260,1 iqn.2014-12.com.example.domain1:server0
[root@desktop0 ~]# iscsiadm -m node -T iqn.2014-12.com.example.domain1:server0 -p 172.25.0.11 -l
Logging in to [iface: default, target: iqn.2014-12.com.example.domain1:server0, portal: 172.25.0.11,3260] (multiple)
Login to [iface: default, target: iqn.2014-12.com.example.domain1:server0, portal: 172.25.0.11,3260] successful.
[root@desktop0 ~]# lsblk
NAME MAJ:MIN RM SIZE RO TYPE MOUNTPOINT
sda 8:0 0 3G 0 disk
vda 253:0 0 10G 0 disk
└─vda1 253:1 0 10G 0 part /
vdb 253:16 0 10G 0 disk
[root@desktop0 ~]# fdisk /dev/sda #创建逻辑分区5,大小1700M
[root@desktop0 ~]# mkfs.xfs /dev/sda5
meta-data=/dev/sda5 isize=256 agcount=8, agsize=54400 blks
= sectsz=512 attr=2, projid32bit=1
= crc=0
data = bsize=4096 blocks=435200, imaxpct=25
= sunit=0 swidth=0 blks
naming =version 2 bsize=4096 ascii-ci=0 ftype=0
log =internal log bsize=4096 blocks=2560, version=2
= sectsz=512 sunit=0 blks, lazy-count=1
realtime =none extsz=4096 blocks=0, rtextents=0
[root@desktop0 ~]# mkdir /mnt/data
[root@desktop0 ~]# vim /etc/fstab
/dev/sda5 /mnt/data xfs defaults,_netdev 0 0
[root@desktop0 ~]# mount -a
[root@desktop0 ~]# df -h
Filesystem Size Used Avail Use% Mounted on
/dev/vda1 10G 3.1G 7.0G 31% /
devtmpfs 906M 0 906M 0% /dev
tmpfs 921M 176K 921M 1% /dev/shm
tmpfs 921M 17M 904M 2% /run
tmpfs 921M 0 921M 0% /sys/fs/cgroup
172.25.0.11:/public 10G 3.1G 7.0G 31% /mnt/nfsmount
//172.25.0.11/miscellaneous 10G 3.1G 7.0G 31% /mnt/multi
172.25.0.11:/protected 10G 3.1G 7.0G 31% /mnt/nfssecure
/dev/sda5 1.7G 33M 1.7G 2% /mnt/data
第二十一题:配置一个数据库
描述:在 system1 上创建一个 MariaDB 数据库, 名为 Contacts ,并符合以下条件:
数据库应该包含来自数据库复制的内容,复制文件的URL为
http://rhgls.domain1.example.com/materials/users.mdb 。
数据库只能被 localhost 访问。
除了root用户, 此数据库只能被用户 Luigi 查询。 此用户密码为 flectrag 。
root 用户的密码为 flectrag , 同时不允许空密码登录。
system1:
[root@server0 ~]# yum install mariadb* -y
[root@server0 ~]# vim /etc/my.cnf
skip_networking=1
[root@server0 ~]# wget http://classroom.example.com/pub/materials/mariadb/mariadb.dump
[root@server0 ~]# systemctl restart mariadb
[root@server0 ~]# mysql_secure_installation
5个y,第一个y设置数据库密码
[root@server0 ~]# mysql -uroot -pflectrag
Welcome to the MariaDB monitor. Commands end with ; or g.
Your MariaDB connection id is 10
Server version: 5.5.35-MariaDB MariaDB Server
Copyright (c) 2000, 2013, Oracle, Monty Program Ab and others.
Type 'help;' or 'h' for help. Type 'c' to clear the current input statement.
MariaDB [(none)]> show databases;
+--------------------+
| Database |
+--------------------+
| information_schema |
| mysql |
| performance_schema |
+--------------------+
3 rows in set (0.00 sec)
MariaDB [(none)]> create database Contacts;
Query OK, 1 row affected (0.00 sec)
MariaDB [(none)]> use Contacts;
Database changed
MariaDB [Contacts]> source /root/mariadb.dump
MariaDB [Contacts]> grant select on Contacts.* to Luigi@'localhost' identified by 'flectrag';
Query OK, 0 rows affected (0.00 sec)
MariaDB [Contacts]> exit
Bye
[root@server0 ~]# mysql -uLuigi -pflectrag
第二十二题:数据库查询
描述:数据库查询,在系统 system1上使用数据库 Contacts,并使用相应的SQL查询以回答下列问题:
密码是 tangerine 的人的名字?
用户ID号码为4654的用户名成是?
system1:
[root@server0 ~]# mysql -uroot -pflectrag
Welcome to the MariaDB monitor. Commands end with ; or g.
Your MariaDB connection id is 15
Server version: 5.5.35-MariaDB MariaDB Server
Copyright (c) 2000, 2013, Oracle, Monty Program Ab and others.
Type 'help;' or 'h' for help. Type 'c' to clear the current input statement.
MariaDB [(none)]> show databases;
+--------------------+
| Database |
+--------------------+
| information_schema |
| Contacts |
| mysql |
| performance_schema |
+--------------------+
4 rows in set (0.00 sec)
MariaDB [(none)]> use Contacts;
Reading table information for completion of table and column names
You can turn off this feature to get a quicker startup with -A
Database changed
MariaDB [Contacts]> show tables;
+--------------------+
| Tables_in_Contacts |
+--------------------+
| category |
| department |
| employee |
| manufacturer |
| product |
+--------------------+
5 rows in set (0.00 sec)
MariaDB [Contacts]>
MariaDB [Contacts]> show tables;
+--------------------+
| Tables_in_Contacts |
+--------------------+
| category |
| department |
| employee |
| manufacturer |
| product |
+--------------------+
5 rows in set (0.00 sec)
MariaDB [Contacts]> desc department;
+-----------+--------------+------+-----+---------+-------+
| Field | Type | Null | Key | Default | Extra |
+-----------+--------------+------+-----+---------+-------+
| dept_id | int(11) | YES | | NULL | |
| dept_name | varchar(100) | YES | | NULL | |
+-----------+--------------+------+-----+---------+-------+
2 rows in set (0.01 sec)
MariaDB [Contacts]> desc employee;
+----------+-------------+------+-----+---------+----------------+
| Field | Type | Null | Key | Default | Extra |
+----------+-------------+------+-----+---------+----------------+
| emp_id | int(11) | NO | PRI | NULL | auto_increment |
| emp_name | varchar(50) | YES | | NULL | |
| age | int(11) | YES | | NULL | |
| dept_id | int(11) | YES | | NULL | |
+----------+-------------+------+-----+---------+----------------+
4 rows in set (0.00 sec)
MariaDB [Contacts]> select * from employee where emp_name = "tianyun";
+--------+----------+------+---------+
| emp_id | emp_name | age | dept_id |
+--------+----------+------+---------+
| 1 | tianyun | 19 | 200 |
+--------+----------+------+---------+
1 row in set (0.00 sec)
MariaDB [Contacts]> select * from employee where emp_id = "3";
+--------+----------+------+---------+
| emp_id | emp_name | age | dept_id |
+--------+----------+------+---------+
| 3 | jack | 30 | 201 |
+--------+----------+------+---------+
1 row in set (0.00 sec)
祝考试顺利!