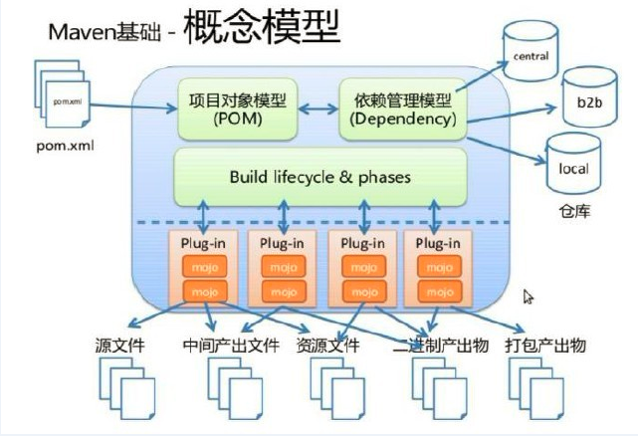
mavne模型

可以看出 maven构件都是由插件支撑的
maven的插件位置在:F:MavenRepositoryorgapachemavenplugins
Maven仓库布局
- 本地仓库
默认情况下,不管是在windows还是linux上,每个用户在自己的用户目录下都有一个路径名为.m2/repository/的仓库目录。有时候,因为某些原因(例如C盘空间不够),用户会想要自定义本地仓库目录地址。这时,可以编辑文件~/.m2/settings.xml,设置localRepository元素的值为想要的仓库地址。例如:
<settings>
    <localRepository>D:java
epository</localRepository>
</settings>
- 远程仓库
安装好Maven后,如果不执行任何Maven命令,本地仓库目录是不存在的。当用户输入第一条Maven命令之后,Maven才会创建本地仓库,然后根据配置和需要,从远程仓库下载构件至本地仓库。 - 中央仓库
可以使用解压工具打开jar文件$M2_HOME/lib/maven-model-builder-3.0.jar,里面可以看到pom.xml中的中央仓库配置,并且可以看到maven项目结构的定义 - 私服
私服是一种特殊的远程仓库,它是架设在局域网内的仓库服务,私服代理广域网上的远程仓库,供局域网内的Maven用户使用。当Maven需要下载构件的时候,它从私服请求,如果私服上不存在该构件,则从外部的远程仓库下载,缓存在私服上之后,再为Maven的下载请求提供服务。此外,一些无法从外部仓库下载到的构件也能从本地上传到私服上供大家使用。
dependency依赖中scope范围
- compile
默认编译依赖范围。对于编译,测试,运行三种classpath都有效 - test
测试依赖范围。只对于测试classpath有效,只对测试代码有效 - provided
已提供依赖范围。对于编译,测试的classpath都有效,但对于运行无效。因为由容器已经提供,例如servlet-api,打包的时候这个包不会打进去 - runtime
运行时提供。例如:jdbc驱动
Compile、runtime打包会打进去,test、provided打包不会打进去
传递性依赖原则
jar 包具有传递性依赖
1. 路径最近者优先 C--->B--->A,C依赖B,B依赖A,会先用B的jar包
2. 路径相同,第一声明者优先:C-->B,C-->A,必须看B和A在C中哪一个先声明,也就是 在pom的顺序,谁先在前面就先用谁的jar包
Maven单元测试
- maven-surefire-plugin简介
Maven本身并不是一个单元测试框架,它只是在构建执行到特定生命周期阶段的时候,通过插件来执行JUnit或者TestNG的测试用例。这个插件就是maven-surefire-plugin,也可以称为测试运行器(Test Runner),它能兼容JUnit 3、JUnit 4以及TestNG。
在默认情况下,maven-surefire-plugin的test目标会自动执行测试源码路径(默认为src/test/java/)下所有符合一组命名模式的测试类。这组模式为:
**/Test.java:任何子目录下所有命名以Test开关的Java类。
**/Test.java:任何子目录下所有命名以Test结尾的Java类。
**/*TestCase.java:任何子目录下所有命名以TestCase结尾的Java类。 - . 跳过测试
mvn package -DskipTests
#或者
<plugin>
    <groupId>org.apache.maven.plugins</groupId>
    <artifactId>maven-surefire-plugin</artifactId>
    <version>2.5</version>
    <configuration>
        <skipTests>true</skipTests>
    </configuration>
</plugin>
#或者
mvn package -Dmaven.test.skip=true    跳过测试代码的编译
- 动态指定要运行的测试用例
maven-surefire-plugin提供了一个test参数让Maven用户能够在命令行指定要运行的测试用例。如:
mvn test -Dtest=RandomGeneratorTest
也可以使用通配符:
mvn test -Dtest=RandomTest
或者也可以使用“,”号指定多个测试类:
mvn test -Dtest=RandomTest,AccountCaptchaServiceTest - 包含与排除测试用例
<plugin>
    <groupId>org.apache.maven.plugins</groupId>
    <artifactId>maven-surefire-plugin</artifactId>
    <version>2.5</version>
    <configuration>
        <includes>
            <include>**/*Tests.java</include>
        </includes>
        #排除测试类
        <excludes>
            <exclude>**/*ServiceTest.java</exclude>
            <exclude>**/TempDaoTest.java</exclude>
        </excludes>
    </configuration>
</plugin>
Maven的聚合和继承
聚合
所谓聚合,顾名思义,就是把多个模块或项目聚合到一起,我们可以建立一个专门负责聚合工作的Maven project
建立该project的时候,我们要注意以下几点:
1、本身也做为一个Maven项目,它必须有自己的POM,没有实际意义,只是管理jar包用,也没有代码
2、它的打包方式必须为: pom
3、引入了新的元素:modules---module
4、版本:聚合模块的版本和被聚合模块版本一致
5、relative path:每个module的值都是一个当前POM的相对目录
6、聚合模块减少的内容:聚合模块的内容仅仅是一个pom.xml文件,它不包含src/main/java、src/test/java等目录,因为它只是用来帮助其它模块构建的工具,本身并没有实质的内容。
继承
1.说到继承肯定是一个父子结构,创建一个parent project
2.
3.结构:父模块只是为了帮助我们消除重复,所以它也不需要src/main/java、src/test/java等目录
4.新的元素:
5.
6.relativePath的默认值: ../pom.xml
7.子模块省略groupId和version: 使用了继承的子模块中可以不声明groupId和version, 子模块将隐式的继承父模块的这两个元素
Maven配置文件动态切换
<!-- 指行命令动态替换文件内容:mvn package -P test -->

    <build>
        <finalName>${project.artifactId}</finalName>
        <plugins>
            <plugin>
                <groupId>org.springframework.boot</groupId>
                <artifactId>spring-boot-maven-plugin</artifactId>
            </plugin>
        </plugins>

        <resources>
            <resource>
                <!--
                 directory:
                 配置那个目录下的文件通过${key}会被替换成属性值,resource目录下的配置文件
                 资源所在目录
                 -->
                <directory>src/main/resources</directory>
                <!--
                自动指定的方式
                includes:
                指定那个目录下那个文件
                -->
                <includes>
                    <include>**/*</include>
                </includes>
                <filtering>true</filtering>
            </resource>

            <!--
            手动指定的方式:
            设置对jdbc.properties进行过虑,即这些文件中的${key} 或 @key@会被替换掉为真正的值
             -->
            <resource>
                <directory>src/main/resources</directory>
                <includes>
                    <include>conf/jdbc.properties</include>
                </includes>
                <!--
                filtering这里指定启用过滤功能
                这个配置的意思是过滤上面指定属性文件中的占位符,占位符是${变量名称}这样的形式,
                maven会自动读取配置文件,然后解析其中的占位符,使用pom文件中定义的属性进行替换
                -->
                <filtering>true</filtering>

                <!--
                <exclueds>:
                在resource目录下,有很多文件,但用些文件不希望替换,则可以通过<excluede>指定
                -->
            </resource>
        </resources>

        <!--
        这里的filters与<profile>的filter意思一样,都是指属性文件地址,
        这个如果定义<profile>的时候指定了,这里就不需要了,
        但有些开发习惯是在<profile>不定义,然后在<build>里指定
        -->
        <!--<filters>-->
        <!--</filters>-->
    </build>


    <!--环境配置-->
    <profiles>
        <profile>
            <id>test</id>
            <activation>
                <activeByDefault>false</activeByDefault>
            </activation>
            <properties>
                <jdbc.driver>test.mysql</jdbc.driver>
                <jdbc.url>test.url</jdbc.url>
                <jdbc.username>test.username</jdbc.username>
                <jdbc.password>test.password</jdbc.password>
            </properties>
            <build>
                <filters>
                    <!-- 使用这个配置文件的值,替换配置文件中的 ${key} 或 @key@ -->
                    <filter>src/main/conf/test.properties</filter>
                </filters>
            </build>
        </profile>
        <profile>
            <id>dev</id>
            <activation>
                <activeByDefault>false</activeByDefault>
            </activation>
            <properties>
                <jdbc.driver>dev.mysql</jdbc.driver>
                <jdbc.url>dev.url</jdbc.url>
                <jdbc.username>dev.username</jdbc.username>
                <jdbc.password>dev.password</jdbc.password>
            </properties>
        </profile>
        <profile>
            <id>product</id>
            <activation>
                <activeByDefault>true</activeByDefault>
            </activation>
            <properties>
                <!--属性key  属性value-->
                <jdbc.driver>product.mysql</jdbc.driver>
                <jdbc.url>product.url</jdbc.url>
                <jdbc.username>product.username</jdbc.username>
                <jdbc.password>product.password</jdbc.password>
            </properties>
        </profile>
    </profiles>
Maven私服
nexus 账号:admin 密码:admin123
<!--配置从私服下载-->
<!--配置文件和顺序:MAVEN_HOME/conf/setting.xml  ~/.m2/setting.xml- project-->
<!--配置所有构件均从私服下载,在~/.m2/setting.xml中配置如下:-->
<settings>
    <mirrors>
        <mirror>
            <!--此处配置所有的构建均从私有仓库中下载 *代表所有,也可以写central -->
            <id>nexus</id>
            <mirrorOf>*</mirrorOf>
            <url>http://192.168.1.100:8000/nexus/content/groups/public</url>
        </mirror>
    </mirrors>

    <profiles>
        <profile>
            <id>nexus</id>
            <repositories>
                <repository>
                    <id>nexus</id>
                    <url>http://39.108.193.58:8080/nexus/content/groups/public/</url>
                    <releases>
                        <enabled>true</enabled>
                    </releases>
                    <snapshots>
                        <enabled>true</enabled>
                    </snapshots>
                </repository>
            </repositories>

            <pluginRepositories>
                <pluginRepository>
                    <id>nexus</id>
                    <url>http://39.108.193.58:8080/nexus/content/groups/public/</url>
                    <releases>
                        <enabled>true</enabled>
                    </releases>
                    <snapshots>
                        <enabled>true</enabled>
                    </snapshots>
                </pluginRepository>
            </pluginRepositories>
        </profile>
    </profiles>

    <activeProfiles>
        <!--make the profile active all the time -->
        <activeProfile>nexus</activeProfile>
    </activeProfiles>
    <!--或者Pom.xml中的配置 开始-->
    <repositories>
        <repository>
            <id>central</id>
            <url>http://localhost:8000/nexus/content/groups/public</url>
            <releases>
                <enabled>true</enabled>
            </releases>
            <snapshots>
                <enabled>true</enabled>
            </snapshots>
        </repository>
    </repositories>

    <pluginRepositories>
        <pluginRepository>
            <id>central</id>
            <url>http://localhost:8000/nexus/content/groups/public</url>
            <releases>
                <enabled>true</enabled>
            </releases>
            <snapshots>
                <enabled>true</enabled>
            </snapshots>
        </pluginRepository>
    </pluginRepositories>
     <!--或者Pom.xml中的配置 结束-->

    <!--配置上传到私服:-->
    <distributionManagement>
        <repository>
            <id>releases</id>
            <name>Internal Releases</name>
            <url>http://localhost:8000/nexus/content/repositories/releases/</url>
        </repository>
        <snapshotRepository>
            <id>snapshots</id>
            <name>Internal Snapshots</name>
            <url>http://localhost:8000/nexus/content/repositories/snapshots/</url>
        </snapshotRepository>
    </distributionManagement>

    <!--Nexus的访问权限控制,在~/m2/setting.xml中配置如下:-->
    <!-- 设置发布时的用户名 -->
    <servers>
        <server>
            <id>releases</id>
            <username>admin</username>
            <password>admin123</password>
        </server>
        <server>
            <id>snapshots</id>
            <username>admin</username>
            <password>admin123</password>
        </server>
    </servers>