一、主从复制原理过程

1、Slave 服务器上执行 start slave,开启主从复制开关。
2、此时,Slave服务器的IO线程会通过在Master上授权的复制用户权限请求连接Master服务器,并请求从指定Binlog 日志文件的指定位置(日志文件名和位置就是在配置主从复制服务时执行 change master 命令时指定的)之后发送 Binlog 日志内容。
3、Master 服务器接收到来自 Slave 服务器的 IO 线程的请求后,Master 服务器上负责复制的IO线程根据 Slave服务器的IO 线程请求的信息读取指定Binlog日志文件指定位置之后的Binlog日志信息,然后返回给Slave端的IO线程。返回的信息中除了 Binlog 日志内容外,还有本次返回日志内容后在 Master 服务器端的新的 Binlog 文件名称以及在 Binlog中的下一个指定更新位置。
4、当 Slave 服务器的IO 线程获取到来自 Master 服务器上 10 线程发送日志内容及日志文件及位置点后,将Binlog日志内容依次写入到 Slave 端自身的 Relay Log(即中继日志)文件(MySQL-relay-bin.xxxxxx)的最末端,并将新的 Binlog 文件名和位置记录到master-info文件中,以便下一次读取Master端新Binlog日志时能够告诉 Master服务器需要从新 Binlog日志的哪个文件哪个位置开始请求新的Binlog 日志内容。。
5、Slave 服务器端的SQL线程会实时的检测本地RelayLog中新增加的日志内容,然后及时的把Log文件中的内容解析成在 Master 端曾经执行的 SQL 语句的内容,并在自身 Slave服务器上按语句的顺序执行应用这些SQL语句,应用完毕后清理应用过的日志。
6、经过了上面的过程,就可以确保在 Master 端和 Slave 端执行了同样的 SQL 语句。当复制状态正常的情况下,Master端和Slave端的数据是完全一样的,MySQL 的同步机制是有一些特殊的情况的,具体请参考官方的说明。
二、主从环境搭建
1、准备两台服务器:
主服务器:192.168.1.70;从服务器:192.168.1.71
分别安装mysql版本5.6
2、修改主从配置文件
主库:
#vi /etc/my.cnf
[mysqld]
log-bin=mysql-bin   #[必须]启用二进制日志
server-id=70        #[必须]服务器唯一ID,默认是1,一般取IP最后一段
从库:
#vi /etc/my.cnf
[mysqld]
log-bin=mysql-bin        # [不是必须]启用二进制日志
server-id=71             # [必须]服务器唯一ID,默认是1,一般取IP最后一段
read_only=1              # 设置只读
relay-log=relay-log      # 启用中继日志
3、重启主从库
/etc/init.d/mysql restart
4、在主库上建立帐户并授权slave
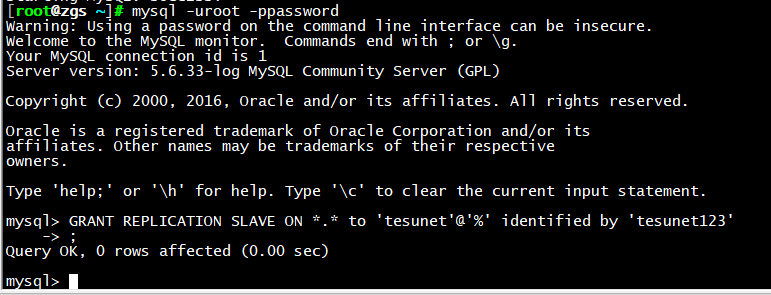
mysql> GRANT REPLICATION SLAVE ON *.* to 'tesunet'@'%' identified by 'tesunet123' # tesunet:用户 tesunet123:密码
5 、查询主库状态
mysql> show master status;

查看主库二进制文件是否开启:
mysql> show global variables like '%log%';

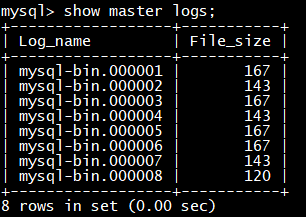
查看主库二进制日志列表:
mysql> show master logs;
查看主库的server id:
mysql> show global variables like '%server%';

7、配置从库Slave
mysql> change master to master_host='192.168.106.70',master_user='tesunet',master_password='tesunet123',master_log_file='mysql-bin.000001',master_log_pos=321;
# 注意:master_log_file与master_log_pos的数值是主库上查询master状态的数据
8、启动从库复制
mysql >start slave;
9、检查从服务器复制功能状态
mysql> show slave statusG

参数解释:
*************************** 1. row ***************************
               Slave_IO_State: Waiting for master to send event  # 这里显示了当前slave I/O线程的状态(slave连接到master的状态)。
                  Master_Host: 192.168.106.70                    # mysql主库的ip地址
                  Master_User: tesunet                           # 这个是master上面的一个用户。用来负责主从复制的用户,创建主从复制的时候建立的(具有reolication slave权限)。
                  Master_Port: 3306                              # master服务器的端口  一般是3306
                Connect_Retry: 60                                # 连接中断后,重新尝试连接的时间间隔。默认值是60秒。
              Master_Log_File: mysql-bin.000002                  # 当前I/O线程正在读取的主服务器二进制日志文件的名称。
          Read_Master_Log_Pos: 1925                              # 当前I/O线程正在读取的二进制日志的位置。
               Relay_Log_File: relay-log.000005                  # 当前slave SQL线程正在读取并执行的relay log的文件名。
                Relay_Log_Pos: 633                               # 当前slave SQL线程正在读取并执行的relay log文件中的位置;
        Relay_Master_Log_File: mysql-bin.000002                  # 当前slave SQL线程读取并执行的relay log的文件中多数近期事件,对应的主服务器二进制日志文件的名称。(说白点就是我SQL线程从relay日志中读取的正在执行的sql语句,对应主库的sql语句记录在主库的哪个binlog日志中)
             Slave_IO_Running: Yes    # I/O线程是否被启动并成功地连接到主服务器上。
            Slave_SQL_Running: Yes    # SQL线程是否被启动。
              Replicate_Do_DB:
          Replicate_Ignore_DB:
           Replicate_Do_Table:
       Replicate_Ignore_Table:
      Replicate_Wild_Do_Table:
  Replicate_Wild_Ignore_Table:
                   Last_Errno: 0
                   Last_Error:        # slave的SQL线程读取日志参数的的错误数量和错误消息。错误数量为0并且消息为空字符串表示没有错误。
                 Skip_Counter: 0      # SQL_SLAVE_SKIP_COUNTER的值,用于设置跳过sql执行步数。
          Exec_Master_Log_Pos: 1925   # slave SQL线程当前执行的事件,对应在master相应的二进制日志中的position。
              Relay_Log_Space: 800    # 所有原有的中继日志结合起来的总大小。
              Until_Condition: None
               Until_Log_File:
                Until_Log_Pos: 0
           Master_SSL_Allowed: No
           Master_SSL_CA_File:
           Master_SSL_CA_Path:
              Master_SSL_Cert:
            Master_SSL_Cipher:
               Master_SSL_Key:
        Seconds_Behind_Master: 0       # 这个值是时间戳的差值。是slave当前的时间戳和master记录该事件时的时间戳的差值。
Master_SSL_Verify_Server_Cert: No
                Last_IO_Errno: 0
                Last_IO_Error:         # 最后一次I/O线程的错误号和错误消息。
               Last_SQL_Errno: 0
               Last_SQL_Error:         # 最后一次SQL线程的错误号和错误消息。
  Replicate_Ignore_Server_Ids:
             Master_Server_Id: 70      # 主库服务器id号
                  Master_UUID: 04025823-b390-11eb-806c-000c29856060     # 主库服务器的UUID
             Master_Info_File: /usr/local/mysql/data/master.info        # 从库中保存主库服务器相关的目录位置。
                    SQL_Delay: 0                                        # 一个非负整数,表示秒数,Slave滞后多少秒于master。
          SQL_Remaining_Delay: NULL         # 当 Slave_SQL_Running_State 等待,直到MASTER_DELAY秒后,Master执行的事件,此字段包含一个整数,表示有多少秒左右的延迟。在其他时候,这个字段是NULL。
      Slave_SQL_Running_State: Slave has read all relay log; waiting for the slave I/O thread to update it   # SQL线程运行状态:线程已经处理了中继日志文件中的所有事件,现在正等待I/O线程将新事件写入中继日志。
           Master_Retry_Count: 86400        # 连接主库失败最多的重试次数。
                  Master_Bind:
      Last_IO_Error_Timestamp:
     Last_SQL_Error_Timestamp:
               Master_SSL_Crl:
           Master_SSL_Crlpath:
           Retrieved_Gtid_Set:
            Executed_Gtid_Set:
                Auto_Position: 0
1 row in set (0.00 sec)
注意:
Slave_IO_Running: Yes
Slave_SQL_Running: Yes

以上两者都为Yes,表示主从环境搭建成功,那下边建表测试是否实现主从同步
三、主从测试(root权限登录)
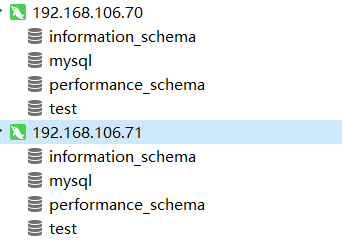
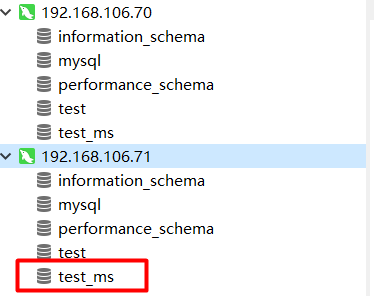
现在在主库新建数据库:test_ms
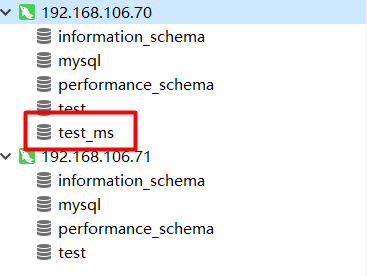
然后刷新备库:
四、测试从库read_only
1、从库创建普通用户,设置权限
mysql> create user 'test'@'%' identified by '123456';                   # 创建普通用户,可以远程连接
mysql> grant select  on *.* to test@'%'identified by '123456';          # 授权所有库,只能查询操作
mysql> grant all privileges on *.* to test@'%'identified by '123456';   # 这是授予所有权限
mysql> flush privileges;                      # 刷新权限
mysql> select user,host from mysql.user;      # 查询用户
2、用此普通账号登录数据库进行修改操作


