对DispatcherServlet的认识
在web项目中,ContextLoaderListener起到的作用就是实例化一个父容器,管理跟逻辑业务相关的bean对象,Dispatcher实例化一个子容器,给管理跟前面比较近的一些bean对象。把拦截下来的请求,依据相应的规则分发到目标Handler来处理。
DispatcherServlet的继承关系
public class DispatcherServlet extends FrameworkServlet
public abstract class FrameworkServlet extends HttpServletBean implements ApplicationContextAware
public abstract class HttpServletBean extends HttpServlet implements EnvironmentCapable, EnvironmentAware
可以看到DispatcherServlet 有这样一些继承关系。
HttpServlet类初学web项目的时候经常用到的,它的作用就是可以处理不同的请求方法(比如:get方法,post方法等等),可以获得servletContext对象,可以获得为这个servlet配置的初始信息(initParam)。特别重要的是每一个servlet都是有生命周期的 init,service,destroy方法代表着这个servlet不同的生命周期。
httpServletBean抽象类除了继承了httpServlet类还是实现了EnvironmentCapable, EnvironmentAware接口。这两个接口的作用分别是返回一个Environment类型的对象和设置一个Environment类型的对象,相当于是为Environment的get/set方法专门设置了两个接口。httpServletBean抽象类主要的作用就是将web.xml中为DispatcherServlet配置的相关信息(init-param)赋值给对应的专门的变量中供后面使用。
FrameworkServlet抽象类除了实现HttpServletBean类还实现了ApplicationContextAware接口,这个接口的作用就是ApplicationContext的set方法。FrameworkServlet抽象类主要的作用集中在其initServletBean方法中,实例化了一个webApplicationContext并完成相关初始化。
DispatcherServlet继承了FrameworkServlet抽象类,他主要功能就是完成FrameworkServlet剩下的初始化工作以及对请求的处理。
DispacherServlet初始化过程
从上面的继承可以看出DispacherServlet也是一个Servlet,在tomcat中使用一个servlet必须按照他的标准生命周期一步一步完成执行才行。
首先会先执行这个servlet的init方法对servlet进行初始化,初始化只执行一次,之后就可以多次使用service方法来处理你的请求了,最后在关闭容器的时候会使用destroy方法。既然DispacherServlet也是一个Servlet(继承了HttpServlet类,在web.xml配置的时候也是把它当做一个Servlet进行配置的),那么DispatcherServlet也需要经过这样的步骤才能被使用。
首先看看init()方法
public final void init() throws ServletException {
		//   将web.xml  中 dispatcherServlet的配置信息以key-value形式包装到PropertyValue中
		PropertyValues pvs = new ServletConfigPropertyValues(getServletConfig(), this.requiredProperties);
		if (!pvs.isEmpty()) {
			try {
				BeanWrapper bw = PropertyAccessorFactory.forBeanPropertyAccess(this);
				ResourceLoader resourceLoader = new ServletContextResourceLoader(getServletContext());
				bw.registerCustomEditor(Resource.class, new ResourceEditor(resourceLoader, getEnvironment()));
				initBeanWrapper(bw);
                                //将为dispatchServlet配置的initParam赋值给相关变量
				bw.setPropertyValues(pvs, true);
			}
			catch (BeansException ex) {
				throw ex;
			}
		}
		initServletBean();
	}
上面函数将web.xml中dispatchServlet配置的信息(init-param)封装一个PropertyValue然后放在PropertyValues中。
然后把dispatchServlet包装成一个BeanWrapper类实例,这个类是Sping提供的一个来操作javaBean属性的工具,使用它可以直接修改一个对象的属性。bw.setPropertyValues(pvs, true)这个方法就是将配置的参数设置到对应的属性中去。
initServletBean()是一个模板方法,在FrameworkServlet具体实现。
至于它是如何实现这个功能的,就不去探究了。通过debug可以看到确实是将我们配置的信息设置到对象的属性中了。
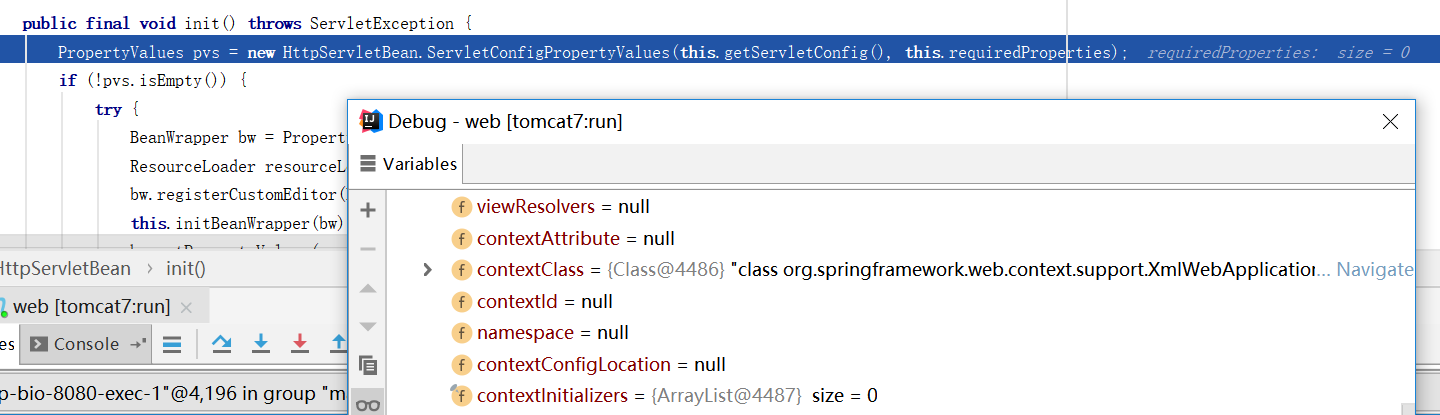
在没有执行init()方法的时候可以看到contextId,contextConfigLocation是null值
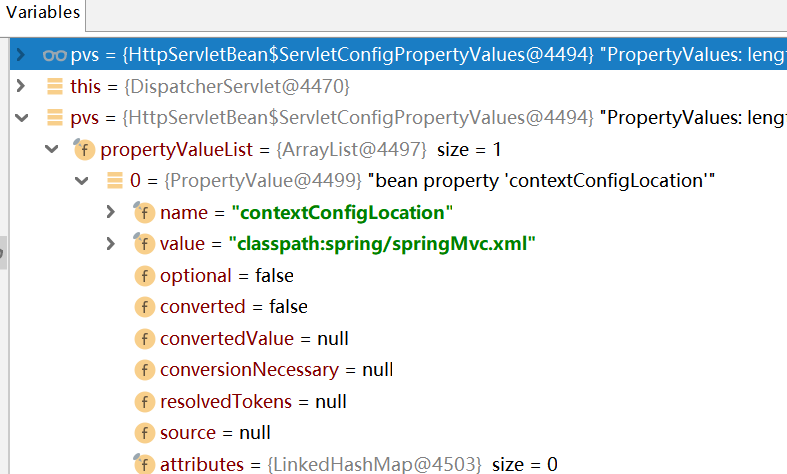
在执行了PropertyValues pvs = new ServletConfigPropertyValues(getServletConfig(), this.requiredProperties)语句后,就将配置的ContextConfigLocation信息包装到PropertyValue并放入PropertyValues的list中了。
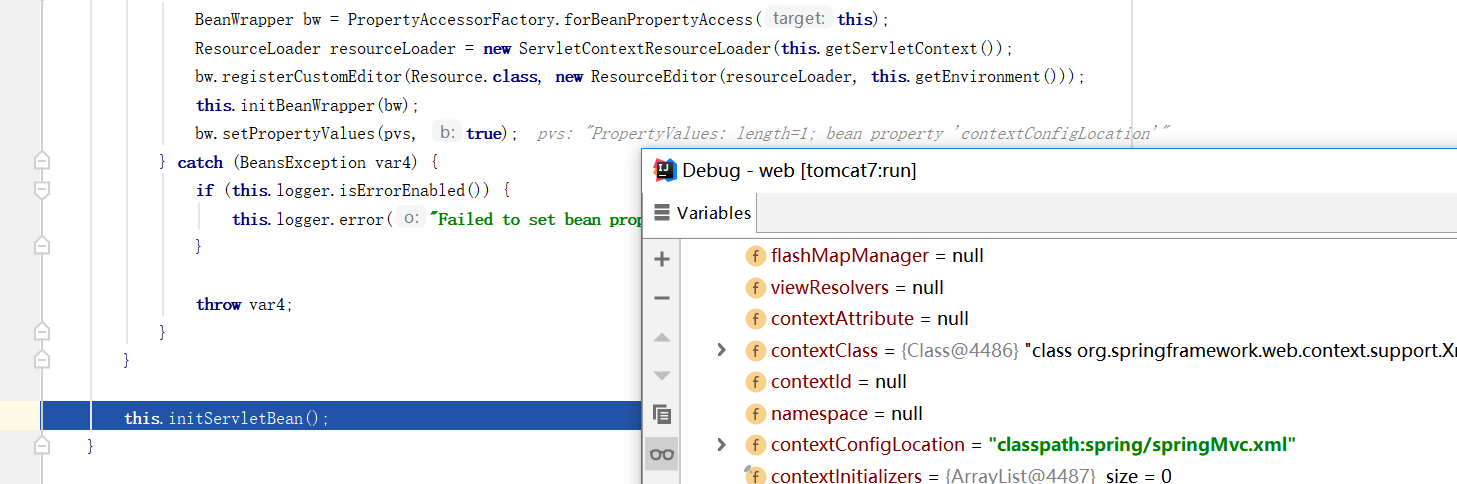
在执行了bw.setPropertyValues(pvs, true)语句后可以看到ContextConfigLocation属性被设置了值(因为只设置了ContextConfigLocation参数,所以contextId还是null)。
接着看看initServletBean()方法做了什么事情
protected final void initServletBean() throws ServletException {
		....
		try {
			this.webApplicationContext = initWebApplicationContext();
			initFrameworkServlet();
		}
		catch (ServletException | RuntimeException ex) {
			logger.error("Context initialization failed", ex);
			throw ex;
		}
	}
可以看到这个函数调用了另外两个函数,其中initFrameworkServlet()是一个模板方法但是在其子类DispatcherServlet中并没有具体实现。
所以主要看看initWebApplicationContext()方法做了什么。
	protected WebApplicationContext initWebApplicationContext() {
		//从servletContext中查找是否设置了rootContext,也就是ContextLoaderListener实例化的webApplicationContext
		WebApplicationContext rootContext =
				WebApplicationContextUtils.getWebApplicationContext(getServletContext());
		WebApplicationContext wac = null;

		if (this.webApplicationContext != null) {
			//如果在构建时注入了一个webApplicationContext->使用它
			wac = this.webApplicationContext;
			if (wac instanceof ConfigurableWebApplicationContext) {
				ConfigurableWebApplicationContext cwac = (ConfigurableWebApplicationContext) wac;
                                //在当前容器不是活动状态时
				if (!cwac.isActive()) {
                                        //设置父容器
					if (cwac.getParent() == null) {
						cwac.setParent(rootContext);
					}
                                        //进行相关配置并实例化单例bean
					configureAndRefreshWebApplicationContext(cwac);
				}
			}
		}
                //如果没有通过构造方法注入,就查看servletContext中是否有DispacherServlet实例化的WebApplicationContext(通过查找Atrribute的方式)
		if (wac == null) {
			wac = findWebApplicationContext();
		}
                //如果之前没有实例化过,那就实例化一个
		if (wac == null) {
			wac = createWebApplicationContext(rootContext);
		}
                //初始化一些处理请求的工具
		if (!this.refreshEventReceived) {
			synchronized (this.onRefreshMonitor) {
				onRefresh(wac);
			}
		}
                //将WebApplicationContext放入servletContext中
		if (this.publishContext) {
			// Publish the context as a servlet context attribute.
			String attrName = getServletContextAttributeName();
			getServletContext().setAttribute(attrName, wac);

		}

		return wac;
	}
可以看到大概做了这么几件事情:
步骤1.查找父容器(rootContext)
步骤2.获得一个WebApplicationContext
步骤3.onrefresh方法中初始化处理请求使用到的工具(比如:handlerMapping,handlerAdapter等等)
步骤4.将webApplicationContext设置到servletContext中
步骤1 和 步骤4 都很简单,容易理解。主要深入了解步骤2和步骤3。
步骤2---获得一个WebApplicationContext有三个步骤:
1.通过构造方法注入一个
2.通过servletContext获得一个(查找servletContext的atrribute属性,属性名和查找父容器不同)
3.自己实例化一个(主要手段)
看看是如何实例化一个webApplicationContext。
protected WebApplicationContext createWebApplicationContext(@Nullable ApplicationContext parent) {
		//获得要实例化的webApplicationContext的class对象,这里获得的是XmlWebApplicationContext   class对象
		Class<?> contextClass = getContextClass();
                //判断class对象是否是ConfigurableWebApplicationContext的子类
		if (!ConfigurableWebApplicationContext.class.isAssignableFrom(contextClass)) {
			throw new ApplicationContextException(
					"Fatal initialization error in servlet with name '" + getServletName() +
					"': custom WebApplicationContext class [" + contextClass.getName() +
					"] is not of type ConfigurableWebApplicationContext");
		}
                //实例化一个
		ConfigurableWebApplicationContext wac =
				(ConfigurableWebApplicationContext) BeanUtils.instantiateClass(contextClass);
                //设置相关属性
		wac.setEnvironment(getEnvironment());
		wac.setParent(parent);
		String configLocation = getContextConfigLocation();
		if (configLocation != null) {
			wac.setConfigLocation(configLocation);
		}
                //设置相关属性并实例化单例bean主要是(refresh方法)
		configureAndRefreshWebApplicationContext(wac);

		return wac;
	}
在看看为什么获得的是一个xmlWebApplicationContext class对象。
	public static final Class<?> DEFAULT_CONTEXT_CLASS = XmlWebApplicationContext.class;
        private Class<?> contextClass = DEFAULT_CONTEXT_CLASS;

        public void setContextClass(Class<?> contextClass) {
		this.contextClass = contextClass;
	}

	public Class<?> getContextClass() {
		return this.contextClass;
	}
在FrameworkServlet中直接指定了默认值,当然你也可以自己通过init-param配置webApplicationContext的class对象,前提是配置的对象必须是ConfigurableWebApplicationContext的子类。配置后会像contextConfigLocation属性一样注入到contextClass对象中。
在看看configureAndRefreshWebApplicationContext(wac)方法具体做了什么。
protected void configureAndRefreshWebApplicationContext(ConfigurableWebApplicationContext wac) {
                //设置Contextid(这个属性可以自己配置)
		if (ObjectUtils.identityToString(wac).equals(wac.getId())) {
			if (this.contextId != null) {
				wac.setId(this.contextId);
			}
			else {
				wac.setId(ConfigurableWebApplicationContext.APPLICATION_CONTEXT_ID_PREFIX +
						ObjectUtils.getDisplayString(getServletContext().getContextPath()) + '/' + getServletName());
			}
		}

                //设置ServletContext属性
		wac.setServletContext(getServletContext());
                //设置servletConfig属性
		wac.setServletConfig(getServletConfig());
                //设置namespace属性(可以自己配置)
		wac.setNamespace(getNamespace());
		wac.addApplicationListener(new SourceFilteringListener(wac, new ContextRefreshListener()));
		ConfigurableEnvironment env = wac.getEnvironment();
                //将servletContext,servletConfig作为属性保存在environment中
		if (env instanceof ConfigurableWebEnvironment) {
			((ConfigurableWebEnvironment) env).initPropertySources(getServletContext(), getServletConfig());
		}
                //在刷新给定的WebApplicationContext之前对其进行后处理(后处理相信了解springFramework的一定知道)
                // 这是个空方法
		postProcessWebApplicationContext(wac);
                //执行配置的实现了  ApplicationContextInitializer接口的类的initialize(C applicationContext)方法
		applyInitializers(wac);
                //ioc容器启动方法,会设置一些属性然后实例化没有设置懒加载的单例的bean
		wac.refresh();
	}
看看applyInitializers(wac)方法
	protected void applyInitializers(ConfigurableApplicationContext wac) {
                //从servletContext中设置init-param中获得配置属性名为globalInitializerClasses的属性值
		String globalClassNames = getServletContext().getInitParameter(ContextLoader.GLOBAL_INITIALIZER_CLASSES_PARAM);
		if (globalClassNames != null) {
			for (String className : StringUtils.tokenizeToStringArray(globalClassNames, INIT_PARAM_DELIMITERS)) {
                                //分解globalInitializerClasses属性值(可能一次配了多个,用,隔开的)
                                //然后loadInitializer方法实例化并放入contextInitializers中
				this.contextInitializers.add(loadInitializer(className, wac));
			}
		}
                // contextInitializerClass  配置在servlet的init-param属性中,然后通过跟ContextConfigLocation同样的方法注入
		if (this.contextInitializerClasses != null) {
			for (String className : StringUtils.tokenizeToStringArray(this.contextInitializerClasses, INIT_PARAM_DELIMITERS)) {
				this.contextInitializers.add(loadInitializer(className, wac));
			}
		}
                // 进行排序
		AnnotationAwareOrderComparator.sort(this.contextInitializers);
                //一个一个的执行其initialize方法
		for (ApplicationContextInitializer<ConfigurableApplicationContext> initializer : this.contextInitializers) {
			initializer.initialize(wac);
		}
	}
步骤3----在看看onRefresh方法,这是个模板方法,在DispatcherServlet中实现。
	protected void onRefresh(ApplicationContext context) {
		initStrategies(context);
	}
在看看initStrategies(context)方法
	protected void initStrategies(ApplicationContext context) {
		initMultipartResolver(context);
		initLocaleResolver(context);
		initThemeResolver(context);
		initHandlerMappings(context);
		initHandlerAdapters(context);
		initHandlerExceptionResolvers(context);
		initRequestToViewNameTranslator(context);
		initViewResolvers(context);
		initFlashMapManager(context);
	}
可以看到它初始化了各种处理请求时用到的工具。包括MultipartResolver,LocaleResolver,ThemeResolver,HandlerMapping,HandlerAdapter,HandlerExceptionResolver,RequestToViewNameTranslator,ViewResolvers,FlashMapManager。
HandlerMapping:是根据request找到响应的处理器handler和Intercepter。
HandlerAdapter:可以理解为使用处理器的。
HandlerExceptionResolver:是处理异常的。
ViewResolver:是将String类型的属兔名和Locale解析为View类型的视图。
RequestToViewNameTranslator: ViewResolver是根据ViewName查找View,但有的Handler处理完并没有设置view也没有设置viewName,这时就需要从
request获取viewName了,RequestToViewNameTranslator 就是做这件事的。
LocaleResolver: 解析视图需要两个参数:一个是视图名,另一个是locale。视图名是处理器返回的或者使用RequestToViewNameTranslator 解析的默认视
图名,locale则是由LocaleResolver解析出来的。
ThemeResolver: 是解析主题的。
MultipartResolver: 用于处理上传请求,处理方法是将普通的request包装成MltipartHttpServletRequest,然后直接调动其getFile方法获得file。
FlashMapManager:用于管理FlashMap的,FlashMap主要用在redirect中传递参数。
看看在DispatcherServlet中这些工具的声明
	@Nullable
	private MultipartResolver multipartResolver;

	/** LocaleResolver used by this servlet */
	@Nullable
	private LocaleResolver localeResolver;

	/** ThemeResolver used by this servlet */
	@Nullable
	private ThemeResolver themeResolver;

	/** List of HandlerMappings used by this servlet */
	@Nullable
	private List<HandlerMapping> handlerMappings;

	/** List of HandlerAdapters used by this servlet */
	@Nullable
	private List<HandlerAdapter> handlerAdapters;

	/** List of HandlerExceptionResolvers used by this servlet */
	@Nullable
	private List<HandlerExceptionResolver> handlerExceptionResolvers;

	/** RequestToViewNameTranslator used by this servlet */
	@Nullable
	private RequestToViewNameTranslator viewNameTranslator;

	/** FlashMapManager used by this servlet */
	@Nullable
	private FlashMapManager flashMapManager;

	/** List of ViewResolvers used by this servlet */
	@Nullable
	private List<ViewResolver> viewResolvers;
所以可以看到有的工具只能有一个,而有的工具可以有多个。
看看是如何初始化这些工具的。
private void initMultipartResolver(ApplicationContext context) {
		try {
			this.multipartResolver = context.getBean(MULTIPART_RESOLVER_BEAN_NAME, MultipartResolver.class);
		}
		catch (NoSuchBeanDefinitionException ex) {
			// Default is no multipart resolver.
			this.multipartResolver = null;
		}
	}
MultipartResolver工具的初始化过程是:首先从IOC容器中查找name=multipartResolver的bean对象,如果IOC容器中没有则会抛出异常,在catch中将其赋值为null。
private void initLocaleResolver(ApplicationContext context) {
		try {
			this.localeResolver = context.getBean(LOCALE_RESOLVER_BEAN_NAME, LocaleResolver.class);
		}
		catch (NoSuchBeanDefinitionException ex) {
			// We need to use the default.
			this.localeResolver = getDefaultStrategy(context, LocaleResolver.class);
		}
	}
LocaleResolver工具的初始化过程是:从IOC容器获取name=localeResolver的bean对象,如果IOC容器没有则抛出异常,在catch中可以看到这个语句this.localeResolver = getDefaultStrategy(context, LocaleResolver.class);获得了一个默认的localeResolver给了this.localeResolver。
默认的LocaleResolver从哪里来??
static {
		try {
			ClassPathResource resource = new ClassPathResource(DEFAULT_STRATEGIES_PATH, DispatcherServlet.class);
			defaultStrategies = PropertiesLoaderUtils.loadProperties(resource);
		}
		catch (IOException ex) {
			throw new IllegalStateException("Could not load '" + DEFAULT_STRATEGIES_PATH + "': " + ex.getMessage());
		}
	}
在DispatcherServlet中有这么一段静态代码段,加载了DispatchServlet.properties文件
文件位于org/springframework/web/servlet/DispatcherServlet.properties
文件内容:
org.springframework.web.servlet.LocaleResolver=org.springframework.web.servlet.i18n.AcceptHeaderLocaleResolver
....
这个文件中设置一些必须工具的默认class(String类型),getDefaultStrategy方法会通过反射实例化这些默认工具(在自己没有配置的时候)
private void initHandlerMappings(ApplicationContext context) {
		this.handlerMappings = null;

		if (this.detectAllHandlerMappings) {
			// Find all HandlerMappings in the ApplicationContext, including ancestor contexts.
			// 找出 所有的handlerMappings  包括父Context中的
			Map<String, HandlerMapping> matchingBeans =
					BeanFactoryUtils.beansOfTypeIncludingAncestors(context, HandlerMapping.class, true, false);
			if (!matchingBeans.isEmpty()) {
				this.handlerMappings = new ArrayList<>(matchingBeans.values());
				// We keep HandlerMappings in sorted order.
				AnnotationAwareOrderComparator.sort(this.handlerMappings);
			}
		}
		else {
			try {
				HandlerMapping hm = context.getBean(HANDLER_MAPPING_BEAN_NAME, HandlerMapping.class);
				this.handlerMappings = Collections.singletonList(hm);
			}
			catch (NoSuchBeanDefinitionException ex) {
				// Ignore, we'll add a default HandlerMapping later.
			}
		}

		// Ensure we have at least one HandlerMapping, by registering
		// a default HandlerMapping if no other mappings are found.
		if (this.handlerMappings == null) {
			this.handlerMappings = getDefaultStrategies(context, HandlerMapping.class);
		}
	}
HandlerMapping 还可以通过设置detectAllHandlerMappings来判断是否需要找出父类的HandlerMapping。