这几天做新课时,忽然发现Junit在Junit4这个版本上停留了十几年之后,原来已经出到5了(后知后觉),花了些时间研究了下,发现还真是不简单,我们一起来看看JUnit5上出现了哪些让人激动的新变化
1. 架构
不像之前的Junit版本所有的组件都包含在Junit这一个包中,新的Junit5准确的说包含三个包:
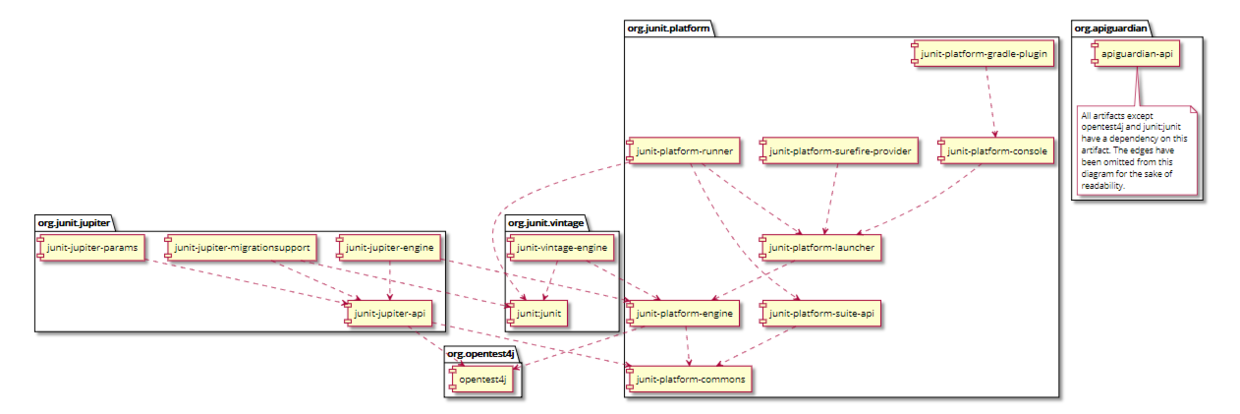
JUnit 5 = JUnit Platform + JUnit Jupiter + JUnit Vintage
JUnit platform ,从名字也可以看出来,Junit已不仅仅想简单作为一个测试框架,更多是希望能作为一个测试平台,也就是说通过JUnit platform,其他的自动化测试引擎或自己定制的引擎都可以接入这个平台实现对接和执行。试想下TestNG运行在Junit上,是不是有点意思了?
JUnit Jupiter, 则是Junit5的核心,它包含了很多丰富的新特性来使JUnit自动化测试更加方便、功能更加丰富和强大。
JUnit Vintage 则是一个对JUnit3,JUnit4兼容的测试引擎,使旧版本junit的自动化测试脚本可以顺畅运行在junit5下,其实也可以看作是基于junit platform实现的接入范例。
组件的依赖关系如下: 
2. JDK
JUnit5需要JDK8或以上版本才能支持。
3. 断言
除了之前版本的各种常规断言,新版本还支持AssertThrow和AssertAll两种新的断言
assertAll可以将一组断言集合起来,并一起在报告中体现
|
1
2
3
4
5
6
7
8
9
|
@Test void groupedAssertions() { // In a grouped assertion all assertions are executed, and any // failures will be reported together. assertAll("person", () -> assertEquals("John", person.getFirstName()), () -> assertEquals("Doe", person.getLastName()) ); } |
assertThrow则是新增的用来专门进行异常预期的断言
|
1
2
3
4
5
6
7
|
@Test void exceptionTesting() { Throwable exception = assertThrows(IllegalArgumentException.class, () -> { throw new IllegalArgumentException("a message"); }); assertEquals("a message", exception.getMessage()); } |
4. Tag的支持
新版本提供了tag特性,类似RobotFramework的tag一样可以给测试打标签。便于在测试执行时根据tag来选择执行。
|
1
2
3
4
5
6
7
8
9
|
@Tag("fast") @Tag("model") class TaggingDemo { @Test @Tag("taxes") void testingTaxCalculation() { } } |
5. 嵌套测试
JUnit5中增加了一种Nested注解,支持在测试中进行嵌套,使测试的层级处理更加丰富
|
1
2
3
4
5
6
7
8
9
10
11
12
13
14
15
16
17
18
19
20
21
22
23
24
25
26
27
28
29
30
31
|
@Nested @DisplayName("after pushing an element") class AfterPushing { String anElement = "an element"; @BeforeEach void pushAnElement() { stack.push(anElement); } @Test @DisplayName("it is no longer empty") void isNotEmpty() { assertFalse(stack.isEmpty()); } @Test @DisplayName("returns the element when popped and is empty") void returnElementWhenPopped() { assertEquals(anElement, stack.pop()); assertTrue(stack.isEmpty()); } @Test @DisplayName("returns the element when peeked but remains not empty") void returnElementWhenPeeked() { assertEquals(anElement, stack.peek()); assertFalse(stack.isEmpty()); } } |
6. 测试用例参数化
Junit5中支持给测试方法提供参数,提高了测试数据管理的便利性。内建的几种数据源
@ValueSource
|
1
2
3
4
5
|
@ParameterizedTest @ValueSource(ints = { 1, 2, 3 }) void testWithValueSource(int argument) { assertTrue(argument > 0 && argument < 4); } |
@EnumSource
|
1
2
3
4
5
|
@ParameterizedTest @EnumSource(TimeUnit.class) void testWithEnumSource(TimeUnit timeUnit) { assertNotNull(timeUnit); } |
还可以提供数据的例外处理,正则匹配等
|
1
2
3
4
5
6
|
@ParameterizedTest @EnumSource(value = TimeUnit.class, mode = EXCLUDE, names = { "DAYS", "HOURS" }) void testWithEnumSourceExclude(TimeUnit timeUnit) { assertFalse(EnumSet.of(TimeUnit.DAYS, TimeUnit.HOURS).contains(timeUnit)); assertTrue(timeUnit.name().length() > 5); } |
or
|
1
2
3
4
5
6
7
|
@ParameterizedTest @EnumSource(value = TimeUnit.class, mode = MATCH_ALL, names = "^(M|N).+SECONDS$") void testWithEnumSourceRegex(TimeUnit timeUnit) { String name = timeUnit.name(); assertTrue(name.startsWith("M") || name.startsWith("N")); assertTrue(name.endsWith("SECONDS")); } |
@MethodSource
|
1
2
3
4
5
6
7
8
9
|
@ParameterizedTest @MethodSource("stringProvider") void testWithSimpleMethodSource(String argument) { assertNotNull(argument); } static Stream<String> stringProvider() { return Stream.of("foo", "bar"); } |
@CsvSource
|
1
2
3
4
5
6
|
@ParameterizedTest @CsvSource({ "foo, 1", "bar, 2", "'baz, qux', 3" }) void testWithCsvSource(String first, int second) { assertNotNull(first); assertNotEquals(0, second); } |
@CsvFileSource
|
1
2
3
4
5
6
|
@ParameterizedTest @CsvFileSource(resources = "/two-column.csv", numLinesToSkip = 1) void testWithCsvFileSource(String first, int second) { assertNotNull(first); assertNotEquals(0, second); } |
two-column.csv
Country, reference
Sweden, 1
Poland, 2
"United States of America", 3
7. 扩展回调机制
Junit5中对不同测试执行阶段提供了对应的回调接口,使扩展JUnit更加方便
| 回调方法 | 描述 |
|---|---|
| BeforeAllCallback | 在@BeforeAll 注解的方法之前执行 |
| AfterAllCallback | 在@AfterAll 注解的方法之后执行 |
| BeforeEachCallback | 在@BeforeEach 注解的方法之前执行 |
| AfterEachCallback | 在@AfterEach 注解的方法之后执行 |
| BeforeTestExecutionCallback | 在测试方法运行之前执行 |
| AfterTestExecutionCallback | 在测试方法运行之后执行 |
8. 动态测试
JUnit Jupiter还引入了一种全新的测试编程模型。
这种新类型的测试是一种动态测试,它是由一个工厂方法在运行时生成的,该方法用@TestFactory注释。与@Test方法相反,@TestFactory方法本身不是测试用例,而是测试用例的工厂。因此,动态测试是工厂的产品.
|
1
2
3
4
5
6
7
|
@TestFactory Iterator<DynamicTest> dynamicTestsFromIterator() { return Arrays.asList( dynamicTest("5th dynamic test", () -> assertTrue(true)), dynamicTest("6th dynamic test", () -> assertEquals(4, 2 * 2)) ).iterator(); } |
9. Lambda语法支持
JUnit5全面支持JDK8 lambda语法表达。这个本人使用不多,无感
|
1
2
3
4
5
6
7
|
@TestFactory Iterator<DynamicTest> dynamicTestsFromIterator() { return Arrays.asList( dynamicTest("5th dynamic test", () -> assertTrue(true)), dynamicTest("6th dynamic test", () -> assertEquals(4, 2 * 2)) ).iterator(); } |
10. 注解的更新
和JUnit4相比,Junit对注解的使用进行了进一步的优化,以下是一个对照表
| FEATURE | JUNIT 4 | JUNIT 5 |
|---|---|---|
| Declare a test method | @Test | @Test |
| Execute before all test methods in the current class | @BeforeClass | @BeforeAll |
| Execute after all test methods in the current class | @AfterClass | @AfterAll |
| Execute before each test method | @Before | @BeforeEach |
| Execute after each test method | @After | @AfterEach |
| Disable a test method / class | @Ignore | @Disabled |
| Test factory for dynamic tests | NA | @TestFactory |
| Nested tests | NA | @Nested |
| Tagging and filtering | @Category | @Tag |
总结
Junit5提供了很多新特性,而且更加容易扩展。大家不妨可以尝试。但官方也说明其中尚有较多试验性的功能,如果大规模使用,建议大家不妨再观望一段时间,等确实稳定下来再切换也许更合适
欢迎关注课程《Android自动化测试实战 Java篇》
作者:城下秋草
链接:http://www.imooc.com/article/44208
来源:慕课网
本文原创发布于慕课网 ,转载请注明出处,谢谢合作