Some time back, Mark Autret posted in his blog that he discovered a scripting property which enables a hidden feature in InDesign which shows a strike-through on text with character level overrides, and vertical line next to text with paragraph level overrides.
The script to toggle this setting is really quite simple as Mark explains on his blog:
app.activeDocument.textPreferences.enableStylePreviewMode^= 1;
Marc has a slightly longer version on his blog which does some checking first.
This script however is like all scripts which must be run from the Script Panel. It would have been great if Adobe created a menu item for this command.
Fortunately creating menu items is quite easy to do via scripting, so turning this script into a startup script is a simple thing to do:
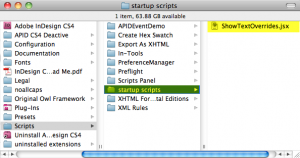
For those who are just interested in using scripts, you can skip all the technical details below, and download the startup script from here. To install the script, simply place it in a folder named “startup scripts” inside your main Scripts folder as shown in this screenshot:
Using the Script
A new menu item will appear at the bottom of the Type menu. To use, simply select the menu item to toggle “Show” and “Hide”:
Nowforallthegeekydetails:
Background:
Menus are composed of two parts: Menu Actions, and Menu Items. Menu actions are the objects which executes a specific command in InDesign, while Menu items are the item that you select in the menu. One menu action can be represented by more than one menu item (i.e. they are reusable).
Menu Types
There are two classes of menu actions and menu items in InDesign: built in ones which are created by plugins, and scripting ones which are created by scripts.
Built in menu actions are represented by the app.menuActions collection, while scripting ones are represented by app.scriptMenuActions. menuActions can be invoked by scripts but not created, while scriptMenuActions can be created as well.
Let’s get Down to Business:
Adding menu items to InDesign (CS3 and later) is a two step process and it’s very straight-forward:
- You create a scriptMenuAction
- You add a menuItem using your scriptMenuAction
Script Menu Actions
Step one is done like this:
var action = app.scriptMenuActions.add("My Cool Command");
The text you provide to the add method will be the name of the menu item.
Adding Menu Items
You then add the menu action to a menu like so:
myMenu.menuItems.add(action);
myMenu is a reference to a specific menu in InDesign. Menus can be anywhere including panel menus.
Menu Positions
You can specify the position of the menu by adding a second “LocationOptions” argument to the add method. Because menus are added to the end by default, the previous command is the same as the following:
myMenu.menuItems.add(action,LocationOptions.AT_END);
To place the menu item after the first menu item, we would do something like the following:
myMenu.menuItems.add(action,LocationOptions.AFTER,myMenu.menuItems.item(0));
Doing the Work
Using menu actions requires event handlers. The event handlers are added to the menu actions — not the menu items, because the menu action is what does the actual work. To create event handlers we need to add an event listener, or in our case two:
action.addEventListener("beforeDisplay", enableDisable);
action.addEventListener("onInvoke", toggleShowTextFormatting);
Customizing Menu Items
Before display allows us to adjust the way the menu item looks We can change whether it’s enabled, checked or even change its text. In our case we want to change the text to either “Show” or “Hide”.
The function to change the text on the menu item looks like this:
function enableDisable(){
  if(app.documents.length == 0){
    if(app.textPreferences.enableStylePreviewMode){
      ShowFormattingController.action.title = "Hide Text Overrides";
    } else {
      ShowFormattingController.action.title = "Show Text Overrides";
    }
  } else {
    if(app.activeDocument.textPreferences.enableStylePreviewMode){
      ShowFormattingController.action.title = "Hide Text Overrides";
    } else {
      ShowFormattingController.action.title = "Show Text Overrides";
    }
  }
}
The function needs to work both on the application level, as well as the document level. That’s why there’s so many if/else clauses. It would be possible to shorten the code at the expense of readability.
Invoking the Menu Item
On Invoke does the actual work:
function toggleShowTextFormatting(){
  if(app.documents.length == 0){
    app.textPreferences.enableStylePreviewMode^= 1;
  } else {
    app.activeDocument.textPreferences.enableStylePreviewMode^= 1;
  }
}
The entire script should just theoretically need the following additional function:
install();
function install(){
  //Global Object for easy reference
  ShowFormattingController = {};
  var actionname = "Show Text Overrides";
  var action = app.scriptMenuActions.add(actionname);
  action.addEventListener("beforeDisplay", enableDisable);
  action.addEventListener("onInvoke", toggleShowTextFormatting);
  ShowFormattingController.action = action;

  var typeMenu = app.menus.item('$ID/Main').submenus.item('$ID/&Type');
  typeMenu.menuItems.add(action);
}
However there is a problem:
InDesign caches all scriptMenuActions on shutdown and remembers them the next time InDesign is launched. The reason for this is because it is possible to create a keyboard shortcut to script menu actions. If the script menu actions would be lost on each relaunch of InDesign, you would need to re-assign your shortcuts every time InDesign is relaunched.
This means that you do not know when InDesign is launched whether the script menu action exists (because it was previously installed), or it does not exist because this is the first time it is being run.
Because of this, any time you create a script menu action, you first have to test for its existence. Our case is further complicated by the fact that the script menu action can have one of two names. This requires us to do a double check:
var actionname = "Hide Text Overrides";
var action = app.scriptMenuActions.item(actionname);
if(action == null) {
  actionname = "Show Text Overrides";
  action = app.scriptMenuActions.item(actionname);
  if(action == null) {
    action = app.scriptMenuActions.add(actionname);
  }
}
We add some gratuitous making sure the action is unchecked and enabled, and this is what we get:
function install(){
  ShowFormattingController = {};
  var actionname = "Hide Text Overrides";
  var action = app.scriptMenuActions.item(actionname);
  if(action == null) {
    actionname = "Show Text Overrides";
    action = app.scriptMenuActions.item(actionname);
    if(action == null) {
      action = app.scriptMenuActions.add(actionname);
    }
  }
  action.checked = false;
  action.enabled = true;
  action.addEventListener("beforeDisplay", enableDisable);
  action.addEventListener("onInvoke", toggleShowTextFormatting);
  ShowFormattingController.action = action;

  var typeMenu = app.menus.item('$ID/Main').submenus.item('$ID/&Type');
  typeMenu.menuItems.add(action);
}
Tags: InDesign, Scripting, Scripts, Startup Script

