使用Builder设计模式,设计ToolBar
Builder设计模式解析
android也有不地方采用了Builder设计模式的,比如NotificationCompat.Builder和AlertDialog.Builder就采用了Builder的设计模式
最典型的代码示例
NotificationCompat.Builder
NotificationCompat.Builder mBuilder =
        new NotificationCompat.Builder(this)
        .setSmallIcon(R.drawable.notification_icon)
        .setContentTitle("My notification")
        .setContentText("Hello World!");
// Creates an explicit intent for an Activity in your app
Intent resultIntent = new Intent(this, ResultActivity.class);

// The stack builder object will contain an artificial back stack for the
// started Activity.
// This ensures that navigating backward from the Activity leads out of
// your application to the Home screen.
TaskStackBuilder stackBuilder = TaskStackBuilder.create(this);
// Adds the back stack for the Intent (but not the Intent itself)
stackBuilder.addParentStack(ResultActivity.class);
// Adds the Intent that starts the Activity to the top of the stack
stackBuilder.addNextIntent(resultIntent);
PendingIntent resultPendingIntent =
        stackBuilder.getPendingIntent(
            0,
            PendingIntent.FLAG_UPDATE_CURRENT
        );
mBuilder.setContentIntent(resultPendingIntent);
NotificationManager mNotificationManager =
    (NotificationManager) getSystemService(Context.NOTIFICATION_SERVICE);
// mId allows you to update the notification later on.
mNotificationManager.notify(mId, mBuilder.build());
AlertDialog.Builder
AlertDialog.Builder builder2=new AlertDialog.Builder(
getActivity(),R.style.AppTheme_NoActionBar);

        builder2.setTitle("警告")
        .setMessage("你确定删除吗")
        new DialogInterface.OnClickListener() {
            @Override
            public void onClick(DialogInterface dialog,
             int which) {
                ToastUtil.showToast(getActivity(),"你点击了取消");
            }
        })
         .setPositiveButton("确定",
         new DialogInterface.OnClickListener() {
                    @Override
                    public void onClick(DialogInterface dialog,
                    int which) {
                        ToastUtil.showToast(getActivity(),
                        "你点击了确定");
                    }
          }) .create().show();
Builder设计模式的特点
参数化
AlertDialog.Builder里面会实例一个AlertController.AlertParams,里面包含大部分,创建AlertDialog的参数,实现功能的参数化
public Builder(Context context, int themeResId) {

 P = new AlertController.AlertParams(new ContextThemeWrapper(context, resolveDialogTheme(context, themeResId)));
        }
可维护性强
由于Builder设计模式的参数,达到功能的多变,可维护性就变得很强
例如:可以 调用setMessage(“你确定删除吗”),也可以去掉
ToolBar的设计,抽象化
接口抽象toolbar的规范public interface INavigation
/**
 * 所有Toolbar的规范
 * 抽象一个Toolbar
 *
 * Created by 辉神 on 2016/8/10.
 */

public interface INavigation {
    /**
     * 定义布局(返回布局id)
     * @return
     */
    public int bindLayoutId();

    /**
     * 创建和绑定布局
     */
    public void build();
}
抽象并实现INavigation——public abstract class AbsNavigation
/**
 * 再次抽象Toolbar
 * -只要是app的开发,都会有布局的创建和绑定
 * -再次抽象,是为了,下次使用时,不用再次创建布局和绑定
 * Created by 辉神 on 2016/8/10.
 */

public abstract class AbsNavigation<P extends AbsNavigation.NavigationParams> implements INavigation {
    /**
     *     设置一个默认LayoutId,默认为0
     */
    private static final  int DEFAULT_LAYOUT_ID=0;
    private P params;
    private View contentView;

    public AbsNavigation(P params) {
        this.params = params;
    }

    public P getParams() {
        return  params;
    }

    @Override
    public int bindLayoutId() {
        return DEFAULT_LAYOUT_ID;
    }

    @Override
    public void build() {
        //创建和绑定布局
        if (contentView==null)
        contentView = bindParent(bindLayoutId(), ((NavigationParams)getParams()).parent);
    }

    /**
     * 方便子类使用
     * @param id
     * @return
     */
    public View findLayoutById(int id){
        return contentView!=null?contentView.findViewById(id):null;
    }
    public String getString(int id){
        return contentView.getContext().getResources().getString(id);
    }

    public View bindParent(int id, ViewGroup parent) {
        //先要判断这个id是否为0
        if (id==DEFAULT_LAYOUT_ID){
            return null;
        }
        View childView = ((NavigationParams)getParams()).inflater.inflate(id, parent,false);
        return bindParent(childView,parent);
    }

    public View bindParent(View childView, ViewGroup parent) {
        ViewGroup viewParent= (ViewGroup) childView.getParent();
        //如果他原来有一个爸爸了,就先把它爸爸干掉
        if(viewParent!=null){
            viewParent.removeView(childView);
        }
        //添加我们的爸爸给这个视图,因为一个视图不可能有两个爸爸
        parent.addView(childView,0);
        //将爸爸返回
        return parent;
    }

    /**
     * Builder设计模式,所有Toolbar都必须有的参数----------参数集(参数类)
     */
    public static class NavigationParams{
        private Context context;//上下文对象,用于加载布局视图
        private ViewGroup parent;//每一个布局视图都有一个爸爸
        private LayoutInflater inflater;
        public NavigationParams(Context context, ViewGroup parent) {
            this.context = context;
            this.parent = parent;
            inflater=inflater.from(context);
        }
    }

    /**
     * 创建Toolbar
     */
    public abstract static class Builder{
        public Builder(Context context,ViewGroup parent) {
        }

        /**
         * 创建Toolbar
         * @return
         */
        public abstract INavigation create();
    }
}
搭建toolbar布局框架——abstract class DefaultNavigation(多个子类(功能)继承此父类,功能需求就可以多变)
/**
 * 左中右场场景,
 * 也就是先设置左中右的布局,子类可以实现更多内容
 * Created by 辉神 on 2016/8/11.
 */

public abstract class DefaultNavigation<P extends AbsNavigation.NavigationParams> extends AbsNavigation<P> {

    public DefaultNavigation(P params) {
        super(params);
    }

    @Override
    public int bindLayoutId() {
        return R.layout.navigation_default;
    }

    @Override
    public void build() {
        super.build();//一定要super,因为要绑定左中右的父容器

        //初始化父容器,布局框架
        LinearLayout ll_left= (LinearLayout) findLayoutById(R.id.ll_left);
        LinearLayout ll_center= (LinearLayout) findLayoutById(R.id.ll_center);
        LinearLayout ll_right= (LinearLayout) findLayoutById(R.id.ll_right);

        //以下方法都是抽象,显然,子类可以任意定义布局,达到动态改变,方便维护
        //绑定布局也就是,将子布局添加到当前这个“左中右场景”中来
        bindParent(bindLeftLayoutId(),ll_left);
        bindParent(bindCenterLayoutId(),ll_center);
        bindParent(bindRightLayoutId(),ll_right);
        //初始化子布局
        initLeftLayout(ll_left);
        initCenterLayout(ll_center);
        initRightLayout(ll_right);

    }

    /**
     *返回左边布局ID—— 用于子布局(待子类实现)
     * @return ID
     */
    public abstract int bindLeftLayoutId();

    /**
     * 返回中间布局ID—— 用于子布局(待子类实现)
     * @return ID
     */
    public abstract int bindCenterLayoutId();

    /**
     * 返回右边布局ID—— 用于子布局(待子类实现)
     * @return ID
     */
    public abstract int bindRightLayoutId();

    /**
     * 初始化左边的布局—— 用于子布局(待子类实现)
     * @param view
     * @return
     */
    public abstract void initLeftLayout(View view);
    /**
     * 初始化中间的布局—— 用于子布局(待子类实现)
     * @param view
     * @return
     */
    public abstract void initCenterLayout(View view);
    /**
     * 初始化右边的布局—— 用于子布局(待子类实现)
     * @param view
     * @return
     */
    public abstract void initRightLayout(View view);
}
主页toolbar的实现——HomeNavigation
/**
* 默认的主页toolbar实现
* Created by 辉神 on 2016/8/11.
*/
public class HomeNavigation extends DefaultNavigation<HomeNavigation.HomeNavigationParams> {
public HomeNavigation(HomeNavigationParams params) {
super(params);
}
/**
* 设置默认主页的参数
*/
public static class HomeNavigationParams extends AbsNavigation.NavigationParams{
public int leftImageRes;
public int centerTitleRes;
public int rightImageRes;
public int rightTextRes;
public View.OnClickListener leftOnclickListener;
public View.OnClickListener rightOnClickListener;
public HomeNavigationParams(Context context, ViewGroup parent) {
super(context, parent);
}
}
/**
* 构建我们的Toolbar
* @return
*/
public static class Builder extends AbsNavigation.Builder{
private HomeNavigationParams p;
public Builder(Context context, ViewGroup parent) {
super(context, parent);
this.p=new HomeNavigationParams(context,parent);
}
/**
* 设置左边的图片
*/
public Builder setLeftImageRes(int leftImageRes){
this.p.leftImageRes=leftImageRes;
return this;
}
/**
* 设置中间标题
* @param centerTitleRes
* @return
*/
public Builder setCenterTitleRes(int centerTitleRes){
this.p.centerTitleRes=centerTitleRes;
return this;
}
/**
* 设置右边图片
* @param rightImageRes
* @return
*/
public Builder setRightImageRes(int rightImageRes){
this.p.rightImageRes=rightImageRes;
return this;
}
/**
* 设置右边文字
* @param rightTextRes
* @return
*/
public Builder setRightTextRes(int rightTextRes){
this.p.rightTextRes=rightTextRes;
return this;
}
/**
* 设置左边监听事件
* @param leftOnclickListener
* @return
*/
public Builder setLeftOnclickListener(View.OnClickListener leftOnclickListener){
this.p.leftOnclickListener=leftOnclickListener;
return this;
}
/**
* 设置右边监听事件
* @param rightOnClickListener
* @return
*/
public Builder setRightOnClickListener(View.OnClickListener rightOnClickListener){
this.p.rightOnClickListener=rightOnClickListener;
return this;
}
/**
* <p>这个方法被调用了之后,还没有结束,还需要调用接口中的build()方法</p>
* <p>HomeNavigation的是上层父类,是INavigation的实现类,</p>
* <p>所以当前INavigation的build()方法被调用时,也就相当于接口回调了,builder设计模式也就完成</p>
* <p>用户还需要再调用最高层接口,已经设计好的方法build()方法</p>
* <p>这个builder设计模式简直屌炸天</p>
* @return
*/
@Override
public INavigation create() {
return new HomeNavigation(p);
}
}
@Override
public int bindLayoutId() {
return super.bindLayoutId();
}
@Override
public int bindLeftLayoutId() {
return R.layout.navigation_default_left;
}
@Override
public int bindCenterLayoutId() {
return R.layout.navigation_default_center;
}
@Override
public int bindRightLayoutId() {
return R.layout.navigation_home_right;
}
@Override
public void initLeftLayout(View view) {
ImageView iv_default_left = (ImageView) view.findViewById(R.id.iv_default_left);
iv_default_left.setImageResource(getParams().leftImageRes);
iv_default_left.setOnClickListener(getParams().leftOnclickListener);
}
@Override
public void initCenterLayout(View view) {
TextView tv_default_center = (TextView) view.findViewById(R.id.tv_default_center);
tv_default_center.setText(getString(getParams().centerTitleRes));
}
@Override
public void initRightLayout(View view) {
TextView tv_home_right = (TextView) view.findViewById(R.id.tv_home_right);
tv_home_right.setText(getString(getParams().rightTextRes));
tv_home_right.setOnClickListener(getParams().rightOnClickListener);
ImageView iv_home_right= (ImageView) view.findViewById(R.id.iv_home_right);
iv_home_right.setImageResource(getParams().rightImageRes);
//启动金币动画
AnimationDrawable animationDrawable= (AnimationDrawable) iv_home_right.getBackground();
animationDrawable.start();
}
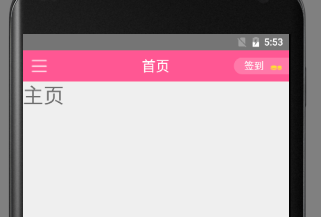
}HomeNavigation的调用,即实例化
private void initNavigation(View contentView) {

HomeNavigation.Builder builder=new HomeNavigation.Builder
(getActivity(), (ViewGroup) contentView);

        builder.setLeftImageRes(R.mipmap.apk_all_top_nav)
                .setCenterTitleRes(R.string.tabbar_home_text)
                .setRightTextRes(R.string.nav_sign_in)
                .setRightImageRes(R.drawable.anim_sign_coin)
                .setLeftOnclickListener(
                new View.OnClickListener() {
                    @Override
                    public void onClick(View v) {
                     ToastUtil .showToast(getActivity(),
                     "点击了菜单");
                    }
                })
                .setRightOnClickListener
                (new View.OnClickListener() {
                    @Override
                    public void onClick(View v) {
                        ToastUtil.showToast(getActivity(),
                        "点击了签到");
                    }
                })
                .create().build();

    }