1.准备环境
虚拟机(redhat enterprise linux 6.5)
jdk-8u92-linux-x64.tar.gz
hadoop-0.20.2.tar.gz
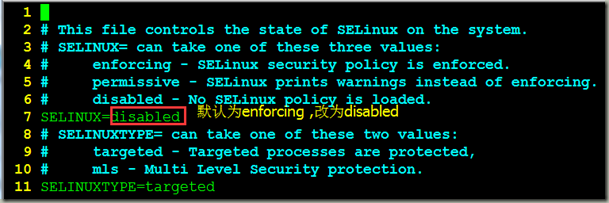
2.关闭虚拟机的防火墙,selinux,配置SSH免密码登录
[root@sishen ~]# vim /etc/sysconfig/selinux
[root@sishen ~]# iptables -F
[root@sishen ~]# service iptables save
iptables: Saving firewall rules to /etc/sysconfig/iptables:[ OK ]
[root@sishen ~]# service iptables stop
iptables: Setting chains to policy ACCEPT: filter [ OK ]
iptables: Flushing firewall rules: [ OK ]
iptables: Unloading modules: [ OK ]
[root@sishen ~]# chkconfig iptables off
[root@sishen ~]# chkconfig iptables --list
iptables 0:off 1:off 2:off 3:off 4:off 5:off 6:off
[root@sishen ~]# ssh-keygen
Generating public/private rsa key pair.
Enter file in which to save the key (/root/.ssh/id_rsa):
Enter passphrase (empty for no passphrase): #这里直接回车
Enter same passphrase again: #这里直接回车
Your identification has been saved in /root/.ssh/id_rsa.
Your public key has been saved in /root/.ssh/id_rsa.pub.
The key fingerprint is:
64:d2:fa:ee:61:ef:29:b0:c8:55:1e:6b:a3:6d:1b:d4 root@sishen.161.cn
The key's randomart image is:
+--[ RSA 2048]----+
| |
| . |
| . + |
| =o. |
| .oSoE |
| oo= |
| . o *=. |
| o oo++ . |
| o+++ |
+-----------------+
[root@sishen ~]# ssh-copy-id localhost #这里写localhost或者主机名均可
The authenticity of host 'localhost (::1)' can't be established.
RSA key fingerprint is a5:c4:4e:54:ea:2d:72:3f:9e:65:a2:ac:cd:41:ce:ca.
Are you sure you want to continue connecting (yes/no)? yes #这里输入yes
Warning: Permanently added 'localhost' (RSA) to the list of known hosts.
root@localhost's password: #这里输入密码
Now try logging into the machine, with "ssh 'localhost'", and check in:
.ssh/authorized_keys
to make sure we haven't added extra keys that you weren't expecting.
测试登陆下
[root@sishen ~]# ssh localhost
Last login: Sat Oct 8 17:16:27 2016 from sishen.161.cn
[root@sishen ~]# exit
logout
Connection to localhost closed.
成功!!!
3.配置环境
首先解压
[root@sishen ~]# tar -xf jdk-8u92-linux-x64.tar.gz -C /usr/src/hadoop/
然后编辑/etc/profile文件
[root@sishen ~]# vim /etc/profile
末尾添加以下内容
79 export JAVA_HOME=/usr/src/hadoop/jdk1.8.0_92
80 export HADOOP_HOME=/usr/src/hadoop/hadoop-0.20.2
81 export PATH=$JAVA_HOME/bin:$PATH:$HADOOP_HOME/bin
保存退出
测试
[root@sishen ~]# java -version
java version "1.8.0_92"
Java(TM) SE Runtime Environment (build 1.8.0_92-b14)
Java HotSpot(TM) 64-Bit Server VM (build 25.92-b14, mixed mode)
成功!!!
然后开始配置hadoop的配置文件
[root@sishen hadoop-0.20.2]# cd /usr/src/hadoop/hadoop-0.20.2/conf/
[root@sishen conf]# ls
capacity-scheduler.xml hadoop-policy.xml slaves
configuration.xsl hdfs-site.xml ssl-client.xml.example
core-site.xml log4j.properties ssl-server.xml.example
hadoop-env.sh mapred-site.xml
hadoop-metrics.properties masters
标红的文件是我们要编辑的
首先编辑hadoop-env.sh ,使用vim打开文件后,找到 # export JAVA_HOME=/usr/lib/j2sdk1.5-sun(大约在第9行左右),然后在此行下面添加如下内容
export JAVA_HOME=/usr/src/hadoop/jdk1.8.0_92,保存并退出
然后编辑core-site.xml文件,使用vim打开之后找到<configuration>,修改为以下内容
<configuration>
<property>
<name>fs.default.name</name>
<value>hdfs://localhost:9000</value>
</property>
</configuration>
编辑hdfs-site.xml文件,在<configuration>标签内添加如下内容(数字是行号!不用写数字)
7 <property>
8 <name>dfs.data.dir</name>
9 <value>/usr/src/hadoop/hadoop-0.20.2/data</value>
10 </property>
11 <property>
12 <name>dfs.replication</name>
13 <value>1</value>
14 </property>
编辑mapred-site.xml文件,找到<configuration>标签后,在添加如下内容(数字为行号!不用写数字)
7 <property>
8 <name>mapred.job.tracker</name>
9 <value>localhost:9001</value>
10 </property>
保存退出以后,开始格式化
[root@sishen ~]# hadoop namenode –format
16/10/09 11:42:11 INFO namenode.NameNode: STARTUP_MSG:
/************************************************************
STARTUP_MSG: Starting NameNode
STARTUP_MSG: host = sishen.161.cn/192.168.186.161
STARTUP_MSG: args = [-format]
STARTUP_MSG: version = 0.20.2
STARTUP_MSG: build = https://svn.apache.org/repos/asf/hadoop/common/branches/branch-0.20 -r 911707; compiled by 'chrisdo' on Fri Feb 19 08:07:34 UTC 2010
************************************************************/
16/10/09 11:42:12 INFO namenode.FSNamesystem: fsOwner=root,root
16/10/09 11:42:12 INFO namenode.FSNamesystem: supergroup=supergroup
16/10/09 11:42:12 INFO namenode.FSNamesystem: isPermissionEnabled=true
16/10/09 11:42:12 INFO common.Storage: Image file of size 94 saved in 0 seconds.
16/10/09 11:42:12 INFO common.Storage: Storage directory /tmp/hadoop-root/dfs/name has been successfully formatted. //格式化成功的标志
16/10/09 11:42:12 INFO namenode.NameNode: SHUTDOWN_MSG:
/************************************************************
SHUTDOWN_MSG: Shutting down NameNode at sishen.161.cn/192.168.186.161
************************************************************/
启动hadoop集群
[root@sishen ~]# start-all.sh
检查
[root@sishen ~]# jps
3058 TaskTracker
2898 SecondaryNameNode
2694 NameNode
2966 JobTracker
2790 DataNode
3111 Jps
停止hadoop集群
[root@sishen ~]# stop-all.sh
stopping jobtracker
localhost: stopping tasktracker
stopping namenode
localhost: stopping datanode
localhost: stopping secondarynamenode
[root@sishen ~]# jps
3426 Jps
至此hadoop-0.20.2伪分布式安全完成!
