领域驱动模型
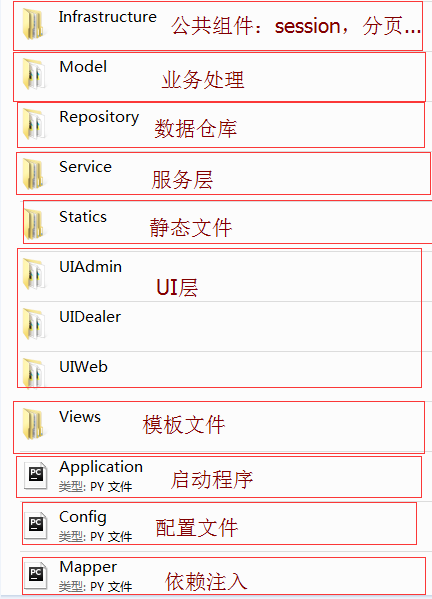
要想了解领域驱动模型,首先你要先知道基于领域驱动的架构目录,如下图
-
Repository 数据仓库,用于数据访问和持久化(功能是基于业务来做,并在业务里定义接口来约束数据库的操作功能)
-
Model 业务处理
-
建模(模型封装业务需要的数据)
-
接口(约束数据库的访问功能)
-
协调 领域模型 和 数据访问处理业务(调用数据库访问的xx方法,并把处理的数据封装到模型中),把模型返回给服务层
-
service 服务层(请求有规则,响应有规则)---调用业务处理的协调者的协调方法
-
UI层 负责请求对应的类
领域驱动设计,用自己的话说就是业务逻辑场景驱动整个程序代码的设计
还是不懂?那看个例子吧,这个例子再寻常不过了
登陆场景
场景分析:
- 常见的两种登陆方法--用户名+密码 或 邮箱+密码,这就是前端提交后台要处理的数据,三个一起交过去,没有的就等于None
- 登陆失败,要显示错误信息,登陆成功,就要显示个人信息,所以后台处理完后要返回这些数据
领域模型,当然是从模型入手了,模型怎么建了,模型是要封装所有需要的数据,那我们需要哪些数据---登陆状态,错误信息,以及个人信息,其中涉及数据库访问的就是个人信息了,那么模型就要封装个人信息
- 模型---个人信息:id,用户名,邮箱,最近登陆时间,用户类型,会员类型(其中用户类型和会员类型又可以分出小模型)
所以在Model里建一个User.py
|
1
2
3
4
5
6
7
8
9
10
11
12
13
14
15
16
17
18
19
20
21
22
23
24
25
26
27
28
29
30
31
32
33
34
35
36
37
38
39
40
41
42
43
44
45
46
|
#建立模型class VipType: dic = { 1:'金牌', 2:'银牌', 3:'铜牌' } def __init__(self,nid): self.nid = nid @property def caption(self): for i in VipType.dic: if i == self.nid: return VipType.dic[i]class UserType: dic = { 1:'普通用户', 2:'商户', 3:'管理员' } def __init__(self,nid): self.nid = nid @property def caption(self): for j in UserType.dic: if self.nid == j: return UserType.dic[j]class User: def __init__(self,nid,username,email,last_login,vip_type_obj,user_type_obj): self.nid = self.nid self.username = username self.email = email self.last_login = last_login self.vip_type = vip_type_obj self.user_type = user_type_obj |
除了建模型,还在这里定义接口(接口主要限制数据库的访问功能),分析认证的过程是邮箱或用户名,可以分开定义成两个方法,一个用用户名验证的方法,一个就是用邮箱验证的方法,最后还要有更新用户登陆时间的方法
|
1
2
3
4
5
6
7
8
9
10
11
12
13
14
15
16
17
18
19
20
21
22
23
24
25
26
27
|
#定义接口class IUserRepository: def fetch_one_by_username(self,username,password): ''' 通过密码到数据库进行验证 :param username: 用户名 :param password: 密码 :return: ''' def fetch_one_by_email(self,email,password): ''' 通过邮箱到数据库进行验证 :param email: :param password: :return: ''' def update_last_login_by_nid(self,nid,cur_date): ''' 通过nid更新数据库的登陆时间 :param nid: id :param cur_date: 最新时间 :return: ''' |
好!接口和模型定义好后,就可以去Repository把接口里方法实现了
- 数据访问,数据访问,肯定要要连接上数据库才能访问
在Repository创建了一个DbConnection.py,专门用连接数据库的
|
1
2
3
4
5
6
7
8
9
10
11
12
13
14
15
16
17
18
19
20
21
22
23
|
import pymysqlimport Configclass DbConnection: def __init__(self): #数据库的信息写在配置文件里 self.__conn_dict = Config.PY_MYSQL_CONN_DICT self.conn = None self.cursor = None #连接数据库,创建游标 def connect(self,cursor=pymysql.cursors.DictCursor): self.conn = pymysql.connect(**self.__conn_dict) self.cursor = self.conn.cursor(cursor=cursor) return self.cursor #关闭游标以及数据库 def close(self): self.conn.commit() self.cursor.close() self.conn.close() |
做好了这一步,访问数据库时只要实例化这样一个对象就可以了
针对业务层User建立一个UserRepository.py专门实现User文件接口的方法,并处理得到的数据封装到模型里
|
1
2
3
4
5
6
7
8
9
10
11
12
13
14
15
16
17
18
19
20
21
22
23
24
25
26
27
28
29
30
31
32
33
34
35
36
37
38
39
40
41
42
43
44
45
46
47
48
49
50
51
52
53
54
55
|
from Model.User import VipType,User,UserType,IUserRepository#进行数据库连接的另成立模块from .DbConnection import DbConnectionclass UserDb(IUserRepository): def __init__(self): self.conn = DbConnection() def fetch_one_by_email(self,email,password): ret = None cursor = self.conn.connect() sql = '''select nid,username,email,last_login,vip_type,user_type from UserInfo where email=% and password=%''' cursor.execute(sql,(email,password)) #db_result是一个字典 db_result = cursor.fetchone() self.conn.close() if db_result: #调用模型进行封装 ret = User(nid=db_result['nid'], username=db_result['username'], email=db_result['email'], last_login=db_result['last_login'], user_type=UserType(nid=db_result['user_type']), vip_type=VipType(nid=db_result['vip_type'])) return ret def fetch_one_by_username(self,username,password): ret = None cursor = self.conn.connect() sql = '''select nid,username,email,last_login,vip_type,user_type from UserInfo where username=% and password=%''' cursor.execute(sql,(username,password)) #db_result是一个字典 db_result = cursor.fetchone() self.conn.close() if db_result: #调用模型进行封装 ret = User(nid=db_result['nid'], username=db_result['username'], email=db_result['email'], last_login=db_result['last_login'], user_type=UserType(nid=db_result['user_type']), vip_type=VipType(nid=db_result['vip_type'])) return ret def update_last_login_by_nid(self,nid,cur_date): cursor = self.conn.connect() sql = '''update UserInfo set last_login=%s where nid=%s''' cursor.execute(sql,(cur_date,nid)) self.conn.close() |
定义好接口方法后我们需要再次来到业务层,在Model的User.py写入协调类,用于调用数据仓库的方法,并把封装好的模型对象返回给服务层,在调用方法前,需要需要先实例UserRepository对象,这里可以用依赖注入
|
1
2
3
4
5
6
7
8
9
10
11
12
13
14
15
16
|
#协调者,进行认证class UserService: def __init__(self,user_repostiory): self.db = user_repostiory def check_login(self,user,pwd,ema): if user: user_model = self.db.fetch_one_by_username(username=user,password=pwd) else: user_model = self.db.fetch_one_by_email(email=ema,password=pwd) if user_model: current_date = datetime.datetime.now() self.db.update_last_login_by_nid(user_model.nid,current_date) return user_model |
那么对于协调者来说,验证的数据哪里来,没错就是服务层,不仅接收处理数据还是传递客户输入的数据进行验证,并且在服务层里协调类里调用业务层的协调方法
在开始写服务层时,你必须理解这句话,就是请求有规则,响应有规则---请求就是传客户数据,响应就是收业务处理数据,到了服务层就要按服务层的规则,按照服务层定义进行封装数据
在服务层下建个User的文件夹专门服务业务层的User
我们先定义‘请求规则’--Request.py
|
1
2
3
4
5
6
7
8
9
10
|
'''对于request类的建立规则就是,前端发来多少项数据就对应建立几个字段'''class UserRequest: def __init__(self,usr,pwd,ema): self.username = usr self.password = pwd self.email = ema |
然后我们定义一下响应规则,在这里我们必须清楚,返回给客户看的是字符串,业务层返回模型里的字段带有对象的就到这里细化
Response.py
|
1
2
3
4
5
6
7
8
9
10
11
|
'''需要返回的信息无非就是执行状态,错误信息,以及用户信息其中用户信息又封装到ModelView对象里'''class UserResponse: def __init__(self,status=True,message='',model_view=None): self.status = status self.message = message self.modelView = model_view |
ModelView.py
|
1
2
3
4
5
6
7
8
9
10
11
12
13
14
15
16
|
'''在服务层,模型数据的接收者,并且细化,在这里是封装客户信息'''class UserModelView: def __init__(self,nid,username,email, last_login,user_type_id,user_type_caption, vip_type_id,vip_type_caption): self.nid = nid self.username = username self.email = email self.last_login = last_login self.user_type = user_type_id self.user_type_caption = user_type_caption self.vip_type = vip_type_id self.vip_type_caption = vip_type_caption |
最后剩下就是调用业务层协调者和把数据返回给UI层的服务层协调者了,这里要调用业务层的协调者就必须实例一个业务层的UserService对象,这个通过参数的形式传入到服务层协调类的构造方法里,就又要用到依赖注入了,并且最终的信息要封装到服务层的规则里(Response),所以在定义验证方法里实例Response对象
|
1
2
3
4
5
6
7
8
9
10
11
12
13
14
15
16
17
18
19
20
21
22
23
24
25
26
27
28
29
30
31
32
33
34
35
36
37
|
'''在Service里,接收request对象里封装信息调用model业务层的方法做验证,先要实例业务层service对象(写在构造方法里)把验证的结果信息封装到response对象里'''from Services.User.Response import UserResponsefrom Services.User.ModelView import UserModelViewclass service: def __init__(self,model_user_service): self.modelUserService = model_user_service #业务层协调者 def check_login(self,user_request): response = UserResponse() try: model = self.modelUserService.check_login(user=user_request.usr,pwd=user_request.pwd,ema=user_request.ema) if model: UserModelView(nid=model.nid, username=model.username, email=model.email, last_login=model.last_login, user_type_id=model.user_type.nid, user_type_caption=model.user_type.caption, vip_type_id=model.vip_type.nid, vip_type_caption=model.vip_type.caption) response.modelView = UserModelView else: raise Exception('密码错误!') except Exception as e: response.status = False response.message = str(e) return response |
最后在UI层导入上述代码类,并实例对象,调用服务层验证方法就可以了
我们看到,整个代码设计都是由登陆这个业务逻辑驱动的
不过你感觉这绕来绕去的,感觉没什么好的,可以这么说小型项目,毫无疑问增加很多不必要的代码,但是对于大型网站,协作与维护是非常方便的,只能因景而异啦
再加个图吧
