通过完成LED的驱动,我们熟悉了驱动编写的大致结构框架,然而在实际开发中,嵌入式Linux和普通单片机最大的不同就是提供大量的代码,满足大部分的应用需求,如本节中,我们使用的UART驱动已经被集成到内核。不过通过对底层驱动更高级的抽象,使用设备树实现了底层驱动的复用,是目前主推的驱动的开发模式,还是必须重视和掌握(后面涉及到驱动的部分都会以设备树开发),下面就开始本小节的修改和开发。
参考资料
1. 开发板原理图 《IMX6UL_ALPHA_V2.0(底板原理图)》 《IMX6ULL_CORE_V1.4(核心板原理图)》
2. 正点原子《Linux驱动开发指南说明V1.0》 第四十三章 Linux设备树
3. 正点原子《Linux驱动开发指南说明V1.0》 第四十五章 pinctrl和gpio子程序
4. 正点原子《Linux驱动开发指南说明V1.0》 第六十三章 Linux RS232/RS485/GPS驱动程序
5. 宋宝华 《Linux设备驱动开发详解:基于最新的Linux 4.0内核》 第18章ARM Linux设备树
UART硬件配置

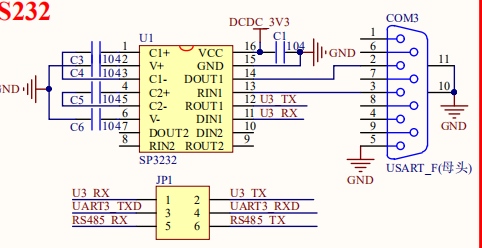
RS232对应的位USART3串口。
设备树的说明和修改
在早期不支持设备树的Linux版本,描述板级信息的代码被集成在内核中,这就让内核充斥着大量的冗余代码以应对不同的开发板和产品的外设需求,如在arch/arm/mach-xxx下的板级目录,代码量在数万行,为了解决这种情况,采用设备树(Flattned Device Tree),将硬件信息从Linux系统中剥离出来,从而不用在内核中进行大量的冗余编码。
设备树由一系列被命名的节点(Node)和属性(Property)组成,其中节点本身可包含子节点,而属性就是成对出现的名与值,在设备树中,可描述的信息包含:
1. CPU的数量和类型
2.内存基地址和大小
3.总线和桥
4.外设连接
5.中断控制器和中断使用情况
6.GPIO控制器和GPIO使用情况
7.时间控制器和时钟使用情况
对于设备树的开发,如果没有原型(如新开发的一款芯片),对于设备树的设计流程如下:根据硬件设计的板级信息,结合DTS语法知识,完成.dts或.dtsi文件的编写,在通过scripts/dtc目录下的DTC工具进行编译,生成.dtb文件。Linux启动后,会加载编译完成的dtb文件到内核中,从而满足内核模块对于硬件和外设的操作要求。不过大多数情况下(非IC设计原厂的软件的工程师), 都会提供好支持官方开发板的相同芯片的DTS文件,而我们的主要工作就是根据硬件设计的变动,修改这个DTS的信息以适配目前应用的需求,那么工作就简单多了,具体分为以下几个步骤
1.结合现有设备树的Node情况,修改成符合需求Node的dts文件,编译完成后,生成dtb文件
2.结合上节内容,实现字符驱动设备的添加,硬件部分操作替换成基于设备树操作的版本
3.下载,编写测试模块并进行测试
按照需求,目前使用的dts文件为arch/arm/boot/dts/imx6ull-14x14-nand-4.3-480*272-c.dts, 通过内部的include代码,我们可以找到
imx6ull-14x14-evk-gpmi-weim.dts ->imx6ull-14x14-evk.dts->imx6ull.dtsi
在imx6ull.dtsi中搜索硬件用到的uart3,通过全局检索如下:
uart3: serial@021ec000 {
    compatible = "fsl,imx6ul-uart",
                "fsl,imx6q-uart", "fsl,imx21-uart";
    reg = <0x021ec000 0x4000>;
    interrupts = <GIC_SPI 28 IRQ_TYPE_LEVEL_HIGH>;
    clocks = <&clks IMX6UL_CLK_UART3_IPG>,
            <&clks IMX6UL_CLK_UART3_SERIAL>;
    clock-names = "ipg", "per";
    dmas = <&sdma 29 4 0>, <&sdma 30 4 0>;
    dma-names = "rx", "tx";
    status = "disabled";
};
其中compatible定义了整个系统(设备级别)的名称,通过检索Linux代码,在drivers/tty/serial/imx.c中可以找到imx6q-uart的位置,定义在imx_uart_devtype中,仔细观察该文件的实现,串口驱动本质上是platform驱动,包含
module_init(imx_serial_init);
module_exit(imx_serial_exit);

MODULE_AUTHOR("Sascha Hauer");
MODULE_DESCRIPTION("IMX generic serial port driver");
MODULE_LICENSE("GPL");
MODULE_ALIAS("platform:imx-uart");
并通过platform_driver_register注册到虚拟总线上,这部分对于内核都已经实现了,我们不要做造轮子了(在上一节为了解驱动开发,所以对驱动进行了比较深入的讲解), 对于嵌入式Linux开发,分清楚何时使用官方提供的驱动,何时使用自己编写,这是需要养成的习惯,也是与单片机开发中是重要不同点。
在imx6ull-14x14-evk.dts声明了关于板级信息,在这里我们要添加GPIO对应的寄存器的信息以及在总线上添加UART3接口,因为默认配置的接口uart1和uart2,所以我们按照原本的格式添加(这部分的了解是可以随着深入慢慢掌握的,先学会如何写更重要),首先我们确认位RS232接口,不需要RTS或CTS功能,搜索&uart1,检索到数据如下:
&uart1 {
    pinctrl-names = "default";
    pinctrl-0 = <&pinctrl_uart1>;
    status = "okay";
};
参考这个结构,在后面添加uart3的节点:
&uart3 {
    pinctrl-names = "default";
    pinctrl-0 = <&pinctrl_uart3>;
    status = "okay";
};
从上面可以看出,我们还需要添加pinctrl_uart3对应的GPIO子系统的信息,那么很简单,检索全局,找到如下代码:
pinctrl_uart1: uart1grp {
fsl,pins = <
        MX6UL_PAD_UART1_TX_DATA__UART1_DCE_TX 0x1b0b1
        MX6UL_PAD_UART1_RX_DATA__UART1_DCE_RX 0x1b0b1
        >;
};
参考上述结构,在后面添加UART3对应的接口:
pinctrl_uart3: uart3grp {
    fsl,pins = <
        MX6UL_PAD_UART3_TX_DATA__UART3_DCE_TX 0x1b0b1
        MX6UL_PAD_UART3_RX_DATA__UART3_DCE_RX 0x1b0b1
    >;
};
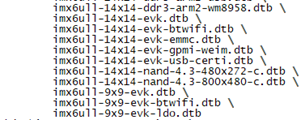
当然,此时还要检索全局,判断UART3的接口是否被用到其它模块,如果被占用,将该模块注释掉。这十分重要,因为被其它模块占用,会导致引脚的配置被覆盖或者改变,从而驱动的注册无效。完成上述上述流程后,将imx6ull-14x14-nand-4.3-480*272-c.dts添加到/arch/arm/boot/dts/Makefile中的dtb-$(CONFIG_SOC_IMX6ULL)下,添加后如下:

然后到linux文件夹下,使用
make dtbs
编译生成需要的dtb文件如下:

将生成的dtb文件,参考之前Linux下载更新的流程,通过mgtool下载到芯片中,重新启动,使用
ls /dev/ttymxc*
即可查看支持的串口,如Uart3对应的位ttymxc2,ttymxc可通过drivers/tty/serial/imx.c中的Device_Name确认,如下图所示:
测试代码
RS232的测试代码和LED类似,有open/write/read/close接口实现,不过和LED不同,RS232作为通用串口,需要上层传递波特率,数据位,停止位,奇偶检验位,这是通关set_attr修改,测试代码如下:

  1 /*
  2  * File      : uart_proto.c
  3  * This file is uart protocolw work
  4  * COPYRIGHT (C) 2020, zc
  5  *
  6  * Change Logs:
  7  * Date           Author       Notes
  8  * 2020-5-4      zc           the first version
  9  */
 10
 11 /**
 12  * @addtogroup IMX6ULL
 13  */
 14 /*@{*/
 15 #include <stdio.h>
 16 #include <string.h>
 17 #include <unistd.h>
 18 #include <fcntl.h>
 19 #include <termios.h>
 20
 21 /**************************************************************************
 22 * Local Macro Definition
 23 ***************************************************************************/
 24 /*协议数据格式*/
 25 #define __DEBUG                         0
 26
 27 /*调试接口*/
 28 #if __DEBUG     == 1
 29 #define USR_DEBUG               printf
 30 #else
 31 void USR_DEBUG(char *format, ...){
 32 }
 33 #endif
 34
 35 #define FRAME_HEAD_SIZE         5
 36
 37 #define PROTO_REQ_HEAD          0x5A    /*协议数据头*/
 38 #define PROTO_ID                0x01    /*设备ID*/
 39
 40 /*设备操作指令*/
 41 #define TYPE_CMD                0x01
 42 #define TYPE_DATA                       0x02
 43 #define TYPE_RST                0x03
 44 //other reserved            0x04~0xff
 45
 46 #define UART_DEV_LED        0x00
 47 #define UART_DEV_OTHERUART  0x01 //目前使用printf打印到系统远程管理口
 48 #define BUFFER_SIZE             1200
 49
 50 /*返回命令状态*/
 51 #define RT_OK               0
 52 #define RT_FAIL             1
 53 #define RT_EMPTY            2
 54
 55 /**************************************************************************
 56 * Local Type Definition
 57 ***************************************************************************/
 58 typedef signed char int8_t;
 59 typedef signed short int16_t;
 60 typedef signed int int32_t;
 61 typedef unsigned char uint8_t;
 62 typedef unsigned short uint16_t;
 63 typedef unsigned int uint32_t;
 64
 65 /*协议包结构*/
 66 #pragma pack(push, 1)
 67 struct req_frame
 68 {
 69         uint8_t head;
 70         uint8_t id;
 71         uint8_t type;
 72         uint16_t length;
 73 };
 74 #pragma pack(pop)
 75 struct extra_frame
 76 {
 77         uint8_t *rx_ptr;
 78         uint8_t *tx_ptr;
 79         uint8_t *rx_data_ptr;
 80         uint16_t rx_size;
 81         uint16_t tx_size;
 82         uint16_t crc;
 83 };
 84
 85 /**************************************************************************
 86 * Local static Variable Declaration
 87 ***************************************************************************/
 88 static uint8_t  rx_buffer[BUFFER_SIZE];
 89 static uint8_t  tx_buffer[BUFFER_SIZE];
 90 static const char DeviceList[][20] = {
 91         "/dev/ttymxc2",
 92 };
 93 struct req_frame *frame_ptr;
 94 struct extra_frame proto_info = {
 95         .rx_ptr = rx_buffer,
 96         .tx_ptr = tx_buffer,
 97         .rx_data_ptr =  &rx_buffer[FRAME_HEAD_SIZE],
 98         .rx_size = 0,
 99         .tx_size = 0,
100         .crc = 0,
101 };
102
103 /**************************************************************************
104 * Global Variable Declaration
105 ***************************************************************************/
106
107 /**************************************************************************
108 * Function
109 ***************************************************************************/
110 int ReceiveCheckData(int);
111 void protocol_process(int);
112 static int set_opt(int, int, int, char, int);
113 static uint16_t  CrcCalculate(char *, int);
114
115 /**
116  * uart执行入口函数
117  *
118  * @param argc
119  * @param argv
120  *
121  * @return the error code, 0 on initialization successfully.
122  */
123 int main(int argc, char* argv[])
124 {
125         const char *pDevice = DeviceList[0];
126         int result = 0;
127         int com_fd;
128
129         result = daemon(1, 1);
130         if(result < 0){
131                 perror("daemon");
132                 return result;
133         }
134
135         if(argc > 2){
136                 pDevice = argv[1];
137         }
138
139         if((com_fd = open(pDevice, O_RDWR|O_NOCTTY|O_NDELAY))<0){
140                 USR_DEBUG("open %s is failed
", pDevice);
141                 return ;
142         }
143         else{
144                 set_opt(com_fd, 115200, 8, 'N', 1);
145                 USR_DEBUG("open %s success!
", pDevice);
146         }
147
148         USR_DEBUG("Uart Main Task Start
");
149         write(com_fd, "Uart Start OK!
", strlen("Uart Start OK!
"));
150         protocol_process(com_fd);
151
152         return result;
153 }
154
155 /**
156  * 协议执行主执行流程
157  *
158  * @param fd
159  *
160  * @return NULL
161  */
162 void protocol_process(int fd)
163 {
164         int flag;
165
166         frame_ptr = (struct req_frame *)rx_buffer;
167
168         for(;;){
169                 flag = ReceiveCheckData(fd);
170                 if(flag == RT_OK){
171                         printf("data:%s, len:%d
", proto_info.rx_ptr, proto_info.rx_size);
172                         write(fd, proto_info.rx_ptr, proto_info.rx_size);
173                         proto_info.rx_size = 0;
174                 }
175         }
176 }
177
178 /**
179  * 协议执行主执行流程
180  *
181  * @param fd
182  *
183  * @return NULL
184  */
185 int ReceiveCheckData(int fd)
186 {
187     int nread;
188     int nLen;
189     int CrcRecv, CrcCacl;
190
191     nread = read(fd, &rx_buffer[proto_info.rx_size], (BUFFER_SIZE-proto_info.rx_size));
192     if(nread > 0)
193     {
194        proto_info.rx_size += nread;
195
196            /*接收到头不符合预期*/
197        if(frame_ptr->head != PROTO_REQ_HEAD) {
198             USR_DEBUG("No Valid Head
");
199             proto_info.rx_size = 0;
200             return RT_FAIL;
201        }
202        else if(proto_info.rx_size > 3){
203                     /*设备ID检测*/
204             if(frame_ptr->id != PROTO_ID && frame_ptr->id != 0xff)
205             {
206                 proto_info.rx_size = 0;
207                 USR_DEBUG("Valid ID
");
208                 return RT_FAIL;
209             }
210                         /*crc检测*/
211             nLen = frame_ptr->length+7;
212             if(proto_info.rx_size >= nLen)
213             {
214                 CrcRecv = (rx_buffer[nLen-2]<<8) + rx_buffer[nLen-1];
215                 CrcCacl = CrcCalculate(&rx_buffer[1], nLen-3);
216                 if(CrcRecv == CrcCacl){
217                     USR_DEBUG("CRC Check OK!
");
218                     return RT_OK;
219                 }
220                 else{
221                         proto_info.rx_size = 0;
222                     USR_DEBUG("CRC Check ERROR!
");
223                     return RT_FAIL;
224                 }
225             }
226        }
227     }
228     return RT_EMPTY;
229 }
230
231 /**
232  * CRC16计算实现
233  *
234  * @param ptr
235  * @param len
236  *
237  * @return NULL
238  */
239 static uint16_t CrcCalculate(char *ptr, int len)
240 {
241     return 0xffff;
242 }
243
244 /**
245  * 设置uart的信息
246  *
247  * @param ptr
248  * @param len
249  *
250  * @return NULL
251  */
252 static int set_opt(int fd, int nSpeed, int nBits, char nEvent, int nStop)
253 {
254         struct termios newtio;
255         struct termios oldtio;
256
257         if  ( tcgetattr( fd,&oldtio)  !=  0) {
258                 perror("SetupSerial 1");
259                 return -1;
260         }
261         bzero( &newtio, sizeof( newtio ) );
262         newtio.c_cflag  |=  CLOCAL | CREAD;
263         newtio.c_cflag &= ~CSIZE;
264
265         switch( nBits )
266         {
267                 case 7:
268                         newtio.c_cflag |= CS7;
269                         break;
270                 case 8:
271                         newtio.c_cflag |= CS8;
272                         break;
273                 default:
274                         break;
275         }
276
277         switch( nEvent )
278         {
279         case 'O':
280                 newtio.c_cflag |= PARENB;
281                 newtio.c_cflag |= PARODD;
282                 newtio.c_iflag |= (INPCK | ISTRIP);
283                 break;
284         case 'E':
285                 newtio.c_iflag |= (INPCK | ISTRIP);
286                 newtio.c_cflag |= PARENB;
287                 newtio.c_cflag &= ~PARODD;
288                 break;
289         case 'N':
290                 newtio.c_cflag &= ~PARENB;
291                 break;
292         }
293
294         switch( nSpeed )
295         {
296         case 2400:
297                 cfsetispeed(&newtio, B2400);
298                 cfsetospeed(&newtio, B2400);
299                 break;
300         case 4800:
301                 cfsetispeed(&newtio, B4800);
302                 cfsetospeed(&newtio, B4800);
303                 break;
304         case 9600:
305                 cfsetispeed(&newtio, B9600);
306                 cfsetospeed(&newtio, B9600);
307                 break;
308         case 115200:
309                 cfsetispeed(&newtio, B115200);
310                 cfsetospeed(&newtio, B115200);
311                 break;
312         case 460800:
313                 cfsetispeed(&newtio, B460800);
314                 cfsetospeed(&newtio, B460800);
315                 break;
316         case 921600:
317                 printf("B921600
");
318                 cfsetispeed(&newtio, B921600);
319                 cfsetospeed(&newtio, B921600);
320                 break;
321         default:
322                 cfsetispeed(&newtio, B9600);
323                 cfsetospeed(&newtio, B9600);
324                 break;
325         }
326         if( nStop == 1 )
327                 newtio.c_cflag &=  ~CSTOPB;
328         else if ( nStop == 2 )
329         newtio.c_cflag |=  CSTOPB;
330         newtio.c_cc[VTIME]  = 0;
331         newtio.c_cc[VMIN] = 0;
332         tcflush(fd,TCIFLUSH);
333         if((tcsetattr(fd,TCSANOW,&newtio))!=0)
334         {
335                 perror("com set error");
336                 return -1;
337         }
338 //      printf("set done!

");
339         return 0;
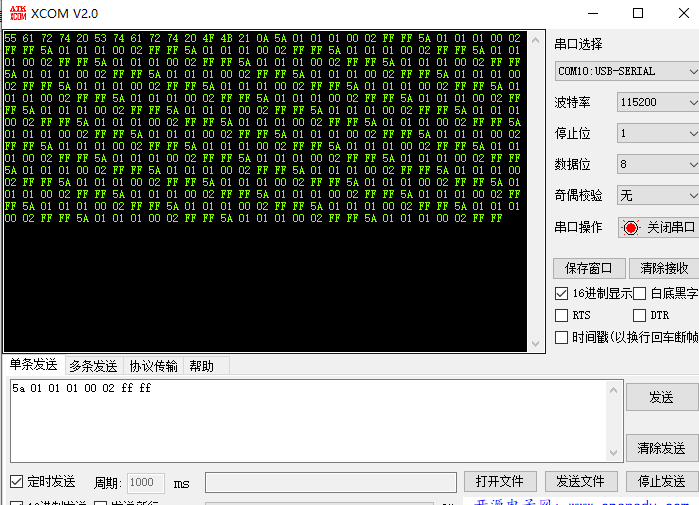
340 }
将编译好的代码上传到嵌入式Linux芯片中并执行,使用串口工具即可测试通讯,如下所示:

