URL配置
基本格式
from django.conf.urls import url
#循环urlpatterns,找到对应的函数执行,匹配上一个路径就找到对应的函数执行,就不再往下循环了,并给函数传一个参数request,和wsgiref的environ类似,就是请求信息的所有内容
urlpatterns = [
     url(正则表达式, views视图函数,参数,别名),
]
urls.py
from app01 import views

urlpatterns = [
    url(r'^admin/', admin.site.urls),
    url(r'^$', views.base),#首页匹配
    # url(r'^index/', views.index),
    # url(r'index/2003/$',views.year)#这样只匹配
    # url(r'index/([0-9]{4})/$',views.year)#匹配4个数字字符还可以用d
    # url(r'index/(?P<year>[d]{4})',views.year)
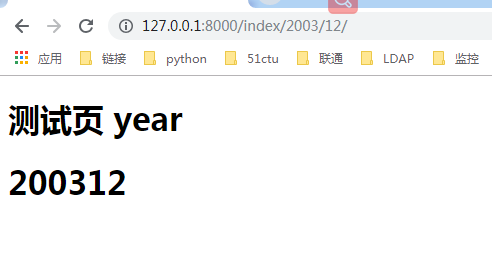
    url(r'index/(?P<year>[d]{4})/(?P<month>[0-9]{2})/$',views.year)
]
找到应用views文件
def index(request):
    return render(request,'index.html')
def base(request):
    return render(request,'index.html')


# def year(request,a):#()方式传参
#     return render(request,'year.html',{'a':a})

# def year(request,year):#(?P<>)方案是传参
#     return render(request,'year.html',{'a':year})

def year(request,year,month):#(?P<>)方案是传参
    return render(request,'year.html',{'y':year,'m':month})
template/创建对应的html文件
<!DOCTYPE html>
<html lang="en">
<head>
    <meta charset="UTF-8">
    <title>Title</title>
</head>
<body>
<h1>欢迎来到index页面</h1>
</body>
</html>
year.html
<!DOCTYPE html>
<html lang="en">
<head>
    <meta charset="UTF-8">
    <title>Title</title>
</head>
<body>
<h1> 测试页 year</h1>
<h1>{{ y }}{{ m }}</h1>
</body>
</html>
会根据 不同 规则 得到 对应的应答

补充说明
# 是否开启URL访问地址后面不为/跳转至带有/的路径的配置项
APPEND_SLASH=True

如果在settings.py中设置了 APPEND_SLASH=False,此时我们再请求 http://www.example.com/blog 时就会提示找不到页面。
多个应用 实现url路由系统
在settings.py里面
添加2个应用
INSTALLED_APPS = [
'app01.apps.App01Config',
'app02.apps.App02Config',
]
在urls文件中添加
from django.conf.urls import include, url
from django.contrib import admin

urlpatterns = [
    url(r'^admin/', admin.site.urls),
    # url(r'^$', views.base),#首页匹配
    url(r'^app01/', include('app01.urls')),#首页匹配
    url(r'^app02/', include('app02.urls')),#首页匹配
]
在2个应用中 分别添加 urls 文件
app01中添加 urls.py
from django.conf.urls import include, url
from django.contrib import admin
from app01 import views

urlpatterns = [
    url(r'^$', views.base),#首页匹配

]
views.py
from django.shortcuts import render,HttpResponse

# Create your views here.
def base(request):
    return render(request,'index.html')
app02中添加 urls.py
urls.py
from django.conf.urls import include, url
from django.contrib import admin
from app02 import views

urlpatterns = [
    url(r'^$', views.base),#首页匹配

]
views.py
from django.shortcuts import render

# Create your views here.
def base(request):
    return render(request,'index02.html')
跳转 命令url(别名)
from django.shortcuts import render,redirect
    return  redirect('/login')
url(r'^home', views.home, name='home'), # 给我的url匹配模式起名(别名)为 home,别名不需要改,路径你就可以随便改了,别的地方使用这个路径,就用别名来搞
在模板里面可以这样引用:
{% url 'home' %} #模板渲染的时候,被django解析成了这个名字对应的那个url,这个过程叫做反向解析