知识点:
自定义按钮:


import QtQuick 2.12
import QtQuick.Window 2.12
import QtQuick.Controls 1.4
import QtQuick.Controls.Styles 1.4

Window {
    id: root
    visible: true
    title: qsTr("Hello World")
     800
    height: 600

    Button {
        id:btn
        x: 0
        y: 62
        text: "Quit2"
        style:ButtonStyle {
            background: Rectangle {
                implicitWidth: 100
                implicitHeight: 25
                border. btn.pressed ? 2 : 1
            }
        }
    }

}
多个窗口:
import QtQuick 2.12
import QtQuick.Window 2.12
import QtQuick.Controls 1.4

Window {
    id: root
    visible: true
    title: qsTr("Hello World")
     800
    height: 600


    Button {  // 会默认放到   data 列表中
        id:btn
        text: "Quit"
    }
    Window {
        id: root2
        visible: true
        title: qsTr("Hello World")
         300
        height: 100
        flags: Qt.Popup

        Text{
            text: "Hello Qt Quick"
        }

    }


}
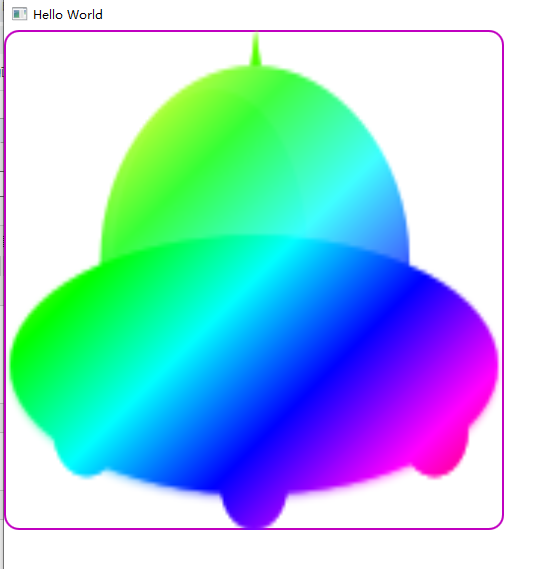
颜色 LinearGradient :
import QtQuick 2.12
import QtQuick.Window 2.12
import QtGraphicalEffects 1.12

Window {
    id: root
    visible: true
    title: qsTr("Hello World")
     800
    height: 600

    Rectangle{
         500
        height: 500
        border.color: Qt.lighter("purple")
        border. 2
        radius: 15
        LinearGradient {
            anchors.fill: parent
            start: Qt.point(0, 0)
            end: Qt.point(500, 500)
            gradient: Gradient {
                GradientStop {
                    position: 0.000
                    color: Qt.rgba(1, 0, 0, 1)
                }
                GradientStop {
                    position: 0.167
                    color: Qt.rgba(1, 1, 0, 1)
                }
                GradientStop {
                    position: 0.333
                    color: Qt.rgba(0, 1, 0, 1)
                }
                GradientStop {
                    position: 0.500
                    color: Qt.rgba(0, 1, 1, 1)
                }
                GradientStop {
                    position: 0.667
                    color: Qt.rgba(0, 0, 1, 1)
                }
                GradientStop {
                    position: 0.833
                    color: Qt.rgba(1, 0, 1, 1)
                }
                GradientStop {
                    position: 1.000
                    color: Qt.rgba(1, 0, 0, 1)
                }
            }
            source:  Image { source:"images/ufo.png" }
        }

        Component.onCompleted: {
            console.log(color.r,color.g,color.b,color.a);
        }
    }


}
Text 控件 多余文字显示 三个点:
import QtQuick 2.12
import QtQuick.Window 2.12
import QtGraphicalEffects 1.12

Window {
    id: root
    visible: true
    title: qsTr("Hello World")
     800
    height: 600
    color: "cyan"

    Rectangle{
        id:rect1
        color: "purple"
         150
        height: 100

        Text {
            id: txt1
            anchors.fill:parent
            text: qsTr("<h1>Hello Red Text,Hello Red Text,Hello Red Text,Hello Red Tex</h1>")
            color:"red"


            clip: true
            wrapMode: Text.WrapAnywhere
            elide: Text.ElideRight
        }

    }
}
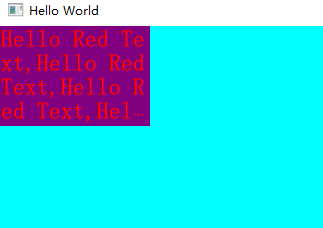
Image 相关:
显示GIF 图片:
Image不能显示GIF,因为Image只能显示静态图片,可以使用 AnimatedImage 显示动态图片
import QtQuick 2.12
import QtQuick.Window 2.12
import QtQuick.Controls 2.12

Window {
    id: root
    visible: true
    title: qsTr("Hello World")
     800
    height: 600
    color: "cyan"

    Image {
        id: img1
         100
        height: 100
        source: "images/1.gif" // 不能显示GIF,因为Image只能显示静态图片
    }
    // 可以使用 AnimatedImage 显示动态图片
    AnimatedImage {
        id:aniImg1
        x:100
        y:100
         100
        height: 100
        source: "images/1.gif"
    }


}
异步加载网络图片:
使用了 BusyIndicator 组件
import QtQuick 2.12
import QtQuick.Window 2.12
import QtQuick.Controls 2.12

Window {
    id: root
    visible: true
    title: qsTr("Hello World")
     800
    height: 600
    color: "cyan"

    Rectangle{
         500
        height: 500
        border.color: "red"
        border. 2
        BusyIndicator{
            id:loading
            running: true
            anchors.centerIn: parent
            z:2 // z-index
        }
        Text {
            id: desc
            visible: false
            anchors.centerIn: parent
            z:3 // z-index
        }


        Image {
            id: img1
            cache: false //  在加载大型图片一般不要进行缓存
            anchors.fill: parent
            source: "http://pic1.juimg.com/161122/330846-16112222051832-lp.jpg"
            fillMode: Image.PreserveAspectFit
            asynchronous: true // 开启异步加载 图片  网络资源自动就是异步,本地资源默认都是同步
            onStatusChanged: {
                if(img1.status === Image.Loading){
                    loading.running = true;
                    desc.visible = false;
//                    console.log("loading");
                }else if(img1.status === Image.Ready){
                    loading.running = false;
//                    console.log("ready");

                }else if(img1.status === Image.Error){
                    loading.running = true;
                    desc.visible = true;
                    desc.text = "load img error";
//                    console.log("error");
                }
            }


//           focus: true
//           Keys.onPressed: {
//               if(event.key === Qt.Key_A){
//                   console.log(img1.status,"||||   ",Image.Error);

//               }
//           }


        }
    }


}
效果:

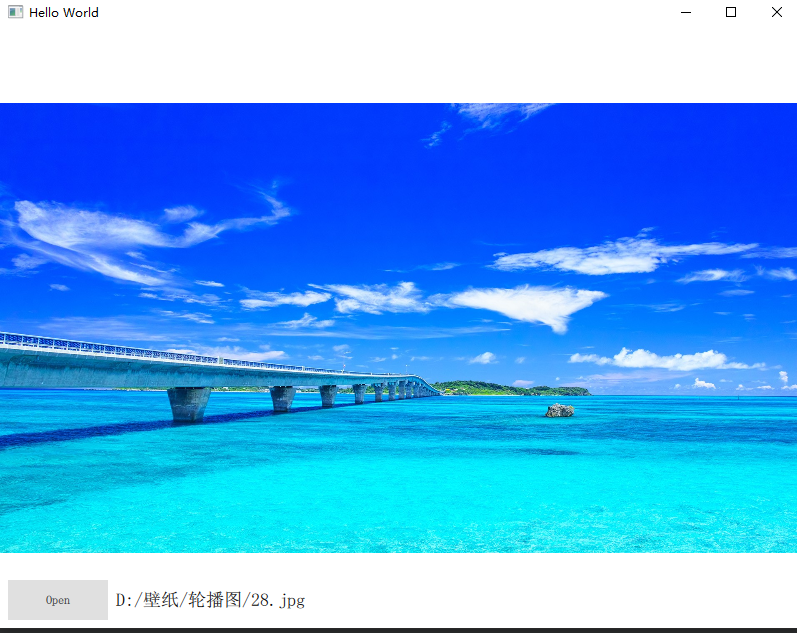
图片查看器(一次打开单张图片):
import QtQuick 2.10
import QtQuick.Window 2.10
import QtQuick.Controls 2.10
import QtQuick.Dialogs 1.3

Window {
    id: root
    visible: true
    title: qsTr("Hello World")
     800
    height: 600
    minimumWidth: 480
    minimumHeight: 360
    BusyIndicator{
        id:loading
        running: false
        anchors.centerIn: parent
        z:2
    }

    Text {
        id: stateTxt
        visible: false
        anchors.centerIn: parent
        z:3
    }
    Image {
        id: imageViewer
        asynchronous: true // 异步加载
        cache: false // 关闭缓存
        anchors.fill: parent
        fillMode: Image.PreserveAspectFit
        onStatusChanged: {
            if(imageViewer.status === Image.Loading){
                loading.running = true;
                stateTxt.visible = false;
            }else if(imageViewer.status === Image.Ready){
                loading.running = false;
            }else if(imageViewer.status === Image.Error){
                loading.running = true;
                stateTxt.visible = true;
                stateTxt.text = "load image error";
            }
        }
    }

    Button{
        id:openFile
        text: "Open"
        anchors.left: parent.left
        anchors.leftMargin: 8
        anchors.bottom: parent.bottom
        anchors.bottomMargin: 8
        onClicked:fileDialog.open()
    }
    FileDialog{
        id:fileDialog
        title: "Please choose a file"
        nameFilters: ["Image Files (*.jpg *.png *.gif)"]
        onAccepted: {
            imageViewer.source = fileDialog.fileUrl;
            var imageFile =new String(fileDialog.fileUrl);
            imagePath.text = imageFile.slice(8);
        }
    }
    Text {
        id: imagePath
        anchors.left: openFile.right
        anchors.leftMargin: 8
        anchors.verticalCenter: openFile.verticalCenter
        font.pixelSize: 18
    }

}
import QtQuick 2.10
import QtQuick.Window 2.10
import QtQuick.Controls 2.10
import QtQuick.Dialogs 1.3

Window {
    id: root
    visible: true
    title: qsTr("Hello World")
     800
    height: 600
    minimumWidth: 480
    minimumHeight: 360
    BusyIndicator{
        id:loading
        running: false
        anchors.centerIn: parent
        z:2
    }

    Text {
        id: stateTxt
        visible: false
        anchors.centerIn: parent
        z:3
    }
    Image {
        id: imageViewer
        asynchronous: true // 异步加载
        cache: false // 关闭缓存
        anchors.fill: parent
        fillMode: Image.PreserveAspectFit
        onStatusChanged: {
            if(imageViewer.status === Image.Loading){
                loading.running = true;
                stateTxt.visible = false;
            }else if(imageViewer.status === Image.Ready){
                loading.running = false;
            }else if(imageViewer.status === Image.Error){
                loading.running = true;
                stateTxt.visible = true;
                stateTxt.text = "load image error";
            }
        }
    }

    Button{
        id:openFile
        text: "Open"
        anchors.left: parent.left
        anchors.leftMargin: 8
        anchors.bottom: parent.bottom
        anchors.bottomMargin: 8
        onClicked:fileDialog.open()
    }
    FileDialog{
        id:fileDialog
        title: "Please choose a file"
        nameFilters: ["Image Files (*.jpg *.png *.gif)","Bitmap Files (*.bmp)","* (*.*)"]
        selectedNameFilter:"Image Files (*.jpg *.png *.gif)" // 默认过滤器
        selectMultiple: true  // 选择多个文件
        onAccepted: {
            imageViewer.source = fileDialog.fileUrls[0];
            var imageFile =new String(fileDialog.fileUrl[0]);
            imagePath.text = imageFile.slice(8);
        }
    }
    Text {
        id: imagePath
        anchors.left: openFile.right
        anchors.leftMargin: 8
        anchors.verticalCenter: openFile.verticalCenter
        font.pixelSize: 18
    }

}
Loader:
Loader 用来动态加载QML Component 组件,
import QtQuick 2.10
import QtQuick.Window 2.10
import QtQuick.Controls 2.10
import QtQuick.Dialogs 1.3

Window {
    id: root
    visible: true
    title: qsTr("Hello World")
     800
    height: 600

    Loader{
        id:redLoader
        anchors.left: parent.left
        anchors.leftMargin: 4
        anchors.bottom: parent.bottom
        anchors.bottomMargin: 4
        sourceComponent: colorComponent
        onLoaded: {
            item.color = "red"; // 这里的item 指的是 所加载的顶层对象即 rect
        }
    }

    Component{
        id:colorComponent  // 注Component 中只能有一个id 属性 和 一个顶层对象!!!
        Rectangle{
            id:rect
             50
            height: 50
            signal zcb(color clr)
            MouseArea{
                anchors.fill: parent
                onPressed: rect.zcb(rect.color)
            }
            onZcb:{
                rect.color = "yellow";
            }
        }

    }


}
如果Loader加载的Item 想要处理按键事件,必须要把Loader 中的 focus 设置为true
import QtQuick 2.10
import QtQuick.Window 2.10
import QtQuick.Controls 2.10
import QtQuick.Dialogs 1.3

Window {
    id: root
    visible: true
    title: qsTr("Hello World")
     800
    height: 600

    Loader{
        id:redLoader
        anchors.left: parent.left
        anchors.leftMargin: 4
        anchors.bottom: parent.bottom
        anchors.bottomMargin: 4
        sourceComponent: colorComponent
        onLoaded: {
            item.color = "red";
        }
        // 如果Loader加载的Item 想要处理按键事件,必须要把Loader focus 设置为true,这样它所加载的组件才可以接收到focus
        focus: true // 开启按键事件

    }

    Component{
        id:colorComponent
        Rectangle{
            id:rect
             50
            height: 50
            signal zcb(color clr)
            MouseArea{
                anchors.fill: parent
                onPressed: rect.zcb(rect.color)
            }
            onZcb:{
                rect.color = "yellow";
            }
            focus: true
            Keys.onPressed: {
                console.log(event.key);
                event.accepted = true;
            }

        }

    }


}
从文件中加载组件:
import QtQuick 2.10
import QtQuick.Window 2.10
import QtQuick.Controls 2.10
import QtQuick.Dialogs 1.3

Window {
    id: root
    visible: true
    title: qsTr("Hello World")
     800
    height: 600

    Loader{
        id:redLoader
        anchors.left: parent.left
        anchors.leftMargin: 4
        anchors.bottom: parent.bottom
        anchors.bottomMargin: 4
//        sourceComponent: colorComponent
        source: "MyTest.qml"
        onLoaded: {
            console.log(item); //此时 item  仍然是顶层对象
            item.color = "red";
        }
        // 如果Loader加载的Item 想要处理按键事件,必须要把Loader focus 设置为true,这样它所加载的组件才可以接收到focus
        focus: true // 开启按键事件

    }

}
import QtQuick 2.10

Rectangle{
    id:colorComponent
     50
    height: 50
    signal zcb(color clr)
    MouseArea{
        anchors.fill: parent
        onPressed: colorComponent.zcb(colorComponent.color)
    }
    onZcb:{
        colorComponent.color = "yellow";
    }

    focus:true
    Keys.onPressed: {
        console.log(event.key);
        event.accepted = true;
    }

}
动态创建和销毁控件:
利用Loader,可以通过设置source为 空串,设置sourceComponent 为undefined 可以销毁控件 ~
在js 中动态创建组件对象:
有两种方式:
1,使用Qt.createComponent() 动态创建一个组件对象,然后使用Component 的createObject() 创建它的实例对象。
2,使用Qt.createQmlObject() 从一个QML字符串直接创建一个实例对象
注:
如果已经有一个QML文件中定义了一个组件,你想创建它的实例对象,这时使用1较好。
如果QML对象本身是在运行时产生的,那么Qt.createQmlObject() 可能是比较好的选择。
第一种,
import QtQuick 2.10
import QtQuick.Window 2.10
import QtQuick.Controls 2.10
import QtQuick.Dialogs 1.3

Window {
    id: root
    visible: true
    title: qsTr("Hello World")
     800
    height: 600

    Rectangle{
        id:rect
        anchors.fill: parent

        focus: true
        Keys.onPressed: {
            if(event.key === Qt.Key_A){
                // 创建组件对象
                var newCom = Qt.createComponent("MyTest.qml");
                newCom.createObject(rect,{"color":"cyan"});// 第一个参数为父级,后面是新创建组件的属性

            }

        }

    }


}
import QtQuick 2.10

Rectangle{
    id:colorComponent
     50
    height: 50
    signal zcb(color clr)
    MouseArea{
        anchors.fill: parent
        onPressed: colorComponent.zcb(colorComponent.color)
    }
    onZcb:{
        colorComponent.color = "yellow";
    }

    focus:true
    Keys.onPressed: {
        console.log(event.key);
        event.accepted = true;
    }

}
第二种,
import QtQuick 2.10
import QtQuick.Window 2.10
import QtQuick.Controls 2.10
import QtQuick.Dialogs 1.3

Window {
    id: root
    visible: true
    title: qsTr("Hello World")
     800
    height: 600

    Rectangle{
        id:rect
        anchors.fill: parent

        focus: true
        Keys.onPressed: {
            if(event.key === Qt.Key_A){
                // 创建组件对象
                var newCom = Qt.createQmlObject('import QtQuick 2.0; Rectangle {color: "red";  20; height: 20;}',
                                                   rect,
                                                   "newCom01"); // 第三个参数 是给对象关联一个文件路径,主要用于报告错误
            }

        }

    }


}
销毁动态创建的对象:
这里说的销毁不是仅仅把对象的visible 设为false或者是opacity 设置为0 。
需要调用 destroy() 函数,
import QtQuick 2.10
import QtQuick.Window 2.10
import QtQuick.Controls 2.10
import QtQuick.Dialogs 1.3

Window {
    id: root
    visible: true
    title: qsTr("Hello World")
     800
    height: 600

    Rectangle{
        id:rect
        anchors.fill: parent

        property var mycom: null

        focus: true
        Keys.onPressed: {
            if(event.key === Qt.Key_A){
                // 创建组件对象
                rect.mycom = Qt.createQmlObject('import QtQuick 2.0; Rectangle {color: "red";  20; height: 20;}',
                                                   rect,
                                                   "newCom01"); // 第三个参数 是给对象关联一个文件路径,主要用于报告错误
            }
            if(event.key === Qt.Key_B){
                console.log(rect.mycom);
                rect.mycom.destroy(0); // 0s  后销毁

            }

        }

    }


}
点击a 创建,点击b 销毁~
Qt Quick 元素布局:
三大类:
1,前面说过的 锚布局(Anchor),它是利用Item 的anchors 属性实现,非常方便!!!
2,定位器(Position),它包含了Row(行定位器),Column(列定位器),Grid(表格定位器),Flow(流定位器)
3,布局管理器(Layout),它包含 行布局(RowLayout),列布局(ColumnLayout),表格布局(GridLayout)
定位器Position
略
布局管理器Layout
Qml 的布局管理器和 Qt widgets 相似,它与定位器的不同之处在于:布局管理器会自动调整子Item 的尺寸来适应界面大小的变化。
要使用布局管理器,需要引入Layouts 模块。
GridLayout:
import QtQuick 2.10
import QtQuick.Window 2.10
import QtQuick.Layouts 1.12


Window {
    id: root
    visible: true
    title: qsTr("Hello World")
     800
    height: 600

    Rectangle{
        id:rootItem
         360
        height: 240
        color:"#eee"

        GridLayout{
             200
            anchors.left: parent.left
            anchors.leftMargin: 4
            anchors.top: parent.top
            anchors.topMargin: 4
            rows:2
            columns: 2
            rowSpacing: 4
            columnSpacing: 4


            Rectangle{
                id:rect1
                100
                height: 100
                color: "purple"
                Layout.columnSpan: 2
                Layout.rowSpan: 2
                Layout.fillWidth: true

            }

            Rectangle{
                id:rect2
                100
                height: 100
                color: "cyan"
            }
            Rectangle{
                id:rect3
                100
                height: 100
                color: "yellow"
            }
        }


    }


}
RowLayout
import QtQuick 2.10
import QtQuick.Window 2.10
import QtQuick.Layouts 1.12


Window {
    id: root
    visible: true
    title: qsTr("Hello World")
     800
    height: 600

    Rectangle{
        id:rootItem
         400
        height: 240
        color:"#eee"

        RowLayout{
             400
            anchors.left: parent.left
            anchors.leftMargin: 4
            anchors.top: parent.top
            anchors.topMargin: 4

            Rectangle{
                id:rect1
                100
                height: 100
                color: "purple"

            }

            Rectangle{
                id:rect2
                100
                height: 100
                color: "cyan"
            }
            Rectangle{
                id:rect3
                100
                height: 100
                color: "yellow"
                Layout.fillWidth: true
            }
        }


    }


}
ColumnLayout:
类似...
QML 常用控件:
1,行编辑:
TextInput ,TextField
2,文本块:
TextEdit,TextArea
3,互斥分组:
ExclusiveGroup
4,RadioButton:
单选按钮
5,CheckBox:
多选框
6,GroupBox:
分组框
7,ComboBox:
下拉框
8,ProgressBar:
进度条
9,TabView:
点击标签会进入对应界面,选项卡控件
10,Slider:
滑块控件
11,Flickable:
Flickable提供一个较小的视窗来显示一个较大的内容给用户,并且用户可以对改内容进行拖拽和轻拂
12,Screen:
它是显示Item 的那个屏幕,它提供了一些只读属性来描述屏幕参数。
Canvas 画布:
Canvas 是Item 的派生类,
1,画布:
    Canvas{
         300
        height: 200
    }
这即是一块画布,
2,画师:
画师是Context2D ,QT帮助文档直接搜索Context2D ,
Canvas{
     300
    height: 200
    onPaint: {
        var ctx = getContext("2d");  // 在QML 中,一块画布只有一个画师
    }
}
3,画笔:
关于画笔的属性设置,在Contex2D对象 上都有,有笔的粗细(lineWidth),笔的颜色(strokeStyle)之类的
4,画刷:
画刷是用来填充画笔勾勒出的区域的,属性是fillStyle,
坐标系:
在2D世界,原点位于屏幕左上角(0,0), 向右是x 轴,向下是y轴。
图元:
基本的图元有线,弧,矩形,曲线,文本,图片,
小试牛刀:
import QtQuick 2.10
import QtQuick.Window 2.10
import QtQuick.Layouts 1.12


Window {
    id: root
    visible: true
    title: qsTr("Hello World")
     800
    height: 600

    Canvas{
         800
        height: 600
        onPaint: {
            var ctx = getContext("2d");  // 在QML 中,一块画布只有一个画师
            ctx.lineWidth = 2;
            ctx.strokeStyle = "red"; // 画笔颜色
            ctx.fillStyle = "blue"; // 画刷 颜色


            ctx.beginPath();
            ctx.rect(60,50,120,80);
            ctx.fill();
            ctx.stroke(); // 使用stroke() 结束路径的绘制

            var gradient = ctx.createRadialGradient(200,140,40,280,220,20);
            gradient.addColorStop(0.0,Qt.rgba(1,0,0,1.0));
            gradient.addColorStop(1.0,Qt.rgba(0,0,1,1.0));
            ctx.fillStyle = gradient;
            ctx.beginPath();

            ctx.rect(200,140,80,80);
            ctx.fill();

            ctx.stroke();

        }
    }

}
import QtQuick 2.10
import QtQuick.Window 2.10
import QtQuick.Layouts 1.12


Window {
    id: root
    visible: true
    title: qsTr("Hello World")
     800
    height: 600

    Canvas{
         800
        height: 600
        onPaint: {
            var ctx = getContext("2d");  // 在QML 中,一块画布只有一个画师
            ctx.lineWidth = 2;
            ctx.strokeStyle = "red"; // 画笔颜色
            ctx.fillStyle = "blue"; // 画刷 颜色
            ctx.beginPath();

            ctx.moveTo(100,80); // 移动到 100,80
            ctx.lineTo(100,200); // 从当前位置到(x,y)点绘制一条直线
            ctx.lineTo(300,200);
            ctx.closePath(); // 结束当前的路径,从路径终点到起点绘制一条直线来封闭路径

            ctx.fill();
            ctx.stroke(); // 使用stroke() 结束路径的绘制

        }
    }

}
import QtQuick 2.10
import QtQuick.Window 2.10
import QtQuick.Layouts 1.12


Window {
    id: root
    visible: true
    title: qsTr("Hello World")
     800
    height: 600

    Canvas{
         800
        height: 600
        onPaint: {
            var ctx = getContext("2d");  // 在QML 中,一块画布只有一个画师
            ctx.lineWidth = 2;
            ctx.strokeStyle = "red"; // 画笔颜色
            ctx.fillStyle = "blue"; // 画刷 颜色
            ctx.font = "42px sans-serif";
            ctx.beginPath();

            ctx.moveTo(4,4);
            ctx.bezierCurveTo(0,height - 1,width -1 ,height/2,width/4,height/4);
            ctx.lineTo(width/2,height/4);
            ctx.arc(width*5/8,height/4,width/8,Math.PI,0,false);
            ctx.ellipse(width*11/16,height/4,width/8,height/4);
            ctx.lineTo(width/2,height*7/8);
            ctx.text("Hello World",width/4,height*7/8);

            ctx.fill();
            ctx.stroke(); // 使用stroke() 结束路径的绘制

        }
    }

}
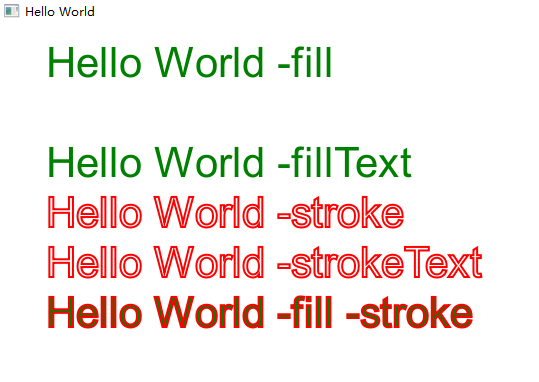
与文本相关:
有三个方法:fillText() ,strokeText(),text()
import QtQuick 2.10
import QtQuick.Window 2.10
import QtQuick.Layouts 1.12


Window {
    id: root
    visible: true
    title: qsTr("Hello World")
     800
    height: 600

    Canvas{
         800
        height: 600
        onPaint: {
            var ctx = getContext("2d");  // 在QML 中,一块画布只有一个画师
            ctx.lineWidth = 2;
            ctx.strokeStyle = "red"; // 画笔颜色
            ctx.font = "42px sans-serif";
            ctx.fillStyle = "green"; // 画刷颜色

            //1
            ctx.beginPath();
            ctx.text("Hello World -fill",50,50);
            ctx.fill();

            //2
            ctx.fillText("Hello World -fillText",50,150);

            //3
            ctx.beginPath();
            ctx.text("Hello World -stroke",50,200);
            ctx.stroke();

            //4
            ctx.strokeText("Hello World -strokeText",50,250);

            //5
            ctx.beginPath();
            ctx.text("Hello World -fill -stroke",50,300);
            ctx.fill();
            ctx.stroke();


        }
    }

}
绘制图片:
import QtQuick 2.10
import QtQuick.Window 2.10
import QtQuick.Layouts 1.12


Window {
    id: root
    visible: true
    title: qsTr("Hello World")
     800
    height: 600

    Canvas{
         800
        height: 600
        property var imgSrc:"images/rocket.png"
        onPaint: {
            var ctx = getContext("2d");
            //1
            ctx.drawImage(imgSrc,100,100);

        }
        Component.onCompleted: loadImage(imgSrc); // loadImage 会异步加载图片,当图片加载完成时会发射imageLoaded 信号
        onImageLoaded: {
            requestPaint(); // 重新绘制 Canvas  画布
        }


    }

}
变换:
平移(translate),旋转(rotate),缩放(scale),错切(shear),
import QtQuick 2.10
import QtQuick.Window 2.10
import QtQuick.Layouts 1.12


Window {
    id: root
    visible: true
    title: qsTr("Hello World")
     800
    height: 600

    Canvas{
         800
        height: 600
        property var imgSrc:"images/rocket.png"
        onPaint: {
            var ctx = getContext("2d");
            ctx.lineWidth = 2;
            ctx.strokeStyle = "blue";
            ctx.fillStyle = "purple";

            ctx.save();
            ctx.beginPath();
            ctx.translate(width/2,height/2);
            ctx.arc(0,0,30,0,Math.PI*2);
            ctx.arc(0,0,50,0,Math.PI*2);
            ctx.arc(0,0,70,0,Math.PI*2);
            ctx.arc(0,0,90,0,Math.PI*2);
            ctx.stroke();
            ctx.restore(); //  恢复到save() 之前的状态

            ctx.save();
            ctx.translate(width/2,30);
            ctx.font = "42px sans-serif";
            ctx.textAlign="center";
            ctx.fillText("concentric circles",0,0);
            ctx.restore();

        }


    }

}
Note :restore() 和 save()结合使用,
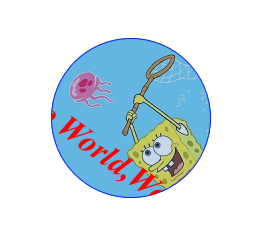
裁剪:
Context2D 的clip() 方法,让我们能够根据当前路径包围的区域来裁剪。
import QtQuick 2.10
import QtQuick.Window 2.10
import QtQuick.Layouts 1.12


Window {
    id: root
    visible: true
    title: qsTr("Hello World")
     800
    height: 600

    Canvas{
         800
        height: 600
        property var imgSrc:"images/1.jpg"
        onPaint: {
            var ctx = getContext("2d");
            ctx.lineWidth = 2;
            ctx.strokeStyle = "blue";
            ctx.fillStyle = Qt.rgba(0.3,0.5,0.7,0.3);

            ctx.save();
            ctx.beginPath();
            ctx.arc(180,150,80,0,Math.PI*2,true);
            ctx.closePath();
            ctx.clip(); // 裁剪
            ctx.drawImage(imgSrc,0,0);
            ctx.stroke();
            ctx.fill();

            ctx.rotate(Math.PI/5);
            ctx.font = "italic bold 32px serif";
            ctx.fillStyle = "red"; // 字体填充颜色
            ctx.fillText("Hello World,Wosdfjklf ",100,70);
            ctx.restore();

        }
        Component.onCompleted: loadImage(imgSrc);
        onImageLoaded: requestPaint();
    }

}
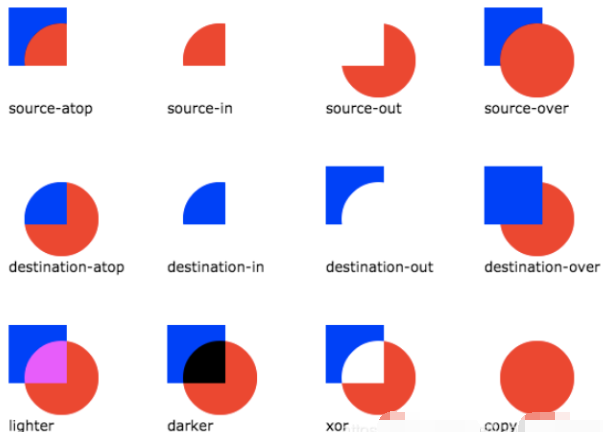
图像合成:
globalCompositeOperation
QML 动画:
基本动画对象:
PropertyAnimation: 通过改变各种类型的property 来产生动画
NumberAnimation: PropertyAnimation 的子类,专门改变数字类型的property来产生动画,效率比PropertyAnimation 好,
ColorAnimaiton : PropertyAnimation 的子类,专门改变color 类型的property 来产生动画,效率比PropertyAnimation 好,
RotationAnimaiton : PropertyAnimation 的子类,专门改变rotation 值来产生动画,效率比PropertyAnimation 好,另外还提供旋转方向等附加属性,
Vector3dAnimation: PropertyAnimation 的子类,当一个Vector3d值 发生变化时使用。
PathAnimation: 让对象沿一个给定的方向移动
SmoothedAnimation: 允许一个property 跟踪一个值,产生平滑动画
SpringAnimation, 允许一个property 跟踪一个值,动画效果类似于弹簧运动,
分组动画对象:
SequentialAnimation: 顺序执行一系列动画
ParallAnimation : 并行执行一系列动画
动画搭档:
State,它是Item的状态,不同状态对应不同的界面效果和业务逻辑。
Transition, 过渡,它用来衔接不同状态,使状态变化过程平滑。
协同动画元素:
Behavior : 它为Item 的property 变化绑定一个默认的动画对象。
ParentAnimation, 当改变一个Item的parent的时候使用,使得从旧parent到新parent的过程更平滑,通常与State,Transition,ParentChange联合使用。
AnchorAnimation: 当改变一个Item 的 anchor的时候使用,通常与State,Transition,AnchorChange联合使用。
PauseAnimation:如果在动画过程插入它,可以将动画过程暂停一段时间。
PropertyAction: 动画执行过程立即改变某个属性。
ScriptAction:动画执行过程运行一段JS脚本。
测试代码:
PropertyAnimation定义的三种方式:
import QtQuick 2.10
import QtQuick.Window 2.10
import QtQuick.Layouts 1.12


Window {
    id: root
    visible: true
    title: qsTr("Hello World")
     800
    height: 600

    Rectangle{
        id:rect
         50
        height: 50
        anchors.centerIn: parent
        color: "blue"
        MouseArea{
            anchors.fill: parent
            onClicked: animation.running = true;
        }
    }
    Rectangle{
        id:rect2
         50
        height: 50
        color: "red"
    }
    PropertyAnimation{
        id:animation
        targets: [rect,rect2]
        properties: "width,height"
        to:150
        duration: 1000;
    }


}
import QtQuick 2.10
import QtQuick.Window 2.10
import QtQuick.Layouts 1.12


Window {
    id: root
    visible: true
    title: qsTr("Hello World")
     800
    height: 600

    Rectangle{
        id:rect
         50
        height: 50
        anchors.centerIn: parent
        color: "blue"
        MouseArea{
            anchors.fill: parent
            onClicked: PropertyAnimation{ // 在信号处理器中直接使用动画
                id:animation
                target: rect
                properties: "width,height"
                to:150
                duration: 1000;
            }
        }
    }


}
import QtQuick 2.10
import QtQuick.Window 2.10
import QtQuick.Layouts 1.12


Window {
    id: root
    visible: true
    title: qsTr("Hello World")
     800
    height: 600

    Rectangle{
        id:rect
         50
        height: 50
        anchors.centerIn: parent
        color: "blue"
        MouseArea{
            id:mouseArea
            anchors.fill: parent
        }
        PropertyAnimation on width{ // Animation on <property > 这种语法格式 可以将一个动画和一个属性关联起来
            to:150
            duration: 1000
            running: {
                return mouseArea.pressed
            }
        }


    }


}
Animation 的started() 和 stopped() 信号:
import QtQuick 2.10
import QtQuick.Window 2.10
import QtQuick.Layouts 1.12


Window {
    id: root
    visible: true
    title: qsTr("Hello World")
     800
    height: 600

    Rectangle{
        id:rect
         50
        height: 150
        anchors.centerIn: parent
        color: "blue"
        property var animation;
        PropertyAnimation{
            id:toSquare
            target: rect
            property: "width"
            to:150
            duration: 1000
            onStarted: {
                rect.animation = toSquare;
                rect.color = "red";
            }
            onStopped: {
                rect.color = "blue";
            }
        }
        PropertyAnimation{
            id:toRect
            target: rect
            property: "width"
            to:50
            duration: 1000
            onStarted: {
                rect.animation = toRect;
                rect.color = "red";
            }
            onStopped: {
                rect.color = "blue";
            }
        }

        MouseArea{
            id:mouseArea
            anchors.fill: parent
            onClicked: {
                if(rect.animation == toRect || rect.animation == undefined){
                    toSquare.start();
                }else{
                    toRect.start();
                }
            }


        }


    }


}
NumberAnimation:
import QtQuick 2.10
import QtQuick.Window 2.10
import QtQuick.Layouts 1.12


Window {
    id: root
    visible: true
    title: qsTr("Hello World")
     800
    height: 600

    Rectangle{
        id:rect
         50
        height: 150
        anchors.centerIn: parent
        color: "blue"

        NumberAnimation {
            id:numAni
            target: rect
            property: "width"
            to:150
            duration: 200
            easing.type: Easing.InOutQuad
        }

        MouseArea{
            id:mouseArea
            anchors.fill: parent
            onClicked: {
                numAni.running = true;
            }

        }


    }


}
ColorAnimation:
import QtQuick 2.10
import QtQuick.Window 2.10
import QtQuick.Layouts 1.12


Window {
    id: root
    visible: true
    title: qsTr("Hello World")
     800
    height: 600

    Rectangle{
        id:rect
         50
        height: 150
        anchors.centerIn: parent
        color: "blue"

        MouseArea{
            id:mouseArea
            anchors.fill: parent
            onClicked: ColorAnimation {
                target: rect
                property: "color"
                to: "green"
                duration: 200
            }

        }


    }


}
RotationAnimation:
import QtQuick 2.10
import QtQuick.Window 2.10
import QtQuick.Layouts 1.12


Window {
    id: root
    visible: true
    title: qsTr("Hello World")
     800
    height: 600

    Rectangle{
        id:rect
         50
        height: 150
        anchors.centerIn: parent
        color: "blue"
//        transformOrigin: Item.TopRight
        Text {
            id: txt
            anchors.fill: parent
            text: qsTr("text")
        }


        MouseArea{
            id:mouseArea
            anchors.fill: parent
            onClicked: RotationAnimation{
                target: rect
                to:90
                duration: 1000
                direction: RotationAnimation.Clockwise // 顺时针

            }

        }


    }


}
PathAnimation:
import QtQuick 2.10
import QtQuick.Window 2.10
import QtQuick.Layouts 1.12


Window {
    id: root
    visible: true
    title: qsTr("Hello World")
     800
    height: 600

    Canvas{  // 画一个半圆
         400
        height: 240

        onPaint: {
            var ctx = getContext("2d");
            ctx.lineWidth = 4;
            ctx.strokeStyle = "red";
            ctx.beginPath();
            ctx.arc(200,0,160,Math.PI*2,0,false);
            ctx.stroke();
        }

    }


    Rectangle{
        id:rect
         40
        height: 40
        color: "blue"
        x:20
        y:0


        MouseArea{
            id:mouseArea
            anchors.fill:parent
            onClicked: pathAnim.start();
        }
        PathAnimation{
            id:pathAnim
            target: rect
            duration: 6000
            anchorPoint: "20,20"// rect 的center

            orientation: PathAnimation.BottomFirst
            orientationEntryDuration: 200  // 调整初始姿态的时间
            endRotation: 0 // 最后的角度 :0
            orientationExitDuration: 200  // 调整终止时姿态的时间
            easing.type: Easing.InOutCubic

            path: Path{
                startX: 40
                startY: 0
                PathArc{
                    x:360 // 终点(360,0)
                    y:0
                    useLargeArc: true; // 采用 优弧(较大)模式
                    radiusX: 160  // 椭圆的两个半轴
                    radiusY: 160
                    direction: PathArc.Counterclockwise // 逆时针
                }
            }

        }


    }


}
SmoothedAnimation:
import QtQuick 2.10
import QtQuick.Window 2.10
import QtQuick.Layouts 1.12


Window {
    id: root
    visible: true
    title: qsTr("Hello World")
     800
    height: 600

    Rectangle{
        id:rect
         40
        height: 40
        color: "red"
        x:20
        y:20

        SmoothedAnimation{  // SmoothedAnimation默认采用 easing.type 为InOutQuad
            id:smoothAni1
            target: rect
            property: "x"
            duration: 1000
            velocity: -1   //速率 默认速率是200units/秒, -1 为禁用速率
                // 如果duration和 velocity同时设置,那么会使用速率计算出一个时间, 它和duration的较短者会被采用。
        }
        SmoothedAnimation{
            id:smoothAni2
            target: rect
            property: "y"
            velocity: 100
        }
    }
    MouseArea{
        anchors.fill: parent
        onClicked: {
            smoothAni1.from = rect.x;
            smoothAni1.to = mouse.x + 4;
            smoothAni1.start();
            smoothAni2.from = rect.y;
            smoothAni2.to = mouse.y + 4;
            smoothAni2.start();
        }
    }


}
SpringAnimation:
可以用来模拟弹簧的震荡行为,
import QtQuick 2.10
import QtQuick.Window 2.10
import QtQuick.Layouts 1.12


Window {
    id: root
    visible: true
    title: qsTr("Hello World")
     800
    height: 600

    Rectangle{
        id:rect
         40
        height: 40
        color: "red"
        x:20
        y:20
    }
    SpringAnimation{
        id:springAni1
        target: rect
        property: "x"
        spring: 3 // 加速度 0-5 有意义 默认为0
        damping: 0.06 //衰减系数0-1.0 有意义, 值越大会越快平复
        epsilon: 0.25 //允许设定一个最接近0 的阈值代表0 ,如果是基于像素动画,建议0.25 ,如果是基于scale动画,建议0.005 。 默认为0.01 ,调整epsilon 可能会有一定的性能提升
    }

    SpringAnimation{
        id:springAni2
        target: rect
        property: "y"
        spring: 3
        damping: 0.06
        epsilon: 0.25
    }

    MouseArea{
        anchors.fill: parent
        onClicked: {
            springAni1.from = rect.x;
            springAni1.to = mouse.x - 20;
            springAni1.start();

            springAni2.from = rect.y;
            springAni2.to = mouse.y - 20;
            springAni2.start();

        }
    }


}
组合动画:
略
State:
在QML中,状态是定义在State类型中的一系列属性配置。不同的配置可能有不同的作用:
1,显示一些UI组件,隐藏另一些
2,想用户呈现不同的操作和功能
3,启动,暂停,停止动画
4,在某种新的状态下执行某些脚本
5,改变某个特定Item的property的值
6,显示一个不同的view或screen
等等...
代码:
import QtQuick 2.10
import QtQuick.Window 2.10
import QtQuick.Layouts 1.12


Window {
    id: root
    visible: true
    title: qsTr("Hello World")
     800
    height: 600

    Rectangle{
        id:rect
         360
        height: 240
        color: "#eee"
        Text {
            id: centerTxt
            text: qsTr("Just a text!")
            anchors.centerIn: parent
            font.pixelSize: 24
            MouseArea{
                id:mouseArea
                anchors.fill: parent

                onPressed: {
                    centerTxt.state = "blueText";
                }
                onReleased: {
                    centerTxt.state = "redText";
                }
            }
            state:"redText"
            states: [
                State {
                    name: "redText"
                    changes: [
                        PropertyChanges {
                            target: centerTxt
                            color:"red"
                        }
                    ]
                },
                State {
                    name: "blueText"
                    PropertyChanges {
                        target: centerTxt
                        color:"blue"
                    }
                }
            ]
        }

    }


}
import QtQuick 2.10
import QtQuick.Window 2.10
import QtQuick.Layouts 1.12


Window {
    id: root
    visible: true
    title: qsTr("Hello World")
     800
    height: 600

    Rectangle{
        id:rect
         360
        height: 240
        color: "#eee"
        Text {
            id: centerTxt
            text: qsTr("Just a text!")
            anchors.centerIn: parent
            font.pixelSize: 24
            MouseArea{
                id:mouseArea
                anchors.fill: parent
                acceptedButtons: Qt.LeftButton | Qt.RightButton
            }
            state:"redText"
            states: [
                State {
                    name: "redText"
                    when:mouseArea.pressedButtons === Qt.RightButton
                    changes: [
                        PropertyChanges {
                            target: centerTxt
                            color:"red"
                        },
                        PropertyChanges {
                            target: centerTxt
                            font.bold:true
                            font.italic: true
                        }
                    ]
                },
                State {
                    name: "blueText"
                    when: mouseArea.pressed
                    PropertyChanges {
                        target: centerTxt
                        color:"blue"
                        font.pixelSize: 48;
                    }
                }
            ]
        }

    }


}
C++ 与 QML 混合编程:
在QML中使用c++ 类和对象:
要想将一个类或对象导出到QML,前提条件是:
1,从QObject 或 QObject 的派生类继承
2,使用Q_OBJECT 宏
省略...