nginx 进程结构 与 热部署:
为什么nginx采用的是多进程?
nginx 采用的是多进程 process ,而不是多线程,
因为如果是多线程,它们是共用资源的,这样一旦挂了,就都挂了,
进程结构图:

master process 并不真正的处理用户请求,而是下面的worker process 来处理用户的请求,
master 是用来管理的作用:
1,如果woker process 中有进程 宕掉,这是master process 会重新再开一个 进程
2,如果有配置文件修改了,master process 也会通知worker process 去用新的配置文件(热加载)
Linux 的信号量管理机制:
所有的信号:
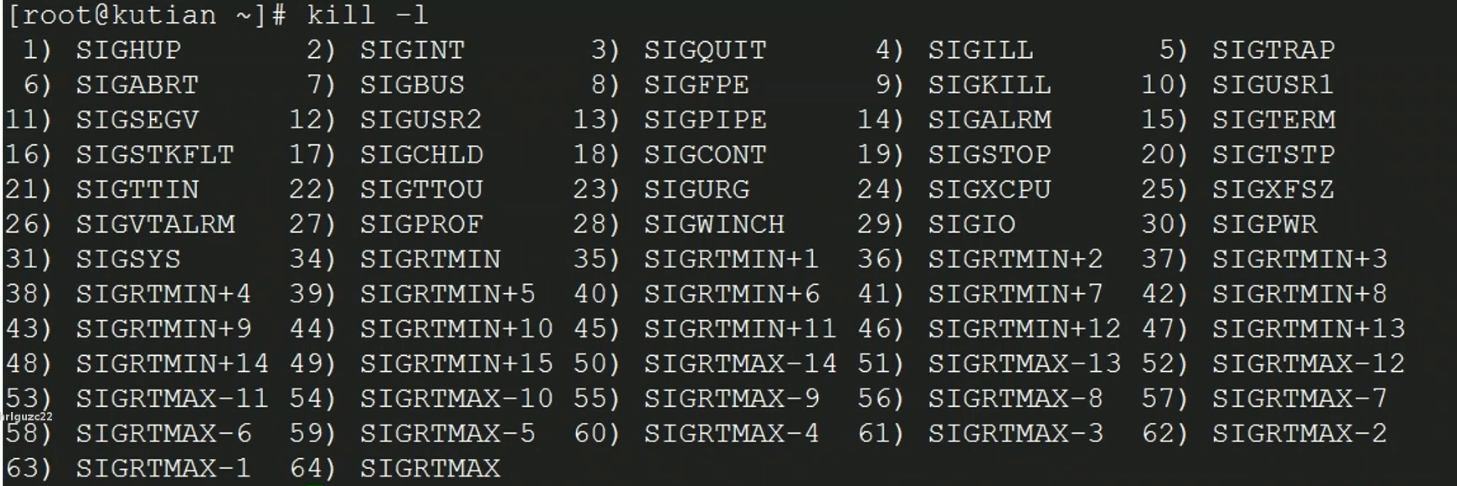
平时使用的kill + pid,其实是kill -15 pid ,
kill -9 pid 是强制杀死进程,
常用的信号量:
1,sigchld: kill -17 pid ,此时会发送给该进程的父进程,
2,sigquit 退出 (ctrl )
3,sigterm 关闭进程
4,sigkill 立即关闭进程
5,sighup 重读配置文件

利用信号量管理nginx:
可以通过信号量管理的进程:
1,Master 进程
2,Worker 进程(不推荐直接给Worker 发送信号 对它进行管理)
Master 进程 接收的信号:
a,监控worker 进程,(如果 worker 进程宕掉,会向master 发送chld 信号 )
b,管理woker 进程,通过 向woker 进程发送 一下信号:

worker 进程 接收的信号:

注:不建议直接给 worker 进程发送信号,而是通过给master 发送信号 来管理worker 进程,
发送 sigterm 给master:
[root@localhost nginx112]# ps -ef | grep nginx
root       1568      1  0 16:56 ?        00:00:00 nginx: master process sbin/nginx
nobody     1590   1568  0 16:56 ?        00:00:00 nginx: worker process
nobody     1591   1568  0 16:56 ?        00:00:00 nginx: worker process
nobody     1592   1568  0 16:56 ?        00:00:00 nginx: worker process
nobody     1593   1568  0 16:56 ?        00:00:00 nginx: worker process
root       1646   1460  0 17:01 pts/0    00:00:00 grep --color=auto nginx
[root@localhost nginx112]# kill -s sigterm 1568
发送 sighup 给master:
它会关闭所有worker 进程,重新打开新的进程(这时新的进程读取了新的配置信息),
[root@localhost nginx112]# ps -ef | grep nginx
root       1650      1  0 17:03 ?        00:00:00 nginx: master process sbin/nginx
nobody     1651   1650  0 17:03 ?        00:00:00 nginx: worker process
nobody     1652   1650  0 17:03 ?        00:00:00 nginx: worker process
nobody     1653   1650  0 17:03 ?        00:00:00 nginx: worker process
nobody     1654   1650  0 17:03 ?        00:00:00 nginx: worker process
root       1657   1460  0 17:05 pts/0    00:00:00 grep --color=auto nginx
[root@localhost nginx112]# kill -s sighup 1650
[root@localhost nginx112]# ps -ef | grep nginx
root       1650      1  0 17:03 ?        00:00:00 nginx: master process sbin/nginx
nobody     1658   1650  0 17:06 ?        00:00:00 nginx: worker process
nobody     1659   1650  0 17:06 ?        00:00:00 nginx: worker process
nobody     1660   1650  0 17:06 ?        00:00:00 nginx: worker process
nobody     1661   1650  0 17:06 ?        00:00:00 nginx: worker process
root       1663   1460  0 17:06 pts/0    00:00:00 grep --color=auto nginx
通过./nginx + 参数 管理nginx:
reload :重新启动,(本质是给 master 发送一个hup 信号)
reopen :重新打开(本质发送 usr1 )
stop : 停止(发送 term 信号)立即停止
quit : Quit 信号 处理完用户请求之后 停止
sbin/nginx -s stop/reload/
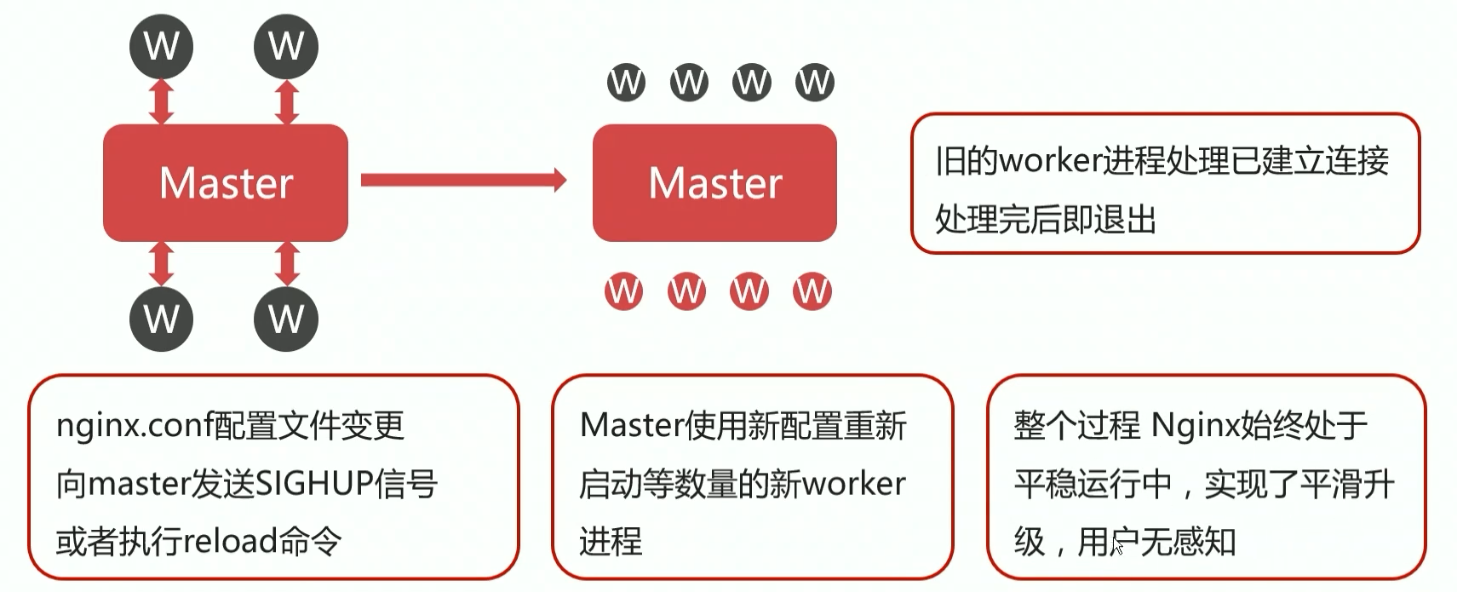
配置文件重载的原理:
可以通过 -s reload 对 nginx 平滑升级,
首先master 接收到 reload 信号,
然后master 去检测nginx.conf 语法是否正确
如果conf 中监听了新的端口(如443),那么master 打开监听端口
后面master 使用新的配置文件启动新的worker 进程,
启动新的worker 进程之后,向老的worker 子进程发送 quit信号
如果旧的worker 进程正在接受用户的请求,它不会立即关闭监听句柄,会等处理完之后再关闭
重载流程如下图:
nginx 热部署(升级 nginx 的版本):
热升级的流程:

注: 热升级时要保证 两个版本的nginx 的目录结构是一致的,
1,去sbin 下备份 nginx 二进制文件,


[root@localhost nginx112]# cd sbin/
[root@localhost sbin]# cp nginx nginx.bak
[root@localhost sbin]# ll
total 10952
-rwxr-xr-x 1 root root 5603880 Apr 14 10:53 nginx
-rwxr-xr-x 1 root root 5603880 Apr 21 17:30 nginx.bak
2, 用新的nginx 二进制文件,直接覆盖 旧的nginx 文件,
3,给老的master 进程发送 sigusr2 信号,
[root@localhost sbin]# ps -ef |grep nginx
root       1650      1  0 17:03 ?        00:00:00 nginx: master process sbin/nginx
nobody     1658   1650  0 17:06 ?        00:00:00 nginx: worker process
nobody     1659   1650  0 17:06 ?        00:00:00 nginx: worker process
nobody     1660   1650  0 17:06 ?        00:00:00 nginx: worker process
nobody     1661   1650  0 17:06 ?        00:00:00 nginx: worker process
root       1789   1460  0 17:31 pts/0    00:00:00 grep --color=auto nginx
[root@localhost sbin]# kill -s sigusr2 1650
[root@localhost sbin]# ps -ef |grep nginx
root       1650      1  0 17:03 ?        00:00:00 nginx: master process sbin/nginx
nobody     1658   1650  0 17:06 ?        00:00:00 nginx: worker process
nobody     1659   1650  0 17:06 ?        00:00:00 nginx: worker process
nobody     1660   1650  0 17:06 ?        00:00:00 nginx: worker process
nobody     1661   1650  0 17:06 ?        00:00:00 nginx: worker process
root       1790   1650  0 17:31 ?        00:00:00 nginx: master process sbin/nginx
nobody     1791   1790  0 17:31 ?        00:00:00 nginx: worker process
nobody     1792   1790  0 17:31 ?        00:00:00 nginx: worker process
nobody     1793   1790  0 17:31 ?        00:00:00 nginx: worker process
nobody     1794   1790  0 17:31 ?        00:00:00 nginx: worker process
root       1796   1460  0 17:31 pts/0    00:00:00 grep --color=auto nginx
而且此时,logs 目录中的也会生成一个nginx.pid.oldbin 文件,里面存的是 旧的master的pid
[root@localhost sbin]# cd ../logs/
[root@localhost logs]# ll
total 16
-rw-r--r-- 1 root root 613 Apr 14 10:56 access.log
-rw-r--r-- 1 root root 453 Apr 21 17:31 error.log
-rw-r--r-- 1 root root   5 Apr 21 17:31 nginx.pid
-rw-r--r-- 1 root root   5 Apr 21 17:03 nginx.pid.oldbin
4,停止旧的master 的子进程
不用quit 要用sigwinch (这时,只会停止旧的worker子进程,不会停止master ,目的是为了回滚)
[root@localhost logs]# kill -s sigwinch 1650
[root@localhost logs]# ps -ef | grep nginx
root       1650      1  0 17:03 ?        00:00:00 nginx: master process sbin/nginx
root       1790   1650  0 17:31 ?        00:00:00 nginx: master process sbin/nginx
nobody     1791   1790  0 17:31 ?        00:00:00 nginx: worker process
nobody     1792   1790  0 17:31 ?        00:00:00 nginx: worker process
nobody     1793   1790  0 17:31 ?        00:00:00 nginx: worker process
nobody     1794   1790  0 17:31 ?        00:00:00 nginx: worker process
root       1839   1460  0 17:36 pts/0    00:00:00 grep --color=auto nginx
5,如果我们要确定不要旧的master 了,杀死即可,
[root@localhost logs]# kill -s sigquit 1650
[root@localhost logs]# ps -ef | grep nginx
root       1790      1  0 17:31 ?        00:00:00 nginx: master process sbin/nginx
nobody     1791   1790  0 17:31 ?        00:00:00 nginx: worker process
nobody     1792   1790  0 17:31 ?        00:00:00 nginx: worker process
nobody     1793   1790  0 17:31 ?        00:00:00 nginx: worker process
nobody     1794   1790  0 17:31 ?        00:00:00 nginx: worker process
root       1845   1460  0 17:38 pts/0    00:00:00 grep --color=auto nginx
logs中的nginx.pid.oldbin 也会被删除,
至此,就完成了整个的平滑升级,
如果第5步,我们仍然还要 旧的 master,操作如下:
[root@localhost logs]# ps -ef | grep nginx
root       1790      1  0 17:31 ?        00:00:00 nginx: master process sbin/nginx
nobody     1791   1790  0 17:31 ?        00:00:00 nginx: worker process
nobody     1792   1790  0 17:31 ?        00:00:00 nginx: worker process
nobody     1793   1790  0 17:31 ?        00:00:00 nginx: worker process
nobody     1794   1790  0 17:31 ?        00:00:00 nginx: worker process
root       1853   1460  0 17:40 pts/0    00:00:00 grep --color=auto nginx
[root@localhost logs]# kill -s sigusr2 1790
[root@localhost logs]# ps -ef | grep nginx
root       1790      1  0 17:31 ?        00:00:00 nginx: master process sbin/nginx
nobody     1791   1790  0 17:31 ?        00:00:00 nginx: worker process
nobody     1792   1790  0 17:31 ?        00:00:00 nginx: worker process
nobody     1793   1790  0 17:31 ?        00:00:00 nginx: worker process
nobody     1794   1790  0 17:31 ?        00:00:00 nginx: worker process
root       1854   1790  0 17:40 ?        00:00:00 nginx: master process sbin/nginx
nobody     1855   1854  0 17:40 ?        00:00:00 nginx: worker process
nobody     1856   1854  0 17:40 ?        00:00:00 nginx: worker process
nobody     1857   1854  0 17:40 ?        00:00:00 nginx: worker process
nobody     1858   1854  0 17:40 ?        00:00:00 nginx: worker process
root       1860   1460  0 17:40 pts/0    00:00:00 grep --color=auto nginx
[root@localhost logs]# kill -s sigwinch 1790
[root@localhost logs]# ps -ef | grep nginx
root       1790      1  0 17:31 ?        00:00:00 nginx: master process sbin/nginx
root       1854   1790  0 17:40 ?        00:00:00 nginx: master process sbin/nginx
nobody     1855   1854  0 17:40 ?        00:00:00 nginx: worker process
nobody     1856   1854  0 17:40 ?        00:00:00 nginx: worker process
nobody     1857   1854  0 17:40 ?        00:00:00 nginx: worker process
nobody     1858   1854  0 17:40 ?        00:00:00 nginx: worker process
root       1862   1460  0 17:40 pts/0    00:00:00 grep --color=auto nginx
[root@localhost logs]# kill -s sighup 1790
[root@localhost logs]# ps -ef | grep nginx
root       1790      1  0 17:31 ?        00:00:00 nginx: master process sbin/nginx
root       1854   1790  0 17:40 ?        00:00:00 nginx: master process sbin/nginx
nobody     1855   1854  0 17:40 ?        00:00:00 nginx: worker process
nobody     1856   1854  0 17:40 ?        00:00:00 nginx: worker process
nobody     1857   1854  0 17:40 ?        00:00:00 nginx: worker process
nobody     1858   1854  0 17:40 ?        00:00:00 nginx: worker process
nobody     1864   1790  0 17:41 ?        00:00:00 nginx: worker process
nobody     1865   1790  0 17:41 ?        00:00:00 nginx: worker process
nobody     1866   1790  0 17:41 ?        00:00:00 nginx: worker process
nobody     1867   1790  0 17:41 ?        00:00:00 nginx: worker process
root       1869   1460  0 17:41 pts/0    00:00:00 grep --color=auto nginx
[root@localhost logs]# kill -s sigquit 1854
[root@localhost logs]# ps -ef | grep nginx
root       1790      1  0 17:31 ?        00:00:00 nginx: master process sbin/nginx
nobody     1864   1790  0 17:41 ?        00:00:00 nginx: worker process
nobody     1865   1790  0 17:41 ?        00:00:00 nginx: worker process
nobody     1866   1790  0 17:41 ?        00:00:00 nginx: worker process
nobody     1867   1790  0 17:41 ?        00:00:00 nginx: worker process
root       1871   1460  0 17:42 pts/0    00:00:00 grep --color=auto nginx
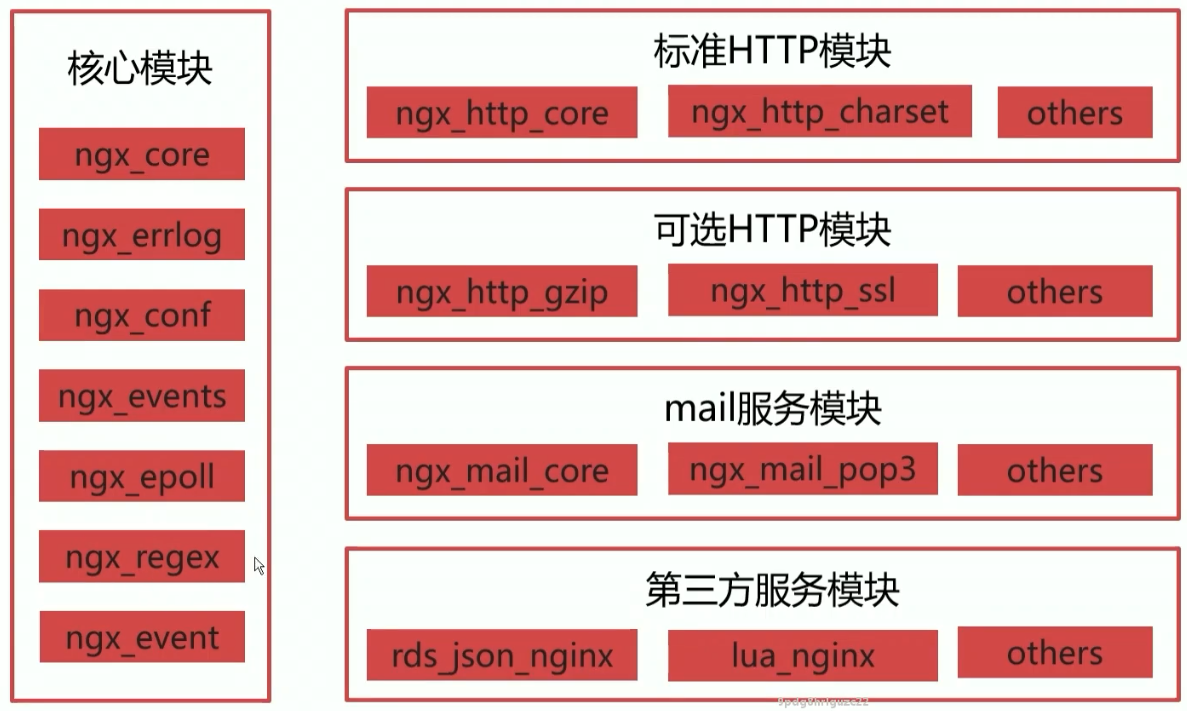
nginx 模块化设计机制:
它的思想是:高内聚,低耦合
模块化结构图如下:

nginx 编译安装的配置参数 :
在这里我们可以选择我们想要使用的模块 编译安装,
常用的配置参数:

通过--with 可以加上 nginx 没有内置的模块,
通过--without 可以去掉nginx 内置的模块,
nginx 配置文件(nginx.conf)结构 :
官方文档:http://nginx.org/en/docs/
整体分为三大模块:
1,main模块
2,events 模块,
3,http 模块,(http 嵌套 多个server )

配置文件结构示例:

worker_processes  auto;
events {
    worker_connections  1024;
}
http {
    include       mime.types;
    default_type  application/octet-stream;

    sendfile        on;
    keepalive_timeout  65;

    server {
        listen       80;
        server_name  localhost;

        location / {
            root   html;
            index  index.html index.htm;
        }
    }
}
nginx 虚拟主机 :
虚拟主机就是 使得 我们单台服务器 构建不同的网站,
nginx 虚拟主机的分类 :

1,基于多ip 的虚拟主机:
这时单台服务器有多个网卡,每个网卡绑定不同的ip ,提供不同的服务
2,基于多端口 的虚拟主机:
这时单台服务器有只有一个网卡,81 端口可以绑定一个网站,82 也可以
上面两种基本都是个人,或者用于演示的时候使用,生产环境 第3中用的多:
3,基于多域名 的虚拟主机:
在一台服务器上,使用不同的域名来区分不同的网站服务,
例如,公司拥有两个域名,www.xxx.com ,www.yyy.com ,它们一般都是不同的业务,
基于多ip 的虚拟主机:
使用 ifconfig 可以查看到网卡的数量,
下面使用虚拟机再添加两块网卡:

要配置新添加网卡的配置信息(在/etc/sysconfig/network-script 目录 添加 ifcfg-ens37 和 ifcfg-ens38[在 ens33 的基础上 ] )
三个ip网卡对应的IP分别是 192.168.144.128 /130 /131
然后重启网络: systemctl restart network
下面是编写 nginx.conf
worker_processes  auto;
events {
    worker_connections  1024;
}
http {
    include       mime.types;
    default_type  application/octet-stream;

    sendfile        on;
    keepalive_timeout  65;

    server {
        listen       192.168.144.128:80;
        server_name  localhost;

        location / {
            root   html/server1;
            index  index.html index.htm;
        }
    }
    server {
        listen       192.168.144.130:80;
        server_name  localhost;

        location / {
            root   html/server2;
            index  index.html index.htm;
        }
    }
    server {
        listen       192.168.144.131:80;
        server_name  localhost;

        location / {
            root   html/server3;
            index  index.html index.htm;
        }
    }


}
此时,html 目录下要分别有 server1 server2 server3 三个目录,并且目录中要有 index.html 或者 index.htm
基于端口 的虚拟主机:
单台服务器仅仅只有一块网卡,使用不同端口来提供不同的网站服务,
worker_processes  auto;
events {
    worker_connections  1024;
}
http {
    include       mime.types;
    default_type  application/octet-stream;

    sendfile        on;
    keepalive_timeout  65;

    server {
        listen       192.168.144.128:8080;
        server_name  localhost;

        location / {
            root   html/server1;
            index  index.html index.htm;
        }
    }
    server {
        listen       192.168.144.128:8081;
        server_name  localhost;

        location / {
            root   html/server2;
            index  index.html index.htm;
        }
    }


}
基于域名 的虚拟主机:
单台服务器只有一个网卡,但服务器的ip 绑定了多个域名,这时,我们可以通过不同域名来访问,
worker_processes  auto;
events {
    worker_connections  1024;
}
http {
    include       mime.types;
    default_type  application/octet-stream;

    sendfile        on;
    keepalive_timeout  65;

    server {
        listen       80;
        server_name  www.paixiaosen.xyz;

        location / {
            root   html/server1;
            index  index.html index.htm;
        }
    }
    server {
        listen       80;
        server_name  www.666kaoyan.com;

        location / {
            root   html/server2;
            index  index.html index.htm;
        }
    }


}
此时,配置下域名: /etc/hosts 中添加:
127.0.0.1   localhost localhost.localdomain localhost4 localhost4.localdomain4
::1         localhost localhost.localdomain localhost6 localhost6.localdomain6

192.168.144.128 www.paixiaosen.xyz
192.168.144.128 www.666kaoyan.com
此时就可以在本机 curl 到,
真正实际中,换成真的域名即可,